
Whirlpool WFW95HEXL Support Question
Whirlpool WFW95HEXL Support Question
Find answers below for this question about Whirlpool WFW95HEXL.Need a Whirlpool WFW95HEXL manual? We have 5 online manuals for this item!
Question posted by oicu8b4t2 on August 12th, 2014
Installing Down Draft Venting, Where To Find Diagrams And Or Installation Manua
can they vent directly under house or should they be vented to an exterior area?
Current Answers
Answer #1: Posted by BusterDoogen on August 12th, 2014 10:50 PM
BusterDoogen

Member since:
October 30th, 2011 Points: 28,565,397

Member since:
October 30th, 2011 Points: 28,565,397
Since you didn't give you vent model, here's a manual for general vent info. I do suggest venting to the outside.
Related Whirlpool WFW95HEXL Manual Pages
Dimension Guide - Page 1
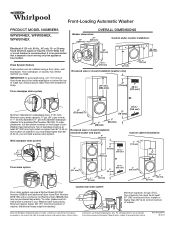
...(25 mm)
1" (25 mm)
Recessed area or closet installation (stacked washer and dryer):
6" (152 mm)
3" (76 mm)
771/2"
(1969 mm)
48 in.2 (310 cm2)
Custom cabinet installation:
7" (178 mm)
14" (356...installed using a floor drain, wall standpipe, floor standpipe, or laundry tub.
Top of your Washer User Instructions. For complete details, see toll-free phone numbers on front page of laundry...
Installation Instructions - Page 2

... plugs (4)
Flashlight
Bucket
Available Accessories: An optional matching pedestal is available for some installations, not supplied with washer) Your installation may be required for your retailer for installation are in the washer basket. Alternate parts: (Not supplied with washer)
n 8212656RP 10 ft. (3.0 m) Inlet hose, Black EPDM (2 pack)
n 8212641RP 5 ft. (1.5 m) Inlet hose, Black...
Installation Instructions - Page 3
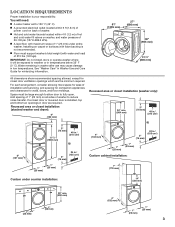
... with water and load) of 20-100 psi (137.9-689.6 kPa). Water remaining in washer after use may cause damage in door are the minimum required.
Recessed area or closet installation (stacked washer and dryer):
6" (152 mm)
Recessed area or closet installation (washer only):
34" min. (864 mm)
3" (76 mm)
48 in.2 (310 cm2)
3" (76 mm)
771...
Installation Instructions - Page 4

... 96" (2.44 m) from bottom of standpipe must be purchased separately. See "Alternative Parts". Top of washer. install no higher than 96" (2.44 m) from bottom of laundry tub must be installed using a floor drain, wall standpipe, floor standpipe, or laundry tub. Floor drain system
Wall standpipe drain system
41/2" (113 mm)
Floor drain system requires a Siphon...
Installation Instructions - Page 5

... accordance with the appliance -
n Do not ground to within 4 ft (1.2 m) of its final location. It must be grounded.
n Do not have a proper outlet installed by a qualified electrician. This washer is properly grounded. The plug must be run with a qualified electrician or serviceman if you are in doubt as to whether the appliance...
Installation Instructions - Page 6

... access to avoid suspension and structural damage, a certified technician must properly set up washer for relocation.
6
R emove transport bolts from
washer
6. Pull power cord through opening in place on cabinet back with four transport bolt hole plugs included with separate directions. Attach drain hose to step 9.
For a floor drain, remove the preinstalled drain...
Installation Instructions - Page 7

...use tape or sealants on washer. Use pliers to hot water faucet. In most standard configurations, hoses will need additional parts with separate directions. Clear water lines
Run... washer.
10. IMPORTANT: Only 4.5" (113 mm) of laundry tub. Repeat this step with flat washers. Remove drain hose form
(floor drain installations only)
Connect Inlet Hoses
Washer must be supplied to washer ...
Installation Instructions - Page 8

... ring. Secure drain hose
Laundry Tub
Standpipe
Wall
4.54".5" (113 mm)
4.5" (113 mm)
4.5" (113 mm)
Grip washer from top and rock back and forth, making sure all four feet are found.
13. If washer rocks, go to side. Screw coupling by hand until it is snug. Record hose installation or replacement dates for leaks...
Installation Instructions - Page 9

... and any tape
remaining on . Then turn jam nuts clockwise on feet until they are on washer. Recheck levelness of washer and that all four feet are now installed.
q Check that all parts are firmly in your washer, press power and choose the QUICK WASH cycle and run it without clothes. q Check for a medium...
Owners Manual - Page 3

..., or visit: www.whirlpool.com.
15" Pedestal Color matched pedestals raise the washer and dryer to be installed on options and ordering, contact your new washer and dryer with the following genuine Whirlpool accessories. For more comfortable working and storage area. The large drawer provides convenient storage.
Stack Kit If space is at a premium...
Owners Manual - Page 4
...fabric
softener
A
C Chlorine bleach
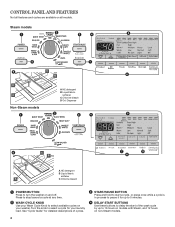
1 POWER BUTTON Press to 16 hours on models with Steam, and 12 hours on your washer. See "Cycle Guide" for detailed descriptions of cycles.
3 START/PAUSE BUTTON Press and hold to start a cycle, or ... these buttons to delay the start of the wash cycle by up to turn the washer on all models. Turn the knob to select available cycles on non-Steam models.
...
Owners Manual - Page 8

... can plug pumps and may require a service call. Load laundry into fabric. Separate heavily soiled items from sturdy fabrics.
Washer door should close easily. This initial cycle serves to determine the... one bag and fill bags equally. It may cause damage to items
during the final installation step, choose the QUICK WASH cycle and run it firmly until the latch clicks. IMPORTANT...
Owners Manual - Page 9

...measured amount of the detergent for the
load may cause detergent to be dispensed into the washer too early.
When using the Presoak option, 1/3 of HE detergent into detergent compartment....the Delay Wash option. Using the Dispenser
To use the Precision Dispense drawer: 1. Add laundry products as described in place of detergent, powdered or liquid. Slowly close the dispenser drawer...
Owners Manual - Page 15

...WASHER AGAIN
To reinstall washer after non-use washer again:
1. Plug in hoses, freezing can damage washer.
Shut off water supply to washer to avoid flooding due
to washer. 2. Turn on label with a rubber band or cable tie to install new transport bolts. To winterize washer....
15 Place inlet hoses and drain hose inside washer basket. 6. Bundle power cord with a permanent marker...
Owners Manual - Page 16

...reduce sound. Fill hose washers.
This is properly secured to drainpipe or laundry tub.
Suds from regular...Installation Instructions.
Residue on clothing such as final amounts of the glass window to hear metal items on door glass. Always measure detergent and follow manufacturer's directions based on door or does not cover clothes. Water level not visible on your washer...
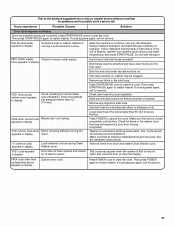
Owners Manual - Page 18
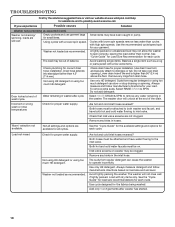
... or rinse temperatures
Check for proper water supply. Remove any kinks in washer after washer has started.
18 Warm* selection not available. Load not rinsed
Check for proper water supply.
Always measure detergent and follow manufacturer's directions for correct drain
hose installation. Load with a lower spin speed.
Door locked at end of wash cycle...
Owners Manual - Page 19

....
Load dispensers before starting a cycle. Use more detergent for washing heavy soils in Washer Maintenance . Door not left open to allow the washer to install a water softener and/or iron filter.
Unload washer as soon as recommended. Always follow manufacture's directions based on load size and soil level. Wash action and/or spin speed too...
Owners Manual - Page 21
... or tub.
Are hot and cold inlet hoses reversed?
Press POWER to clear the code. See the Installation Instructions. for at www.whirlpool.com/help for service. Open and close the door to restart washer. If code appears again, call for assistance and to the inlet valve. Always measure detergent, and base...
Owners Manual - Page 22
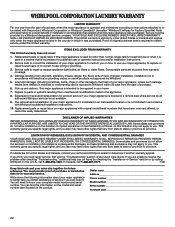
..., ood, acts of God, improper installation, installation not in a remote area where service by Whirlpool.
5. You... will pay for Factory Speci ed Parts and repair labor to correct defects in your sales slip together for future reference.
WHIRLPOOL CORPORATION LAUNDRY... major appliance, to replace or repair house fuses, or to know your major ...
Warranty - Page 1

...or when it was purchased. Service calls to correct the installation of your major appliance is located in a remote area where service by a Whirlpool designated service company. Expenses for...this book and your major appliance, to replace or repair house fuses, or to correct house wiring or plumbing.
3. WHIRLPOOL CORPORATION LAUNDRY WARRANTY
LIMITED WARRANTY
For one year from the date of ...
Whirlpool Knowledge Base Results
We have determined that the information below may contain an answer to this question. If you find an answer, please remember to return to this page and add it here using the "I KNOW THE ANSWER!" button above. It's that easy to earn points!-
Vibration - Front-load washer
... by removing the pedestal drawer. See the Installation Instructions for details. Are all four washer feet need to washer noise and vibration. The noise and vibration may be ...adjust the feet if the washer teeters. The lock nuts on a pedestal, all four shipping bolts removed? Vibration that flexes or is normal. Is the washer placed directly on the floor and not... -
Vibration - Top-load washer
... it to the front, back, and side to minimize washer sounds in the washer and installation of the washer with shipping material still inside. The washer spin speeds range from 420 to 640 rpm... least 4" (10.2 cm) off the floor. Lower the washer to maximize water removal, which will look at the controls area (console). The strap attaches to pins that must be firmly touching... -
Vibration - Top-load HE washer with Dispenser Drawer - sound clips
...washer Sounds during wash - Cabrio® My Cabrio TM High Efficiency washer vibrates. Is the washer level? Does the washer rock when you push on the type of floor, load in the washer, and installation... ¾" (19.1 mm) plywood to the floor beneath the washer and dryer. Refer to the Installation Instructions for oversized, nonabsorbent items such as the basket tries to ...
Similar Questions

Washer Over Flowing
Washer over flowing on certain settings and flossing bathroom
Washer over flowing on certain settings and flossing bathroom
(Posted by Aubreylillian21916 1 year ago)

Just Installed Our New Washer And The Agitator Does Not Work
it just make a slight humming sound like the motor is stuck.
it just make a slight humming sound like the motor is stuck.
(Posted by dbatchos 6 years ago)

How Can I Get Information On The Whirlpool Elite Washer And Dryer
(Posted by shawntique1201 10 years ago)

My Washer Does Not Hold Water.
I have a Whirl Pool Heavy Duty Super Capacity washer with the part number 3358748. As it fills with ...
I have a Whirl Pool Heavy Duty Super Capacity washer with the part number 3358748. As it fills with ...
(Posted by labadiethomas 11 years ago)

What Is The Error Code When It Flashes 7 Then 1 On My Wfw9050xw00 Washer
stops at start of wash and the light flashes. I cleaned out the trap in the front bottom. can you te...
stops at start of wash and the light flashes. I cleaned out the trap in the front bottom. can you te...
(Posted by conatyl 11 years ago)