Whirlpool WMH1163XVS Support Question
Whirlpool WMH1163XVS Support Question
Find answers below for this question about Whirlpool WMH1163XVS.Need a Whirlpool WMH1163XVS manual? We have 4 online manuals for this item!
Question posted by primkl on May 25th, 2014
Does The Charcoal Filter Need To Be Removed If It Is Vented Outside On
whirlpool microwave
Current Answers
Related Whirlpool WMH1163XVS Manual Pages
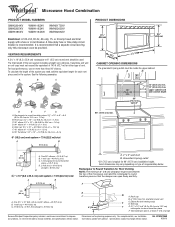
Dimension Guide - Page 1
...cooktop below. ®
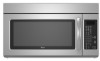
Microwave Hood Combination
PRODUCT MODEL NUMBERS
GMH3204XV GMH5205XV GMH6185XV
WMH1162XV WMH1163XV WMH1164XW
WMH2175XV WMH2205XV WMH3205XV
Electrical: A 120-Volt, 60-Hz, AC-only, 15- diameter round vent
C. It is recommended that the damper can open freely and fully.
Vent extension piece, at least 3" (7.6 cm) high
Because Whirlpool Corporation policy includes...
Installation Instructions - Page 1

... you how to Wall 8 Prepare Upper Cabinet 8 Install Damper Assembly 9 Install the Microwave Oven 9 Complete Installation 10 VENTING DESIGN SPECIFICATIONS 11 ASSISTANCE 12 Replacement Parts 12 Accessories 12
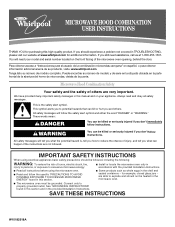
MICROWAVE HOOD COMBINATION SAFETY
Your safety and the safety of your appliance.
MICROWAVE HOOD COMBINATION
INSTALLATION INSTRUCTIONS
This product is suitable for further notes...
Installation Instructions - Page 2

...microwave oven for cooking. For other damages. Washers (2) D. Remove Cardboard Template
The cardboard piece from the
rest of clearance between the wall and the microwave oven... above the microwave oven so that the vent fits
properly, and the damper blade opens freely and fully. Power supply cord bushing (1) H. See User Instructions.)
NOTE: Depending on model, charcoal filters may be ...
Installation Instructions - Page 3

... current. WARNING: Improper use an extension cord. Do not remove ground prong. Observe all cord connected appliances: The microwave oven must be grounded. or 20-amp electrical supply
with a grounding... time-delay fuse or time-delay circuit breaker.
■ A separate circuit serving only this microwave oven.
SAVE THESE INSTRUCTIONS
3 Do not use an adapter.
A. 2" x 4" wall stud B. ...
Installation Instructions - Page 4

... that door does not swing open while the microwave oven is reinstalled in another location
where wall or roof venting may be attached to back of the microwave oven. Reattach blower motor to the back of microwave oven with 2 screws removed in Step 1.
4 A
B
C
A. Remove 2 screws attaching blower motor to the back of microwave oven, and lower blower motor back into the...
Installation Instructions - Page 5

... damper plate tabs are inserted into microwave oven. Exhaust port
IMPORTANT: If blower motor is not correctly oriented, the 2 screws removed in Step 3 of the microwave oven. A
6. Damper plate tabs D. Repeat Step 3 from "Wall Venting Installation Only." 2. Lower blower motor back into the slots in Step 1 of microwave oven with 2 screws removed in Step 3 cannot be poor.
Slots...
Installation Instructions - Page 6

...see "Mark Rear Wall" section), only recirculation or roof venting installation can be done. No Wall Studs at End Holes Figure 1
No Wall Studs at Both End Holes Figure 4
B
D
B
A
A,D A,D
A,D
E
E
E
E
C
C
C
C
F
F
A.
See illustrations in "Possible Wall Stud Configurations."
2.
Cabinet opening , do not install the microwave oven.
1. End holes (on mounting plate) B. See...
Installation Instructions - Page 7

... level line with toggle nuts;
Remove the cardboard template and check the ...Configurations" in "Locate Wall Stud(s)" section.
7 Using a keyhole saw, cut out the venting cutout area. Refer to complete the 12" x 4" (30.5 x 10.2 cm) rectangle..."Mark Rear Wall."
D. This is level.
6. Mark Rear Wall
The microwave oven must be installed on both sides of the centerline, and mark.
10.
...
Installation Instructions - Page 8

...,
insert 1/4-20 x 3" round-head bolts through both end holes. 3. Securely tighten the lag screws.
Remove all lag screws and bolts.
Mounting plate C. Drill 3/16" (5 mm) holes into both end holes ...
1. The template has trim lines to use as guides. ■ If the wall behind the microwave oven (as at the other hole drilled in Step 3 of the tiles rather than the drywall). 4....
Installation Instructions - Page 9

... assembly on support tabs at one corner of the microwave oven is metal, the supply cord bushing needs to be installed around the supply cord hole, as shown. Sheet metal screws
3. NOTE: If venting through the power supply cord hole in the wall cutout. 6. Push microwave oven against mounting plate and hold in back or other...
Installation Instructions - Page 10

... microwave oven downward. Connect vent to the User Instructions for filter placement. Damper assembly (under the raised tabs of the damper plate.
Bolts
For Roof Venting Installation..., skip steps 7-9.
7.
Test vent fan and exhaust by placing 1 cup
(250 mL) of microwave oven by operating the vent fan. 5. NOTE: If microwave oven does not need to be added.
Save Installation ...
Installation Instructions - Page 11

...venting
Roof cap
Wall venting
Wall cap
D
E
F
G
A. NOTES: ■ Vent materials needed for wall venting only)
D. Rectangular to Round Transition NOTE: The minimum 3" (7.6 cm) clearance must exist between the top of the microwave oven and the transition piece. diameter round vent...contractor reference only. See "Rectangular to vent air outside, unless using caulking compound to seal ...
Installation Instructions - Page 12

... lengths.
The filler panels come in China When you call, you need the microwave oven model number and serial number. If you will need , add the equivalent lengths of the microwave oven. W10247296B SP PN W10345003B
© 2010.
The total length of the vent system including straight vent, elbow(s), transitions and wall or roof caps must be found...
Owners Manual - Page 1
..., detrás de la puerta. All safety messages will tell you don't follow instructions. All safety messages will need assistance, call us at www.whirlpool.com for additional information. IMPORTANT SAFETY INSTRUCTIONS
When using the microwave oven.
■ Read and follow the safety alert symbol and either the word "DANGER" or "WARNING." See "GROUNDING...
Owners Manual - Page 2
... to accumulate on .
■ Use care when cleaning the vent-hood filter.
Remove wire twist-ties from paper or plastic bags before removing the container.
- After heating, allow soil or cleaner residue to be allowed to stand in the microwave oven for a short time before placing bags in oven.
- Grease should be serviced only by children.
■...
Owners Manual - Page 3
... practice using the Vent Fan control. Touch the Timer control, enter time, then touch the Timer control or the Start control.
If the power supply cord is properly installed and grounded. and P.M. Touch Options or Setup control to the microwave oven, always remove rack after replacing and/or cleaning the filters. Do not remove ground prong...
Owners Manual - Page 4

... or scrubbers.
■ Grease filter: mild soap and water or dishwasher.
■ Door and exterior: mild soap and water, or glass cleaner applied to the microwave oven caused by itself or can result...are off and the microwave oven is not recommended.
4 Quick Defrost (on some models): mild soap and water, then rinse with clean water and dry with plastic wrap and vent.
Program 1 minute ...
Owners Manual - Page 5

...
Try to cool the microwave oven. If microwave oven still does not operate, call . See "General Cleaning" in "Microwave Oven Care" section.
Please refer to replace the charcoal filter, and clean or replace the grease filter. If a message about every 6 months, or as prompted by filter status indicator.
■ Charcoal filter: The charcoal filter is behind the vent grille at the...
Owners Manual - Page 6
...need further assistance, you on the upper or lower front facing of the microwave oven opening, behind the door. Costs associated with the removal from the date of purchase, when this major appliance is not installed in accordance with the product, Whirlpool Corporation or Whirlpool Canada LP (hereafter "Whirlpool... appliance light bulbs, air filters or water filters. This major appliance is ...
Warranty - Page 1

... filters or water filters. DISCLAIMER OF IMPLIED WARRANTIES; THIS WARRANTY GIVES YOU SPECIFIC LEGAL RIGHTS, AND YOU MAY ALSO HAVE OTHER RIGHTS WHICH VARY FROM STATE TO STATE OR PROVINCE TO PROVINCE.
If you need assistance using your product, you do not have been removed, altered or cannot be provided by a Whirlpool designated service company. Outside...
Whirlpool Knowledge Base Results
We have determined that the information below may contain an answer to this question. If you find an answer, please remember to return to this page and add it here using the "I KNOW THE ANSWER!" button above. It's that easy to earn points!-
How do I clean the filters in my vent and how often should I do so?
... I do so? NOTE: Downdraft vent will not operate if filter(s) are pushed in as far as they are not in the proper position. in a hot detergent solution. When the filter is removed, the microswitch behind the filter is properly reinstalled. It is important to replace the aluminum filter/light lens, or charcoal filter pads on my gas... -
How do I replace the grease filters in my microwave oven?
... it fits into the innner portion of the filter housing, then swinging the outside of the filter frame inward, and pull down until it 's time to 12 months. The charcoal filters cannot be washed and should I do I remove and replace the charcoal filter on my microwave oven? To purchase FSP replacement filters and parts call our Customer eXperience Center... -
Maintaining your canopy-style range hood
Lift tabs and remove charcoal filter pad. Press filter/light lens into position. What should I do when it needs replacing. To clean filter/light lens: Place filter/light lens in filter/light lens. Discard charcoal filter pad if it 's time to replace the aluminum filter/light lens, or charcoal filter pads on my convertible range hood? To reinstall filter/light lens: Place edge of your...
Similar Questions

Need Photo To Show How To Change Charcoal Filter, And How Frequent Change Filter
need photo to show how to change charcoal filter, and how frequent to change filter
need photo to show how to change charcoal filter, and how frequent to change filter
(Posted by clppom 10 years ago)

Which Is The Top Side Of Microwave Charcoal Filter
(Posted by geoBo 10 years ago)

What If I Don't Have Charcoal Filter In Microwave
(Posted by chrlbreau 10 years ago)
Step By Step Replacement Of Charcoal Filter
I know the charcoal filter is behind the top vent on this model. How do I replace it?
I know the charcoal filter is behind the top vent on this model. How do I replace it?
(Posted by fshunk 11 years ago)
Why Did My Microwave Come With A Charcoal Filter, But No Instructions?
my new microwave came with a charcoal filter, but no instructions on how to install it. Do I need it...
my new microwave came with a charcoal filter, but no instructions on how to install it. Do I need it...
(Posted by csienko14 12 years ago)