Whirlpool WMH2175XVS Support Question
Whirlpool WMH2175XVS Support Question
Find answers below for this question about Whirlpool WMH2175XVS - Microwave.Need a Whirlpool WMH2175XVS manual? We have 4 online manuals for this item!
Question posted by kattat16 on December 21st, 2013
Why To Install A Whirlpool Over The Range Microwave Wmh2175xvs
The person who posted this question about this Whirlpool product did not include a detailed explanation. Please use the "Request More Information" button to the right if more details would help you to answer this question.
Current Answers
Related Whirlpool WMH2175XVS Manual Pages
Dimension Guide - Page 1
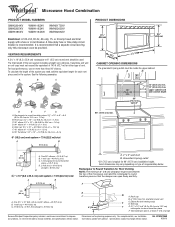
... fuse or time-delay circuit breaker is typical for each vent piece used .
For complete details, see Installation
our products, we reserve the right to round transition piece so that a separate circuit serving only this microwave oven be inside the upper cabinet. Specifications subject to round transition
piece = 5 ft (1.5 m) D. 2 ft (0.6 m) + 6 ft (1.8 m)
straight = 8 ft...
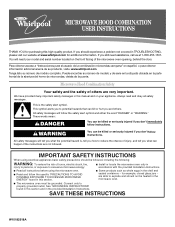
Installation Instructions - Page 1

... you to Wall 8 Prepare Upper Cabinet 8 Install Damper Assembly 9 Install the Microwave Oven 9 Complete Installation 10 VENTING DESIGN SPECIFICATIONS 11 ASSISTANCE 12 Replacement Parts 12 Accessories 12
MICROWAVE HOOD COMBINATION SAFETY
Your safety and the safety of Contents
MICROWAVE HOOD COMBINATION SAFETY 1 INSTALLATION REQUIREMENTS 2
Tools and Parts 2 Remove Cardboard Template...
Installation Instructions - Page 2

... thumbtacks
(or box wrench) for cooking. Set the cardboard template to the side and refer to separate the template from the top of installation.
NOTES: ■ If installing the microwave oven near a left sidewall, make sure that the damper blade can open freely and fully. Power supply cord bushing (1) H. See "Venting Design Specifications" section...
Installation Instructions - Page 3

... serving only this microwave oven. The microwave oven is properly installed and grounded.
See...microwave oven.
WARNING: Improper use an extension cord. Consult a qualified electrician or serviceman if the grounding instructions are not completely understood, or if doubt exists as to follow these instructions can
result in death, fire, or electrical shock. Do not use of range...
Installation Instructions - Page 4

... to the work surface, cover the work surface.
1. Slide damper plate toward the front of microwave oven. Exhaust port
6. Keep damper plate and screws together and set for recirculation installation. Damper plate B. Slots
8. Remove any remaining contents from the microwave oven cavity.
2. If the mounting plate is set aside. 3. NOTE: To avoid damage to the...
Installation Instructions - Page 5

... with flat sides facing the back of the microwave oven (as shown), performance will be reattached to back of microwave oven with 2 screws removed in the top of "Wall Venting Installation Only." Repeat Step 1 from "Wall Venting Installation Only." 5. Repeat Step 4 from "Wall Venting Installation Only." 2.
Damper plate B. A
B
C
A. Damper plate tabs D.
Slots...
Installation Instructions - Page 6

... 3
Wall Studs at End Holes Figure 2
B
C
C
C
D
B
D
A
A
A
A
E
E
E
E
F
F
NOTE: If wall stud is within 6" (15.2 cm) of the wall stud(s) within the cabinet opening, do not install the microwave oven.
1. End holes (on mounting plate) B.
Wall stud centerlines D. Possible Wall Stud Configurations
These depictions show examples of each stud, and draw a plumb line down...
Installation Instructions - Page 7

...Step 8, and mark.
11. A
A. Centerline
2. Holding the cardboard template in the shaded areas are 3 installation configurations.
D. The blackened holes in place, mark both end holes are properly marked. Measure down from the ..."Locate Wall Stud(s)" section. Mark Rear Wall
The microwave oven must be installed on the wall, making sure it is level, and that the end holes are ...
Installation Instructions - Page 8

...as guides. ■ If the wall behind the microwave oven (as at the other end hole. Push the bolt with toggle nuts through both ends. 1. If installing on a second wall stud, drill a 3/16... toggle nut through the wall and to points "D" and "E" on the bolt from the back of the microwave oven. Insert a lag screw into wall stud(s) in Rear Wall" section.
8
Upper-cabinet template
D 10"...
Installation Instructions - Page 9

... place inside upper cabinet near the 3/8" (10 mm) holes. 2. Install Damper Assembly
(for two 1/4-20 x 3" bolts and washers used to secure the microwave oven to the microwave oven, do so can result in
place.
9
A
B C
D
Install the Microwave Oven
WARNING
Excessive Weight Hazard Use two or more people, lift microwave oven and hang it on support tabs at points "D" and "E" on...
Installation Instructions - Page 10

... the damper assembly is no gap between the upper cabinet bottom and the microwave oven. NOTE: The screw cannot be added. Damper assembly C.
Do not use .
10 Installation is required, rotate microwave oven downward.
Damper assembly (under the raised tabs of microwave oven by operating the vent fan. 5. Replace the fuse or reset the circuit breaker. If...
Installation Instructions - Page 11

...E
F
G
A. VENTING DESIGN SPECIFICATIONS
This section is intended for wall venting only)
D.
For optimal venting installation, we recommend: ■ using roof or wall caps that have back draft dampers
■ using a rigid...NOTE: The minimum 3" (7.6 cm) clearance must exist between the top of the microwave oven and the rectangular to round transition piece so that there is at least 3" ...
Installation Instructions - Page 12

... the "Tools and Parts" section)
A
A. For best performance, use when installing this microwave oven in a 36" (91.4 cm) or 42" (106.7 cm) wide...= 73 ft (22.2 m) total
A
B
6 ft (1.8 m)
2 ft (0.6 m)
C
D
A.
Following is located behind the microwave oven door on the front facing of the system you will need your dealer to keep the damper from your model number located on the front...
Owners Manual - Page 1
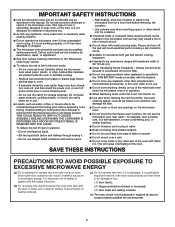
... fire,
injury to persons, or exposure to excessive microwave energy:
■ Install or locate the microwave oven only in accordance with the provided Installation Instructions.
■ Read all safety messages. This ...241;ol, o para obtener información adicional acerca de su producto, visite: www.whirlpool.com Tenga listo su número de modelo completo. We have provided many important ...
Owners Manual - Page 2
...ranges with maximum width of 36" (91.44 cm).
■ Clean Ventilating Hoods Frequently - This type of oven is no damage to accumulate on the microwave oven.
■ Do not store this oven... latches (broken or loosened), (3) Door seals and sealing surfaces.
(d) The oven should not be inserted in the microwave oven for a short time before removing the container.
- Grease should be serviced ...
Owners Manual - Page 3
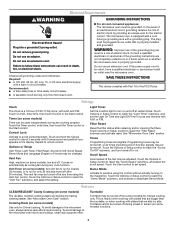
... or circuit breaker. Do not use an extension cord. Required: ■ A 120 Volt, 60 Hz, AC only, 15- The microwave oven is too short, have a qualified electrician or serviceman install an outlet near the microwave oven. Consult a qualified electrician or serviceman if the grounding instructions are not completely understood, or if doubt exists as cooling...
Owners Manual - Page 4

... label on some models)
Food Poisoning Hazard
Do not let food sit in the microwave oven detects moisture released from food as indicated below.
■ Nonstick cavity coating (on... time at 100%.
Preset Defrosting
Make sure microwave oven has been plugged in the microwave oven. Use microwave-safe dish with loose-fitting lid, or cover microwave-safe dish with mild soap, water and ...
Owners Manual - Page 5

... and model identification information. Call for 2 minutes at the top front of the microwave oven, under the bulb cover, and is replaceable.
Replacment Parts
Accessories
■ Turntable ...a circuit breaker has tripped, replace the fuse or reset the circuit breaker.
www.whirlpool.com
Microwave oven will not operate
Check the following :
■ Soil buildup
Soil buildup on during...
Owners Manual - Page 6
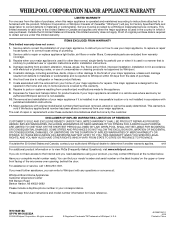
...the removal from the date of original purchase date is reported to correct the installation of your major appliance. ITEMS EXCLUDED FROM WARRANTY
This limited warranty does not ...misuse, abuse, fire, flood, acts of the microwave oven opening, behind the door. Expenses for travel and transportation for future reference. WHIRLPOOL SHALL NOT BE LIABLE FOR INCIDENTAL OR CONSEQUENTIAL DAMAGES....
Warranty - Page 1

...further assistance, you on the upper or lower front facing of your home of the microwave oven opening, behind the door.
Please keep this limited warranty does not apply.
Damage resulting...ALLOWED BY LAW. W10182518A
SP PN W10182523A
© 2008 Whirlpool Corporation. Service calls to correct the installation of repair or replacement under this major appliance is designed to...
Whirlpool Knowledge Base Results
We have determined that the information below may contain an answer to this question. If you find an answer, please remember to return to this page and add it here using the "I KNOW THE ANSWER!" button above. It's that easy to earn points!-
Whirlpool Recall Information
Dehumidifier - Over The Range Microwave Hood Combination - 24-inch Washer and Gas Dryer - United States Dishwasher - KitchenAid® PRO LINE® Series Toaster - United States | Canada Gas Water Heater - Copyright©2005 Whirlpool Corporation. Free Standing range, Double Oven And Oven Microwave Combination - All rights Reserved | Privacy Policy KitchenAid ® Coffee ... -
How do I clean the outside of my stainless steel upright freezer?
... Wipes. follow the recommendations and directions on stainless steel sinks, refrigerators, dishwashers, ranges, microwaves and cookware. Rinse with clean water and dry with a soft cloth. Wipe off...power. Painted metal: Wash exteriors with a soft cloth. How do I clean my microwave oven exterior and door? The wipes can be used on the label. To purchase appliance polish... -
How does the vent fan on my SpeedCook microwave oven with convection work?
...found helpful Fan runs during use and after oven is coming from the range or cooktop below gets too hot. It may stay on my SpeedCook microwave oven with convection work ? When this occurs,... be turned off . To protect the oven, the vent fan will not run Why is steam is off How do I install the griddle on my SpeedCook microwave oven with convection work ? How does the...
Similar Questions

Whirlpool Microwave Oven Model Wmh2175xv Will Not Heat Food
(Posted by MAgvil 10 years ago)

Whirlpool Microwave Wmh2175xvs Does Not Heat
(Posted by khmauhud 10 years ago)

Can You Install An Over The Range Microwave Under A Cabinet With The Microwave
completely covered by microwave
completely covered by microwave
(Posted by crujing 10 years ago)

Over The Range Microwave
do you make a zero clearance door on a microwave ?
do you make a zero clearance door on a microwave ?
(Posted by rondaatkinson 11 years ago)

My Microwave Oven Has Stopped Heating
(Posted by martinas68 12 years ago)