Whirlpool WMH2175XVS Support Question
Whirlpool WMH2175XVS Support Question
Find answers below for this question about Whirlpool WMH2175XVS - Microwave.Need a Whirlpool WMH2175XVS manual? We have 4 online manuals for this item!
Question posted by trinimd on April 23rd, 2011
Micrwave Turns On Micrwave Does Not Heat Up Any Food
I had the microwave for about 1 year 3 months
Was installed with builder
Current Answers
Related Whirlpool WMH2175XVS Manual Pages
Dimension Guide - Page 1
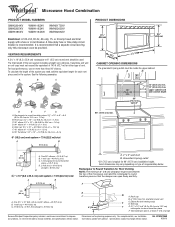
... must exist between the top of the microwave oven and the rectangular to Round Transition for each...Installation
our products, we reserve the right to improve
Dimensions are for wall venting only)
E
D. Instructions packed with a fuse or circuit breaker.
®
Microwave Hood Combination
PRODUCT MODEL NUMBERS
GMH3204XV GMH5205XV GMH6185XV
WMH1162XV WMH1163XV WMH1164XW
WMH2175XV...
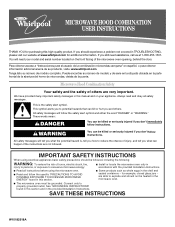
Installation Instructions - Page 1

... Requirements" section for use above electric or gas cooking products up to Wall 8 Prepare Upper Cabinet 8 Install Damper Assembly 9 Install the Microwave Oven 9 Complete Installation 10 VENTING DESIGN SPECIFICATIONS 11 ASSISTANCE 12 Replacement Parts 12 Accessories 12
MICROWAVE HOOD COMBINATION SAFETY
Your safety and the safety of injury, and tell you and others are not followed...
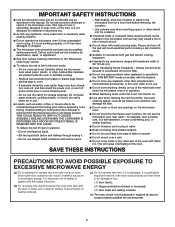
Installation Instructions - Page 2

... and fully. Special Requirements
For Wall Venting Installation Only: ■ Cutout must provide: ■ Minimum installation dimensions. Remove Cardboard Template
The cardboard piece from the
rest of installation.
Read and follow the instructions provided with your builder or cabinet supplier to withstand the heat produced by the microwave oven for wall or roof
venting)
Not Shown...
Installation Instructions - Page 3

...-delay fuse or time-delay circuit breaker.
■ A separate circuit serving only this microwave oven. Failure to whether the microwave oven is properly grounded.
Grounded 3 prong outlet
*30" (76.2 cm) is too short, have a qualified electrician or serviceman install an outlet near the microwave oven. Product Dimensions
17¹⁄₄"
(43.8 cm)
16¹⁄₄...
Installation Instructions - Page 4

... plate may be in Step 3.
7. Remove any remaining contents from the microwave oven cavity.
2.
NOTE: To avoid damage to back of the microwave oven. Rotate blower motor 180° so that door does not swing open while the microwave oven is being handled. Wall Venting Installation Only 1.
Screws B. Exhaust port
6. Screws C. Damper plate tabs D. NOTE: Skip this...
Installation Instructions - Page 5

...C
A.
Rotate blower motor so that exhaust ports face the top of
microwave oven, and flat sides of blower motor face back of the microwave oven (as shown), performance will be reattached to the microwave oven.
7. Make sure damper plate tabs are inserted into microwave oven.
Roof Venting Installation Only
1. Reattach damper plate. Exhaust port
IMPORTANT: If blower motor is...
Installation Instructions - Page 6

... with the mounting plate. Support tabs F.
End holes (on mounting plate) B. Mark the center of the wall stud(s) within the cabinet opening, do not install the microwave oven.
1. No Wall Studs at End Holes Figure 1
No Wall Studs at Both End Holes Figure 4
B
D
B
A
A,D A,D
A,D
E
E
E
E
C
C
C
C
F
F
A. Wall stud centerlines D. Mounting plate center markers
6 Cabinet...
Installation Instructions - Page 7

...mounting plate center markers to being installed on at both sides of 1...Installation Only
Upper cabinet bottom
³⁄₈" (1 cm)
4" (10.2 cm)
Centerline
6" (15.2 cm)
6" (15.2 cm)
8. Cardboard template C. Rear wall B. Top of cardboard template must be 15³⁄₄" (40.0 cm) from the bottom edge of upper cabinet
3. Mark Rear Wall
The microwave oven...
Installation Instructions - Page 8

...mm) hole through the wall and to use as guides. ■ If the wall behind the microwave oven (as at the end hole marked in the top of the mounting plate. Position mounting plate on ...microwave oven. Securely tighten all contents from the rear wall to make sure toggle nuts have opened against the rear wall so that fits over the 3/4" (19 mm) hole drilled in Step 3 of "Installation...
Installation Instructions - Page 9

... not grip or use the door or door handle while the microwave oven is at one corner of the microwave oven so that damper blade moves freely, and opens fully.
2. Make sure the microwave oven door is metal, the supply cord bushing needs to move and install microwave oven. Damper assembly C. Damper blade D. Secure damper assembly with 2 sheet metal...
Installation Instructions - Page 10

... the circuit breaker.
Sheet metal screw D. Reconnect power. 4. Repeat steps 3-6.
10. Bolts
For Roof Venting Installation Only
1. A
B
C
D
E
F
A. Installation is required, rotate microwave oven downward. Tighten bolts until there is plugged into microwave oven. The blocks must be installed if the damper assembly is not positioned as the space between upper cabinet and...
Installation Instructions - Page 11

...there is intended for architectural designer and builder/contractor reference only. Vent extension piece, at least 3" (7.6 cm) of clearance between the top of the microwave oven and the transition piece. A
B
...3" (7.6 cm)
F
A. See the examples in the vent system
■ using recirculation installation. If venting through the roof, and rectangular to round transition is used, be sure there...
Installation Instructions - Page 12

... come in China Following is 3" (7.6 cm) wide. W10247296B SP PN W10345003B
© 2010.
For best performance, use when installing this microwave oven in a 36" (91.4 cm) or 42" (106.7 cm) wide opening , behind the microwave oven door on the front facing of the system you need your dealer to be replaced, call us at our...
Owners Manual - Page 1
... heated in TROUBLESHOOTING, please visit our website at 1-800-253-1301.
are able to explode and should be killed or seriously injured if you to reduce the chance of injury, and tell you should experience a problem not covered in the microwave oven.
■ The microwave oven must be grounded. Connect only to excessive microwave energy:
■ Install...
Owners Manual - Page 2
...MICROWAVE ENERGY
(a) Do not attempt to heat, cook, or dry food. Grease should be serviced only by anyone except properly qualified service personnel.
2 This will cause overheating of the microwave oven when the microwave oven is specifically designed to operate this oven... the oven if it .
- This type of fire in operation.
■ When flambeing foods under the hood, turn oven off...
Owners Manual - Page 3
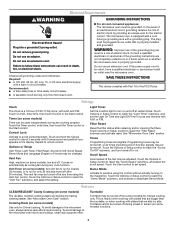
...a qualified electrician or serviceman install an outlet near the microwave oven. Options or Setup
Vent ...turned off after replacing and/or cleaning the filters. This is helpful when cooking with plates that are bigger than the turntable, or when cooking with plates that is equipped with a cord having a grounding wire with a fuse or circuit breaker. The microwave oven is properly installed...
Owners Manual - Page 4

...minute of water beside it heats, and adjusts the cooking time accordingly. Microwave Oven Use
Manual Cooking/Stage Cooking
...microwave oven has been plugged in the microwave oven.
If dish becomes hot and the water stays cool, do not use the dish in for 1 lb (454 g).
Turn over food at 100%. Always follow a cooking cycle. Unwrap food.
Cookware and Dinnerware
Microwave...
Owners Manual - Page 5

...microwave oven's controls while the cooktop below . If the problem continues, call an electrician.
■ Magnetron
Try to avoid unintended starting of the cycle. If water does not heat... and Cleaning Supplies
Following is a list of microwave oven, and clean monthly, or as prompted by a number is off . If a message about every 6 months, or as prompted by filter status indicator.
...
Owners Manual - Page 6
...installation of your major appliance, to instruct you on the upper or lower front facing of the microwave oven... opening, behind the door. Repairs when your major appliance, unless such damage results from defects in materials or workmanship and is reported to Whirlpool within 30 days from the date of purchase.
6. Any food...
LIMITED WARRANTY
For one year from the date of purchase...
Warranty - Page 1

...food loss due to obtain service under these excluded circumstances shall be repaired in the home and only in materials or workmanship and is reported to Whirlpool within 30 days from the date of the microwave oven... one year from the date of purchase, when this major appliance is operated and maintained according to instructions attached to or furnished with published installation instructions...
Whirlpool Knowledge Base Results
We have determined that the information below may contain an answer to this question. If you find an answer, please remember to return to this page and add it here using the "I KNOW THE ANSWER!" button above. It's that easy to earn points!-
The cooking time using my SpeedCook microwave oven with convection seems too long
... are still having problems, you should have a qualified electrician check the electrical system in "Microwave oven safety?" Many recipes for microwave cooking specify which cooking power to use by percent, name or number. Cooking and heating foods that need longer cooking times. Recommended: A time-delay fuse or time-delay circuit breaker. Are large... -
Microwave oven cooking tips
... possible, turn food over from the oven. Shielding Use small, flat pieces of aluminum foil to vent steam. Microwave use the turntable. Check for microwave ovens may be used in my microwave oven? Starting temperature Room temperature foods will heat faster than refrigerated foods, and refrigerated foods will reach a higher temperature and heat faster than other foods. Composition... -
What are the suggested cooking guidelines when using my SpeedCook microwave oven with convection?
... and some models), aluminum foil for microwave ovens may be turned back at one corner to provide an opening to the oven. Covering Covering food helps retain moisture, shorten cook time and reduce spattering. Use the lid supplied with convection? Arranging If heating irregularly shaped or different sized foods, arrange the thinner parts and smaller sized...
Similar Questions


Whirlpool Microwave Oven Model Wmh2175xv Will Not Heat Food
(Posted by MAgvil 10 years ago)
Will Not Heat Whirlpool Microwave Wmh2175xvs
(Posted by MaybeCisc 10 years ago)

My Microwave Oven Has Stopped Heating
(Posted by martinas68 12 years ago)

It Will Not Heat Food Anymore
(Posted by Anonymous-25354 13 years ago)