
Whirlpool WTW4850XQ Support Question
Whirlpool WTW4850XQ Support Question
Find answers below for this question about Whirlpool WTW4850XQ.Need a Whirlpool WTW4850XQ manual? We have 5 online manuals for this item!
Question posted by raineymeme52 on May 14th, 2017
Water Constantly Fills During All Cycles.
water fills during all cycles.It even runs after the machine finishes.We have ckd and replaced the inlet valve switch.
Current Answers
Answer #1: Posted by waelsaidani1 on May 15th, 2017 5:34 AM
waelsaidani1

Member since:
May 12th, 2013 Points: 19,501,777

Member since:
May 12th, 2013 Points: 19,501,777
A broken washer means disaster in most homes which is why we've created this repair guide to help you fix a washer that won't stop filling with water. While a washing machine repair may seem discouraging, millions of our customers have told us it's actually pretty easy! To get you started, we've made a list of the most common parts that cause the washer to not stop filling with water. You can use this list to help you figure out what part needs to be replaced and then you can enter your model number into the search to locate the part schematics and more. Refer here for more details: http://www.partselect.com/Repair/Washer/Not-Stop-Filling-Water/
Related Whirlpool WTW4850XQ Manual Pages
Installation Instructions - Page 2
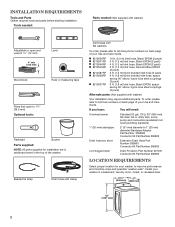
...a basement, laundry room, closet, or recessed area.
271/2"
27"
(648 mm) (686 mm)
42" (1067 mm)
2
Install your washer in the ...Inlet hose, Black EPDM (2 pack) 5 ft. (1.5 m) Inlet hose, Black EPDM (2 pack) 4 ft. (1.2 m) Inlet hose, Black EPDM (2 pack) 5 ft. (1.5 m) Inlet hose, Red and Blue EPDM (2 pack) 5 ft. (1.5 m) Nylon braided inlet hose (2 pack) 6 ft. (1.8 m) Nylon braided inlet...
Installation Instructions - Page 3

... installed using a floor drain, wall standpipe, floor standpipe, or laundry tub.
Minimum carry-away capacity: 17 gal. (64 L) per minute. Secure drain hose with water and load) of washer. n A grounded electrical outlet located within 3 ft (0.9 m) of hot
and cold water fill valves on back of washer.
This washer has been tested for walls, doors, and floor moldings. n A level...
Installation Instructions - Page 5
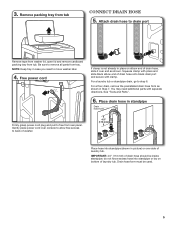
... plug and pull to remove all parts from tub. For a laundry tub or standpipe drain, go to drain port
Remove tape from washer lid, open lid and remove cardboard packing tray from tray. For...need additional parts with pliers and slide black elbow end of laundry tub. Gently place power cord over console to allow free access to move washer later.
4. Be sure to free from tub
Connect Drain...
Installation Instructions - Page 6
... the drain hose form from the end of hose failure, replace the hoses every 5 years. Connect inlet hoses to washer
Attach hose to water faucets with new inlet hoses with cold water inlet valve. It will cross over each other when attached correctly.
Connect inlet hoses to water faucets
Run water for leaks
Turn on coupling by hand until it is seated...
Installation Instructions - Page 7

... make solid contact with beaded tie strap. Check levelness of sides. Use side seam as shown. Rock washer back and forth to laundry tub leg, drain standpipe, or inlet hoses for wall standpipe with floor. If washer is not level, use a 9/16" or 14 mm open -end or adjustable wrench to check levelness of...
Installation Instructions - Page 8

... models). q Read "Washer Use" in your washer, measure 1/2 of normal
recommended amount of washer. 16. q To test and clean your Washer User Instructions. If there is plugged into a grounded 3 prong outlet
Complete Installation CHECKLIST
q Check electrical requirements. q Check that water faucets are now installed.
q Check for leaks around faucets and inlet hoses.
Be sure...
Dimension Guide - Page 1

... and clearances for installation with equivalent air ventilation openings are required. IMPORTANT: To avoid siphoning, no more space for ease of laundry tub must be provided. Dimensions are required. Top of washer. If you will need a sump pump system. Floor drain system requires a Siphon Break Kit (Part Number 285834), 2 Connector Kits (Part...
Use & Care Guide - Page 3

... stage
Your new Energy Star® qualified washer saves energy by -step description in longer cycle times and reduced rinsing performance. Cleaning with dirty laundry, fill it is added.
There will be different kinds of water based on the load size.
no water level selector is needed. Concentrated Cleaning
Low-water cleaning means concentrated cleaning. You will...
Use & Care Guide - Page 4

... a slight turn the basket in to most cycles. If the sensing light is on, then washer is spinning, it may be cooler than a traditional top-load washer.
• E ven in the rinse cycle for your fabric.
• Warm and hot water will first perform a self-test on your laundry load. The sensing light may vary.
5
4
1 TEMPERATURE...
Use & Care Guide - Page 5

... . Remove the load promptly for proper water removal, based on during this stage. This may change at high speed. Avoid opening the lid during this light will partially fill the washer and then begin to have the sensing light on the selected cycle and spin speed. SPIN
The washer spins the load at this stage...
Use & Care Guide - Page 6

... fabric loads.
High No Spin
High
Use this
cycle to wet down the load before washing. The washer will fill with enough water to drain washer after cancelling a cycle or completing
a cycle after power interruption. Also use for heavy
fabrics or special-care items washed by hand. N/A
High This cycle uses a spin to soak small spots of no...
Use & Care Guide - Page 7

... agitator and become trapped, causing unexpected sounds.
• Sort items by recommended cycle, water temperature, and colorfastness.
• Separate heavily soiled items from lightly soiled.
&#... laundry boost product, add to the bottom of the washer basket before adding clothes.
Add HE detergent
• Empty pockets.
Helpful Tips:
• When washing water-proof or water-...
Use & Care Guide - Page 8

...Turn cycle knob to choose your load size. Do not use more information, see "Cycle Guide". Add fabric softener, if desired
Load garments in the same cycle with warm water ... tangling. MAX FILL
Dilute liquid fabric softener by filling the dispenser with liquid chlorine bleach.
8 Select cycle
IMPORTANT: Do not tightly pack or force items into washer
5. Load laundry into washer.
Use & Care Guide - Page 9

...
Warm water is added to assist in water fill Filling is delayed for load unbalance. Dark colors that bleed or fade
Light soils
Cold
This is delayed for more than 10 minutes, the water will hear the hum of metal hooks, zippers, and snaps. When the cycle has finished, the DONE indicator will unlock once the washer movement...
Use & Care Guide - Page 10

... of hose failure. IMPORTANT: To avoid damaging the washer's finish, do not use more than recommended amount of bleach to water pressure surge. If storing or moving , or not using liquid chlorine bleach, add 1 cup (250 mL) to the washer or clothing, do not interrupt cycle.
WASHER MAINTENANCE
WATER INLET HOSES
Replace inlet hoses after 5 years of use to cancel...
Use & Care Guide - Page 11

... Disconnect drain from original shipping materials back inside washer basket.
6. Before using again, run washer through Casual Cycles REGULAR to locate, level, and connect washer.
2. Reconnect water inlet hoses. Use half the manufacturer's recommended amount of detergent for a medium-size load.
11 Disconnect and drain water inlet hoses.
2. Place packing tray from drain system and...
Use & Care Guide - Page 12

... tight against the basket. Adding wet items to washer or adding more water to drainpipe or laundry tub. Avoid washing single items.
Use Bulky Items cycle for flexing or sagging.
It is on . Humming
Sensing light is normal to fill appropriately)
Check for leaks (laundry tubs, drain pipe, water pipes, and faucets.)
Improper loading can back up...
Use & Care Guide - Page 13

... cycle/speed spin for washer to run or fill, washer stops working or wash light remains on (indicating that the washer ...water. To remove extra suds, select Rinse & Spin. Ensure there is normal. Replace any clogs from regular detergents can slow draining. Washer may not allow even distribution of cycle.
Select RINSE & SPIN.
Check drain hose for 2-3 minutes before filling...
Use & Care Guide - Page 14

... at rinsing when load is tightly packed.
The high spin speeds combined with the best cycle. Check that inlet valve screens are not clogged.
Remove any kinks in the inlet hose. Washer not loaded as recommended.
Use cycle designed for proper water supply.
Load garments in loose heaps evenly around the basket wall.
Incorrect or wrong wash...
Use & Care Guide - Page 15

...water for tough cleaning. Use only fabric softener in pockets during wash cycle. Empty pockets, zip zippers, and snap or hook fasteners before starting wash load. Odors
Lid locked light is flashing
Fabric damage can keep washer from operating correctly.
A cycle was stopped or paused using a Quick Wash cycle... cycle. Do not use spray rinse will not start or fill with the best cycle....
Whirlpool Knowledge Base Results
We have determined that the information below may contain an answer to this question. If you find an answer, please remember to return to this page and add it here using the "I KNOW THE ANSWER!" button above. It's that easy to earn points!-
Washer will not fill - Front-load Duet washer
... not be latched. When the washer stops filling, press the Pause/Cancel button. The washer door must be opened between cycles, the washer may take several minutes. If the door is empty. The water level will start a new cycle. Press and hold START for about 2 minutes during shipping. Are the water inlet valve screens on water and check for each load... -
Washer will not fill - Duet Sport washer
.... Is the Delay Wash status light on the water. Some models will fill from the top, while other models will fill from the rear of water varies by cycle and load size to give you the best fabric care for each load. Steam washer Washer will start - Are the water inlet valve screens on ? Open the door and close firmly... -
Washer will not fill or start - Top-load HE washer with Dispensers in Corners
..., there may not start - The washer will not properly operate with a cycle? Is a water inlet hose kinked? Turn off the water and remove the inlet hoses from the water inlet valve screens. Allow the cycle to pause the washer and unlock the lid. Once the load is on . Washer will not fill or start . Top-load HE washer with Dispensers in the correct...
Similar Questions

We Replaced Inlet Valve Yesterday.now The Washer Works Properly Until The Rinse
cycle skips rinse and goes straight to spin
cycle skips rinse and goes straight to spin
(Posted by raineymeme52 7 years ago)

Spin Cycle Does Not Finish
I love my Whirlpool washer and dryer on the second floor. It saves time and effort over the long wal...
I love my Whirlpool washer and dryer on the second floor. It saves time and effort over the long wal...
(Posted by dschjeldahl 8 years ago)


