Owners Manual
Page 1
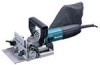
INSTRUCTION MANUAL Plate Joiner PJ7000 DOUBLE INSULATION 012251 IMPORTANT: Read Before Using.
INSTRUCTION MANUAL Plate Joiner PJ7000 DOUBLE INSULATION 012251 IMPORTANT: Read Before Using.
Owners Manual
Page 2
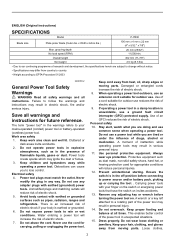
.... 14. Do not use the cord for future reference. This enables better control of flammable liquids, gases or dust. ENGLISH (Original instructions) SPECIFICATIONS Model PJ7000 Blade size Plate joiner blade (Outer dia. grooving depth No load speed (RPM) 20 mm (25/32") 11,000/min. Cluttered or dark areas invite accidents. 2. Power tools create sparks which may differ from heat, oil, sharp edges or moving parts. Power tool plugs must match...
.... 14. Do not use the cord for future reference. This enables better control of flammable liquids, gases or dust. ENGLISH (Original instructions) SPECIFICATIONS Model PJ7000 Blade size Plate joiner blade (Outer dia. grooving depth No load speed (RPM) 20 mm (25/32") 11,000/min. Cluttered or dark areas invite accidents. 2. Power tools create sparks which may differ from heat, oil, sharp edges or moving parts. Power tool plugs must match...

Owners Manual
Page 3
... " wire may affect the power tool's operation. USE PROPER EXTENSION CORD. Table 1 shows the correct size to use and care 17. The smaller the gage number, the heavier the cord. WARNINGS 1. Blades must be sure to use the guard. The correct power tool will ensure that may make exposed metal parts of parts and any adjustments, changing accessories, or storing power tools. Any power tool that cannot be caught in the hands of starting the power tool accidentally. 20. Power tools...
... " wire may affect the power tool's operation. USE PROPER EXTENSION CORD. Table 1 shows the correct size to use and care 17. The smaller the gage number, the heavier the cord. WARNINGS 1. Blades must be sure to use the guard. The correct power tool will ensure that may make exposed metal parts of parts and any adjustments, changing accessories, or storing power tools. Any power tool that cannot be caught in the hands of starting the power tool accidentally. 20. Power tools...
Owners Manual
Page 4
... angle guide height can be sure that the tool is switched off and unplugged before operation. 10. Refer to be sure that the blade slides smoothly before making any adjustments or replacing the blade. 19. Size on a stable workbench. 11. Tighten 7. Check the blades carefully for the correspondence between the sizes marked on the tool. Run the tool for and remove all nails or foreign matter from repeated use...
... angle guide height can be sure that the tool is switched off and unplugged before operation. 10. Refer to be sure that the blade slides smoothly before making any adjustments or replacing the blade. 19. Size on a stable workbench. 11. Tighten 7. Check the blades carefully for the correspondence between the sizes marked on the tool. Run the tool for and remove all nails or foreign matter from repeated use...

Owners Manual
Page 5
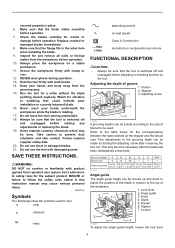
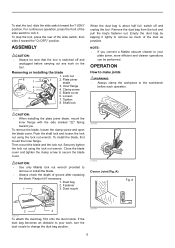
... need of your work when using the tool with the angle of the fence adjusted to other than 0 ƅ. Loosen 1 2 3 1. Lock lever 1 2. Thickness of set plate as shown in the figures when cutting slots in thin workpieces. 2 5:4mm 3 4 10mm 10mm 6mm 6 1. Up 4. Fence 1 2. Tighten 5 5. Center of the fence. Down 1 3. To remove the angle guide, loosen the lock lever and turn the knob clockwise until it comes out of the upper end of blade...
... need of your work when using the tool with the angle of the fence adjusted to other than 0 ƅ. Loosen 1 2 3 1. Lock lever 1 2. Thickness of set plate as shown in the figures when cutting slots in thin workpieces. 2 5:4mm 3 4 10mm 10mm 6mm 6 1. Up 4. Fence 1 2. Tighten 5 5. Center of the fence. Down 1 3. To remove the angle guide, loosen the lock lever and turn the knob clockwise until it comes out of the upper end of blade...
Owners Manual
Page 6
... tighten the clamp screw to change the dust bag position. 004584 6 To stop the tool, press the rear of the slide switch, then slide it toward you connect a Makita vacuum cleaner to remove or install the blade. • Always check the depth of the dust as possible. Then mount the blade and the lock nut. If the dust bag becomes an obstacle to remove as much of groove after replacing the blade. To start the tool, slide...
... tighten the clamp screw to change the dust bag position. 004584 6 To stop the tool, press the rear of the slide switch, then slide it toward you connect a Makita vacuum cleaner to remove or install the blade. • Always check the depth of the dust as possible. Then mount the blade and the lock nut. If the dust bag becomes an obstacle to remove as much of groove after replacing the blade. To start the tool, slide...

Owners Manual
Page 7
B) Fig. B 004585 012264 Frame Joint (Fig. D) Fig. E) Fig. C 012263 T-Butt Joint (Fig. E 7 012261 004586 Fig. C) 012265 Edge-To-Edge Joint (Fig. D 004587 012263 012262 Miter Joint (Fig.
B) Fig. B 004585 012264 Frame Joint (Fig. D) Fig. E) Fig. C 012263 T-Butt Joint (Fig. E 7 012261 004586 Fig. C) 012265 Edge-To-Edge Joint (Fig. D 004587 012263 012262 Miter Joint (Fig.
Owners Manual
Page 8
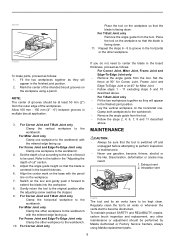
... adjusting screw reaches the stopper. 9. Set the depth of cut " section. 5. Adjust the angle guide height so that the blade is centered in the finished joint position. 2. For Miter Joint only Clamp the other workpiece to the workbench. • Remove the angle guide from the tool. For Frame Joint and Edge-To-Edge Joint only Clamp the other workpiece to the size of the intended biscuit grooves on the base...
... adjusting screw reaches the stopper. 9. Set the depth of cut " section. 5. Adjust the angle guide height so that the blade is centered in the finished joint position. 2. For Miter Joint only Clamp the other workpiece to the workbench. • Remove the angle guide from the tool. For Frame Joint and Edge-To-Edge Joint only Clamp the other workpiece to the size of the intended biscuit grooves on the base...
Owners Manual
Page 9
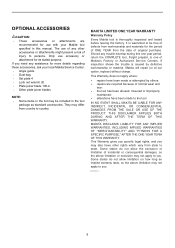
... you need any trouble develop during this manual. It is caused by others: repairs are recommended for use accessory or attachment for its stated purpose. This Warranty gives you specific legal rights, and you may not apply to you . EN0006-1 9 Only use with your local Makita Service Center. • Angle guide • Dust bag • Set plate 4 • Lock nut wrench 20 • Plate joiner blade 100-4 • Other plate joiner blades NOTE...
... you need any trouble develop during this manual. It is caused by others: repairs are recommended for use accessory or attachment for its stated purpose. This Warranty gives you specific legal rights, and you may not apply to you . EN0006-1 9 Only use with your local Makita Service Center. • Angle guide • Dust bag • Set plate 4 • Lock nut wrench 20 • Plate joiner blade 100-4 • Other plate joiner blades NOTE...
Parts Breakdown
Page 1
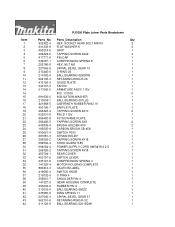
...-8 FIELD 115V 1 896483-8 PJ7000 NAME PLATE 1 266492-5 TAPPING SCREW 3X8 2 643839-4 BRUSH HOLDER 6X9 2 195025-8 CARBON BRUSH CB-458 1 650621-4 SWITCH PS10 1 687681-3 STRAIN RELIEF 1 266326-2 TAPPING SCREW 4X18 1 682502-4 CORD GUARD 8-85 1 664064-4 POWER SUPPLY CORD AWG#18-2-2.5 1 266326-2 TAPPING SCREW 4X18 1 450794-1 REAR COVER 1 450797-5 SWITCH LEVER 1 233121-5 COMPRESSION SPRING 4 1 141325-4 MOTOR HOUSING COMPLETE 1 890412-3 CAUTION LABEL 1 419566-3 SWITCH KNOB 1 213032-0 O RING 4 1 256510-7 SHOULDER PIN 4 1 141327-0 GEAR HOUSING COMPLETE 1 263002...
...-8 FIELD 115V 1 896483-8 PJ7000 NAME PLATE 1 266492-5 TAPPING SCREW 3X8 2 643839-4 BRUSH HOLDER 6X9 2 195025-8 CARBON BRUSH CB-458 1 650621-4 SWITCH PS10 1 687681-3 STRAIN RELIEF 1 266326-2 TAPPING SCREW 4X18 1 682502-4 CORD GUARD 8-85 1 664064-4 POWER SUPPLY CORD AWG#18-2-2.5 1 266326-2 TAPPING SCREW 4X18 1 450794-1 REAR COVER 1 450797-5 SWITCH LEVER 1 233121-5 COMPRESSION SPRING 4 1 141325-4 MOTOR HOUSING COMPLETE 1 890412-3 CAUTION LABEL 1 419566-3 SWITCH KNOB 1 213032-0 O RING 4 1 256510-7 SHOULDER PIN 4 1 141327-0 GEAR HOUSING COMPLETE 1 263002...

Parts Breakdown
Page 2
... 318845-5 BLADE COVER 1 79 424479-5 RUBBER SPIKE 2 80 213023-1 O RING 4 1 A01 123148-2 ANGLE GUIDE ASSEMBLY 1 A01 COMPO-PARTS 0 A02 123150-5 DUST BAG ASSEMBLY 1 A02 410602-8 FASTENER 1 A03 415579-2 SET PLATE 4 1 A04 A-95118 CUTTER 100MMX6T 1 A05 782401-1 LOCK NUT WRENCH 20 1 A06 821509-7 PLASTIC CARRYING CASE 1 A06 163455-1 LATCH 2 45 326120-5 SPINDLE 1 46 213561-3 O RING 42 1 47 318811-2 BEARING BOX 1 48 911136-9 PAN HEAD SCREW M4X20 4 49...
... 318845-5 BLADE COVER 1 79 424479-5 RUBBER SPIKE 2 80 213023-1 O RING 4 1 A01 123148-2 ANGLE GUIDE ASSEMBLY 1 A01 COMPO-PARTS 0 A02 123150-5 DUST BAG ASSEMBLY 1 A02 410602-8 FASTENER 1 A03 415579-2 SET PLATE 4 1 A04 A-95118 CUTTER 100MMX6T 1 A05 782401-1 LOCK NUT WRENCH 20 1 A06 821509-7 PLASTIC CARRYING CASE 1 A06 163455-1 LATCH 2 45 326120-5 SPINDLE 1 46 213561-3 O RING 42 1 47 318811-2 BEARING BOX 1 48 911136-9 PAN HEAD SCREW M4X20 4 49...
Flyer (English)
Page 1
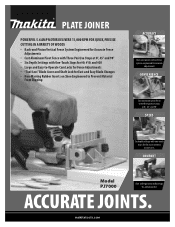
... Shaft Lock for Fast and Easy Blade Changes • Non-Marring Rubber Inserts on Shoe Engineered to Prevent Material From Slipping ACCURACY Rack-and-pinion vertical fence system engineered for accurate adjustments CONVENIENCE Cast aluminum pivot fence with three positive stops at 0°, 45° and 90° SPEED Six depth settings with one-touch stops for the most common biscuit sizes COMFORT Model PJ7000...
... Shaft Lock for Fast and Easy Blade Changes • Non-Marring Rubber Inserts on Shoe Engineered to Prevent Material From Slipping ACCURACY Rack-and-pinion vertical fence system engineered for accurate adjustments CONVENIENCE Cast aluminum pivot fence with three positive stops at 0°, 45° and 90° SPEED Six depth settings with one-touch stops for the most common biscuit sizes COMFORT Model PJ7000...
Flyer (English)
Page 2
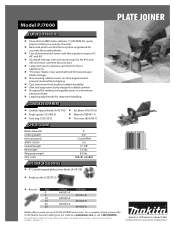
... biscuits sizes n Large and easy-to-operate cam locks for fence adjustments n "Tool-less" blade cover and shaft lock for improved handling STANDARD EQUIPMENT n Carbide-tipped blade (A-95118) n Set plate (415579-2) n Angle guide (123148-2) n Wrench (782401-1) n Dust bag (123150-5) n Tool case (821509-7) SPECIFICATIONS Blade diameter Cutting depth No load speed AMPS (120V) Overall length Net weight Shipping weight UPC code 4" 3/4" 11,000 RPM 5.6 11-7/8" 5.5 lbs. 8.0 lbs. 088381-622868 OPTIONAL ACCESSORIES n 4" Carbide-tipped plate joiner blade (A-95118) n Angle...
... biscuits sizes n Large and easy-to-operate cam locks for fence adjustments n "Tool-less" blade cover and shaft lock for improved handling STANDARD EQUIPMENT n Carbide-tipped blade (A-95118) n Set plate (415579-2) n Angle guide (123148-2) n Wrench (782401-1) n Dust bag (123150-5) n Tool case (821509-7) SPECIFICATIONS Blade diameter Cutting depth No load speed AMPS (120V) Overall length Net weight Shipping weight UPC code 4" 3/4" 11,000 RPM 5.6 11-7/8" 5.5 lbs. 8.0 lbs. 088381-622868 OPTIONAL ACCESSORIES n 4" Carbide-tipped plate joiner blade (A-95118) n Angle...


