
User Guide 1
Page 1
LabelManager 120P Basic label maker with easy-to-use smart keys LM120P_Cover_US.indd 1 User Guide www.dymo.com 8/22/2007 10:18:32 AM
LabelManager 120P Basic label maker with easy-to-use smart keys LM120P_Cover_US.indd 1 User Guide www.dymo.com 8/22/2007 10:18:32 AM
User Guide 1
Page 2
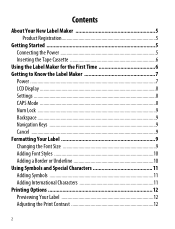
... New Label Maker 5 Product Registration 5 Getting Started 5 Connecting the Power 5 Inserting the Tape Cassette 6 Using the Label Maker for the First Time 6 Getting to Know the Label Maker 7 Power ...7 LCD Display 8 Settings ...8 CAPS Mode 8 Num Lock 9 Backspace 9 Navigation Keys 9 Cancel ...9 Formatting Your Label 9 Changing the Font Size 9 Adding Font Styles 10 Adding a Border or Underline 10 Using Symbols and Special Characters 11 Adding Symbols 11 Adding International Characters 11 Printing Options 12 Previewing Your Label 12 Adjusting the Print...
... New Label Maker 5 Product Registration 5 Getting Started 5 Connecting the Power 5 Inserting the Tape Cassette 6 Using the Label Maker for the First Time 6 Getting to Know the Label Maker 7 Power ...7 LCD Display 8 Settings ...8 CAPS Mode 8 Num Lock 9 Backspace 9 Navigation Keys 9 Cancel ...9 Formatting Your Label 9 Changing the Font Size 9 Adding Font Styles 10 Adding a Border or Underline 10 Using Symbols and Special Characters 11 Adding Symbols 11 Adding International Characters 11 Printing Options 12 Previewing Your Label 12 Adjusting the Print...

User Guide 1
Page 3
Caring for Your Label Maker 13 Troubleshooting 14 Documentation Feedback 15 Environmental Information 16 3
Caring for Your Label Maker 13 Troubleshooting 14 Documentation Feedback 15 Environmental Information 16 3
User Guide 1
Page 4
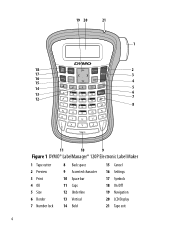
19 20 21 1 18 On Off Symbols Preview 2 17 Print 3 16 Cancel OK 15 4 14 5 13 12 6 7 8 C A c a p s c e n t Space 11 10 9 Figure 1 DYMO® LabelManager® 120P Electronic Label Maker 1 Tape cutter 2 Preview 3 Print 4 OK 5 Size 6 Border 7 Number lock 8 Back space 9 Accented character 10 Space bar 11 Caps 12 Underline 13 Vertical 14 Bold 15 Cancel 16 Settings 17 Symbols 18 On/Off 19 Navigation 20 LCD Display 21 Tape exit 4
19 20 21 1 18 On Off Symbols Preview 2 17 Print 3 16 Cancel OK 15 4 14 5 13 12 6 7 8 C A c a p s c e n t Space 11 10 9 Figure 1 DYMO® LabelManager® 120P Electronic Label Maker 1 Tape cutter 2 Preview 3 Print 4 OK 5 Size 6 Border 7 Number lock 8 Back space 9 Accented character 10 Space bar 11 Caps 12 Underline 13 Vertical 14 Bold 15 Cancel 16 Settings 17 Symbols 18 On/Off 19 Navigation 20 LCD Display 21 Tape exit 4
User Guide 1
Page 5
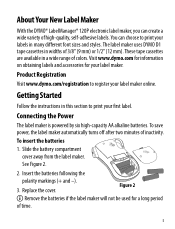
... New Label Maker With the DYMO® LabelManager® 120P electronic label maker, you can choose to print your labels in many different font sizes and styles. To insert the batteries 1. Insert the batteries following the polarity markings (+ and -). 3. The label maker uses DYMO D1 tape cassettes in widths of high-quality, self-adhesive labels. Product Registration Visit www.dymo.com/registration to print your label maker online. Getting Started Follow the instructions in a wide range of colors. Replace the cover. You can create...
... New Label Maker With the DYMO® LabelManager® 120P electronic label maker, you can choose to print your labels in many different font sizes and styles. To insert the batteries 1. Insert the batteries following the polarity markings (+ and -). 3. The label maker uses DYMO D1 tape cassettes in widths of high-quality, self-adhesive labels. Product Registration Visit www.dymo.com/registration to print your label maker online. Getting Started Follow the instructions in a wide range of colors. Replace the cover. You can create...
User Guide 1
Page 6
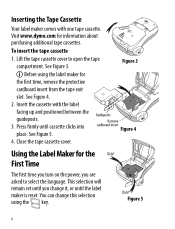
Visit www.dymo.com for the Click! See Figure 3. See Figure 4. 2. Using the Label Maker for information about purchasing additional tape cassettes. Figure 3 Ç Before using the key. See Figure 5. You can change it, or until the label maker is reset. Figure 5 6 First Time The first time you turn on the power, you change this selection using the label maker for the first time, remove the protective cardboard insert from the tape exit...
Visit www.dymo.com for the Click! See Figure 3. See Figure 4. 2. Using the Label Maker for information about purchasing additional tape cassettes. Figure 3 Ç Before using the key. See Figure 5. You can change it, or until the label maker is reset. Figure 5 6 First Time The first time you turn on the power, you change this selection using the label maker for the first time, remove the protective cardboard insert from the tape exit...
User Guide 1
Page 7
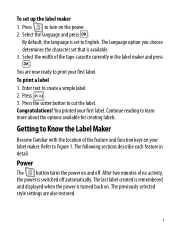
By default, the language is turned back on and off automatically. You printed your label maker. The previously selected style settings are now ready to print your first label. Press On Off to turn on your first label. Enter text to cut the label. To set to English. You are also restored. 7 Press the cutter button to create a simple label. 2. Continue reading to Figure 1. Select the language and press }. The language option you choose determines...
By default, the language is turned back on and off automatically. You printed your label maker. The previously selected style settings are now ready to print your first label. Press On Off to turn on your first label. Enter text to cut the label. To set to English. You are also restored. 7 Press the cutter button to create a simple label. 2. Continue reading to Figure 1. Select the language and press }. The language option you choose determines...
User Guide 1
Page 8
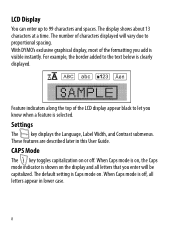
... number of the formatting you know when a feature is shown on . Settings The key displays the Language, Label Width, and Contrast submenus. For example, the border added to let you add is Caps mode on the display and all letters appear in this User Guide. When Caps mode is on, the Caps mode indicator is selected. When Caps mode is clearly displayed. The display shows about 13 characters...
... number of the formatting you know when a feature is shown on . Settings The key displays the Language, Label Width, and Contrast submenus. For example, the border added to let you add is Caps mode on the display and all letters appear in this User Guide. When Caps mode is on, the Caps mode indicator is selected. When Caps mode is clearly displayed. The display shows about 13 characters...

User Guide 1
Page 9
... numbers 0 through menu selections using the left of the alphabetic keys. The font size applies to the other. 9 You can review and edit your labels. When Num Lock mode is turned on some of the cursor. Cancel The Cancel key allows you press the corresponding letter keys. Num Lock is shown on a label. Changing the Font Size Two font sizes are available for your labels: Normal and Large. The font size...
... numbers 0 through menu selections using the left of the alphabetic keys. The font size applies to the other. 9 You can review and edit your labels. When Num Lock mode is turned on some of the cursor. Cancel The Cancel key allows you press the corresponding letter keys. Num Lock is shown on a label. Changing the Font Size Two font sizes are available for your labels: Normal and Large. The font size...
User Guide 1
Page 10
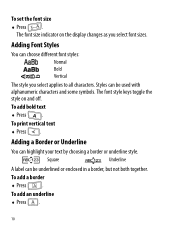
To set the font size ♦ Press . Square Underline A label can choose different font styles: Normal Bold Vertical The style you select font sizes. Adding Font Styles You can be used with alphanumeric characters and some symbols. To add bold text ♦ Press . Adding a Border or Underline You can be underlined or enclosed in a border, but not both together. To print vertical text ♦ Press . To add...
To set the font size ♦ Press . Square Underline A label can choose different font styles: Normal Bold Vertical The style you select font sizes. Adding Font Styles You can be used with alphanumeric characters and some symbols. To add bold text ♦ Press . Adding a Border or Underline You can be underlined or enclosed in a border, but not both together. To print vertical text ♦ Press . To add...
User Guide 1
Page 11
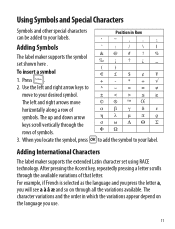
... The label maker supports the symbol set using RACE technology. The up and down arrow keys scroll vertically through the available variations of that letter. Use the left and right arrows move to your labels. The left and right arrow keys to move horizontally along a row of symbols. 3. For example, if French is selected as the language and you press the letter a, you use. 11 To insert...
... The label maker supports the symbol set using RACE technology. The up and down arrow keys scroll vertically through the available variations of that letter. Use the left and right arrows move to your labels. The left and right arrow keys to move horizontally along a row of symbols. 3. For example, if French is selected as the language and you press the letter a, you use. 11 To insert...
User Guide 1
Page 12
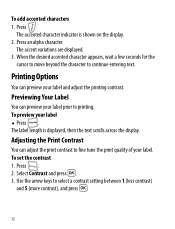
... The label length is shown on the display. 2. Press . 2. c c ne t The accented character indicator is displayed, then the text scrolls across the display. Select Contrast and press }. 3. Press an alpha character. Printing Options You can preview your label and adjust the printing contrast. To preview your label. To add accented characters A 1. The accent variations are displayed. 3. Adjusting the Print Contrast You can adjust the print contrast to printing. To set the contrast...
... The label length is shown on the display. 2. Press . 2. c c ne t The accented character indicator is displayed, then the text scrolls across the display. Select Contrast and press }. 3. Press an alpha character. Printing Options You can preview your label and adjust the printing contrast. To preview your label. To add accented characters A 1. The accent variations are displayed. 3. Adjusting the Print Contrast You can adjust the print contrast to printing. To set the contrast...

User Guide 1
Page 13
...; The cutter blade is designed to keep it working properly. Caring for Your Label Maker Your label maker is extremely sharp. See Figure 6. 13 Clean your label maker from inside the label compartment cover. 3. Remove the cleaning tool from time to time to give you replace the tape cassette. To clean the print head Figure 6 1. Press and Print head hold the cutter button to clean both sides of the tool across the print head. See Figure 6. 3. Use...
...; The cutter blade is designed to keep it working properly. Caring for Your Label Maker Your label maker is extremely sharp. See Figure 6. 13 Clean your label maker from inside the label compartment cover. 3. Remove the cleaning tool from time to time to give you replace the tape cassette. To clean the print head Figure 6 1. Press and Print head hold the cutter button to clean both sides of the tool across the print head. See Figure 6. 3. Use...
User Guide 1
Page 14
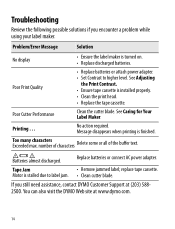
... when printing is turned on. • Replace discharged batteries. replace tape cassette. No action required. Troubleshooting Review the following possible solutions if you still need assistance, contact DYMO Customer Support at www.dymo.com. 14 Problem/Error Message Solution No display • Ensure the label maker is finished. Poor Cutter Performance Clean the cutter blade. If you encounter a problem while using your label maker. See Adjusting the Print Contrast. • Ensure tape cassette is stalled due to higher level. number of characters...
... when printing is turned on. • Replace discharged batteries. replace tape cassette. No action required. Troubleshooting Review the following possible solutions if you still need assistance, contact DYMO Customer Support at www.dymo.com. 14 Problem/Error Message Solution No display • Ensure the label maker is finished. Poor Cutter Performance Clean the cutter blade. If you encounter a problem while using your label maker. See Adjusting the Print Contrast. • Ensure tape cassette is stalled due to higher level. number of characters...
User Guide 1
Page 15
...dymo.com Please keep in the documentation. Send email messages to see covered in mind that this email address is needed, and so on We also welcome your suggestions about our user guides. Send us your feedback. We welcome your comments or suggestions about additional topics you have a technical question, please contact Customer Support.... 15 Please include the following information with your feedback: • Product name, model number, and User Guide page number • Brief description of instructions that are constantly working to produce the ...
...dymo.com Please keep in the documentation. Send email messages to see covered in mind that this email address is needed, and so on We also welcome your suggestions about our user guides. Send us your feedback. We welcome your comments or suggestions about additional topics you have a technical question, please contact Customer Support.... 15 Please include the following information with your feedback: • Product name, model number, and User Guide page number • Brief description of instructions that are constantly working to produce the ...

User Guide 1
Page 16
...health and the environment. Environmental Information The equipment that are hazardous to conform with the EMC directive and the low voltage directive and is CE marked in accordance with the following international standards: US FCC Class B Compatibility Safety - The crossed-bin symbol marked on the ... need more information on the environmental performance of natural resources for more information on your device indicates you should use these systems. If you to use of our products. In order to avoid the dissemination of those substances in an environmentally sound way. EN ...
...health and the environment. Environmental Information The equipment that are hazardous to conform with the EMC directive and the low voltage directive and is CE marked in accordance with the following international standards: US FCC Class B Compatibility Safety - The crossed-bin symbol marked on the ... need more information on the environmental performance of natural resources for more information on your device indicates you should use these systems. If you to use of our products. In order to avoid the dissemination of those substances in an environmentally sound way. EN ...

User Guide 1
Page 18
26 M220P-UK_WEU.indd 26 931487 www.sanford.com Produced by: DYMO Stamford CT 06902 800-426-7827: www.dymo.com ©2007 A Newell Rubbermaid Company 10-07-2007 15:12:24
26 M220P-UK_WEU.indd 26 931487 www.sanford.com Produced by: DYMO Stamford CT 06902 800-426-7827: www.dymo.com ©2007 A Newell Rubbermaid Company 10-07-2007 15:12:24


