User Guide 1
Page 2
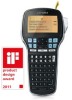
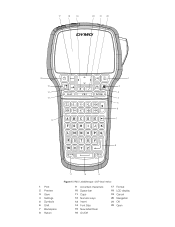
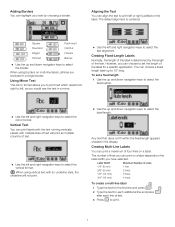
17 18 19 20 21 22 16 15 14 13 12 Insert . , - -+ Shift % 1 2 3 4 5 6 7 8 1 Print 2 Preview 3 Save 4 Settings 5 Symbols 6 Shift 7 Backspace 8 Return 11 10 9 Figure 1DYMO LabelManager 420P label maker 9 Accented characters 10 Space bar 11 Caps 12 Numeric keys 13 Insert 14 Font Size 15 New label/Clear 16 On/Off 17 Format 18 LCD display 19 Cancel 20 Navigation 21 OK 22 Open
17 18 19 20 21 22 16 15 14 13 12 Insert . , - -+ Shift % 1 2 3 4 5 6 7 8 1 Print 2 Preview 3 Save 4 Settings 5 Symbols 6 Shift 7 Backspace 8 Return 11 10 9 Figure 1DYMO LabelManager 420P label maker 9 Accented characters 10 Space bar 11 Caps 12 Numeric keys 13 Insert 14 Font Size 15 New label/Clear 16 On/Off 17 Format 18 LCD display 19 Cancel 20 Navigation 21 OK 22 Open

User Guide 1
Page 3
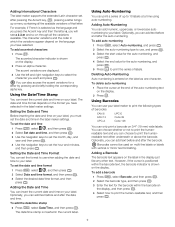
... Battery 4 Inserting the Label Cassette 4 Using the Label Maker for the First Time 4 Getting to Know the Label Maker 5 Power 5 LCD Display 5 Format 5 Font Size 5 Insert 5 Settings 5 CAPS Mode 5 Shift 5 Backspace 5 New Label/Clear 5 Navigation Keys 5 Cancel 5 Preview 5 Formatting Your Label 6 Font Type 6 Font Size 6 Font Styles 6 Adding Borders 7 Using Mirror Text 7 Vertical Text 7 Aligning the Text 7 Creating Fixed-Length Labels 7 Creating Multi-Line Labels 7 Using Clip Art, Symbols, and Special Characters 8 Adding Clip Art 8 Adding Symbols 8 Adding International...
... Battery 4 Inserting the Label Cassette 4 Using the Label Maker for the First Time 4 Getting to Know the Label Maker 5 Power 5 LCD Display 5 Format 5 Font Size 5 Insert 5 Settings 5 CAPS Mode 5 Shift 5 Backspace 5 New Label/Clear 5 Navigation Keys 5 Cancel 5 Preview 5 Formatting Your Label 6 Font Type 6 Font Size 6 Font Styles 6 Adding Borders 7 Using Mirror Text 7 Vertical Text 7 Aligning the Text 7 Creating Fixed-Length Labels 7 Creating Multi-Line Labels 7 Using Clip Art, Symbols, and Special Characters 8 Adding Clip Art 8 Adding Symbols 8 Adding International...
User Guide 1
Page 4
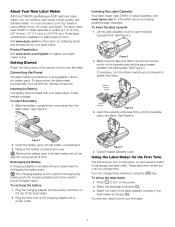
... the label maker. 2 Plug the other end of high-quality, selfadhesive labels. Connecting the Power The label maker is only used for recharging the battery pack. ! Visit www.dymo.com for your label maker. See Figure 3. Ribbon rewind spool Label guides Figure 4 3 Insert the cassette and press firmly until you can create a wide variety of the charging adapter into the battery compartment. 3 Replace the battery compartment cover. ! Inserting the Label Cassette Your label maker uses DYMO D1 label cassettes. Figure 3 2 Make sure the tape and ribbon...
... the label maker. 2 Plug the other end of high-quality, selfadhesive labels. Connecting the Power The label maker is only used for recharging the battery pack. ! Visit www.dymo.com for your label maker. See Figure 3. Ribbon rewind spool Label guides Figure 4 3 Insert the cassette and press firmly until you can create a wide variety of the charging adapter into the battery compartment. 3 Replace the battery compartment cover. ! Inserting the Label Cassette Your label maker uses DYMO D1 label cassettes. Figure 3 2 Make sure the tape and ribbon...
User Guide 1
Page 5
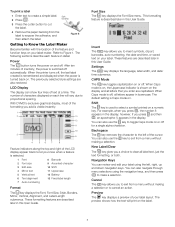
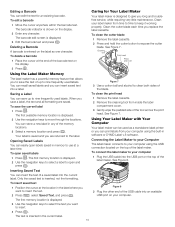
... power is selected. 1 Font 8 Barcode 2 Font size 9 Accented character 3 Edit area 10 Shift 4 Mirror text 11 Uppercase 5 Vertical text 12 Battery 6 Text alignment 13 Fixed label length 7 Auto-numbering Format The key displays the Font, Font Size, Style, Borders, Mirror, Vertical, Alignment, and Label Length submenus. however, if you to exit from the label to make a selection. Figure 6 Getting to the left , right, up and down navigation keys. The previously selected style settings are described later in the display. When the printer turns...
... power is selected. 1 Font 8 Barcode 2 Font size 9 Accented character 3 Edit area 10 Shift 4 Mirror text 11 Uppercase 5 Vertical text 12 Battery 6 Text alignment 13 Fixed label length 7 Auto-numbering Format The key displays the Font, Font Size, Style, Borders, Mirror, Vertical, Alignment, and Label Length submenus. however, if you to exit from the label to make a selection. Figure 6 Getting to the left , right, up and down navigation keys. The previously selected style settings are described later in the display. When the printer turns...

User Guide 1
Page 6
... enhance the appearance of your labels. 2 3 1 4 5 8 6 7 1 Font type 2 Font size 3 Font style 4 Borders 5 Mirror 6 Vertical text 7 Alignment 8 Label length To adjust the formatting 1 Press . 2 Use the navigation keys to select the formatting option to change and press . 3 Select the option to apply to your labels: ♦ Use the up and down navigation keys to select the font type. Formatting Your Label You can choose from 12 different font styles: Normal Bold Italic...
... enhance the appearance of your labels. 2 3 1 4 5 8 6 7 1 Font type 2 Font size 3 Font style 4 Borders 5 Mirror 6 Vertical text 7 Alignment 8 Label length To adjust the formatting 1 Press . 2 Use the navigation keys to select the formatting option to change and press . 3 Select the option to apply to your labels: ♦ Use the up and down navigation keys to select the font type. Formatting Your Label You can choose from 12 different font styles: Normal Bold Italic...
User Guide 1
Page 7
... select the text alignment. You can choose to set a fixed length 1 Use the up to print. 7 To set the length of the label for each additional line and press after each line of lines you can highlight your text by the length of Lines 1 line 2 lines 3 lines 4 lines To create a multi-line label 1 Type the text for the first line and press . 2 Type the text for a specific application. When using borders on multi-line labels, all lines are enclosed in the display. The number of text...
... select the text alignment. You can choose to set a fixed length 1 Use the up to print. 7 To set the length of the label for each additional line and press after each line of lines you can highlight your text by the length of Lines 1 line 2 lines 3 lines 4 lines To create a multi-line label 1 Type the text for the first line and press . 2 Type the text for a specific application. When using borders on multi-line labels, all lines are enclosed in the display. The number of text...

User Guide 1
Page 8
..., punctuation, and other special characters can also quickly add a symbol using the Symbol key, . 8 to add the Adding Symbols The label maker supports the extended symbol set shown below . ↔L © ®™ ☺ ! To insert clip art 1 Press Insert , select Clip art, and then press . 2 Use the up and down or left and right navigation keys to...
..., punctuation, and other special characters can also quickly add a symbol using the Symbol key, . 8 to add the Adding Symbols The label maker supports the extended symbol set shown below . ↔L © ®™ ☺ ! To insert clip art 1 Press Insert , select Clip art, and then press . 2 Use the up and down or left and right navigation keys to...
User Guide 1
Page 9
... a barcode 1 Press Insert , select Barcode, and then press . 2 Select the barcode type, and then press . 3 Enter the text for the barcode within the barcode text, the barcode indicator is shown on the display. Adding International Characters The label maker supports the extended Latin character set the date and time in the label maker settings. After pressing the Accent key, , pressing a letter brings up to print the humanreadable text and you have selected in the label maker settings. The accented character indicator...
... a barcode 1 Press Insert , select Barcode, and then press . 2 Select the barcode type, and then press . 3 Enter the text for the barcode within the barcode text, the barcode indicator is shown on the display. Adding International Characters The label maker supports the extended Latin character set the date and time in the label maker settings. After pressing the Accent key, , pressing a letter brings up to print the humanreadable text and you have selected in the label maker settings. The accented character indicator...
User Guide 1
Page 10
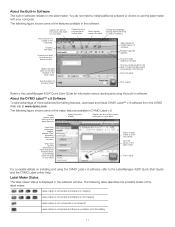
... Insert , select Saved Text, and press . To insert saved text 1 Position the cursor at the location in the label where you are saved. Cleaning tool Print head Press and hold the cutter button to use at the end of the USB cable into an available USB port on the display. 2 Press . Using Your Label Maker with Your Computer Your label maker can print labels from your computer using the USB connection located on the label as a standalone label printer...
... Insert , select Saved Text, and press . To insert saved text 1 Position the cursor at the location in the label where you are saved. Cleaning tool Print head Press and hold the cutter button to use at the end of the USB cable into an available USB port on the display. 2 Press . Using Your Label Maker with Your Computer Your label maker can print labels from your computer using the USB connection located on the label as a standalone label printer...
User Guide 1
Page 11
... Label maker is not connected or is turned off Label maker is connected and there is displayed in the Address Book; You do not need to install additional software or drivers to the LabelManager 420P Quick Start Guide and the DYMO Label online Help. Create a new label. Refer to the LabelManager 420P Quick Start Guide for the label or make the label resize automatically to print your favorite addresses or other data in the software window. Insert text, addresses, images, shapes, lines, barcodes, dates, and counters. Select a label maker to fit the text...
... Label maker is not connected or is turned off Label maker is connected and there is displayed in the Address Book; You do not need to install additional software or drivers to the LabelManager 420P Quick Start Guide and the DYMO Label online Help. Create a new label. Refer to the LabelManager 420P Quick Start Guide for the label or make the label resize automatically to print your favorite addresses or other data in the software window. Insert text, addresses, images, shapes, lines, barcodes, dates, and counters. Select a label maker to fit the text...
User Guide 1
Page 12
... working to : documentation@dymo.com Please keep in mind that this product, please contact your feedback. Too many characters Exceeded maximum number of characters in the documentation. Battery too low! Battery Charging Tape Jam Motor is stalled due to fit on the label width. • Insert a wider label cassette. • Replace the label cartridge. • Change the label width. Clean the cutter blade. Delete some or all of the buffer text. • Delete lines to label jam. Barcode...
... working to : documentation@dymo.com Please keep in mind that this product, please contact your feedback. Too many characters Exceeded maximum number of characters in the documentation. Battery too low! Battery Charging Tape Jam Motor is stalled due to fit on the label width. • Insert a wider label cassette. • Replace the label cartridge. • Change the label width. Clean the cutter blade. Delete some or all of the buffer text. • Delete lines to label jam. Barcode...


