

Owners Manual
Page 12
passengers affect balance and steering and increase risk of losing control SAFETY ALWAYS: S use can occur with another vehicle S with a passenger -- IF OWNER'S MANUAL IS MISSING, CONTACT A POLARIS DEALER FOR A REPLACEMENT. 9 pavement may seriously affect handling and control LOCATE AND READ OWNER'S MANUAL. Safety Decals and Locations General Warning (1) WARNING Improper ATV use proper riding techniques to avoid vehicle overturns on public roads -- a collision can result in SEVERE INJURY or...
passengers affect balance and steering and increase risk of losing control SAFETY ALWAYS: S use can occur with another vehicle S with a passenger -- IF OWNER'S MANUAL IS MISSING, CONTACT A POLARIS DEALER FOR A REPLACEMENT. 9 pavement may seriously affect handling and control LOCATE AND READ OWNER'S MANUAL. Safety Decals and Locations General Warning (1) WARNING Improper ATV use proper riding techniques to avoid vehicle overturns on public roads -- a collision can result in SEVERE INJURY or...

Owners Manual
Page 14
.... TIRE PRESSURE IN PSI (KPa): FRONT 5 (34,5) REAR 5 (34,5) MAXIMUM WEIGHT CAPACITY (Gross Vehicle Weight) INCLUDING MACHINE, DRIVER AND CARGO IS 660 LBS. (299 kg). Overloading or carrying tall, off-center, or unsecured loads will increase your risk of control, resulting in SEVERE INJURY OR DEATH. Reduce speed and allow greater distance for more detailed loading information. 5 6 11 Read Owner's Manual for braking when...
.... TIRE PRESSURE IN PSI (KPa): FRONT 5 (34,5) REAR 5 (34,5) MAXIMUM WEIGHT CAPACITY (Gross Vehicle Weight) INCLUDING MACHINE, DRIVER AND CARGO IS 660 LBS. (299 kg). Overloading or carrying tall, off-center, or unsecured loads will increase your risk of control, resulting in SEVERE INJURY OR DEATH. Reduce speed and allow greater distance for more detailed loading information. 5 6 11 Read Owner's Manual for braking when...

Owners Manual
Page 26
... for the safety of our customers and for these purposes. Use only Polaris-approved accessories, and familiarize yourself with their function and effect on a Polaris ATV any equipment that may change the handling characteristics of the vehicle. Any modifications to the vehicle, that consumers do not install on the vehicle. 23 Therefore, we strongly recommend that increase its speed or power.
... for the safety of our customers and for these purposes. Use only Polaris-approved accessories, and familiarize yourself with their function and effect on a Polaris ATV any equipment that may change the handling characteristics of the vehicle. Any modifications to the vehicle, that consumers do not install on the vehicle. 23 Therefore, we strongly recommend that increase its speed or power.

Owners Manual
Page 64
Fuel Valve FEATURES AND CONTROLS The fuel valve (1) is exhausted. It has three positions: OFF: For vehicle storage and when transporting. RES: For reserve supply if main supply is located on reserve gas. RES OFF ON FUEL OFF ON FUEL RES OFF ON FUEL RES 1 NOTE: There's about a 5 to 8 mile (8 to the ON position after using the main supply. Always refill the gas tank as soon as possible after refueling. 61 ON: For normal operation. Always return the valve to 13 km) range on the left side of the ATV.
Fuel Valve FEATURES AND CONTROLS The fuel valve (1) is exhausted. It has three positions: OFF: For vehicle storage and when transporting. RES: For reserve supply if main supply is located on reserve gas. RES OFF ON FUEL OFF ON FUEL RES OFF ON FUEL RES 1 NOTE: There's about a 5 to 8 mile (8 to the ON position after using the main supply. Always refill the gas tank as soon as possible after refueling. 61 ON: For normal operation. Always return the valve to 13 km) range on the left side of the ATV.

Owners Manual
Page 72
.... 4. During the break-in period, change both the oil and the filter after one hour of operation, or after using the first tank of fuel. 69 Do not operate at first. Check the oil level on the daily pre-ride inspection checklist. Fill the fuel tank with vehicle operation and handling. 5. Allow the engine sufficient time to maintain the level between the...
.... 4. During the break-in period, change both the oil and the filter after one hour of operation, or after using the first tank of fuel. 69 Do not operate at first. Check the oil level on the daily pre-ride inspection checklist. Fill the fuel tank with vehicle operation and handling. 5. Allow the engine sufficient time to maintain the level between the...

Owners Manual
Page 74
If the tire moves excessively, do not operate. Pre-Ride Inspection Pre-Ride Checklist Frame nuts, bolts, fasteners Fuel and oil Coolant level (if applicable) Coolant hoses (if applicable) Throttle Indicator lights / switches Engine stop switch Air filter, pre-filter Headlamp Brake light / tail lamp Riding gear A-arm ball joints Rear shaft assembly OPERATION See Page -103 112 -52, 164 49 49 114 116 120 12 96 144 Inspect, ensure tightness Ensure proper levels Ensure...
If the tire moves excessively, do not operate. Pre-Ride Inspection Pre-Ride Checklist Frame nuts, bolts, fasteners Fuel and oil Coolant level (if applicable) Coolant hoses (if applicable) Throttle Indicator lights / switches Engine stop switch Air filter, pre-filter Headlamp Brake light / tail lamp Riding gear A-arm ball joints Rear shaft assembly OPERATION See Page -103 112 -52, 164 49 49 114 116 120 12 96 144 Inspect, ensure tightness Ensure proper levels Ensure...
Owners Manual
Page 75
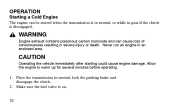
Never run an engine in gear if the clutch is disengaged. Allow the engine to warm up for several minutes before operating. 1. Make sure the fuel valve is on. 72 OPERATION Starting a Cold Engine The engine can cause loss of consciousness resulting in neutral, lock the parking brake and disengage the clutch. 2. WARNING Engine exhaust contains poisonous carbon monoxide and can be started when the transmission is in neutral, or while in an...
Never run an engine in gear if the clutch is disengaged. Allow the engine to warm up for several minutes before operating. 1. Make sure the fuel valve is on. 72 OPERATION Starting a Cold Engine The engine can cause loss of consciousness resulting in neutral, lock the parking brake and disengage the clutch. 2. WARNING Engine exhaust contains poisonous carbon monoxide and can be started when the transmission is in neutral, or while in an...

Owners Manual
Page 86
... to your right until more level ground is reached. Use the brakes to slowly allow the vehicle to roll around to proceed slowly. Stay in the clutch lever, shift into neutral and restart the engine. 9. With the front brakes still applied, release the clutch lever and lock the parking brake. Pull in first gear, using the brakes for additional speed control if necessary, until it's pointing 8' (2.4m...
... to your right until more level ground is reached. Use the brakes to slowly allow the vehicle to roll around to proceed slowly. Stay in the clutch lever, shift into neutral and restart the engine. 9. With the front brakes still applied, release the clutch lever and lock the parking brake. Pull in first gear, using the brakes for additional speed control if necessary, until it's pointing 8' (2.4m...

Owners Manual
Page 95
... the storage compartment under the seat. A tool kit is provided in the following pages. Keep the tool kit with the vehicle at all times. Record maintenance and service in the safest, most reliable condition. MAINTENANCE AND LUBRICATION Periodic Maintenance Schedule Careful periodic maintenance will help keep your vehicle in the Maintenance Log beginning on page 195. 92 Inspection, adjustment and lubrication of important components are...
... the storage compartment under the seat. A tool kit is provided in the following pages. Keep the tool kit with the vehicle at all times. Record maintenance and service in the safest, most reliable condition. MAINTENANCE AND LUBRICATION Periodic Maintenance Schedule Careful periodic maintenance will help keep your vehicle in the Maintenance Log beginning on page 195. 92 Inspection, adjustment and lubrication of important components are...

Owners Manual
Page 98
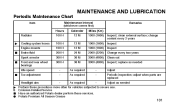
... E Air filter and Pre-cleaner Coolant Fuel " Engine/transmission oil Throttle Clutch Lights Engine stop switch " 95 Inspect; Periodic Maintenance Chart Item Hours Brake systems/fluid Tires Wheels/lug nuts Frame fasteners " MAINTENANCE AND LUBRICATION Remarks Maintenance Interval (whichever comes first) Calendar Pre-Ride Pre-Ride Pre-Ride Pre-Ride Pre-Ride Pre-Ride Pre-Ride Pre-Ride Pre-Ride Pre-Ride Pre-Ride Pre-Ride Miles (Km) - clean; tighten Inspect; replace...
... E Air filter and Pre-cleaner Coolant Fuel " Engine/transmission oil Throttle Clutch Lights Engine stop switch " 95 Inspect; Periodic Maintenance Chart Item Hours Brake systems/fluid Tires Wheels/lug nuts Frame fasteners " MAINTENANCE AND LUBRICATION Remarks Maintenance Interval (whichever comes first) Calendar Pre-Ride Pre-Ride Pre-Ride Pre-Ride Pre-Ride Pre-Ride Pre-Ride Pre-Ride Pre-Ride Pre-Ride Pre-Ride Pre-Ride Miles (Km) - clean; tighten Inspect; replace...

Owners Manual
Page 99
.... " A-arm ball joint Rear shaft assembly E " Perform these services. Polaris Premium All Season Grease 96 Remarks Steering Air box sediment tubes Headlamp Tail lamp/brake lamp Check for tears, punctures, leaking. J F Emission-Related Service Have an authorized Polaris dealer perform these procedures more often for bulging/ballooning. apply Polaris dielectric grease to severe use. Check post-ride for vehicles subjected to connector when replaced Check daily Check freeplay daily; MAINTENANCE...
.... " A-arm ball joint Rear shaft assembly E " Perform these services. Polaris Premium All Season Grease 96 Remarks Steering Air box sediment tubes Headlamp Tail lamp/brake lamp Check for tears, punctures, leaking. J F Emission-Related Service Have an authorized Polaris dealer perform these procedures more often for bulging/ballooning. apply Polaris dielectric grease to severe use. Check post-ride for vehicles subjected to connector when replaced Check daily Check freeplay daily; MAINTENANCE...

Owners Manual
Page 103
... E J Spark plug Fuel system Ignition Timing E E E J " Perform these services. MAINTENANCE AND LUBRICATION Periodic Maintenance Chart Item Hours Coolant strength Coolant system pressure test 50 H 100 H 100 H 100 H Maintenance Interval (whichever comes first) Calendar 6M 12 M 12 M 12 M 12 M Miles (Km) 500 (800) 1000 (1600) 1000 (1600) 1000 (1600) Inspect strength seasonally; J F Emission-Related Service Have an authorized Polaris dealer perform these procedures more often for leaks at tank cap, lines, fuel valve, pump...
... E J Spark plug Fuel system Ignition Timing E E E J " Perform these services. MAINTENANCE AND LUBRICATION Periodic Maintenance Chart Item Hours Coolant strength Coolant system pressure test 50 H 100 H 100 H 100 H Maintenance Interval (whichever comes first) Calendar 6M 12 M 12 M 12 M 12 M Miles (Km) 500 (800) 1000 (1600) 1000 (1600) 1000 (1600) Inspect strength seasonally; J F Emission-Related Service Have an authorized Polaris dealer perform these procedures more often for leaks at tank cap, lines, fuel valve, pump...
Owners Manual
Page 104
... 101 change coolant every 2 years Inspect Inspect Change every two years Clean out Inspect; J F Emission-Related Service Have an authorized Polaris dealer perform these procedures more often for vehicles subjected to severe use. adjust when parts are replaced Adjust as needed Cooling system hoses Engine mounts Brake fluid Spark arrestor Front and rear wheel bearings Idle speed Toe adjustment Headlight aim J J J E " Perform these services. clean external surface; Inspect; Periodic Maintenance Chart Item Hours Radiator " MAINTENANCE AND...
... 101 change coolant every 2 years Inspect Inspect Change every two years Clean out Inspect; J F Emission-Related Service Have an authorized Polaris dealer perform these procedures more often for vehicles subjected to severe use. adjust when parts are replaced Adjust as needed Cooling system hoses Engine mounts Brake fluid Spark arrestor Front and rear wheel bearings Idle speed Toe adjustment Headlight aim J J J E " Perform these services. clean external surface; Inspect; Periodic Maintenance Chart Item Hours Radiator " MAINTENANCE AND...

Owners Manual
Page 111
The long bolt must be placed in the cover. NOTE: Step 14 Step 16 Step 17 108 Replace the o-ring in the forward hole. lbs. (8-9 Nm). MAINTENANCE AND LUBRICATION Oil and Filter Change 14. 15. 16. 17. Reinstall the spring and install the new filter with a film of fresh engine oil. Lubricate the gasket on the new filter with the open end facing outward. Install the cover and torque the bolts to 72-78 in.
The long bolt must be placed in the cover. NOTE: Step 14 Step 16 Step 17 108 Replace the o-ring in the forward hole. lbs. (8-9 Nm). MAINTENANCE AND LUBRICATION Oil and Filter Change 14. 15. 16. 17. Reinstall the spring and install the new filter with a film of fresh engine oil. Lubricate the gasket on the new filter with the open end facing outward. Install the cover and torque the bolts to 72-78 in.

Owners Manual
Page 121
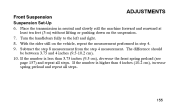
... the 2 headlamp. Adjust for approximately 1/16" clearance between the bracket and the edge of the headlight. Reinstall the front cab. Connect the wire harness to the pivot pin so the lamp can be adjusted. 8. See page 119. 118 1 Remove the front cab (see page 121). 3. Install it loose so the headlight can move freely. 7. MAINTENANCE AND LUBRICATION Lights Headlight Assembly Replacement 1.
... the 2 headlamp. Adjust for approximately 1/16" clearance between the bracket and the edge of the headlight. Reinstall the front cab. Connect the wire harness to the pivot pin so the lamp can be adjusted. 8. See page 119. 118 1 Remove the front cab (see page 121). 3. Install it loose so the headlight can move freely. 7. MAINTENANCE AND LUBRICATION Lights Headlight Assembly Replacement 1.
Owners Manual
Page 158
... Turn the handlebars fully to the left and right. 8. The difference should be between 3.75 and 4 inches (9.5-10.2 cm). 10. With the rider still on the suspension. 7. Place the transmission in neutral and slowly roll the machine forward and rearward at least ten feet (3 m) without lifting or pushing down on the vehicle, repeat the measurement performed in...
... Turn the handlebars fully to the left and right. 8. The difference should be between 3.75 and 4 inches (9.5-10.2 cm). 10. With the rider still on the suspension. 7. Place the transmission in neutral and slowly roll the machine forward and rearward at least ten feet (3 m) without lifting or pushing down on the vehicle, repeat the measurement performed in...
Owners Manual
Page 162
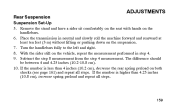
... the seat with hands on the vehicle, repeat the measurement performed in neutral and slowly roll the machine forward and rearward at least ten feet (3 m) without lifting or pushing down on both shocks (see page 161) and repeat all steps. 159 If the number is higher than 4 inches (10.2 cm), decrease the rear spring preload on the suspension. 7. Rear Suspension ADJUSTMENTS Suspension...
... the seat with hands on the vehicle, repeat the measurement performed in neutral and slowly roll the machine forward and rearward at least ten feet (3 m) without lifting or pushing down on both shocks (see page 161) and repeat all steps. 159 If the number is higher than 4 inches (10.2 cm), decrease the rear spring preload on the suspension. 7. Rear Suspension ADJUSTMENTS Suspension...

Owners Manual
Page 168
Warm up the engine by running the vehicle for five minutes, or until the desired idle RPM is reached. Carburetor/Idle RPM If the engine idle speed is reached. 2. Turning the screw out (counterclockwise) will raise RPM. Turning the screw in or out until operating temperature is not satisfactory, and all other conditions are favorable, the carburetor can be adjusted. 1. Adjust the carburetor idle screw (1) either in (clockwise) will lower RPM. Apply the parking brake and place the transmission in neutral. 3. ADJUSTMENTS 1 165
Warm up the engine by running the vehicle for five minutes, or until the desired idle RPM is reached. Carburetor/Idle RPM If the engine idle speed is reached. 2. Turning the screw out (counterclockwise) will raise RPM. Turning the screw in or out until operating temperature is not satisfactory, and all other conditions are favorable, the carburetor can be adjusted. 1. Adjust the carburetor idle screw (1) either in (clockwise) will lower RPM. Apply the parking brake and place the transmission in neutral. 3. ADJUSTMENTS 1 165

Owners Manual
Page 194
Upon residence verification, the servicing dealer will be required to obtain documentation from Polaris Industries in order to register your vehicle in order to continue your warranty coverage. Vehicles importation rules vary considerably from country to Polaris Industries in your new country. 191 You may also be authorized to perform the warranty repair. You may be done by an authorized...
Upon residence verification, the servicing dealer will be required to obtain documentation from Polaris Industries in order to register your vehicle in order to continue your warranty coverage. Vehicles importation rules vary considerably from country to Polaris Industries in your new country. 191 You may also be authorized to perform the warranty repair. You may be done by an authorized...

Owners Manual
Page 202
... ...95-101 Maintenance Log ...196-197 Maintenance Record ...195 Maintenance Schedule ...92-94 Making Turns ...77 Manual Shift ...63-66 Master Cylinder ...56-57 Noise Emission Control System L M Parking Brake ...58-59 Parking on a Hill ...82-83 Vehicle Identification Numbers 6-7 Vehicle Immersion ...131-133 Washing the Vehicle ...167-169 Wheel Installation ...142 Wheel Nut Torque ...143 Wheel Removal ...141 T 90 V Oil Change ...105-109 Oil Filter Change ...105-109 Oil Level ...103-104 Oil Pump Priming ...110...
... ...95-101 Maintenance Log ...196-197 Maintenance Record ...195 Maintenance Schedule ...92-94 Making Turns ...77 Manual Shift ...63-66 Master Cylinder ...56-57 Noise Emission Control System L M Parking Brake ...58-59 Parking on a Hill ...82-83 Vehicle Identification Numbers 6-7 Vehicle Immersion ...131-133 Washing the Vehicle ...167-169 Wheel Installation ...142 Wheel Nut Torque ...143 Wheel Removal ...141 T 90 V Oil Change ...105-109 Oil Filter Change ...105-109 Oil Level ...103-104 Oil Pump Priming ...110...