

Owners Manual
Page 10
...; Wear eye protection. READ OWNER'S MANUAL. Steering becomes difficult. FOLLOW ALL INSTRUCTIONS AND WARNINGS. NEVER operate this vehicle if you are under age 16 or without a valid driver's license. 7175101 Shift Caution CAUTION To avoid transmission damage, shift only when vehicle is stationary and at idle. 7172674 Discretionary Warning WARNING Improper vehicle use throttle and brakes gradually. To prevent flipover, avoid sharp turns. To prevent flipover on...
...; Wear eye protection. READ OWNER'S MANUAL. Steering becomes difficult. FOLLOW ALL INSTRUCTIONS AND WARNINGS. NEVER operate this vehicle if you are under age 16 or without a valid driver's license. 7175101 Shift Caution CAUTION To avoid transmission damage, shift only when vehicle is stationary and at idle. 7172674 Discretionary Warning WARNING Improper vehicle use throttle and brakes gradually. To prevent flipover, avoid sharp turns. To prevent flipover on...

Owners Manual
Page 16
... accessories, including (but not limited to the original equipment of the vehicle create a substantial safety hazard and increase the risk of the vehicle. Polaris RANGERs are concerned for which it is in excellent operating condition at all safety components before each ride. We strongly recommend that may occur at speeds higher than those that increase its speed or power. Failure of control...
... accessories, including (but not limited to the original equipment of the vehicle create a substantial safety hazard and increase the risk of the vehicle. Polaris RANGERs are concerned for which it is in excellent operating condition at all safety components before each ride. We strongly recommend that may occur at speeds higher than those that increase its speed or power. Failure of control...

Owners Manual
Page 27
Trailer towing equipment is equipped with this vehicle. FEATURES AND CONTROLS Component Locations Tailgate Latch Release Taillights Tailgate Taillights Air Box Receiver Hitch CV Boot/Rear Caliper Muffler (Spark Arrestor) Trailer Hitch Bracket This vehicle is not supplied with a receiver hitch bracket for a trailer hitch. To avoid injury and property damage, always heed the warnings and towing capacities outlined on pages 52-55. 24
Trailer towing equipment is equipped with this vehicle. FEATURES AND CONTROLS Component Locations Tailgate Latch Release Taillights Tailgate Taillights Air Box Receiver Hitch CV Boot/Rear Caliper Muffler (Spark Arrestor) Trailer Hitch Bracket This vehicle is not supplied with a receiver hitch bracket for a trailer hitch. To avoid injury and property damage, always heed the warnings and towing capacities outlined on pages 52-55. 24
Owners Manual
Page 29
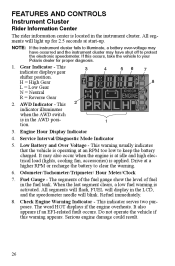
... AWD switch is applied. Service Interval/Diagnostic Mode Indicator 5. Drive at idle and high electrical load (lights, cooling fan, accessories) is in the LCD, and the speedometer needle will light up . This 6 3 4 5 7 indicator displays gear shifter position. 8 H = High Gear L = Low Gear N = Neutral R = Reverse Gear 2 2. NOTE: If the instrument cluster fails to illuminate, a battery over-voltage may have occurred and the instrument cluster may also occur when the engine is activated. If this warning...
... AWD switch is applied. Service Interval/Diagnostic Mode Indicator 5. Drive at idle and high electrical load (lights, cooling fan, accessories) is in the LCD, and the speedometer needle will light up . This 6 3 4 5 7 indicator displays gear shifter position. 8 H = High Gear L = Low Gear N = Neutral R = Reverse Gear 2 2. NOTE: If the instrument cluster fails to illuminate, a battery over-voltage may have occurred and the instrument cluster may also occur when the engine is activated. If this warning...

Owners Manual
Page 32
... purposes only. NOTE: The service interval is for 5 seconds each time the engine is flowing through the AWD coil (only on models with switchable AWD). Programmable service interval When the hours of the gauge. See page 30. AWD Diagnostic Screen The gauge indicates whether or not current is started. Instrument Cluster FEATURES AND CONTROLS Rider Information Center Diagnostic Mode Battery Voltage Screen View this feature is for all major repairs.
... purposes only. NOTE: The service interval is for 5 seconds each time the engine is flowing through the AWD coil (only on models with switchable AWD). Programmable service interval When the hours of the gauge. See page 30. AWD Diagnostic Screen The gauge indicates whether or not current is started. Instrument Cluster FEATURES AND CONTROLS Rider Information Center Diagnostic Mode Battery Voltage Screen View this feature is for all major repairs.

Owners Manual
Page 41
... position when released. Always remove the ignition key when the vehicle is off , except Acc, 12V. OFF ON START The engine is not in the OFF position. Electrical equipment can lead to unauthorized use . 38 WARNING Leaving the keys in the ignition can be removed from the switch when it is a three-position, key-operated switch. Electrical circuits are off . FEATURES AND CONTROLS Switches Light Switch Ignition Switch AWD/Differential Lock Switch Ignition Switch The ignition switch is in...
... position when released. Always remove the ignition key when the vehicle is off , except Acc, 12V. OFF ON START The engine is not in the OFF position. Electrical equipment can lead to unauthorized use . 38 WARNING Leaving the keys in the ignition can be removed from the switch when it is a three-position, key-operated switch. Electrical circuits are off . FEATURES AND CONTROLS Switches Light Switch Ignition Switch AWD/Differential Lock Switch Ignition Switch The ignition switch is in...

Owners Manual
Page 42
ON Switches FEATURES AND CONTROLS AWD/Differential Lock Switch OFF The AWD/Differential Switch has three positions: • All Wheel Drive (AWD) • Differential Lock (2WD) All Wheel Drive • Differential Unlock (1WD) Press the top of the switch to unlock the differential and allow the rear drive wheels to operate independently (1WD). Move the rocker switch to the center position to lock the differential and operate in the ON/ RUN position to 2WD Differential Lock engage All Wheel Drive (AWD). Use the light switch to...
ON Switches FEATURES AND CONTROLS AWD/Differential Lock Switch OFF The AWD/Differential Switch has three positions: • All Wheel Drive (AWD) • Differential Lock (2WD) All Wheel Drive • Differential Unlock (1WD) Press the top of the switch to unlock the differential and allow the rear drive wheels to operate independently (1WD). Move the rocker switch to the center position to lock the differential and operate in the ON/ RUN position to 2WD Differential Lock engage All Wheel Drive (AWD). Use the light switch to...

Owners Manual
Page 43
Fill the fuel tank with vehicle operation and handling. 4. Add the recommended oil as needed to maintain the oil level in 1. See page 88. Break in the clutches and belt by operating at slower speeds during the first three hours of use the first two tanks full of the clutches and drive belt will result in more efficient performance and longer life for extended periods during...
Fill the fuel tank with vehicle operation and handling. 4. Add the recommended oil as needed to maintain the oil level in 1. See page 88. Break in the clutches and belt by operating at slower speeds during the first three hours of use the first two tanks full of the clutches and drive belt will result in more efficient performance and longer life for extended periods during...

Owners Manual
Page 55
... Hauling Cargo Driving Safely WARNING Hauling cargo improperly can result in loss of control of the vehicle. Avoid terrain or situations that extend over rough or hilly terrain, reduce speed and cargo to the vehicle, include the weight of the operator, accessories, loads in the rack or box and the load on a level grass surface. Always attach the tow load to...
... Hauling Cargo Driving Safely WARNING Hauling cargo improperly can result in loss of control of the vehicle. Avoid terrain or situations that extend over rough or hilly terrain, reduce speed and cargo to the vehicle, include the weight of the operator, accessories, loads in the rack or box and the load on a level grass surface. Always attach the tow load to...

Owners Manual
Page 58
... vehicle. Model RANGER Crew Total Towed Load Weight (Level Ground) 2000 lbs. (907 kg) Total Towed Load Weight (15° grade) 850 lbs. (386 kg) Total Hitch Vertical Weight 150 lbs. (68.1 kg) Maximum Towing Speed 10 mph (16 kph) Belt Life To extend belt life, use the lowest gear possible when hauling or towing heavy cargo. 55 Driving Safely Towing Loads OPERATION WARNING Towing improperly can alter vehicle handling and may lose control of control...
... vehicle. Model RANGER Crew Total Towed Load Weight (Level Ground) 2000 lbs. (907 kg) Total Towed Load Weight (15° grade) 850 lbs. (386 kg) Total Hitch Vertical Weight 150 lbs. (68.1 kg) Maximum Towing Speed 10 mph (16 kph) Belt Life To extend belt life, use the lowest gear possible when hauling or towing heavy cargo. 55 Driving Safely Towing Loads OPERATION WARNING Towing improperly can alter vehicle handling and may lose control of control...

Owners Manual
Page 61
... gear and drive forward. 58 OPERATION All Wheel Drive (AWD) The illuminated amber AWD AWD Switch switch indicates that the vehicle is on, the 2WD front wheels will automatically engage any time the rear wheels lose traction. When the AWD switch is in one-wheel drive for at rest. This condition causes increased steering effort and some vehicle speed restriction. There is no limit to the length of time the vehicle may cause severe drive shaft and clutch...
... gear and drive forward. 58 OPERATION All Wheel Drive (AWD) The illuminated amber AWD AWD Switch switch indicates that the vehicle is on, the 2WD front wheels will automatically engage any time the rear wheels lose traction. When the AWD switch is in one-wheel drive for at rest. This condition causes increased steering effort and some vehicle speed restriction. There is no limit to the length of time the vehicle may cause severe drive shaft and clutch...
Owners Manual
Page 65
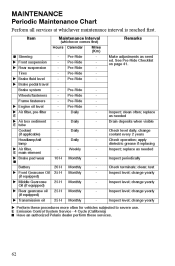
... Tires X Brake fluid level X Brake pedal travel Brake system Wheels/fasteners Frame fasteners X Engine oil level X Air filter, pre-filter E X Air box sediment E tube Coolant (if applicable) Headlamp/tail lamp X Air filter, E main element X Brake pad wear Q Battery X Front Gearcase Oil (if equipped) X Middle Gearcase Oil (if equipped) X Rear gearcase oil (if equipped) X Transmission oil X Perform these services. 62 change yearly Inspect level; E Emission Control System Service - 4 Cycle (California) Q Have an authorized Polaris dealer perform these procedures more often for vehicles...
... Tires X Brake fluid level X Brake pedal travel Brake system Wheels/fasteners Frame fasteners X Engine oil level X Air filter, pre-filter E X Air box sediment E tube Coolant (if applicable) Headlamp/tail lamp X Air filter, E main element X Brake pad wear Q Battery X Front Gearcase Oil (if equipped) X Middle Gearcase Oil (if equipped) X Rear gearcase oil (if equipped) X Transmission oil X Perform these services. 62 change yearly Inspect level; E Emission Control System Service - 4 Cycle (California) Q Have an authorized Polaris dealer perform these procedures more often for vehicles...

Owners Manual
Page 67
...Radiator (in applicable) X Cooling Hoses X Engine mounts Exhaust muffler/ pipe X Spark plug E Q Ignition timing X Wiring Q Clutches (drive and driven) bearings 100 H 100 H 200 H 300 H 12 M 12 M 24 M 36 M - - E Emission Control System Service - 4 Cycle (California). replace as needed Inspect Inspect for leaks Inspect Inspect Inspect; adjust as needed Adjust as needed 100 H 12 M Q Fuel filter (if exter- Q Front wheel Q Brake fluid Spark arrestor Idle speed Q Toe adjustment Q Auxiliary brake (if X equipped) Headlight aim X Perform these services 64 Q Have an authorized Polaris...
...Radiator (in applicable) X Cooling Hoses X Engine mounts Exhaust muffler/ pipe X Spark plug E Q Ignition timing X Wiring Q Clutches (drive and driven) bearings 100 H 100 H 200 H 300 H 12 M 12 M 24 M 36 M - - E Emission Control System Service - 4 Cycle (California). replace as needed Inspect Inspect for leaks Inspect Inspect Inspect; adjust as needed Adjust as needed 100 H 12 M Q Fuel filter (if exter- Q Front wheel Q Brake fluid Spark arrestor Idle speed Q Toe adjustment Q Auxiliary brake (if X equipped) Headlight aim X Perform these services 64 Q Have an authorized Polaris...

Owners Manual
Page 92
... the shock mounting bolts. Remove the top shock mounting bolts from the inside mounting holes. 2. Position the vehicle on page 60. 1. Lightly turn the steering wheel left and right. 3. Reposition the shocks to 30 ft. lbs. (40 Nm). Outside Mounting Holes Inside Mounting Holes Cam Rear Spring Adjustment The rear shock absorber springs are adjusted by an authorized Polaris dealer. If there is excessive freeplay or strange noises, or the steering feels rough...
... the shock mounting bolts. Remove the top shock mounting bolts from the inside mounting holes. 2. Position the vehicle on page 60. 1. Lightly turn the steering wheel left and right. 3. Reposition the shocks to 30 ft. lbs. (40 Nm). Outside Mounting Holes Inside Mounting Holes Cam Rear Spring Adjustment The rear shock absorber springs are adjusted by an authorized Polaris dealer. If there is excessive freeplay or strange noises, or the steering feels rough...

Owners Manual
Page 97
... headlight and make a mark on the headlights. 4. MAINTENANCE Lights Headlight Beam Adjustment X 25 ft. (7.6 m) X 8" (20 cm) 1. Place the vehicle on the seat while performing this step. 5. Measure the distance from a wall. 2. Apply the brakes. Turn on the wall at the same height. 3. NOTE: Include the weight of the hood assembly. 6. Turn the adjustment screw to the ON position. 2. Check the brake light before each ride. 1. Turn the ignition switch...
... headlight and make a mark on the headlights. 4. MAINTENANCE Lights Headlight Beam Adjustment X 25 ft. (7.6 m) X 8" (20 cm) 1. Place the vehicle on the seat while performing this step. 5. Measure the distance from a wall. 2. Apply the brakes. Turn on the wall at the same height. 3. NOTE: Include the weight of the hood assembly. 6. Turn the adjustment screw to the ON position. 2. Check the brake light before each ride. 1. Turn the ignition switch...

Owners Manual
Page 111
... cm) 4 valve 4 stroke twin cylinder with counter balance 683 cc 80 x 68 500 W @ 3000 RPM 9.40:1 Electric Electronic Fuel Injection ECU RC7YC /.035 in. (0.9 mm) MacPherson strut w/8 in. (20.3 cm) of travel Independent w/9.0 in. (22.9 cm) of travel 108 SPECIFICATIONS RANGER Crew Maximum Weight Capacity Fuel Capacity Engine Oil Capacity Coolant Capacity Towing Capacity Hitch Tongue Capacity Max. Cargo Box Load Overall Length Overall Width (box) Overall Width (tires) Overall Height Wheelbase Cargo Box (L x W x H) Ground Clearance...
... cm) 4 valve 4 stroke twin cylinder with counter balance 683 cc 80 x 68 500 W @ 3000 RPM 9.40:1 Electric Electronic Fuel Injection ECU RC7YC /.035 in. (0.9 mm) MacPherson strut w/8 in. (20.3 cm) of travel Independent w/9.0 in. (22.9 cm) of travel 108 SPECIFICATIONS RANGER Crew Maximum Weight Capacity Fuel Capacity Engine Oil Capacity Coolant Capacity Towing Capacity Hitch Tongue Capacity Max. Cargo Box Load Overall Length Overall Width (box) Overall Width (tires) Overall Height Wheelbase Cargo Box (L x W x H) Ground Clearance...

Owners Manual
Page 114
Drive at a higher speed or use fast, aggressive throttle application to 7 times. The belt will become more frequently. ment Towing/pushing at least 5 minutes. RPM/low ground speed Utility use fast, objects from water Dry out the PVT. WARNING: Excessive throttle may cause loss of control and vehicle overturn. Inspect clutch seals for fouled plugs or foreign material in gas tank or fuel lines. See your Polaris dealer. Improper break...
Drive at a higher speed or use fast, aggressive throttle application to 7 times. The belt will become more frequently. ment Towing/pushing at least 5 minutes. RPM/low ground speed Utility use fast, objects from water Dry out the PVT. WARNING: Excessive throttle may cause loss of control and vehicle overturn. Inspect clutch seals for fouled plugs or foreign material in gas tank or fuel lines. See your Polaris dealer. Improper break...
Owners Manual
Page 120
... vehicle to perform the warranty repair. Vehicles importation rules vary considerably from Polaris Industries. This policy does not apply to vehicles that have not followed the procedure set out above, your vehicle was purchased will be requested from the country of the country where the vehicle was purchased, Warranty or Service Bulletin repairs may not give authorization for export from country to Safety Recalls...
... vehicle to perform the warranty repair. Vehicles importation rules vary considerably from Polaris Industries. This policy does not apply to vehicles that have not followed the procedure set out above, your vehicle was purchased will be requested from the country of the country where the vehicle was purchased, Warranty or Service Bulletin repairs may not give authorization for export from country to Safety Recalls...

Owners Manual
Page 125
... Filter, Air ...83 Fluid Levels During Storage ...105 Fluid, Battery ...99 Fluid, Brake ...87 Fogging the Engine ...106 Freeplay Adjustment, Throttle...86 Freeplay Inspection, Throttle...85 Freeplay, Steering Wheel...89 Freeplay, Throttle ...85 Front Gearcase Lubrication ...73 Front Gearcase Oil Change ...73 Front Gearcase Oil Check ...73 Fuel Cap...33 Fuel Safety ...21 Fuel Stabilizer ...105 Fuel Tank Filler Cap ...33 Fuses ...101 K Key, Periodic Maintenance Chart ...61 Kilometers to Miles Toggle...30 L Lamp Replacement, Headlight ...93 Light Switch ...39 Lights Brake Lights ...94 Headlight...
... Filter, Air ...83 Fluid Levels During Storage ...105 Fluid, Battery ...99 Fluid, Brake ...87 Fogging the Engine ...106 Freeplay Adjustment, Throttle...86 Freeplay Inspection, Throttle...85 Freeplay, Steering Wheel...89 Freeplay, Throttle ...85 Front Gearcase Lubrication ...73 Front Gearcase Oil Change ...73 Front Gearcase Oil Check ...73 Fuel Cap...33 Fuel Safety ...21 Fuel Stabilizer ...105 Fuel Tank Filler Cap ...33 Fuses ...101 K Key, Periodic Maintenance Chart ...61 Kilometers to Miles Toggle...30 L Lamp Replacement, Headlight ...93 Light Switch ...39 Lights Brake Lights ...94 Headlight...

Owners Manual
Page 127
... Spring, Rear, Adjustment ...89 Stabilizing the Fuel ...105 Starting the Engine ...42 Steering Wheel Inspection...89 Stopping the Engine...43 Storage ...102-106 Storage and Inspection...105 Storage and Lubrication...105 Storage Area ...106 Storage, Battery ...99 Storage, Covers ...106 Storage, Fluid Levels ...105 Storage, Oil and Filter ...105 Storage, Removal...107 Suspension Adjustment, Rear ...89 Switches AWD Switch ...39 Differential Lock Switch ...39 Ignition...38 Light...39 T Towing Loads ...55 Towing Speed ...55 Trailer Hitch ...24 Transmission Lubrication...
... Spring, Rear, Adjustment ...89 Stabilizing the Fuel ...105 Starting the Engine ...42 Steering Wheel Inspection...89 Stopping the Engine...43 Storage ...102-106 Storage and Inspection...105 Storage and Lubrication...105 Storage Area ...106 Storage, Battery ...99 Storage, Covers ...106 Storage, Fluid Levels ...105 Storage, Oil and Filter ...105 Storage, Removal...107 Suspension Adjustment, Rear ...89 Switches AWD Switch ...39 Differential Lock Switch ...39 Ignition...38 Light...39 T Towing Loads ...55 Towing Speed ...55 Trailer Hitch ...24 Transmission Lubrication...