
Owners Manual
Page 4
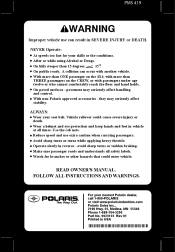
... and understands all times. On public roads. pavement may seriously affect stability. they may seriously affect handling and control. After or while using Alcohol or Drugs. PMS 419 WARNING Improper vehicle use extra caution when carrying passengers. Use the cab nets. FOLLOW ALL INSTRUCTIONS AND WARNINGS. For your seat belt. Avoid sharp turns or turns while applying heavy throttle. NEVER Operate: At speeds too fast...
... and understands all times. On public roads. pavement may seriously affect stability. they may seriously affect handling and control. After or while using Alcohol or Drugs. PMS 419 WARNING Improper vehicle use extra caution when carrying passengers. Use the cab nets. FOLLOW ALL INSTRUCTIONS AND WARNINGS. For your seat belt. Avoid sharp turns or turns while applying heavy throttle. NEVER Operate: At speeds too fast...
Owners Manual
Page 18
... use or accidental starting. Reduce speed and follow the instructions in this manual. SAFETY Operator Safety • Never operate your vehicle in fast-flowing water or in water deeper than that specified in this manual for hauling cargo or pulling a trailer. Wet brakes may have reduced stopping ability. See page 17 for fuel safety warnings. • Always remove the ignition key when the vehicle is extremely flammable...
... use or accidental starting. Reduce speed and follow the instructions in this manual. SAFETY Operator Safety • Never operate your vehicle in fast-flowing water or in water deeper than that specified in this manual for hauling cargo or pulling a trailer. Wet brakes may have reduced stopping ability. See page 17 for fuel safety warnings. • Always remove the ignition key when the vehicle is extremely flammable...

Owners Manual
Page 21
.... The engine exhaust from the box before filling them with soap and water and change clothing. SAFETY Operator Safety Cab Nets Riding in this product contains chemicals known to cause cancer, birth defects or other reproductive harm. Always follow all times. Always keep hands and feet inside the vehicle at all inspection and maintenance procedures and schedules described in safe operating condition...
.... The engine exhaust from the box before filling them with soap and water and change clothing. SAFETY Operator Safety Cab Nets Riding in this product contains chemicals known to cause cancer, birth defects or other reproductive harm. Always follow all times. Always keep hands and feet inside the vehicle at all inspection and maintenance procedures and schedules described in safe operating condition...

Owners Manual
Page 28
... used . Lights are on. Turn the key to the START position to the LIGHTS ON position after starting the engine. 24 Electrical circuits are on . Lights are on . Turn the key to engage the electric starter. Electrical equipment can be removed from the switch when it is in the OFF position. OFF LIGHTS ON LIGHTS OFF START The engine is a four-position, key-operated switch. Electrical circuits are off. FEATURES AND CONTROLS Switches Ignition Switch Light Switch AWD/Differential Switch Ignition Switch/Light Switch The ignition switch is...
... used . Lights are on. Turn the key to the START position to the LIGHTS ON position after starting the engine. 24 Electrical circuits are on . Lights are on . Turn the key to engage the electric starter. Electrical equipment can be removed from the switch when it is in the OFF position. OFF LIGHTS ON LIGHTS OFF START The engine is a four-position, key-operated switch. Electrical circuits are off. FEATURES AND CONTROLS Switches Ignition Switch Light Switch AWD/Differential Switch Ignition Switch/Light Switch The ignition switch is...

Owners Manual
Page 36
FEATURES AND CONTROLS Instrument Cluster Rider Information Center The rider information center is in the AWD position. 3. If this warning appears. This indicator illuminates when the AWD switch 1 is located in the instrument cluster. Engine Hour Display Indicator 4. This warning usually indicates that the vehicle is applied. Drive at an RPM too low to your Polaris dealer for 2.5 seconds at idle and high electrical load (lights, cooling fan, accessories) is operating at a higher RPM...
FEATURES AND CONTROLS Instrument Cluster Rider Information Center The rider information center is in the AWD position. 3. If this warning appears. This indicator illuminates when the AWD switch 1 is located in the instrument cluster. Engine Hour Display Indicator 4. This warning usually indicates that the vehicle is applied. Drive at an RPM too low to your Polaris dealer for 2.5 seconds at idle and high electrical load (lights, cooling fan, accessories) is operating at a higher RPM...

Owners Manual
Page 42
... Error: Defective ECU Engine Temp Sensor Circuit: Short to Ground Engine Temp Sensor Circuit: Open or Short to Battery Injector 1: Open Load Injector 1: Short Circuit to Ground Injector 1: Short Circuit to Battery Injector 2: Open Load Injector 2: Short Circuit to Ground Injector 2: Short Circuit to Battery Rear Differential: Open Load (RANGER 4X4 only) Rear Differential: Short Circuit to Ground (RANGER 4X4 only) Rear Differential: Short Circuit to Battery (RANGER 4X4 only) Engine Temp Lamp: Open Load...
... Error: Defective ECU Engine Temp Sensor Circuit: Short to Ground Engine Temp Sensor Circuit: Open or Short to Battery Injector 1: Open Load Injector 1: Short Circuit to Ground Injector 1: Short Circuit to Battery Injector 2: Open Load Injector 2: Short Circuit to Ground Injector 2: Short Circuit to Battery Rear Differential: Open Load (RANGER 4X4 only) Rear Differential: Short Circuit to Ground (RANGER 4X4 only) Rear Differential: Short Circuit to Battery (RANGER 4X4 only) Engine Temp Lamp: Open Load...

Owners Manual
Page 44
Add the recommended oil as recommended. Pull only light loads. 7. See page 41. 6. Fill the fuel tank with vehicle operation and handling. 4. Drive slowly at sustained idle. 5. Vary throttle positions. Pull only light loads. Avoid aggressive acceleration and high speed operation during the break-in period. 40 Break in the clutches and belt by operating at 25 hours. Heed the gasoline warnings on the daily...
Add the recommended oil as recommended. Pull only light loads. 7. See page 41. 6. Fill the fuel tank with vehicle operation and handling. 4. Drive slowly at sustained idle. 5. Vary throttle positions. Pull only light loads. Avoid aggressive acceleration and high speed operation during the break-in period. 40 Break in the clutches and belt by operating at 25 hours. Heed the gasoline warnings on the daily...

Owners Manual
Page 56
... loss of control of control or brake instability, which can alter vehicle handling and may cause loss of the vehicle. When handling off-centered loads that cannot be adversely affected, causing the vehicle to maintain stable driving conditions. Vehicle speed should never exceed 10 mph (16 kph) while towing a load on the trailer tongue. Always attach the tow load to the vehicle, include the weight of the vehicle. USE...
... loss of control of control or brake instability, which can alter vehicle handling and may cause loss of the vehicle. When handling off-centered loads that cannot be adversely affected, causing the vehicle to maintain stable driving conditions. Vehicle speed should never exceed 10 mph (16 kph) while towing a load on the trailer tongue. Always attach the tow load to the vehicle, include the weight of the vehicle. USE...

Owners Manual
Page 59
...) Maximum Towing Speed 10 mph (16 kph) 10 mph (16 kph) Belt Life To extend belt life, use the lowest gear possible when hauling or towing heavy cargo. 55 See page 52. See the towing capacity chart below and the specifications charts beginning on the towing bracket. 2. Never tow a trailer on a grade steeper than the recommended weight for the vehicle. Towing a trailer increases braking distance. 3. Attach a trailer to any...
...) Maximum Towing Speed 10 mph (16 kph) 10 mph (16 kph) Belt Life To extend belt life, use the lowest gear possible when hauling or towing heavy cargo. 55 See page 52. See the towing capacity chart below and the specifications charts beginning on the towing bracket. 2. Never tow a trailer on a grade steeper than the recommended weight for the vehicle. Towing a trailer increases braking distance. 3. Attach a trailer to any...

Owners Manual
Page 61
... AWD before switching to AWD. NOTICE: Switching to AWD while the rear wheels are spinning, release the throttle before getting into low gear and drive forward. 57 Shift into conditions where front wheel drive may be possible for the front gearcase to remain locked unnecessarily. This condition causes increased steering effort and some vehicle speed restriction. Disengaging AWD Under certain conditions, it will not enable the AWD until the rear wheels regain traction. Initially, the vehicle...
... AWD before switching to AWD. NOTICE: Switching to AWD while the rear wheels are spinning, release the throttle before getting into low gear and drive forward. 57 Shift into conditions where front wheel drive may be possible for the front gearcase to remain locked unnecessarily. This condition causes increased steering effort and some vehicle speed restriction. Disengaging AWD Under certain conditions, it will not enable the AWD until the rear wheels regain traction. Initially, the vehicle...
Owners Manual
Page 65
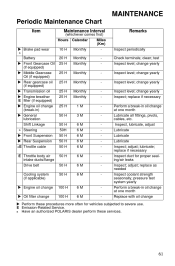
...) X Transmission oil X Engine breather E filter (if equipped) X Engine oil change (break-in oil change yearly Inspect level; E Emission-Related Service. n Have an authorized POLARIS dealer perform these procedures more often for proper sealing/air leaks Inspect; X Perform these services. 61 replace as needed Inspect coolant strength seasonally; change 100 H 100 H 6M 6M - replace if necessary Perform a break-in ) X General lubrication Shift Linkage n Steering X Front Suspension X Rear Suspension nE Throttle cable E Throttle body air intake ducts/flange Drive belt Cooling...
...) X Transmission oil X Engine breather E filter (if equipped) X Engine oil change (break-in oil change yearly Inspect level; E Emission-Related Service. n Have an authorized POLARIS dealer perform these procedures more often for proper sealing/air leaks Inspect; X Perform these services. 61 replace as needed Inspect coolant strength seasonally; change 100 H 100 H 6M 6M - replace if necessary Perform a break-in ) X General lubrication Shift Linkage n Steering X Front Suspension X Rear Suspension nE Throttle cable E Throttle body air intake ducts/flange Drive belt Cooling...
Owners Manual
Page 66
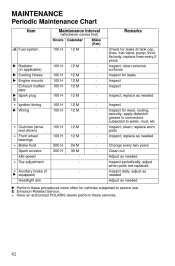
... first) Hours Calendar nE Fuel system Remarks Miles (Km) Check for leaks Inspect Inspect Inspect; adjust when parts are replaced Inspect daily; clean external surfaces Inspect for leaks at tank cap, lines, fuel valve, pump, throttle body; E Emission-Related Service. replace as needed Inspect periodically; replace as needed Change every two years Clean out Adjust as needed 100 H 12 M X Radiator (in applicable) X Cooling Hoses X Engine mounts Exhaust muffler/ pipe X Spark plug E n Ignition timing 100 H 100 H 100 H 100...
... first) Hours Calendar nE Fuel system Remarks Miles (Km) Check for leaks Inspect Inspect Inspect; adjust when parts are replaced Inspect daily; clean external surfaces Inspect for leaks at tank cap, lines, fuel valve, pump, throttle body; E Emission-Related Service. replace as needed Inspect periodically; replace as needed Change every two years Clean out Adjust as needed 100 H 12 M X Radiator (in applicable) X Cooling Hoses X Engine mounts Exhaust muffler/ pipe X Spark plug E n Ignition timing 100 H 100 H 100 H 100...

Owners Manual
Page 93
MAINTENANCE Tires Wheel Removal 1. 2. 3. 4. 5. Remove the wheel. WARNING! Always ensure that have a cotter pin installed. Loosen the wheel nuts slightly. Do not service axle nuts that all nuts are torqued to specification. Torque the wheel nuts to the ground. 5. Apply the brakes. Place the transmission in PARK. 2. Remove the wheel nuts and washers. Place the transmission in PARK. Carefully lower the vehicle to specification. Be sure the valve stem is toward forward...
MAINTENANCE Tires Wheel Removal 1. 2. 3. 4. 5. Remove the wheel. WARNING! Always ensure that have a cotter pin installed. Loosen the wheel nuts slightly. Do not service axle nuts that all nuts are torqued to specification. Torque the wheel nuts to the ground. 5. Apply the brakes. Place the transmission in PARK. 2. Remove the wheel nuts and washers. Place the transmission in PARK. Carefully lower the vehicle to specification. Be sure the valve stem is toward forward...

Owners Manual
Page 94
.... Tip: Make sure the tab on the wiring. 3. Allow lamps to remove it. 4. Install the new lamp. MAINTENANCE Lights Poor lighting can cause burns to skin. Headlight and taillight lenses become dirty during normal operation. Always make sure lights are adjusted properly for best visibility. Oil from the wiring harness. Headlight Lamp Replacement 1. Open the hood. CAUTION! Reinstall the harness assembly into the headlight assembly. 90
.... Tip: Make sure the tab on the wiring. 3. Allow lamps to remove it. 4. Install the new lamp. MAINTENANCE Lights Poor lighting can cause burns to skin. Headlight and taillight lenses become dirty during normal operation. Always make sure lights are adjusted properly for best visibility. Oil from the wiring harness. Headlight Lamp Replacement 1. Open the hood. CAUTION! Reinstall the harness assembly into the headlight assembly. 90

Owners Manual
Page 95
... of a rider on the headlights. 4. Measure the distance from a wall. 2. Turn the ignition switch to the center of pedal travel. MAINTENANCE Lights Headlight Beam Adjustment X X 8" (20 cm) 25 ft. (7.6 m) 1. Check the brake light before each ride. 1. Turn on the seat while performing this step. 5. If the light doesn't come on . Apply the brakes. Repeat steps 4-6 until the lamp is depressed, the console brake light comes on after about...
... of a rider on the headlights. 4. Measure the distance from a wall. 2. Turn the ignition switch to the center of pedal travel. MAINTENANCE Lights Headlight Beam Adjustment X X 8" (20 cm) 25 ft. (7.6 m) 1. Check the brake light before each ride. 1. Turn on the seat while performing this step. 5. If the light doesn't come on . Apply the brakes. Repeat steps 4-6 until the lamp is depressed, the console brake light comes on after about...

Owners Manual
Page 108
... Dry Sump Dry Sump Liquid Liquid Dual A-arm w/9.6 in . (23 cm) of travel cm) of operator, passenger, cargo, accessories) Dry Weight Fuel Capacity Engine Oil Capacity Coolant Capacity Overall Length Overall Width Overall Height Wheelbase Cargo Box Dimensions (Inside) Ground Clearance Min. SPECIFICATIONS RANGER 500 EFI 4X4 Maximum Weight Capacity (includes weight of travel 104 Dual A-arm w/9.6 in. (24.4 cm) of travel (24.4 cm) of travel Independent w/9 in. (23 Independent w/9 in . Turning Radius Towing Capacity Hitch Tongue Capacity Max.
... Dry Sump Dry Sump Liquid Liquid Dual A-arm w/9.6 in . (23 cm) of travel cm) of operator, passenger, cargo, accessories) Dry Weight Fuel Capacity Engine Oil Capacity Coolant Capacity Overall Length Overall Width Overall Height Wheelbase Cargo Box Dimensions (Inside) Ground Clearance Min. SPECIFICATIONS RANGER 500 EFI 4X4 Maximum Weight Capacity (includes weight of travel 104 Dual A-arm w/9.6 in. (24.4 cm) of travel (24.4 cm) of travel Independent w/9 in. (23 Independent w/9 in . Turning Radius Towing Capacity Hitch Tongue Capacity Max.

Owners Manual
Page 116
... AND EXCLUSIONS: LIMITATIONS OF WARRANTIES AND REMEDIES The POLARIS limited warranty excludes any vehicle that are covered by this warranty does not cover physical damage to the following items: Wheels and tires Suspension components Brake components Seat components Clutches and components Steering components Batteries Light bulbs/Sealed beam lamps Finished and unfinished surfaces Carburetor/Throttle body components Engine components Drive belts Hydraulic components Circuit breakers/Fuses Electronic components 112 WARRANTY LIMITED WARRANTY POLARIS Sales Inc., 2100 Highway...
... AND EXCLUSIONS: LIMITATIONS OF WARRANTIES AND REMEDIES The POLARIS limited warranty excludes any vehicle that are covered by this warranty does not cover physical damage to the following items: Wheels and tires Suspension components Brake components Seat components Clutches and components Steering components Batteries Light bulbs/Sealed beam lamps Finished and unfinished surfaces Carburetor/Throttle body components Engine components Drive belts Hydraulic components Circuit breakers/Fuses Electronic components 112 WARRANTY LIMITED WARRANTY POLARIS Sales Inc., 2100 Highway...

Owners Manual
Page 121
...; Fuel Tank • Vacuum Control Diaphragms* • Fuel Cap • Control Cables* • Fuel Line • Control Linkages* • Fuel Line Fittings • Purge Valves • Clamps* • Vapor Hoses • Pressure Relief Valves* • Liquid/Vapor Separator • Control Valves* • Carbon Canister • Control Solenoids* • Canister Mounting Brackets • Electronic Controls* • Carburetor Purge Port Connector *As related to the POLARIS standard limited warranty for a period of 500 hours...
...; Fuel Tank • Vacuum Control Diaphragms* • Fuel Cap • Control Cables* • Fuel Line • Control Linkages* • Fuel Line Fittings • Purge Valves • Clamps* • Vapor Hoses • Pressure Relief Valves* • Liquid/Vapor Separator • Control Valves* • Carbon Canister • Control Solenoids* • Canister Mounting Brackets • Electronic Controls* • Carburetor Purge Port Connector *As related to the POLARIS standard limited warranty for a period of 500 hours...
Owners Manual
Page 127
... Exhaust System Warning ...82 F Fouled Plugs ...73 Freeplay Adjustment, Throttle ...85 Freeplay, Throttle ...84 Front Gearcase ...70-71 Fuel Cap ...29 Fuel Safety ...17 Fuel Stabilizer ...101 Fuel Tank Filler Cap ...29 Fuses ...97 G Gap, Spark Plug ...72 Gasoline Handling ...17 Gear Circuit Diagnostics...35 Gear Selector ...23 Gearcase Specification Chart ...68 Gearcase, Front ...70-71 Gearcase, Main ...69 Gearcases ...68-71 Gears, Shifting ...23 F Filter Systems ...80-81 Filter, Air ...80 Filter, Breather ...81 Fluid, Battery ...95 Fluid Change Engine Oil...
... Exhaust System Warning ...82 F Fouled Plugs ...73 Freeplay Adjustment, Throttle ...85 Freeplay, Throttle ...84 Front Gearcase ...70-71 Fuel Cap ...29 Fuel Safety ...17 Fuel Stabilizer ...101 Fuel Tank Filler Cap ...29 Fuses ...97 G Gap, Spark Plug ...72 Gasoline Handling ...17 Gear Circuit Diagnostics...35 Gear Selector ...23 Gearcase Specification Chart ...68 Gearcase, Front ...70-71 Gearcase, Main ...69 Gearcases ...68-71 Gears, Shifting ...23 F Filter Systems ...80-81 Filter, Air ...80 Filter, Breather ...81 Fluid, Battery ...95 Fluid Change Engine Oil...

Owners Manual
Page 129
..., Battery ...95 Storage, Covers ...102 Storage, Removal from ...103 Switches ...24-25 AWD Switch...25 Differential Lock Switch ...25 Ignition Switch ...24 Light Switch ...24 T Tachometer ...33, 35 Throttle Freeplay ...84 Throttle Freeplay Adjustment...85 Throttle Freeplay Inspection...84 Throttle Pedal ...25 Throttle System...84-85 Tires ...88-89 Nut Torque ...88 Tread Depth ...88 Wheel Installation ...89 Wheel Removal ...89 Torque, Spark Plug ...72 Towing Loads ...55 Towing Speed ...55 Trailer Hitch Bracket ...21 Transmission...69 Transmission Operation...
..., Battery ...95 Storage, Covers ...102 Storage, Removal from ...103 Switches ...24-25 AWD Switch...25 Differential Lock Switch ...25 Ignition Switch ...24 Light Switch ...24 T Tachometer ...33, 35 Throttle Freeplay ...84 Throttle Freeplay Adjustment...85 Throttle Freeplay Inspection...84 Throttle Pedal ...25 Throttle System...84-85 Tires ...88-89 Nut Torque ...88 Tread Depth ...88 Wheel Installation ...89 Wheel Removal ...89 Torque, Spark Plug ...72 Towing Loads ...55 Towing Speed ...55 Trailer Hitch Bracket ...21 Transmission...69 Transmission Operation...