

Owners Manual
Page 4
... affect handling and control. • with more than 15 degrees. • on public roads. • on hills steeper than one passenger in a 2-seat vehicle. • with non-Polaris approved accessories - ALWAYS: • keep hands and feet inside vehicle. NEVER USE WITH DRUGS OR ALCOHOL. ALWAYS USE AN APPROVED HELMET AND PROTECTIVE GEAR FOR OPERATOR AND PASSENGERS. READ OWNER'S MANUAL. PMS 419 WARNING Improper vehicle use...
... affect handling and control. • with more than 15 degrees. • on public roads. • on hills steeper than one passenger in a 2-seat vehicle. • with non-Polaris approved accessories - ALWAYS: • keep hands and feet inside vehicle. NEVER USE WITH DRUGS OR ALCOHOL. ALWAYS USE AN APPROVED HELMET AND PROTECTIVE GEAR FOR OPERATOR AND PASSENGERS. READ OWNER'S MANUAL. PMS 419 WARNING Improper vehicle use...

Owners Manual
Page 41
... of the rocker switch toward the dash to start the engine. AWD 2WD 37 FEATURES AND CONTROLS Switches Ignition Switch The ignition switch is off. Electrical circuits are on low beam. Move the rocker switch to the center position to engage the electric starter. Turn the key to the START position to place the headlights on . Press the top of the switch to turn the lights on high beam. Use the ignition switch to place the...
... of the rocker switch toward the dash to start the engine. AWD 2WD 37 FEATURES AND CONTROLS Switches Ignition Switch The ignition switch is off. Electrical circuits are on low beam. Move the rocker switch to the center position to engage the electric starter. Turn the key to the START position to place the headlights on . Press the top of the switch to turn the lights on high beam. Use the ignition switch to place the...

Owners Manual
Page 44
... the rear wheels regain traction, the demand drive unit will automatically engage any time the rear wheels lose traction. Once enabled, the AWD remains enabled until the rear wheels regain traction. If the rear wheels are spinning, release the throttle before getting into conditions where front wheel drive may remain in AWD, the demand drive unit will automatically disengage. When the switch is on AWD, the vehicle is in the instrument cluster will be turned on...
... the rear wheels regain traction, the demand drive unit will automatically engage any time the rear wheels lose traction. Once enabled, the AWD remains enabled until the rear wheels regain traction. If the rear wheels are spinning, release the throttle before getting into conditions where front wheel drive may remain in AWD, the demand drive unit will automatically disengage. When the switch is on AWD, the vehicle is in the instrument cluster will be turned on...

Owners Manual
Page 48
... engine is at idle and high electrical load (lights, cooling fan, accessories) is activated. Service Indicator - FEATURES AND CONTROLS Instrument Cluster Rider Information Center 2. Fuel Gauge - When the last segment clears, a low fuel warning is applied. Information Display Area - This indicator illuminates when the 4X4 system is engaged (switch is operating at a higher RPM or recharge the battery to display, an open or short circuit has occurred in the fuel sensor...
... engine is at idle and high electrical load (lights, cooling fan, accessories) is activated. Service Indicator - FEATURES AND CONTROLS Instrument Cluster Rider Information Center 2. Fuel Gauge - When the last segment clears, a low fuel warning is applied. Information Display Area - This indicator illuminates when the 4X4 system is engaged (switch is operating at a higher RPM or recharge the battery to display, an open or short circuit has occurred in the fuel sensor...

Owners Manual
Page 55
... page 51. 5. PVT Break-in (Clutches/Belt) A proper break-in 1. OPERATION Vehicle Break-in Period Engine and Drivetrain Break-in of the brakes. Avoid aggressive use of the clutches and drive belt will ensure a longer life and better performance. See Brake System Break-in period. Fill the fuel tank with gasoline. Avoid aggressive acceleration and high speed operation during the break-in the...
... page 51. 5. PVT Break-in (Clutches/Belt) A proper break-in 1. OPERATION Vehicle Break-in Period Engine and Drivetrain Break-in of the brakes. Avoid aggressive use of the clutches and drive belt will ensure a longer life and better performance. See Brake System Break-in period. Fill the fuel tank with gasoline. Avoid aggressive acceleration and high speed operation during the break-in the...

Owners Manual
Page 70
... MAXIMUM WEIGHT CAPACITY of the operator, passengers, accessories, loads in the rack or box and the load on a level grass surface. OPERATE ONLY WITH STABLE AND SAFELY ARRANGED LOADS. When handling off-centered loads that extend over rough or hilly terrain, reduce speed and cargo to maintain stable driving conditions. Vehicle speed should never exceed 10 mph (16 kph) while towing a load on the trailer...
... MAXIMUM WEIGHT CAPACITY of the operator, passengers, accessories, loads in the rack or box and the load on a level grass surface. OPERATE ONLY WITH STABLE AND SAFELY ARRANGED LOADS. When handling off-centered loads that extend over rough or hilly terrain, reduce speed and cargo to maintain stable driving conditions. Vehicle speed should never exceed 10 mph (16 kph) while towing a load on the trailer...

Owners Manual
Page 71
... the towing bracket. 2. Towing Loads WARNING Towing improperly can alter vehicle handling and may cause loss of the vehicle. 5. Towing a trailer increases braking distance. 3. Do not operate the vehicle faster than 150 lbs. (68.1 kg) tongue weight on rough or hilly terrain, reduce both speed and cargo. Always follow these precautions when towing: 1. OPERATION Hauling Cargo Your POLARIS vehicle has been designed to carry or tow specific capacities. Reduce speed...
... the towing bracket. 2. Towing Loads WARNING Towing improperly can alter vehicle handling and may cause loss of the vehicle. 5. Towing a trailer increases braking distance. 3. Do not operate the vehicle faster than 150 lbs. (68.1 kg) tongue weight on rough or hilly terrain, reduce both speed and cargo. Always follow these precautions when towing: 1. OPERATION Hauling Cargo Your POLARIS vehicle has been designed to carry or tow specific capacities. Reduce speed...

Owners Manual
Page 92
Locate and correct any short circuits that may need replacement. Fuse 20A 10A 20A 10A 20A Feature Supported Lights: Headlights, Taillights Drive: AWD Accessory: Winch Switch, 12V Power Receptacle Fuel Pump Electronic Engine Control, Starting Power Fuse 20A 30A 30A Feature Supported Engine Control Lights, Drive, Accessories Power Steering (if equipped) 88 MAINTENANCE Fuses If the engine stops or will not start, if the power steering stops working (if equipped), or if you experience other electrical failures, a fuse may have caused the blown fuse, then replace the fuse.
Locate and correct any short circuits that may need replacement. Fuse 20A 10A 20A 10A 20A Feature Supported Lights: Headlights, Taillights Drive: AWD Accessory: Winch Switch, 12V Power Receptacle Fuel Pump Electronic Engine Control, Starting Power Fuse 20A 30A 30A Feature Supported Engine Control Lights, Drive, Accessories Power Steering (if equipped) 88 MAINTENANCE Fuses If the engine stops or will not start, if the power steering stops working (if equipped), or if you experience other electrical failures, a fuse may have caused the blown fuse, then replace the fuse.

Owners Manual
Page 110
... the transmission in PARK. Be sure the valve stem is toward forward rotation. Attach the wheel nuts and washers and finger tighten. 4. Stop the engine. Wheel Installation 1. Improperly installed wheels can adversely affect tire wear and vehicle handling, which can result in the correct position on the wheel hub. See page 105. 106 Carefully lower the vehicle to specification. Remove the wheel. See your POLARIS dealer. 3. MAINTENANCE Tires Wheel...
... the transmission in PARK. Be sure the valve stem is toward forward rotation. Attach the wheel nuts and washers and finger tighten. 4. Stop the engine. Wheel Installation 1. Improperly installed wheels can adversely affect tire wear and vehicle handling, which can result in the correct position on the wheel hub. See page 105. 106 Carefully lower the vehicle to specification. Remove the wheel. See your POLARIS dealer. 3. MAINTENANCE Tires Wheel...

Owners Manual
Page 111
.... 3. Oil from the wiring harness. Halogen Headlamps Do not service the headlamps until they've cooled sufficiently. 1. Unplug the headlamp from your skin leaves a residue, causing a hot spot that will shorten the life of the lamp. Wiring Harness 107 Turn the lamp counterclockwise to maintain lighting quality. Make sure the tab on the wiring. 2. Reinstall the harness assembly into the headlight assembly. Headlight Lamp Replacement LED...
.... 3. Oil from the wiring harness. Halogen Headlamps Do not service the headlamps until they've cooled sufficiently. 1. Unplug the headlamp from your skin leaves a residue, causing a hot spot that will shorten the life of the lamp. Wiring Harness 107 Turn the lamp counterclockwise to maintain lighting quality. Make sure the tab on the wiring. 2. Reinstall the harness assembly into the headlight assembly. Headlight Lamp Replacement LED...

Owners Manual
Page 112
... performing this step. 5. MAINTENANCE Lights Headlight High Beam Adjustment X 25 ft. (7.6 m) X 8" (20 cm) 1. Place the transmission in step 2. Turn the headlights to adjust the beam. 6. If adjustment is properly adjusted. 108 Measure the distance from a wall. Place the vehicle on a level surface with the headlight approximately 25 ft. (7.6 m) from the floor to the center of a rider on the wall in PARK. 2. Start the engine...
... performing this step. 5. MAINTENANCE Lights Headlight High Beam Adjustment X 25 ft. (7.6 m) X 8" (20 cm) 1. Place the transmission in step 2. Turn the headlights to adjust the beam. 6. If adjustment is properly adjusted. 108 Measure the distance from a wall. Place the vehicle on a level surface with the headlight approximately 25 ft. (7.6 m) from the floor to the center of a rider on the wall in PARK. 2. Start the engine...

Owners Manual
Page 113
... the air box and replace the filter with a new filter. Thoroughly dry the air pre-filter. Turn the engine over several times. 5. Turn the ignition switch to your dealer for drying. 109 If water has been ingested into the PVT follow the steps outlined below. 1. Move the vehicle to start the engine. Take the vehicle to a dealer before starting it, follow the procedure on , check the bulb. Remove the spark plugs...
... the air box and replace the filter with a new filter. Thoroughly dry the air pre-filter. Turn the engine over several times. 5. Turn the ignition switch to your dealer for drying. 109 If water has been ingested into the PVT follow the steps outlined below. 1. Move the vehicle to start the engine. Take the vehicle to a dealer before starting it, follow the procedure on , check the bulb. Remove the spark plugs...
Owners Manual
Page 123
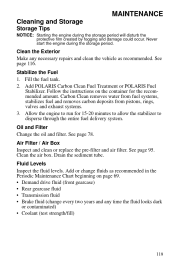
...; Rear gearcase fluid • Transmission fluid • Brake fluid (change fluids as recommended. Air Filter / Air Box Inspect and clean or replace the pre-filter and air filter. Drain the sediment tube. Carbon Clean removes water from fuel systems, stabilizes fuel and removes carbon deposits from pistons, rings, valves and exhaust systems. 3. Fluid Levels Inspect the fluid levels. Add or change every two years and any time the fluid looks dark or contaminated) • Coolant (test...
...; Rear gearcase fluid • Transmission fluid • Brake fluid (change fluids as recommended. Air Filter / Air Box Inspect and clean or replace the pre-filter and air filter. Drain the sediment tube. Carbon Clean removes water from fuel systems, stabilizes fuel and removes carbon deposits from pistons, rings, valves and exhaust systems. 3. Fluid Levels Inspect the fluid levels. Add or change every two years and any time the fluid looks dark or contaminated) • Coolant (test...
Owners Manual
Page 126
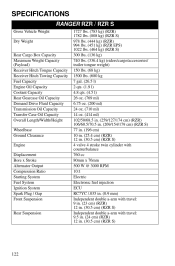
SPECIFICATIONS RANGER RZR / RZR S Gross Vehicle Weight Dry Weight Rear Cargo Box Capacity Maximum Weight Capacity (Payload) Receiver Hitch Tongue Capacity Receiver Hitch Towing Capacity Fuel Capacity Engine Oil Capacity Coolant Capacity Rear Gearcase Oil Capacity Demand Drive Fluid Capacity Transmission Oil Capacity Transfer Case Oil Capacity Overall Length/Width/Height Wheelbase Ground Clearance Engine Displacement Bore x Stroke Alternator Output Compression Ratio Starting System Fuel System Ignition System Spark Plug / Gap Front Suspension Rear Suspension 1727 lbs. (783 kg) (RZR) 1782 lbs. (...
SPECIFICATIONS RANGER RZR / RZR S Gross Vehicle Weight Dry Weight Rear Cargo Box Capacity Maximum Weight Capacity (Payload) Receiver Hitch Tongue Capacity Receiver Hitch Towing Capacity Fuel Capacity Engine Oil Capacity Coolant Capacity Rear Gearcase Oil Capacity Demand Drive Fluid Capacity Transmission Oil Capacity Transfer Case Oil Capacity Overall Length/Width/Height Wheelbase Ground Clearance Engine Displacement Bore x Stroke Alternator Output Compression Ratio Starting System Fuel System Ignition System Spark Plug / Gap Front Suspension Rear Suspension 1727 lbs. (783 kg) (RZR) 1782 lbs. (...

Owners Manual
Page 128
SPECIFICATIONS RANGER RZR 4 Gross Vehicle Weight Dry Weight Rear Cargo Box Capacity Maximum Weight Capacity (Payload) Receiver Hitch Tongue Capacity Receiver Hitch Towing Capacity Fuel Capacity Engine Oil Capacity Coolant Capacity Rear Gearcase Oil Capacity Demand Drive Fluid Capacity Transmission Oil Capacity Transfer Case Oil Capacity Overall Length/Width/Height Wheelbase Ground Clearance Engine Displacement Bore x Stroke Alternator Output Compression Ratio Starting System Fuel System Ignition System Spark Plug / Gap Front Suspension Rear Suspension 2206 lbs. (1000 kg) 1255 lbs. (569 kg) (...
SPECIFICATIONS RANGER RZR 4 Gross Vehicle Weight Dry Weight Rear Cargo Box Capacity Maximum Weight Capacity (Payload) Receiver Hitch Tongue Capacity Receiver Hitch Towing Capacity Fuel Capacity Engine Oil Capacity Coolant Capacity Rear Gearcase Oil Capacity Demand Drive Fluid Capacity Transmission Oil Capacity Transfer Case Oil Capacity Overall Length/Width/Height Wheelbase Ground Clearance Engine Displacement Bore x Stroke Alternator Output Compression Ratio Starting System Fuel System Ignition System Spark Plug / Gap Front Suspension Rear Suspension 2206 lbs. (1000 kg) 1255 lbs. (569 kg) (...

Owners Manual
Page 140
... for exhaust emissions: • Aftertreatment devices • Crankcase ventilation valves • Sensors • Electronic control units The following parts are considered emission-related components for evaporative emissions Fuel Tank Fuel Cap Fuel Line Fuel Line Fittings Clamps* Pressure Relief Valves* Control Valves* Control Solenoids* Electronic Controls Vacuum Control Diaphragms* Control Cables* Control Linkages* Purge Valves Vapor Hoses Liquid/Vapor Separator Carbon Canister Canister Mounting Brackets Carburetor Purge Port Connector *As related to the POLARIS...
... for exhaust emissions: • Aftertreatment devices • Crankcase ventilation valves • Sensors • Electronic control units The following parts are considered emission-related components for evaporative emissions Fuel Tank Fuel Cap Fuel Line Fuel Line Fittings Clamps* Pressure Relief Valves* Control Valves* Control Solenoids* Electronic Controls Vacuum Control Diaphragms* Control Cables* Control Linkages* Purge Valves Vapor Hoses Liquid/Vapor Separator Carbon Canister Canister Mounting Brackets Carburetor Purge Port Connector *As related to the POLARIS...

Owners Manual
Page 144
... Cab Nets ...34 Cap, Fuel ...34 Cargo ...66-67 Changing Coolant ...90 Changing Gears ...38 Chart, Periodic Maintenance ...69-73 Check Engine Indicator ...49 Chrome Wheel Care ...118 Cleaning and Storage...116-121 Cleaning the Air Filter...95 Cleaning the Exhaust System ...96 Cleaning the Spark Arrestor ...96 Clothing ...9 Clutching ...123, 125 Component Locations ...28-30 Condition, Spark Plugs ...87 Coolant Level ...92 Coolant Level, Radiator...91 Coolant, Adding or Changing ...90 Cooling Fan ...91 Cooling System...
... Cab Nets ...34 Cap, Fuel ...34 Cargo ...66-67 Changing Coolant ...90 Changing Gears ...38 Chart, Periodic Maintenance ...69-73 Check Engine Indicator ...49 Chrome Wheel Care ...118 Cleaning and Storage...116-121 Cleaning the Air Filter...95 Cleaning the Exhaust System ...96 Cleaning the Spark Arrestor ...96 Clothing ...9 Clutching ...123, 125 Component Locations ...28-30 Condition, Spark Plugs ...87 Coolant Level ...92 Coolant Level, Radiator...91 Coolant, Adding or Changing ...90 Cooling Fan ...91 Cooling System...
Owners Manual
Page 145
... Transfer Case ...80 Transmission...82 Fluid Levels During Storage...119 Fluid Recommendations, Gearcase . 86 Fluid, Battery ...113 Fluid, Brake ...100 Fogging the Engine...120 Fouled Plugs ...87 Freeplay Adjustment, Throttle ...98 Freeplay, Steering Wheel ...101 Fuel Cap ...34 Fuel Safety ...19 Fuel Stabilizer ...119 Fuel Tank Filler Cap ...34 Fuses ...88-89 G Gap, Spark Plug ...86 Gasoline Handling ...19 Gear Selector ...38 Gearcase Capacities ...86 Gearcase Oil Demand Drive...84 Front ...84 Main ...82-83 Rear...85 Transfer Case ...80...
... Transfer Case ...80 Transmission...82 Fluid Levels During Storage...119 Fluid Recommendations, Gearcase . 86 Fluid, Battery ...113 Fluid, Brake ...100 Fogging the Engine...120 Fouled Plugs ...87 Freeplay Adjustment, Throttle ...98 Freeplay, Steering Wheel ...101 Fuel Cap ...34 Fuel Safety ...19 Fuel Stabilizer ...119 Fuel Tank Filler Cap ...34 Fuses ...88-89 G Gap, Spark Plug ...86 Gasoline Handling ...19 Gear Selector ...38 Gearcase Capacities ...86 Gearcase Oil Demand Drive...84 Front ...84 Main ...82-83 Rear...85 Transfer Case ...80...

Owners Manual
Page 146
... Headlight Lamp Replacement ...107 Headlight Switch ...37 Helmet ...8 Hitch ...30 Hitch Weight ...67 Hood Removal ...33 M Maintenance Log ...138-139 Maintenance, Periodic ...69-73 Metric Display ...45 Mode Button ...41 N Nets, Cab ...34 New Operator Procedures ...56-57 Noise Emission Control System ...68 I Idle Speed ...98 Ignition Switch...37 Indicator Lamps ...42 Inspection, Axle Nuts ...105 Inspection, Brakes ...101 Inspection, Pre-Ride ...52 Inspection, Steering Wheel ...101 Inspection, Throttle Freeplay...97 Inspection, Wheel...
... Headlight Lamp Replacement ...107 Headlight Switch ...37 Helmet ...8 Hitch ...30 Hitch Weight ...67 Hood Removal ...33 M Maintenance Log ...138-139 Maintenance, Periodic ...69-73 Metric Display ...45 Mode Button ...41 N Nets, Cab ...34 New Operator Procedures ...56-57 Noise Emission Control System ...68 I Idle Speed ...98 Ignition Switch...37 Indicator Lamps ...42 Inspection, Axle Nuts ...105 Inspection, Brakes ...101 Inspection, Pre-Ride ...52 Inspection, Steering Wheel ...101 Inspection, Throttle Freeplay...97 Inspection, Wheel...

Owners Manual
Page 147
..., Gear ...38 Service Panel, Rear ...31 Severe Use Definition...69 Shifting Gears ...38 Shock Compression ...104 Signal Words ...4 Spark Arrester Warning ...96 Spark Arrestor Cleaning ...96 Spark Plug Condition ...87 Spark Plug Gap ...86 Spark Plug Removal ...87 Spark Plug Torque ...86 Spark Plugs ...86-87 Spark Plugs, Fouled ...87 Specifications ...122-125 Specifications, Gearcase ...86 Speed, Idle ...98 Speed, Towing ...67 Speedometer ...41 Spring Preload ...103 Spring Preload (RZR) ...102 Stabilizing the Fuel ...119 Starting the Engine ...54 Steering Wheel Adjustment ...32 Steering Wheel...
..., Gear ...38 Service Panel, Rear ...31 Severe Use Definition...69 Shifting Gears ...38 Shock Compression ...104 Signal Words ...4 Spark Arrester Warning ...96 Spark Arrestor Cleaning ...96 Spark Plug Condition ...87 Spark Plug Gap ...86 Spark Plug Removal ...87 Spark Plug Torque ...86 Spark Plugs ...86-87 Spark Plugs, Fouled ...87 Specifications ...122-125 Specifications, Gearcase ...86 Speed, Idle ...98 Speed, Towing ...67 Speedometer ...41 Spring Preload ...103 Spring Preload (RZR) ...102 Stabilizing the Fuel ...119 Starting the Engine ...54 Steering Wheel Adjustment ...32 Steering Wheel...