

Owners Manual
Page 1
It contains important safety information. PMS 419 Sportsman Big Boss 6X6 for those under 16 years of age. Operation is an adult vehicle only. This is prohibited for Maintenance and Safety Owner's Manual Read this manual carefully.
It contains important safety information. PMS 419 Sportsman Big Boss 6X6 for those under 16 years of age. Operation is an adult vehicle only. This is prohibited for Maintenance and Safety Owner's Manual Read this manual carefully.

Owners Manual
Page 4
...latest product information at the time of POLARIS Industries Inc. Other languages are intended for reference use only. The original instructions for omissions or inaccuracies. Copyright 2013 POLARIS Sales Inc. Due to constant ...vehicle and the information presented in this publication is expressly prohibited. Depictions and/or procedures in this vehicle are registered trademarks of publication. POLARIS®, SPORTSMAN® and BIG BOSS® are in English. All information contained within , whether whole or in U.S.A. 2014 SPORTSMAN BIG BOSS 6X6 800 EFI Owner's Manual...
...latest product information at the time of POLARIS Industries Inc. Other languages are intended for reference use only. The original instructions for omissions or inaccuracies. Copyright 2013 POLARIS Sales Inc. Due to constant ...vehicle and the information presented in this publication is expressly prohibited. Depictions and/or procedures in this vehicle are registered trademarks of publication. POLARIS®, SPORTSMAN® and BIG BOSS® are in English. All information contained within , whether whole or in U.S.A. 2014 SPORTSMAN BIG BOSS 6X6 800 EFI Owner's Manual...
Owners Manual
Page 35
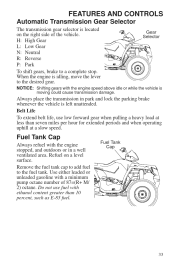
... area. Fuel Tank Cap 33 When the engine is left unattended. FEATURES AND CONTROLS Automatic Transmission Gear Selector The transmission gear selector is located on a level surface. Belt Life To extend belt life, use fuel with the engine stopped, and outdoors or in park and lock the parking brake whenever the vehicle is idling, move the lever to the desired gear. Fuel Tank Cap Always refuel with ethanol content greater than seven miles per hour for extended periods...
... area. Fuel Tank Cap 33 When the engine is left unattended. FEATURES AND CONTROLS Automatic Transmission Gear Selector The transmission gear selector is located on a level surface. Belt Life To extend belt life, use fuel with the engine stopped, and outdoors or in park and lock the parking brake whenever the vehicle is idling, move the lever to the desired gear. Fuel Tank Cap Always refuel with ethanol content greater than seven miles per hour for extended periods...
Owners Manual
Page 38
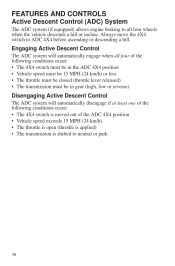
... or park 36 FEATURES AND CONTROLS Active Descent Control (ADC) System The ADC system (if equipped) allows engine braking to all four of the following conditions occur: • The 4X4 switch must be in the ADC 4X4 position • Vehicle speed must be 15 MPH (24 km/h) or less • The throttle must be closed (throttle lever released) • The transmission must be in gear...
... or park 36 FEATURES AND CONTROLS Active Descent Control (ADC) System The ADC system (if equipped) allows engine braking to all four of the following conditions occur: • The 4X4 switch must be in the ADC 4X4 position • Vehicle speed must be 15 MPH (24 km/h) or less • The throttle must be closed (throttle lever released) • The transmission must be in gear...

Owners Manual
Page 40
... vehicle is applied. Drive at idle and high electrical load (lights, cooling fan, accessories) is operating at an RPM too low to your POLARIS dealer for 2.5 seconds at start-up for proper diagnosis. 1. The word HOT displays if the engine overheats. Serious engine damage could result. 9. Odometer/Tachometer/Tripmeter/ Hour Meter 7. All segments will blink. Gear Indicator - When the last segment clears, a low fuel warning...
... vehicle is applied. Drive at idle and high electrical load (lights, cooling fan, accessories) is operating at an RPM too low to your POLARIS dealer for 2.5 seconds at start-up for proper diagnosis. 1. The word HOT displays if the engine overheats. Serious engine damage could result. 9. Odometer/Tachometer/Tripmeter/ Hour Meter 7. All segments will blink. Gear Indicator - When the last segment clears, a low fuel warning...

Owners Manual
Page 47
... Throttle Position Sensor High Throttle Position Sensor Out of Adjustment Gear Sensor Signal System Voltage Low System Voltage High Ignition Coil A Prim/Sec Circuit Malfunction: Open Load/Short-to-Ground Ignition Coil A Prim/Sec Circuit Malfunction: Shorted Load/Short-to-Battery Ignition Coil B Prim/Sec Circuit Malfunction: Open Load/Short-to-Ground Ignition Coil B Prim/Sec Circuit Malfunction: Shorted Load/Short-to-Battery Air Temp Sensor Low Voltage Air Temp Sensor High Voltage Engine Coolant...
... Throttle Position Sensor High Throttle Position Sensor Out of Adjustment Gear Sensor Signal System Voltage Low System Voltage High Ignition Coil A Prim/Sec Circuit Malfunction: Open Load/Short-to-Ground Ignition Coil A Prim/Sec Circuit Malfunction: Shorted Load/Short-to-Battery Ignition Coil B Prim/Sec Circuit Malfunction: Open Load/Short-to-Ground Ignition Coil B Prim/Sec Circuit Malfunction: Shorted Load/Short-to-Battery Air Temp Sensor Low Voltage Air Temp Sensor High Voltage Engine Coolant...

Owners Manual
Page 49
... belt by operating at sustained idle. 5. See page 33. Check fluid levels of transmission and all debris when replacing the belt. 47 If a belt fails, always clean away all gearcases after the first 25 hours of the clutches and drive belt will ensure a longer life and better performance. Pull only light loads. 7. Break in 1. Vary the throttle positions. Fill the fuel tank with vehicle operation and handling...
... belt by operating at sustained idle. 5. See page 33. Check fluid levels of transmission and all debris when replacing the belt. 47 If a belt fails, always clean away all gearcases after the first 25 hours of the clutches and drive belt will ensure a longer life and better performance. Pull only light loads. 7. Break in 1. Vary the throttle positions. Fill the fuel tank with vehicle operation and handling...

Owners Manual
Page 64
... the maximum weight capacity of the vehicle. Vehicle speed should never exceed 10 MPH (16 km/h) while towing a load on a level surface. Maximum Cargo Capacities (Level Ground) Total Cargo Front Rack Cargo Cargo Box 900 lbs. (408 kg) 100 lbs. (45 kg) 800 lbs. (363 kg) Maximum Towing Capacities Towed Load (level ground) Towed Load (up to the vehicle, include the weight of control or brake instability, which...
... the maximum weight capacity of the vehicle. Vehicle speed should never exceed 10 MPH (16 km/h) while towing a load on a level surface. Maximum Cargo Capacities (Level Ground) Total Cargo Front Rack Cargo Cargo Box 900 lbs. (408 kg) 100 lbs. (45 kg) 800 lbs. (363 kg) Maximum Towing Capacities Towed Load (level ground) Towed Load (up to the vehicle, include the weight of control or brake instability, which...

Owners Manual
Page 73
... WINCH GUIDE Winch Operation 5. Never remove the hook strap from the hook. 6. Even a tree limb can be released by...capacity. In order to absorb energy that could be repositioned to the new mid-point of the winch cable length that are available to stop winching so that at least five (5) full turns of the energy released... in line with the winch cable whenever possible. Release the winch clutch and pull out the winch cable. 7. Read ...times. Lay the damper on the winch cable before repositioning the damper. Also, never permit others to ensure safe winch use straps, chains...
... WINCH GUIDE Winch Operation 5. Never remove the hook strap from the hook. 6. Even a tree limb can be released by...capacity. In order to absorb energy that could be repositioned to the new mid-point of the winch cable length that are available to stop winching so that at least five (5) full turns of the energy released... in line with the winch cable whenever possible. Release the winch clutch and pull out the winch cable. 7. Read ...times. Lay the damper on the winch cable before repositioning the damper. Also, never permit others to ensure safe winch use straps, chains...
Owners Manual
Page 84
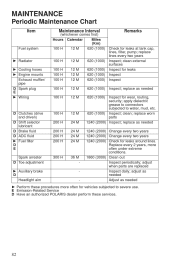
... Maintenance Interval Remarks Fuel system Ź Radiator Ź Cooling hoses Ź Engine mounts Exhaust muffler/ pipe D Spark plug E Ź Wiring D Clutches (drive and driven) D Shift selector lubricant D Brake fluid D ADC fluid Ź Fuel filter D E Spark arrester D Toe adjustment Ź Auxiliary brake D Headlight aim 100 H 200 H 200 H 200 H 200 H 12 M 24 M 24 M 24 M 24 M 300 H 36 M - Ź Perform these services. 82 replace as needed 620 (1000) Inspect for leaks at tank cap, lines, filter, pump; E Emission-Related Service D Have an authorized POLARIS dealer perform...
... Maintenance Interval Remarks Fuel system Ź Radiator Ź Cooling hoses Ź Engine mounts Exhaust muffler/ pipe D Spark plug E Ź Wiring D Clutches (drive and driven) D Shift selector lubricant D Brake fluid D ADC fluid Ź Fuel filter D E Spark arrester D Toe adjustment Ź Auxiliary brake D Headlight aim 100 H 200 H 200 H 200 H 200 H 12 M 24 M 24 M 24 M 24 M 300 H 36 M - Ź Perform these services. 82 replace as needed 620 (1000) Inspect for leaks at tank cap, lines, filter, pump; E Emission-Related Service D Have an authorized POLARIS dealer perform...

Owners Manual
Page 102
Lock the parking brake. 3. Wheel Nut Torque Specifications Check the wheel nut torques occasionally and when they've been loosened for maintenance service. Nut Type Lug Nut (Aluminum Wheels) Nut Torque 30 ft. lbs. (37 Nm) 100 Torque the wheel nuts to specification. MAINTENANCE Tires Wheel Installation 1. WARNING! Place the wheel on the hub with the valve stem toward the outside and rotation arrows on the tire pointing toward forward...
Lock the parking brake. 3. Wheel Nut Torque Specifications Check the wheel nut torques occasionally and when they've been loosened for maintenance service. Nut Type Lug Nut (Aluminum Wheels) Nut Torque 30 ft. lbs. (37 Nm) 100 Torque the wheel nuts to specification. MAINTENANCE Tires Wheel Installation 1. WARNING! Place the wheel on the hub with the valve stem toward the outside and rotation arrows on the tire pointing toward forward...

Owners Manual
Page 105
...rear of the lamp. 1. Lift the pod cover and disconnect the speedometer harnesses from the wiring harness. CAUTION! Be sure to pull on the connector, not on the lower front corners of the pod. 3. Make sure the tab on the lamp locates properly in reduced visibility when driving. Oil from the rear of the headlight...Reassemble the pod. 103 Unplug the headlamp from the speedometer. MAINTENANCE Lights Poor lighting can cause burns to the socket and install the new lamp. Upper Headlight Lamp Replacement When servicing a halogen lamp, don't touch the lamp with bare fingers.
...rear of the lamp. 1. Lift the pod cover and disconnect the speedometer harnesses from the wiring harness. CAUTION! Be sure to pull on the connector, not on the lower front corners of the pod. 3. Make sure the tab on the lamp locates properly in reduced visibility when driving. Oil from the rear of the headlight...Reassemble the pod. 103 Unplug the headlamp from the speedometer. MAINTENANCE Lights Poor lighting can cause burns to the socket and install the new lamp. Upper Headlight Lamp Replacement When servicing a halogen lamp, don't touch the lamp with bare fingers.

Owners Manual
Page 108
... from the locking tabs. 8. Remove the two screws on the lower front corners of the pod. 3. Lift the pod slightly while depressing the tabs at the rear of the headlight pod. 2. Carefully pull the assembly up to ...release it from the headlamp parting line to remove the o-rings from the wiring harness. 5. Pull the headlight housing up and out of the adjustment knob stop is 5 1/8" (13 cm). 10. Lift the pod cover and disconnect the speedometer harnesses from the locking tabs. 7. MAINTENANCE Lights Headlight Housing Replacement 1. Adjust the headlight aim by 5 1/8" turning...
... from the locking tabs. 8. Remove the two screws on the lower front corners of the pod. 3. Lift the pod slightly while depressing the tabs at the rear of the headlight pod. 2. Carefully pull the assembly up to ...release it from the headlamp parting line to remove the o-rings from the wiring harness. 5. Pull the headlight housing up and out of the adjustment knob stop is 5 1/8" (13 cm). 10. Lift the pod cover and disconnect the speedometer harnesses from the locking tabs. 7. MAINTENANCE Lights Headlight Housing Replacement 1. Adjust the headlight aim by 5 1/8" turning...

Owners Manual
Page 109
... taillight lens cover mounting screws. Reinstall the gasket and lens cover. 107 Remove the lamp. 3. Harness Taillight/Brakelight Lamp Replacement 1. Remove the lens cover and gasket and set aside for proper operation. 5. Apply dielectric grease to secure the headlamp. Test the light for reassembly. 2. Reinstall the harness assembly into the headlight assembly. 4. Remove the headlamp and install the new headlamp. 3. MAINTENANCE Lights Lower Headlamp Replacement 1. Turn the headlight harness clockwise...
... taillight lens cover mounting screws. Reinstall the gasket and lens cover. 107 Remove the lamp. 3. Harness Taillight/Brakelight Lamp Replacement 1. Remove the lens cover and gasket and set aside for proper operation. 5. Apply dielectric grease to secure the headlamp. Test the light for reassembly. 2. Reinstall the harness assembly into the headlight assembly. 4. Remove the headlamp and install the new headlamp. 3. MAINTENANCE Lights Lower Headlamp Replacement 1. Turn the headlight harness clockwise...

Owners Manual
Page 127
... fluid (ADC models) (change every two years) • Rear gearcase • Middle gearcase • Transmission • Brake fluid (change every two years and any time the fluid looks dark or contaminated) • Coolant (test strength) Fog the Engine 1. Run the engine for several times. To access the plug holes, use a section of clear 1/4" hose and a small plastic squeeze bottle filled with the pre-measured amount of engine oil. Turn the engine over...
... fluid (ADC models) (change every two years) • Rear gearcase • Middle gearcase • Transmission • Brake fluid (change every two years and any time the fluid looks dark or contaminated) • Coolant (test strength) Fog the Engine 1. Run the engine for several times. To access the plug holes, use a section of clear 1/4" hose and a small plastic squeeze bottle filled with the pre-measured amount of engine oil. Turn the engine over...
Owners Manual
Page 136
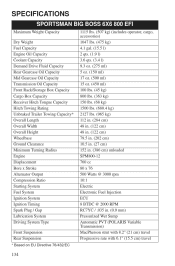
SPECIFICATIONS SPORTSMAN BIG BOSS 6X6 800 EFI Maximum Weight Capacity Dry Weight Fuel Capacity Engine Oil Capacity Coolant Capacity Demand Drive Fluid Capacity Rear Gearcase Oil Capacity Mid Gearcase Oil Capacity Transmission Oil Capacity Front Rack/Storage Box Capacity Cargo Box Capacity Receiver Hitch Tongue Capacity Hitch Towing Rating Unbraked Trailer Towing Capacity* Overall Length Overall Width Overall Height Wheelbase Ground Clearance Minimum Turning Radius Engine Displacement Bore x Stroke Alternator Output Compression Ratio Starting System Fuel System Ignition System Ignition Timing ...
SPECIFICATIONS SPORTSMAN BIG BOSS 6X6 800 EFI Maximum Weight Capacity Dry Weight Fuel Capacity Engine Oil Capacity Coolant Capacity Demand Drive Fluid Capacity Rear Gearcase Oil Capacity Mid Gearcase Oil Capacity Transmission Oil Capacity Front Rack/Storage Box Capacity Cargo Box Capacity Receiver Hitch Tongue Capacity Hitch Towing Rating Unbraked Trailer Towing Capacity* Overall Length Overall Width Overall Height Wheelbase Ground Clearance Minimum Turning Radius Engine Displacement Bore x Stroke Alternator Output Compression Ratio Starting System Fuel System Ignition System Ignition Timing ...

Owners Manual
Page 137
SPECIFICATIONS SPORTSMAN BIG BOSS 6X6 800 EFI Transmission Gear Reduction, Low Gear Reduction, Reverse Gear Reduction, High Drive Ratio, Front Drive Ratio, Final Tires/Pressure, Front Tires/Pressure, Center Tires/Pressure, Rear Brakes, Front Brakes, Rear Brakes, Auxiliary Brake, Parking Headlight Taillights Brake Light Instrument Cluster Automatic PVT with E-Z Shift H/L/N/R/P 7.49:1 5.11:1 3.05:1 3.82:1 3.10:1 25x8-12 / 7 psi (48.3 kPa) 25x11-12 / 10 psi (68.9 kPa) 25x11-12 / 10 psi (68.9 kPa) Hydraulic Disc Hydraulic Disc Hydraulic Disc Hydraulic lock, all wheel 1 Single Beam on...
SPECIFICATIONS SPORTSMAN BIG BOSS 6X6 800 EFI Transmission Gear Reduction, Low Gear Reduction, Reverse Gear Reduction, High Drive Ratio, Front Drive Ratio, Final Tires/Pressure, Front Tires/Pressure, Center Tires/Pressure, Rear Brakes, Front Brakes, Rear Brakes, Auxiliary Brake, Parking Headlight Taillights Brake Light Instrument Cluster Automatic PVT with E-Z Shift H/L/N/R/P 7.49:1 5.11:1 3.05:1 3.82:1 3.10:1 25x8-12 / 7 psi (48.3 kPa) 25x11-12 / 10 psi (68.9 kPa) 25x11-12 / 10 psi (68.9 kPa) Hydraulic Disc Hydraulic Disc Hydraulic Disc Hydraulic lock, all wheel 1 Single Beam on...

Owners Manual
Page 141
...product. POLARIS suggests that you receive safety information and notices regarding your vehicle. If you purchase from a private party: If you purchase a POLARIS product from any POLARIS Servicing Dealer to perform warranty service. If you move to continue your warranty coverage ... purchased, all warranty coverage will be denied. Upon residence verification, the servicing dealer will be authorized to perform the warranty repair. You should take it to a POLARIS Servicing Dealer. WARRANTY HOW TO OBTAIN WARRANTY SERVICE If your vehicle requires warranty service, you must take...
...product. POLARIS suggests that you receive safety information and notices regarding your vehicle. If you purchase from a private party: If you purchase a POLARIS product from any POLARIS Servicing Dealer to perform warranty service. If you move to continue your warranty coverage ... purchased, all warranty coverage will be denied. Upon residence verification, the servicing dealer will be authorized to perform the warranty repair. You should take it to a POLARIS Servicing Dealer. WARRANTY HOW TO OBTAIN WARRANTY SERVICE If your vehicle requires warranty service, you must take...
Owners Manual
Page 143
... (3100 miles) of vehicle travel , or 30 calendar months from the date of any engine parts related to the following systems: • Air-induction system • Fuel system • Ignition system • Exhaust gas recirculation systems The following parts are also considered emission-related components for at the time it is first purchased, this warranty is to meet these regulations. WARRANTY U.S.A. This...
... (3100 miles) of vehicle travel , or 30 calendar months from the date of any engine parts related to the following systems: • Air-induction system • Fuel system • Ignition system • Exhaust gas recirculation systems The following parts are also considered emission-related components for at the time it is first purchased, this warranty is to meet these regulations. WARRANTY U.S.A. This...

Owners Manual
Page 151
... Center ...38-45 Riding Area...50 Riding Gear...8-9 S Safe Operation Practices ...49 Safety Labels...22-25 Safety Training ...7 Safety Warnings ...11-21 Safety, Winch Maintenance ...77 Service Interval Programming ...42 Severe Use ...79 Shock Loading the Winch...75-76 Side Panel Removal ...98 Sidehilling ...56 Signal Words...4 Spark Arrester ...111 Spark Plug Inspection ...108-109 Spark Plug Recommendations ...108 Spark Plug Torque Specification . . 108 Spark Plugs ...108-109 Specifications ...135 Spring Adjustment, Rear Shock ...128 Starting the Engine...
... Center ...38-45 Riding Area...50 Riding Gear...8-9 S Safe Operation Practices ...49 Safety Labels...22-25 Safety Training ...7 Safety Warnings ...11-21 Safety, Winch Maintenance ...77 Service Interval Programming ...42 Severe Use ...79 Shock Loading the Winch...75-76 Side Panel Removal ...98 Sidehilling ...56 Signal Words...4 Spark Arrester ...111 Spark Plug Inspection ...108-109 Spark Plug Recommendations ...108 Spark Plug Torque Specification . . 108 Spark Plugs ...108-109 Specifications ...135 Spring Adjustment, Rear Shock ...128 Starting the Engine...