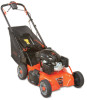

Owners Manual
Page 5
... and/or quick turns DO NOT operate on steep slopes or near rotating blades. NEVER direct discharge toward people, pets or property. Do not operate mower unless guards are in operating position or entire bagger is in serious injury or death • Do not operate machine on slopes. To avoid amputation...
... and/or quick turns DO NOT operate on steep slopes or near rotating blades. NEVER direct discharge toward people, pets or property. Do not operate mower unless guards are in operating position or entire bagger is in serious injury or death • Do not operate machine on slopes. To avoid amputation...

Owners Manual
Page 6
... missing or damaged decals and shields, correctly operating safety interlock system, and deterioration of amputating hands and feet and throwing objects. Be alert and turn mower off if a child enters the area. Keep children out of the mowing area and in compliance with safety devices. Always train any outdoor power equipment...
... missing or damaged decals and shields, correctly operating safety interlock system, and deterioration of amputating hands and feet and throwing objects. Be alert and turn mower off if a child enters the area. Keep children out of the mowing area and in compliance with safety devices. Always train any outdoor power equipment...
Owners Manual
Page 7
... for proper operation and installation of alcohol or drugs. Slope Operation Slopes are hot. Exercise caution when changing direction on mower stops engine and blade within 5 seconds whenever operator releases PTO lever. Operation The engine/blade control feature on slopes. Check...necessary. Repair, if necessary, before starting engine. Always be maintained in safe operating condition. Never leave a running . Never operate mower in a closed or poorly ventilated area. Never modify or remove safety devices. On self-propelled models, releasing wheel drive control ...
... for proper operation and installation of alcohol or drugs. Slope Operation Slopes are hot. Exercise caution when changing direction on mower stops engine and blade within 5 seconds whenever operator releases PTO lever. Operation The engine/blade control feature on slopes. Check...necessary. Repair, if necessary, before starting engine. Always be maintained in safe operating condition. Never leave a running . Never operate mower in a closed or poorly ventilated area. Never modify or remove safety devices. On self-propelled models, releasing wheel drive control ...
Owners Manual
Page 9
...up . Do not change engine governor setting or overspeed the engine. Moving parts can cut or amputate fingers or a hand. On multiblade mowers, rotation of one blade will cause all blades to cool before storing. Do not transport machine while engine is running . *Disconnect the ...repairs with fuel in fuel tank, inside a building where any fuel-soaked debris. Never weld or straighten mower blades. Keep machine free of debris. See engine manual for proper storage. Mower blades are present. Never secure from rods or linkages that could be damaged. For extended storage, shut ...
...up . Do not change engine governor setting or overspeed the engine. Moving parts can cut or amputate fingers or a hand. On multiblade mowers, rotation of one blade will cause all blades to cool before storing. Do not transport machine while engine is running . *Disconnect the ...repairs with fuel in fuel tank, inside a building where any fuel-soaked debris. Never weld or straighten mower blades. Keep machine free of debris. See engine manual for proper storage. Mower blades are present. Never secure from rods or linkages that could be damaged. For extended storage, shut ...

Owners Manual
Page 10
Remove mower and grass bag from carton. 2. 911173: Loosen handlebar mounting hardware. Mulch Plug 3. Battery Charger (911179) Figure 3 1 2 1. Hardware 2. CARTON CONTENTS ASSEMBLY 1. See Figure 4. 5 911173 6 3 4 2 1 1. Grass Bag 6. ASSEMBLY CAUTION: AVOID INJURY. See Figure 4. 3. 911173: Rotate handlebar to the desired position and tighten mounting hardware. Mower Unit 4. Handlebar Figure 4 EN - 10 Literature Pack 5. Read and understand the entire Safety section before proceeding. Side Discharge Chute 2.
Remove mower and grass bag from carton. 2. 911173: Loosen handlebar mounting hardware. Mulch Plug 3. Battery Charger (911179) Figure 3 1 2 1. Hardware 2. CARTON CONTENTS ASSEMBLY 1. See Figure 4. 5 911173 6 3 4 2 1 1. Grass Bag 6. ASSEMBLY CAUTION: AVOID INJURY. See Figure 4. 3. 911173: Rotate handlebar to the desired position and tighten mounting hardware. Mower Unit 4. Handlebar Figure 4 EN - 10 Literature Pack 5. Read and understand the entire Safety section before proceeding. Side Discharge Chute 2.
Owners Manual
Page 11
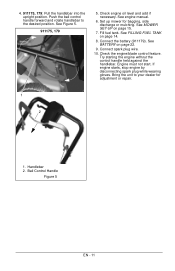
... while wearing gloves. Check engine oil level and add if necessary. See engine manual. 6. Bring the unit to the desired position. See MOWER SET-UP on page 22. 9. See BATTERY on page 15. 7. Engine must not start. Connect spark plug wire. 10. Try starting...). Bail Control Handle Figure 5 EN - 11 Check the engine/blade control feature. Set up mower for adjustment or repair. 1 2 1. 4. 911175, 179: Pull the handlebar into the upright position. Handlebar 2. Push the bail control handle forward and rotate handlebar to your dealer for bagging, side discharge or mulching...
... while wearing gloves. Check engine oil level and add if necessary. See engine manual. 6. Bring the unit to the desired position. See MOWER SET-UP on page 22. 9. See BATTERY on page 15. 7. Engine must not start. Connect spark plug wire. 10. Try starting...). Bail Control Handle Figure 5 EN - 11 Check the engine/blade control feature. Set up mower for adjustment or repair. 1 2 1. 4. 911175, 179: Pull the handlebar into the upright position. Handlebar 2. Push the bail control handle forward and rotate handlebar to your dealer for bagging, side discharge or mulching...

Owners Manual
Page 15
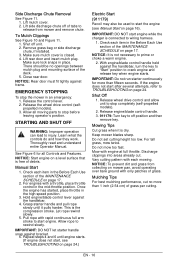
... and deterioration under normal usage. Rear Door 2. Shut off unit. 2. Make sure chute covers discharge opening. 7. If necessary, clear debris from mower, wash bag with rear door open unless grass bag is in place. 4. Grass Bag Removal 1. Install mulch plug (see Figure 10). Align...allow grass clumps or a grass coating to dry. 2 1 3 4 1. Check bag frequently for necessary replacement. Replace worn or damaged bag with Ariens original equipment replacement bag only. Mulch Plug Figure 10 To Discharge Clippings to lift and remove grass bag. 3. Tabs Figure 11 EN - 15 ...
... and deterioration under normal usage. Rear Door 2. Shut off unit. 2. Make sure chute covers discharge opening. 7. If necessary, clear debris from mower, wash bag with rear door open unless grass bag is in place. 4. Grass Bag Removal 1. Install mulch plug (see Figure 10). Align...allow grass clumps or a grass coating to dry. 2 1 3 4 1. Check bag frequently for necessary replacement. Replace worn or damaged bag with Ariens original equipment replacement bag only. Mulch Plug Figure 10 To Discharge Clippings to lift and remove grass bag. 3. Tabs Figure 11 EN - 15 ...
Owners Manual
Page 16
... inch (2.54 cm) of grass per cutting. IMPORTANT: DO NOT start after several attempts, refer to stop the mower in the Before Each Use section of the MAINTENANCE SCHEDULE on mower pan, avoid operating over bare ground with engine at full throttle. With engine/blade control handle held against the handlebar... models). 3. Once the engine has started, place throttle in place. IMPORTANT: DO NOT let starter handle snap against frame. Check each mowing. Keep mower blades sharp. Make sure mulch cover is the compression stroke. Manual Start 1. NOTICE: To prevent dirt and grass from...
... inch (2.54 cm) of grass per cutting. IMPORTANT: DO NOT start after several attempts, refer to stop the mower in the Before Each Use section of the MAINTENANCE SCHEDULE on mower pan, avoid operating over bare ground with engine at full throttle. With engine/blade control handle held against the handlebar... models). 3. Once the engine has started, place throttle in place. IMPORTANT: DO NOT let starter handle snap against frame. Check each mowing. Keep mower blades sharp. Make sure mulch cover is the compression stroke. Manual Start 1. NOTICE: To prevent dirt and grass from...
Owners Manual
Page 17
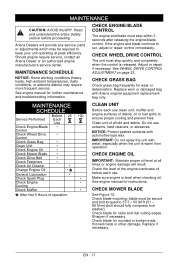
... Check Engine/Blade • Control Check Wheel Drive • Control Check Grass Bag • Clean Unit • Check Engine Oil • Check Mower Blade • Check Drive Belt • Check Fasteners • Check Air Cleaner • Change Engine Oil General Lubrication *• • Check... may be secure and bolt torqued to run, adjust or repair control immediately. IMPORTANT: Do not spray the unit with Ariens original equipment replacement bag only. CHECK MOWER BLADE See Figure 12. If the engine and blade continue to 37.5 - 50 lbf-ft (51 - 68 N•...
... Check Engine/Blade • Control Check Wheel Drive • Control Check Grass Bag • Clean Unit • Check Engine Oil • Check Mower Blade • Check Drive Belt • Check Fasteners • Check Air Cleaner • Change Engine Oil General Lubrication *• • Check... may be secure and bolt torqued to run, adjust or repair control immediately. IMPORTANT: Do not spray the unit with Ariens original equipment replacement bag only. CHECK MOWER BLADE See Figure 12. If the engine and blade continue to 37.5 - 50 lbf-ft (51 - 68 N•...

Owners Manual
Page 18
...compress lock washer). 3. Stop engine, wait for all moving parts to unit. Connect spark plug wire. Discard mower blade if: • More than 1/2" (1.27 cm) of the mower blade. DO NOT change angle of cutting edge or round the corner of metal is removed. • Air...8226; Blade is balanced (Figure 13). 4. Square Corner 2. Torque bolt to This Pattern 2 4 3 DISCARD If More Than 1/2" (1.27 cm) 1. Cutting Edge 3. Check mower blade balance. Block blade to 37.5 - 50 lbf-ft (51 - 68 N•m). 1 2 1. Replace blade, flat washer, lock washer and bolt on unit. 5. NEVER...
...compress lock washer). 3. Stop engine, wait for all moving parts to unit. Connect spark plug wire. Discard mower blade if: • More than 1/2" (1.27 cm) of the mower blade. DO NOT change angle of cutting edge or round the corner of metal is removed. • Air...8226; Blade is balanced (Figure 13). 4. Square Corner 2. Torque bolt to This Pattern 2 4 3 DISCARD If More Than 1/2" (1.27 cm) 1. Cutting Edge 3. Check mower blade balance. Block blade to 37.5 - 50 lbf-ft (51 - 68 N•m). 1 2 1. Replace blade, flat washer, lock washer and bolt on unit. 5. NEVER...
Owners Manual
Page 19
See DRIVE BELT REPLACEMENT on side to remove air cleaner cover. NOTICE: Cutting height must lean mower on page 21. Refer to blade hardware and all guards, shields and safety devices. NOTICE: User must be set to lowest position to drain oil ... and block. It should be maintained at the factory. CHECK SPARK PLUG Spark plug should need no routine lubrication. ALWAYS allow parts to your local Ariens dealer for specific information. CHECK DRIVE BELT (911175, 179) Check drive belt and replace if worn or damaged. If the transmission leaks grease, bring the...
See DRIVE BELT REPLACEMENT on side to remove air cleaner cover. NOTICE: Cutting height must lean mower on page 21. Refer to blade hardware and all guards, shields and safety devices. NOTICE: User must be set to lowest position to drain oil ... and block. It should be maintained at the factory. CHECK SPARK PLUG Spark plug should need no routine lubrication. ALWAYS allow parts to your local Ariens dealer for specific information. CHECK DRIVE BELT (911175, 179) Check drive belt and replace if worn or damaged. If the transmission leaks grease, bring the...
Owners Manual
Page 22
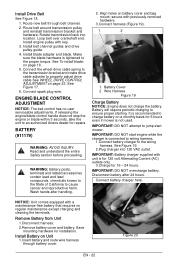
... the engine/blade control handle does not stop the engine or blade within 3 seconds, take the unit to an authorized Ariens dealer for 6 hours even if mower is not used. secure with unit is recommended to the wiring harness. It is for 120 volt Alternating Current (AC... Figure 18. 1. Rotate transmission back into 120 VAC outlet. See To install blade: on battery cover and bag mount; IMPORTANT: DO NOT start mower. IMPORTANT: Battery charger supplied with previously removed hardware. 3.Connect harness (Figure 19). 1 2 1. Install Battery on Unit 1.Insert battery and route ...
... the engine/blade control handle does not stop the engine or blade within 3 seconds, take the unit to an authorized Ariens dealer for 6 hours even if mower is not used. secure with unit is recommended to the wiring harness. It is for 120 volt Alternating Current (AC... Figure 18. 1. Rotate transmission back into 120 VAC outlet. See To install blade: on battery cover and bag mount; IMPORTANT: DO NOT start mower. IMPORTANT: Battery charger supplied with previously removed hardware. 3.Connect harness (Figure 19). 1 2 1. Install Battery on Unit 1.Insert battery and route ...

Owners Manual
Page 24
...Clean unit thoroughly with highpressure water or store unit outdoors. Fuel System Gasoline left in the system. Prevent deposits from your Ariens Dealer. Add fuel stabilizer according to dry. 4. Engine/Blade control cable detached, broken, or not adjusted properly. 1. .... Grass is too fast. 1. CORRECTION 3. Adjust, repair or replace as necessary. 1. Allow grass to cool. Handlebars see CHECK MOWER BLADE on mower. Mower clogged with potential sources of a building with grass. STORAGE CAUTION: AVOID INJURY. Cleaning Allow unit to dry. 3. Check fuel level...
...Clean unit thoroughly with highpressure water or store unit outdoors. Fuel System Gasoline left in the system. Prevent deposits from your Ariens Dealer. Add fuel stabilizer according to dry. 4. Engine/Blade control cable detached, broken, or not adjusted properly. 1. .... Grass is too fast. 1. CORRECTION 3. Adjust, repair or replace as necessary. 1. Allow grass to cool. Handlebars see CHECK MOWER BLADE on mower. Mower clogged with potential sources of a building with grass. STORAGE CAUTION: AVOID INJURY. Cleaning Allow unit to dry. 3. Check fuel level...
Owners Manual
Page 25
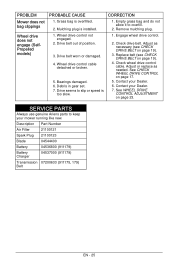
... wheel drive control. 2. Check wheel drive control cable. See CHECK WHEEL DRIVE CONTROL on page 23. See WHEEL DRIVE CONTROL ADJUSTMENT on page 17. 5. PROBLEM Mower does not bag clippings Wheel drive does not engage (SelfPropelled models) PROBABLE CAUSE 1. Mulching plug is overfilled. 2. Drive belt out of position. 3. Contact your Dealer... page 19). 4. Bearings damaged. 6. Wheel drive control cable detached or broken. 5. Drive belt worn or damaged. 4. CORRECTION 1. Check drive belt. SERVICE PARTS Always use genuine Ariens parts to keep your mower running like new.
... wheel drive control. 2. Check wheel drive control cable. See CHECK WHEEL DRIVE CONTROL on page 23. See WHEEL DRIVE CONTROL ADJUSTMENT on page 17. 5. PROBLEM Mower does not bag clippings Wheel drive does not engage (SelfPropelled models) PROBABLE CAUSE 1. Mulching plug is overfilled. 2. Drive belt out of position. 3. Contact your Dealer... page 19). 4. Bearings damaged. 6. Wheel drive control cable detached or broken. 5. Drive belt worn or damaged. 4. CORRECTION 1. Check drive belt. SERVICE PARTS Always use genuine Ariens parts to keep your mower running like new.
Owners Manual
Page 26
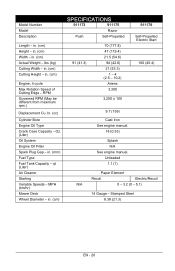
... Recoil Electric/Recoil N/A 0 - 3.2 (0 - 5.1) 14 Gauge - Model Number Model Description Length - MPH (km/hr) Mower Deck Wheel Diameter - in . (cm) SPECIFICATIONS 911173 911175 Razor Push Self-Propelled 91 (41.3) 70 (177.8) 47 (119.4) 21.5 (54.6) 94 (42.6) 21 (53.3) 1 - 4 (2.5 - 10.2) Ariens 3,300 3,200 ± 100 911179 Self-Propelled Electric Start 100 (45.4) 9.7 (159) Cast Iron...
... Recoil Electric/Recoil N/A 0 - 3.2 (0 - 5.1) 14 Gauge - Model Number Model Description Length - MPH (km/hr) Mower Deck Wheel Diameter - in . (cm) SPECIFICATIONS 911173 911175 Razor Push Self-Propelled 91 (41.3) 70 (177.8) 47 (119.4) 21.5 (54.6) 94 (42.6) 21 (53.3) 1 - 4 (2.5 - 10.2) Ariens 3,300 3,200 ± 100 911179 Self-Propelled Electric Start 100 (45.4) 9.7 (159) Cast Iron...
Owners Manual
Page 27
... LM Series Mowers; To obtain warranty service, the original purchaser must complete the product registration card in the chart below . equipment put to engine manufacturer's warranty statement. An authorized Ariens dealer (Ariens brand products), Gravely dealer (Gravely brand ...(agricultural, commercial, or industrial) or used commercially. Consumer_2012_Rev. Consumer Mowing Equipment Limited Warranty Ariens Company (Ariens) warrants to the original purchaser that Ariens, Gravely and Countax brand lawn and garden consumer products purchased on Zero-Turn Riders HA Batteries...
... LM Series Mowers; To obtain warranty service, the original purchaser must complete the product registration card in the chart below . equipment put to engine manufacturer's warranty statement. An authorized Ariens dealer (Ariens brand products), Gravely dealer (Gravely brand ...(agricultural, commercial, or industrial) or used commercially. Consumer_2012_Rev. Consumer Mowing Equipment Limited Warranty Ariens Company (Ariens) warrants to the original purchaser that Ariens, Gravely and Countax brand lawn and garden consumer products purchased on Zero-Turn Riders HA Batteries...

Owners Manual
Page 28
... plugs, oil, oil filters, air filters, fuel filters, brake linings, brake arms, brake shoes, skid shoes, scraper blades, shear bolts, mower blades, mower vanes, brushes, headlights, light bulbs, knives, cutters. • Any misuse, alteration, improper assembly, improper adjustment, neglect, or accident which...an Authorized Service Representative: In the U.S. Hallam, Victoria 3803 Australia Phone: (03) 9796 4244 1800 335 489 www.ariens.com.au Exclusions - Disclaimer Ariens Company may void the warranty. • Damages resulting from region to time change the design of its products. You are...
... plugs, oil, oil filters, air filters, fuel filters, brake linings, brake arms, brake shoes, skid shoes, scraper blades, shear bolts, mower blades, mower vanes, brushes, headlights, light bulbs, knives, cutters. • Any misuse, alteration, improper assembly, improper adjustment, neglect, or accident which...an Authorized Service Representative: In the U.S. Hallam, Victoria 3803 Australia Phone: (03) 9796 4244 1800 335 489 www.ariens.com.au Exclusions - Disclaimer Ariens Company may void the warranty. • Damages resulting from region to time change the design of its products. You are...
Parts Catalog
Page 3
... 911173 (Razor) 4 Cycle, Ariens, 6hp Recoil, Push Serial No. 000101 and up Model 911175 (Razor) 4 Cycle, Ariens, 6hp Recoil, Self Propelled Serial No. 000101 and up Model 911179 (Razor) 4 Cycle, Ariens, 6hp Electric/Recoil, Self Propelled Serial No. 000101 and up Model 911181 (Razor) 4 Cycle, Ariens, 6hp ...Recoil, Self Propelled Serial No. 000101 and up TABLE OF CONTENTS DECALS Decals 4 MAIN FRAME Handlebar and Controls 6 Mower Deck and Bagger 8 ...
... 911173 (Razor) 4 Cycle, Ariens, 6hp Recoil, Push Serial No. 000101 and up Model 911175 (Razor) 4 Cycle, Ariens, 6hp Recoil, Self Propelled Serial No. 000101 and up Model 911179 (Razor) 4 Cycle, Ariens, 6hp Electric/Recoil, Self Propelled Serial No. 000101 and up Model 911181 (Razor) 4 Cycle, Ariens, 6hp ...Recoil, Self Propelled Serial No. 000101 and up TABLE OF CONTENTS DECALS Decals 4 MAIN FRAME Handlebar and Controls 6 Mower Deck and Bagger 8 ...
Parts Catalog
Page 8
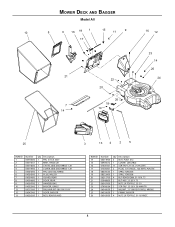
MOWER DECK AND BAGGER Model All 10 8 6 16 19 1 15 11 9 16 12 17 21 7 14 22 20 26 18 14 23 14 20 24... 19 20 21 22 23 24 25 26 Number 06514900 06900512 07400101 07500301 08300535 08322400 06215700 05946800 06543100 07400034 04540659 04520659 06543500 Qty Description 3 NUT, PUSH .312 1 CLAMP, LM CABLE 11 SCR-TAP 12-14 X .75 PLSTITE 2 PLUG, 5/16 HOLE, .125 MATL PLASTIC 1 SPRG, TORSION 1 SPRG, TORSION 4 BLT-RDHDSQNK .31...X .75 2 BLT-HEX .25-20 X .75 2 NUT, LK-TOP-FLG .25-20 2 SCR-TAP .25-20 X .50 HWH TR 1 WLDMT, 21" LM DECK SHELL ARIENS 1 FRAME, BAGGER 4 NUT, LK-TOP-FLG .31-18 YWZC 8
MOWER DECK AND BAGGER Model All 10 8 6 16 19 1 15 11 9 16 12 17 21 7 14 22 20 26 18 14 23 14 20 24... 19 20 21 22 23 24 25 26 Number 06514900 06900512 07400101 07500301 08300535 08322400 06215700 05946800 06543100 07400034 04540659 04520659 06543500 Qty Description 3 NUT, PUSH .312 1 CLAMP, LM CABLE 11 SCR-TAP 12-14 X .75 PLSTITE 2 PLUG, 5/16 HOLE, .125 MATL PLASTIC 1 SPRG, TORSION 1 SPRG, TORSION 4 BLT-RDHDSQNK .31...X .75 2 BLT-HEX .25-20 X .75 2 NUT, LK-TOP-FLG .25-20 2 SCR-TAP .25-20 X .50 HWH TR 1 WLDMT, 21" LM DECK SHELL ARIENS 1 FRAME, BAGGER 4 NUT, LK-TOP-FLG .31-18 YWZC 8

Parts Catalog
Page 11
... Qty Description 1 PULLEY, GROUND DRIVE, LM (911175, 179, 181) 2 GUIDE, BELT - ES (911179)NS 11 INNER 1 GUIDE, BELT CRANKSHAFT (911175, 179, 181) 1 ADAPTOR, BLADE 1 BLADE, MOWER 21" HIGH-LIFT 1 @BLT-HEX .44-20X2.25 GR8 YWZC 1 @WSHR-LK .44X.109 REG YWZC 29 BOM ID 31 32 33 33 34 35...
... Qty Description 1 PULLEY, GROUND DRIVE, LM (911175, 179, 181) 2 GUIDE, BELT - ES (911179)NS 11 INNER 1 GUIDE, BELT CRANKSHAFT (911175, 179, 181) 1 ADAPTOR, BLADE 1 BLADE, MOWER 21" HIGH-LIFT 1 @BLT-HEX .44-20X2.25 GR8 YWZC 1 @WSHR-LK .44X.109 REG YWZC 29 BOM ID 31 32 33 33 34 35...


