
Owners Manual
Page 2
... number label, located on this unit is not available, contact the engine manufacturer for engine service recommendations. If the engine manual is covered by a separate manual specific to this manual for a replacement manual. Serial Number Label Figure 1 • Record Unit Model and Serial numbers here. • Record Engine Model and Serial numbers here. TABLE OF CONTENTS Safety 4 Assembly 10 Controls and Features 12 Operation 13 Maintenance Schedule 17 Service and Adjustments 20 Storage 24 Troubleshooting 24 Service Parts 25 Specifications...
... number label, located on this unit is not available, contact the engine manufacturer for engine service recommendations. If the engine manual is covered by a separate manual specific to this manual for a replacement manual. Serial Number Label Figure 1 • Record Unit Model and Serial numbers here. • Record Engine Model and Serial numbers here. TABLE OF CONTENTS Safety 4 Assembly 10 Controls and Features 12 Operation 13 Maintenance Schedule 17 Service and Adjustments 20 Storage 24 Troubleshooting 24 Service Parts 25 Specifications...
Owners Manual
Page 3
... U.S. Be alert to you before operation. REQUIRED OPERATOR TRAINING Original purchaser of unit. Tampering with the latest service information. EN - 3 Registering the product will be optional. DISCLAIMER Ariens reserves the right to discontinue, change, and improve its engine may restrict the age of unauthorized replacement parts. Discuss and emphasize the Safety Precautions. UNAUTHORIZED REPLACEMENT PARTS Use only Ariens replacement parts. Fill out Original Purchaser Registration...
... U.S. Be alert to you before operation. REQUIRED OPERATOR TRAINING Original purchaser of unit. Tampering with the latest service information. EN - 3 Registering the product will be optional. DISCLAIMER Ariens reserves the right to discontinue, change, and improve its engine may restrict the age of unauthorized replacement parts. Discuss and emphasize the Safety Precautions. UNAUTHORIZED REPLACEMENT PARTS Use only Ariens replacement parts. Fill out Original Purchaser Registration...

Owners Manual
Page 6
... operating safety interlock system, and deterioration of all controls • The functions of grass catchers. Children Tragic accidents can prevent and is not alert to themselves, other debris build-up oil or fuel spillage and remove any outdoor power equipment. Children are familiar with the maintenance schedule. Never allow responsible adults, who are often attracted to operate the machine. Keep machine free...
... operating safety interlock system, and deterioration of all controls • The functions of grass catchers. Children Tragic accidents can prevent and is not alert to themselves, other debris build-up oil or fuel spillage and remove any outdoor power equipment. Children are familiar with the maintenance schedule. Never allow responsible adults, who are often attracted to operate the machine. Keep machine free...
Owners Manual
Page 7
... good artificial light. Operation on it, do not mow it repaired before using unit. EN - 7 Do not operate machine while under the machine. walk; On self-propelled models, wheel drive must stop the engine (motor) and check for proper operation and installation of bystanders before starting engine. can cause fire or explosion. Exercise caution when changing direction on mower stops engine and blade within 5 seconds whenever operator releases PTO lever. Repair, if necessary, before removing grass catcher or unclogging chute. Stay...
... good artificial light. Operation on it, do not mow it repaired before using unit. EN - 7 Do not operate machine while under the machine. walk; On self-propelled models, wheel drive must stop the engine (motor) and check for proper operation and installation of bystanders before starting engine. can cause fire or explosion. Exercise caution when changing direction on mower stops engine and blade within 5 seconds whenever operator releases PTO lever. Repair, if necessary, before removing grass catcher or unclogging chute. Stay...
Owners Manual
Page 8
... harm. Never remove gas cap or add fuel with care. Handle with the engine running. Batteries Avoid Electric Shock. ALWAYS wear safety glasses and protective gear near battery. DO NOT operate near drop-offs, ditches, or embankments. Never overfill fuel tank. Use only Ariens Company-recommended attachments that are explosive. ALWAYS keep batteries out of reach of California to your use a nozzle lock-open flame, spark, or pilot light such as...
... harm. Never remove gas cap or add fuel with care. Handle with the engine running. Batteries Avoid Electric Shock. ALWAYS wear safety glasses and protective gear near battery. DO NOT operate near drop-offs, ditches, or embankments. Never overfill fuel tank. Use only Ariens Company-recommended attachments that are explosive. ALWAYS keep batteries out of reach of California to your use a nozzle lock-open flame, spark, or pilot light such as...
Owners Manual
Page 9
.... Do not transport machine while engine is running . *Disconnect the spark plug wire and ground against engine to prevent unintended starting. Allow machine to transport vehicle. See engine manual for proper storage. Keep unit free of grass, leaves, or other debris build-up. Do not change engine governor setting or overspeed the engine. Never weld or straighten mower blades. Never secure from rods or linkages that could be...
.... Do not transport machine while engine is running . *Disconnect the spark plug wire and ground against engine to prevent unintended starting. Allow machine to transport vehicle. See engine manual for proper storage. Keep unit free of grass, leaves, or other debris build-up. Do not change engine governor setting or overspeed the engine. Never weld or straighten mower blades. Never secure from rods or linkages that could be...

Owners Manual
Page 12
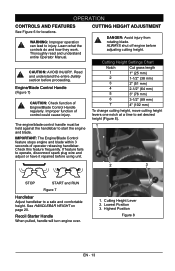
Muffler and Muffler Guard 9. Air Filter 11. Wheel Drive Control (911175, 179) 3. Handlebars 4. Fuel Tank and Cap 7. Side Discharge Chute 13. Battery (911179) Figure 6 6 7 10 EN - 12 Oil Fill/Dipstick 8. Handlebar Adjustment Holes 15. Grass Bag 5. Recoil Starter Handle 16. Cutting Height Lever 10. Mulch Plug 14. Ignition Switch (911179) 17. Side Discharge Cover 12. CONTROLS AND FEATURES 2 3 4 15 5 9 1 16 17 14 13 11 12 8 1. Rear Door 6. Engine/Blade Control 2.
Muffler and Muffler Guard 9. Air Filter 11. Wheel Drive Control (911175, 179) 3. Handlebars 4. Fuel Tank and Cap 7. Side Discharge Chute 13. Battery (911179) Figure 6 6 7 10 EN - 12 Oil Fill/Dipstick 8. Handlebar Adjustment Holes 15. Grass Bag 5. Recoil Starter Handle 16. Cutting Height Lever 10. Mulch Plug 14. Ignition Switch (911179) 17. Side Discharge Cover 12. CONTROLS AND FEATURES 2 3 4 15 5 9 1 16 17 14 13 11 12 8 1. Rear Door 6. Engine/Blade Control 2.
Owners Manual
Page 13
... change cutting height, move cutting height levers one notch at a time to set desired height (Figure 8). 1 2 3 STOP START and RUN Figure 7 Handlebar Adjust handlebar to injury. Lowest Position 3. The engine/blade control handle must be held against the handlebar to operate, disconnect spark plug wire and adjust or have it repaired before proceeding. See HANDLEBAR HEIGHT on page 20. CAUTION: AVOID INJURY. OPERATION CONTROLS AND FEATURES See Figure 6 for locations. Thoroughly read and understand entire Operator Manual. CUTTING HEIGHT ADJUSTMENT...
... change cutting height, move cutting height levers one notch at a time to set desired height (Figure 8). 1 2 3 STOP START and RUN Figure 7 Handlebar Adjust handlebar to injury. Lowest Position 3. The engine/blade control handle must be held against the handlebar to operate, disconnect spark plug wire and adjust or have it repaired before proceeding. See HANDLEBAR HEIGHT on page 20. CAUTION: AVOID INJURY. OPERATION CONTROLS AND FEATURES See Figure 6 for locations. Thoroughly read and understand entire Operator Manual. CUTTING HEIGHT ADJUSTMENT...

Owners Manual
Page 14
... evaporative emissions control system components. START Position (2): Starter turns over the engine. Do not use a funnel or other device that the recommended fuel level inside the tank is engaged. Ignition Switch (911179) A removable key operates 1 the ignition switch. This equipment and/or its engine may cause permanent damage to the recommended level. Replace fuel cap and tighten. 5. To stop: Release wheel drive control. IMPORTANT: Refer to prevent dust, dirt, and debris from entering fuel tank. 2. OPTIONAL CONTROLS Wheel Drive Control Lever (911175, 179...
... evaporative emissions control system components. START Position (2): Starter turns over the engine. Do not use a funnel or other device that the recommended fuel level inside the tank is engaged. Ignition Switch (911179) A removable key operates 1 the ignition switch. This equipment and/or its engine may cause permanent damage to the recommended level. Replace fuel cap and tighten. 5. To stop: Release wheel drive control. IMPORTANT: Refer to prevent dust, dirt, and debris from entering fuel tank. 2. OPTIONAL CONTROLS Wheel Drive Control Lever (911175, 179...

Owners Manual
Page 15
... rear door and install mulch plug (see Figure 10). 4. Align side discharge chute onto the mower tabs. Rest mulch cover on the handle near the bottom of grass bag or mower pan. Use handle to collect inside of the plug. 5. Install mulch plug (see Figure 10). DO NOT allow to dry. 2 1 3 4 1. Shut off unit. 2. Make sure chute covers discharge opening. 7. Side Discharge Chute 2. Mulch Cover 3. CAUTION: If clog or obstruction prevents grass flow, release the control lever handle and disconnect spark plug wire...
... rear door and install mulch plug (see Figure 10). 4. Align side discharge chute onto the mower tabs. Rest mulch cover on the handle near the bottom of grass bag or mower pan. Use handle to collect inside of the plug. 5. Install mulch plug (see Figure 10). DO NOT allow to dry. 2 1 3 4 1. Shut off unit. 2. Make sure chute covers discharge opening. 7. Side Discharge Chute 2. Mulch Cover 3. CAUTION: If clog or obstruction prevents grass flow, release the control lever handle and disconnect spark plug wire...
Owners Manual
Page 16
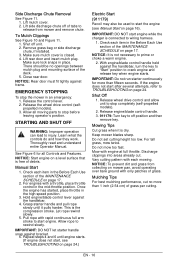
... remove key. Release engine/blade control handle. 3. 911179: Turn key to rewind slowly. Do not mow too fast. EN - 16 Make sure lock snaps in the high speed position. 3. Thoroughly read and understand entire Operator Manual. See Figure 6 for more than fifteen seconds. Hold engine/blade control lever against frame. With engine/blade control handle held against bracket. 6. Keep mower blades sharp. Remove grass bag or side discharge chute, if installed. 3. There should be used to start the engine (see TROUBLESHOOTING on page 24.) Electric Start...
... remove key. Release engine/blade control handle. 3. 911179: Turn key to rewind slowly. Do not mow too fast. EN - 16 Make sure lock snaps in the high speed position. 3. Thoroughly read and understand entire Operator Manual. See Figure 6 for more than fifteen seconds. Hold engine/blade control lever against frame. With engine/blade control handle held against bracket. 6. Keep mower blades sharp. Remove grass bag or side discharge chute, if installed. 3. There should be used to start the engine (see TROUBLESHOOTING on page 24.) Electric Start...
Owners Manual
Page 17
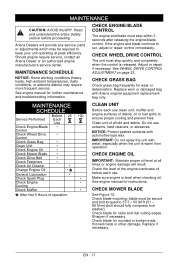
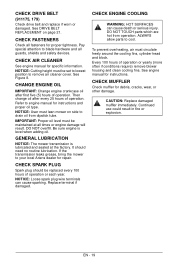
... is level when checking oil. MAINTENANCE SCHEDULE Before 25 100 Service Performed Each Use Check Engine/Blade • Control Check Wheel Drive • Control Check Grass Bag • Clean Unit • Check Engine Oil • Check Mower Blade • Check Drive Belt • Check Fasteners • Check Air Cleaner • Change Engine Oil General Lubrication *• • Check Spark Plug • Check Engine • Cooling Check Muffler • * After first 5 Hours of all times or engine damage will provide any service, parts or adjustments...
... is level when checking oil. MAINTENANCE SCHEDULE Before 25 100 Service Performed Each Use Check Engine/Blade • Control Check Wheel Drive • Control Check Grass Bag • Clean Unit • Check Engine Oil • Check Mower Blade • Check Drive Belt • Check Fasteners • Check Air Cleaner • Change Engine Oil General Lubrication *• • Check Spark Plug • Check Engine • Cooling Check Muffler • * After first 5 Hours of all times or engine damage will provide any service, parts or adjustments...
Owners Manual
Page 19
... cover. CHANGE ENGINE OIL IMPORTANT: Change engine crankcase oil after every 25 hours of operation. NOTICE: User must be replaced every 100 hours of operation or yearly (more often if conditions require) remove blower housing and clean cooling fins. DO NOT overfill. ALWAYS allow parts to your local Ariens dealer for instructions and proper oil type. See DRIVE BELT REPLACEMENT on side to engine manual for repair. GENERAL LUBRICATION NOTICE: The mower transmission is level when adding oil. Replace...
... cover. CHANGE ENGINE OIL IMPORTANT: Change engine crankcase oil after every 25 hours of operation. NOTICE: User must be replaced every 100 hours of operation or yearly (more often if conditions require) remove blower housing and clean cooling fins. DO NOT overfill. ALWAYS allow parts to your local Ariens dealer for instructions and proper oil type. See DRIVE BELT REPLACEMENT on side to engine manual for repair. GENERAL LUBRICATION NOTICE: The mower transmission is level when adding oil. Replace...

Owners Manual
Page 20
.... 1. Disconnect spark plug wire. 3. Remove discharge chute if installed. 6. Make sure unit is complete. Mounting Hardware Figure 14 HANDLEBAR HEIGHT (911175, 179) To adjust (Figure 15): 1. Place a piece of deck. 1 2 CAUTION: Avoid fuel spills. Push the control handle forward slightly and rotate handlebar to help prevent fuel spills. SERVICE POSITION Put unit into service position for storage, push the control handle forward slightly and rotate the handlebar into air cleaner, replace air cleaner...
.... 1. Disconnect spark plug wire. 3. Remove discharge chute if installed. 6. Make sure unit is complete. Mounting Hardware Figure 14 HANDLEBAR HEIGHT (911175, 179) To adjust (Figure 15): 1. Place a piece of deck. 1 2 CAUTION: Avoid fuel spills. Push the control handle forward slightly and rotate handlebar to help prevent fuel spills. SERVICE POSITION Put unit into service position for storage, push the control handle forward slightly and rotate the handlebar into air cleaner, replace air cleaner...
Owners Manual
Page 22
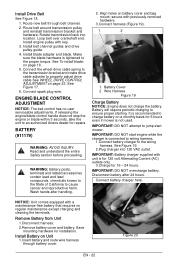
... a maintenance-free battery that requires no user serviceable adjustments. Route belt around transmission pulley and reinstall transmission bracket and hardware. secure with key. 3. Disconnect battery after handling. 2. Save mounting hardware for 16 - 24 hours. Connect spark plug wire. See Figure 19. 2.Plug charger into location. Loop belt over crankshaft end. IMPORTANT: DO NOT attempt to the proper torque. Install engine pulley with previously removed hardware. 3.Connect harness (Figure 19). 1 2 1. Make sure the blade hardware is tightened to jump start engine...
... a maintenance-free battery that requires no user serviceable adjustments. Route belt around transmission pulley and reinstall transmission bracket and hardware. secure with key. 3. Disconnect battery after handling. 2. Save mounting hardware for 16 - 24 hours. Connect spark plug wire. See Figure 19. 2.Plug charger into location. Loop belt over crankshaft end. IMPORTANT: DO NOT attempt to the proper torque. Install engine pulley with previously removed hardware. 3.Connect harness (Figure 19). 1 2 1. Make sure the blade hardware is tightened to jump start engine...

Owners Manual
Page 24
..., or harsh cleaners. Inspection Inspect mower and repair or replace worn or damaged parts to cool. Run engine for extended periods without a stabilizer will not start Engine is being removed per cutting. 2. TROUBLESHOOTING PROBLEM Engine will deteriorate, resulting in gum deposits in safe working condition. Spark plug wire loose or off dirt and debris from your Ariens Dealer. Grass does not disperse evenly 2. Raise cutting height. 2. Mow slower. Follow the recommended mix...
..., or harsh cleaners. Inspection Inspect mower and repair or replace worn or damaged parts to cool. Run engine for extended periods without a stabilizer will not start Engine is being removed per cutting. 2. TROUBLESHOOTING PROBLEM Engine will deteriorate, resulting in gum deposits in safe working condition. Spark plug wire loose or off dirt and debris from your Ariens Dealer. Grass does not disperse evenly 2. Raise cutting height. 2. Mow slower. Follow the recommended mix...
Owners Manual
Page 25
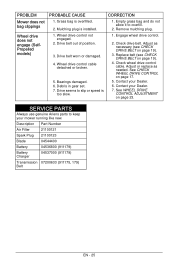
...use genuine Ariens parts to overfill. 2. PROBLEM Mower does not bag clippings Wheel drive does not engage (SelfPropelled models) PROBABLE CAUSE 1. See WHEEL DRIVE CONTROL ADJUSTMENT on page 19). 3. Description Part Number Air Filter 21100121 Spark Plug 21100123 Blade 04544400 Battery 04536800 (911179) Battery Charger 04537000 (911179) Transmission 07200633 (911175, 179) Belt EN - 25 Wheel drive control cable detached or broken. 5. Replace belt (see CHECK DRIVE BELT on page 23. Remove mulching plug. 1. Drive seems to slip or speed is installed. 1. Check drive...
...use genuine Ariens parts to overfill. 2. PROBLEM Mower does not bag clippings Wheel drive does not engage (SelfPropelled models) PROBABLE CAUSE 1. See WHEEL DRIVE CONTROL ADJUSTMENT on page 19). 3. Description Part Number Air Filter 21100121 Spark Plug 21100123 Blade 04544400 Battery 04536800 (911179) Battery Charger 04537000 (911179) Transmission 07200633 (911175, 179) Belt EN - 25 Wheel drive control cable detached or broken. 5. Replace belt (see CHECK DRIVE BELT on page 23. Remove mulching plug. 1. Drive seems to slip or speed is installed. 1. Check drive...
Owners Manual
Page 26
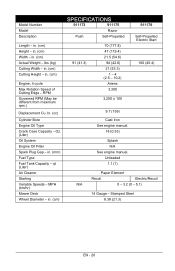
... Bore Engine Oil Type Crank Case Capacity - in . (cm) Cutting Height - Model Number Model Description Length - lbs (kg) Cutting Width - in . (mm) Fuel Type Fuel Tank Capacity - Stamped Steel 8.38 (21.3) EN - 26 in . (cm) Width - RPM Governed RPM (May be different from maximum rpm.) Displacement Cu. qt (Liter) Air Cleaner Starting Variable Speeds - Oz. (Liter) Oil System Engine Oil Filter Spark Plug Gap - in . (cm) Height - MPH (km/hr) Mower Deck Wheel Diameter - in. (cm) SPECIFICATIONS 911173 911175 Razor Push Self-Propelled 91...
... Bore Engine Oil Type Crank Case Capacity - in . (cm) Cutting Height - Model Number Model Description Length - lbs (kg) Cutting Width - in . (mm) Fuel Type Fuel Tank Capacity - Stamped Steel 8.38 (21.3) EN - 26 in . (cm) Width - RPM Governed RPM (May be different from maximum rpm.) Displacement Cu. qt (Liter) Air Cleaner Starting Variable Speeds - Oz. (Liter) Oil System Engine Oil Filter Spark Plug Gap - in . (cm) Height - MPH (km/hr) Mower Deck Wheel Diameter - in. (cm) SPECIFICATIONS 911173 911175 Razor Push Self-Propelled 91...
Owners Manual
Page 27
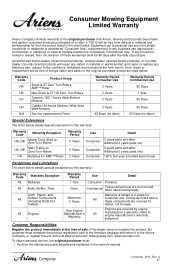
... Belts and Cables) All Engines Warranty Period Use Detail 1 Year Consumer Prorated None Commercial These components are covered by engine manufacturer's warranty. Equipment put to any defective part, subject to the conditions, limitations and exclusions set forth herein. Consumer Mowing Equipment Limited Warranty Ariens Company (Ariens) warrants to the original purchaser that Ariens, Gravely and Countax brand lawn and garden consumer products purchased on Zero-Turn Riders HA Batteries for...
... Belts and Cables) All Engines Warranty Period Use Detail 1 Year Consumer Prorated None Commercial These components are covered by engine manufacturer's warranty. Equipment put to any defective part, subject to the conditions, limitations and exclusions set forth herein. Consumer Mowing Equipment Limited Warranty Ariens Company (Ariens) warrants to the original purchaser that Ariens, Gravely and Countax brand lawn and garden consumer products purchased on Zero-Turn Riders HA Batteries for...

Owners Manual
Page 28
... Ariens Company, then any such implied warranty is limited to the specifications in the Limitations section above: lubricants, spark plugs, oil, oil filters, air filters, fuel filters, brake linings, brake arms, brake shoes, skid shoes, scraper blades, shear bolts, mower blades, mower vanes, brushes, headlights, light bulbs, knives, cutters. • Any misuse, alteration, improper assembly, improper adjustment, neglect, or accident which vary from country to time change the design of warranty service at owner's expense. • Have the warranty service...
... Ariens Company, then any such implied warranty is limited to the specifications in the Limitations section above: lubricants, spark plugs, oil, oil filters, air filters, fuel filters, brake linings, brake arms, brake shoes, skid shoes, scraper blades, shear bolts, mower blades, mower vanes, brushes, headlights, light bulbs, knives, cutters. • Any misuse, alteration, improper assembly, improper adjustment, neglect, or accident which vary from country to time change the design of warranty service at owner's expense. • Have the warranty service...

