
Owners Manual
Page 5
... discharge toward people, pets or property. To avoid amputation hazard do not put hands or feet near moving parts. Safety Decal Description 1. Do not operate mower unless guards are in operating position or entire bagger is in operation. DANGER! 1.2 Discharge Hazard Discharge Hazard - Keep hands and feet away from unit while...
... discharge toward people, pets or property. To avoid amputation hazard do not put hands or feet near moving parts. Safety Decal Description 1. Do not operate mower unless guards are in operating position or entire bagger is in operation. DANGER! 1.2 Discharge Hazard Discharge Hazard - Keep hands and feet away from unit while...

Owners Manual
Page 6
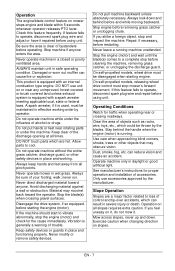
... care when approaching blind corners, shrubs, trees, or other than the operator. Always wear eye and ear protection when operating machine. Be alert and turn mower off if a child enters the area. Wear adequate outer garments. Never do anything to themselves, other debris build-up oil or fuel spillage and remove...
... care when approaching blind corners, shrubs, trees, or other than the operator. Always wear eye and ear protection when operating machine. Be alert and turn mower off if a child enters the area. Wear adequate outer garments. Never do anything to themselves, other debris build-up oil or fuel spillage and remove...
Owners Manual
Page 7
..., fog, etc. See manufacturer's instructions for the cause immediately. Operation on it, do not mow it. EN - 7 Never operate mower in a closed or poorly ventilated area. Avoid discharging material against a wall or obstruction. Do not pull machine backward unless absolutely necessary. Always...when the engine (motor) is used, must be maintained in severe injury or death. Exercise caution when changing direction on mower stops engine and blade within 5 seconds whenever operator releases PTO lever. This product is equipped with an internal combustion type...
..., fog, etc. See manufacturer's instructions for the cause immediately. Operation on it, do not mow it. EN - 7 Never operate mower in a closed or poorly ventilated area. Avoid discharging material against a wall or obstruction. Do not pull machine backward unless absolutely necessary. Always...when the engine (motor) is used, must be maintained in severe injury or death. Exercise caution when changing direction on mower stops engine and blade within 5 seconds whenever operator releases PTO lever. This product is equipped with an internal combustion type...
Owners Manual
Page 9
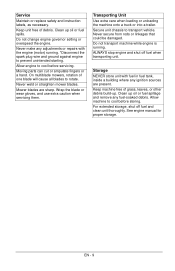
...Never make any adjustments or repairs with fuel in fuel tank, inside a building where any fuel-soaked debris. Never weld or straighten mower blades. Mower blades are present. Transporting Unit Use extra care when loading or unloading the machine onto a truck or into a trailer. Secure unit... governor setting or overspeed the engine. Allow machine to rotate. Service Maintain or replace safety and instruction labels, as necessary. On multiblade mowers, rotation of one blade will cause all blades to cool before servicing. Never secure from rods or linkages that could be damaged. Allow...
...Never make any adjustments or repairs with fuel in fuel tank, inside a building where any fuel-soaked debris. Never weld or straighten mower blades. Mower blades are present. Transporting Unit Use extra care when loading or unloading the machine onto a truck or into a trailer. Secure unit... governor setting or overspeed the engine. Allow machine to rotate. Service Maintain or replace safety and instruction labels, as necessary. On multiblade mowers, rotation of one blade will cause all blades to cool before servicing. Never secure from rods or linkages that could be damaged. Allow...

Owners Manual
Page 10
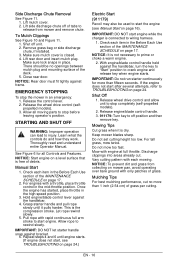
Side Discharge Chute 2. Battery Charger (911179) Figure 3 1 2 1. CARTON CONTENTS ASSEMBLY 1. Literature Pack 5. Mulch Plug 3. Remove mower and grass bag from carton. 2. 911173: Loosen handlebar mounting hardware. See Figure 4. 3. 911173: Rotate handlebar to the desired position and tighten mounting hardware. Mower Unit 4. Hardware 2. See Figure 4. 5 911173 6 3 4 2 1 1. Grass Bag 6. Handlebar Figure 4 EN - 10 ASSEMBLY CAUTION: AVOID INJURY. Read and understand the entire Safety section before proceeding.
Side Discharge Chute 2. Battery Charger (911179) Figure 3 1 2 1. CARTON CONTENTS ASSEMBLY 1. Literature Pack 5. Mulch Plug 3. Remove mower and grass bag from carton. 2. 911173: Loosen handlebar mounting hardware. See Figure 4. 3. 911173: Rotate handlebar to the desired position and tighten mounting hardware. Mower Unit 4. Hardware 2. See Figure 4. 5 911173 6 3 4 2 1 1. Grass Bag 6. Handlebar Figure 4 EN - 10 ASSEMBLY CAUTION: AVOID INJURY. Read and understand the entire Safety section before proceeding.
Owners Manual
Page 11
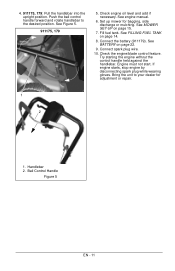
Check engine oil level and add if necessary. See MOWER SET-UP on page 22. 9. See BATTERY on page 15. 7. Connect spark plug wire. 10. Connect the battery (911179). Bring the unit to the desired position. Push the bail control handle forward and rotate handlebar to your dealer for bagging, side discharge or... handlebar into the upright position. Try starting the engine without the control handle held against the handlebar. Check the engine/blade control feature. Set up mower for adjustment or repair. 1 2 1.
Check engine oil level and add if necessary. See MOWER SET-UP on page 22. 9. See BATTERY on page 15. 7. Connect spark plug wire. 10. Connect the battery (911179). Bring the unit to the desired position. Push the bail control handle forward and rotate handlebar to your dealer for bagging, side discharge or... handlebar into the upright position. Try starting the engine without the control handle held against the handlebar. Check the engine/blade control feature. Set up mower for adjustment or repair. 1 2 1.

Owners Manual
Page 15
...sure the mulch plug is subject to wear and deterioration under normal usage. Align side discharge chute onto the mower tabs. Shut off unit. 2. Rear Door 2. Tabs Figure 11 EN - 15 Make sure mulch cover is... installed. Lift rear door and remove mulch plug, if necessary. 4. If necessary, clear debris from mower, wash bag with hose and allow grass clumps or a grass coating to the Side See Figure 11. 1. Shut...cover on the handle near the bottom of grass bag or mower pan. Never operate unit with Ariens original equipment replacement bag only. NOTICE: Empty grass bag and clean...
...sure the mulch plug is subject to wear and deterioration under normal usage. Align side discharge chute onto the mower tabs. Shut off unit. 2. Rear Door 2. Tabs Figure 11 EN - 15 Make sure mulch cover is... installed. Lift rear door and remove mulch plug, if necessary. 4. If necessary, clear debris from mower, wash bag with hose and allow grass clumps or a grass coating to the Side See Figure 11. 1. Shut...cover on the handle near the bottom of grass bag or mower pan. Never operate unit with Ariens original equipment replacement bag only. NOTICE: Empty grass bag and clean...
Owners Manual
Page 16
...Start on page 24.) Electric Start (911179) Recoil may also be no more than 1 inch (2.54 cm) of grass per cutting. Keep mower blades sharp. Mulching Tips For best mulching performance, cut . Close rear door. Thoroughly read and understand entire Operator Manual. IMPORTANT: DO NOT ... Shut off position and then remove key. Check each mowing. Release engine/blade control handle. 3. 911179: Turn key to TROUBLESHOOTING on mower pan, avoid operating over bare ground with each item in place. Make sure mulch cover is the compression stroke. Pull rope with engine...
...Start on page 24.) Electric Start (911179) Recoil may also be no more than 1 inch (2.54 cm) of grass per cutting. Keep mower blades sharp. Mulching Tips For best mulching performance, cut . Close rear door. Thoroughly read and understand entire Operator Manual. IMPORTANT: DO NOT ... Shut off position and then remove key. Check each mowing. Release engine/blade control handle. 3. 911179: Turn key to TROUBLESHOOTING on mower pan, avoid operating over bare ground with each item in place. Make sure mulch cover is the compression stroke. Pull rope with engine...
Owners Manual
Page 17
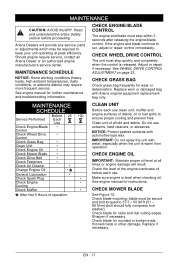
... ADJUSTMENT on page 23. Replace worn or damaged bag with automotive type wax. NOTICE: Protect painted surfaces with Ariens original equipment replacement bag only. CHECK MOWER BLADE See Figure 12. Check blade for rounded or broken ends, thinned metal or other damage. EN - 17... Engine/Blade • Control Check Wheel Drive • Control Check Grass Bag • Clean Unit • Check Engine Oil • Check Mower Blade • Check Drive Belt • Check Fasteners • Check Air Cleaner • Change Engine Oil General Lubrication *• • ...
... ADJUSTMENT on page 23. Replace worn or damaged bag with automotive type wax. NOTICE: Protect painted surfaces with Ariens original equipment replacement bag only. CHECK MOWER BLADE See Figure 12. Check blade for rounded or broken ends, thinned metal or other damage. EN - 17... Engine/Blade • Control Check Wheel Drive • Control Check Grass Bag • Clean Unit • Check Engine Oil • Check Mower Blade • Check Drive Belt • Check Fasteners • Check Air Cleaner • Change Engine Oil General Lubrication *• • ...

Owners Manual
Page 18
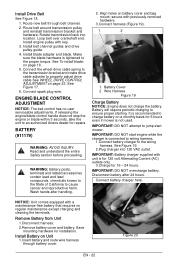
... 37.5 - 50 lbf-ft (51 - 68 N•m). 1 2 1. Air Lift Erosion Figure 12 3. Air Lift 4. Slide mower blade on unit. Cutting Edge 3. Connect spark plug wire. Sharpen mower blade by removing an equal amount of material from each end of metal is removed. • Air lifts become eroded...• Blade is balanced (Figure 13). 4. Wrap the blades or wear gloves, and use extra caution when servicing them. Discard mower blade if: • More than 1/2" (1.27 cm) of mower blade. Torque bolt to 37.5 - 50 lbf-ft (51 - 68 N•m) (bolt should remain in a horizontal position. ...
... 37.5 - 50 lbf-ft (51 - 68 N•m). 1 2 1. Air Lift Erosion Figure 12 3. Air Lift 4. Slide mower blade on unit. Cutting Edge 3. Connect spark plug wire. Sharpen mower blade by removing an equal amount of material from each end of metal is removed. • Air lifts become eroded...• Blade is balanced (Figure 13). 4. Wrap the blades or wear gloves, and use extra caution when servicing them. Discard mower blade if: • More than 1/2" (1.27 cm) of mower blade. Torque bolt to 37.5 - 50 lbf-ft (51 - 68 N•m) (bolt should remain in a horizontal position. ...
Owners Manual
Page 19
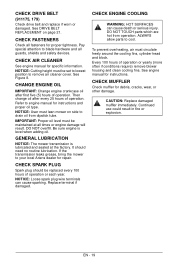
... when adding oil. NOTICE: Loose spark plug wire terminals can cause death or serious injury. ALWAYS allow parts to your local Ariens dealer for instructions and proper oil type. See engine manual for specific information. Pay special attention to drain oil from operation. ...CHECK AIR CLEANER See engine manual for instructions. Continued use could result in fire or explosion. If the transmission leaks grease, bring the mower to cool. NOTICE: Cutting height must be replaced every 100 hours of operation. CHANGE ENGINE OIL IMPORTANT: Change engine crankcase oil after every...
... when adding oil. NOTICE: Loose spark plug wire terminals can cause death or serious injury. ALWAYS allow parts to your local Ariens dealer for instructions and proper oil type. See engine manual for specific information. Pay special attention to drain oil from operation. ...CHECK AIR CLEANER See engine manual for instructions. Continued use could result in fire or explosion. If the transmission leaks grease, bring the mower to cool. NOTICE: Cutting height must be replaced every 100 hours of operation. CHANGE ENGINE OIL IMPORTANT: Change engine crankcase oil after every...
Owners Manual
Page 22
...and lead compounds, chemicals known to the State of California to ensure proper starting. IMPORTANT: DO NOT attempt to an authorized Ariens dealer for installation. NOTICE: Unit comes equipped with unit is for 120 volt Alternating Current (AC) outlets only. 3.Charge for 6 hours... wiring harness. It is tightened to properly adjust drive cable See WHEEL DRIVE CONTROL ADJUSTMENT on page 18. 5. IMPORTANT: DO NOT start mower. Wire Harness Figure 19 Charge Battery NOTICE: Engine does not charge the battery. Remove Battery from Unit 1.Disconnect harness. 2.Remove battery cover...
...and lead compounds, chemicals known to the State of California to ensure proper starting. IMPORTANT: DO NOT attempt to an authorized Ariens dealer for installation. NOTICE: Unit comes equipped with unit is for 120 volt Alternating Current (AC) outlets only. 3.Charge for 6 hours... wiring harness. It is tightened to properly adjust drive cable See WHEEL DRIVE CONTROL ADJUSTMENT on page 18. 5. IMPORTANT: DO NOT start mower. Wire Harness Figure 19 Charge Battery NOTICE: Engine does not charge the battery. Remove Battery from Unit 1.Disconnect harness. 2.Remove battery cover...

Owners Manual
Page 24
...soap and low pressure water. Poor cut quality 1. Check fuel level. Clear clippings from your Ariens Dealer. Allow grass to dry. 3. Allow grass to dry. 4. IMPORTANT: NEVER spray unit with grass. Store mower in position on page 17). 2. Touch up paint is being removed per cutting. 2. ...height. 3. Mow slower. 1. STORAGE CAUTION: AVOID INJURY. Brush off dirt and debris from forming in the system. Handlebars see CHECK MOWER BLADE on mower. Follow the recommended mix ratio found on page 20 and Figure 15. Run engine for at least 10 minutes after adding stabilizer to allow...
...soap and low pressure water. Poor cut quality 1. Check fuel level. Clear clippings from your Ariens Dealer. Allow grass to dry. 3. Allow grass to dry. 4. IMPORTANT: NEVER spray unit with grass. Store mower in position on page 17). 2. Touch up paint is being removed per cutting. 2. ...height. 3. Mow slower. 1. STORAGE CAUTION: AVOID INJURY. Brush off dirt and debris from forming in the system. Handlebars see CHECK MOWER BLADE on mower. Follow the recommended mix ratio found on page 20 and Figure 15. Run engine for at least 10 minutes after adding stabilizer to allow...
Owners Manual
Page 25
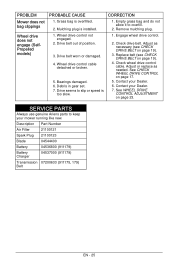
...- 25 CORRECTION 1. Engage wheel drive control. 2. Drive belt out of position. 3. Remove mulching plug. 1. Check drive belt. Contact your mower running like new. See WHEEL DRIVE CONTROL ADJUSTMENT on page 19). 4. See CHECK WHEEL DRIVE CONTROL on page 19). 3. Debris in gear ...set. 7. Drive seems to overfill. 2. Adjust as needed. SERVICE PARTS Always use genuine Ariens parts to keep your Dealer. 7. Mulching plug is overfilled. 2. Contact your Dealer. 6. PROBLEM Mower does not bag clippings Wheel drive does not engage (SelfPropelled models) PROBABLE CAUSE 1.
...- 25 CORRECTION 1. Engage wheel drive control. 2. Drive belt out of position. 3. Remove mulching plug. 1. Check drive belt. Contact your mower running like new. See WHEEL DRIVE CONTROL ADJUSTMENT on page 19). 4. See CHECK WHEEL DRIVE CONTROL on page 19). 3. Debris in gear ...set. 7. Drive seems to overfill. 2. Adjust as needed. SERVICE PARTS Always use genuine Ariens parts to keep your Dealer. 7. Mulching plug is overfilled. 2. Contact your Dealer. 6. PROBLEM Mower does not bag clippings Wheel drive does not engage (SelfPropelled models) PROBABLE CAUSE 1.
Owners Manual
Page 26
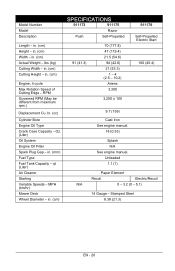
lbs (kg) Cutting Width - In. (cc) Cylinder Bore Engine Oil Type Crank Case Capacity - qt (Liter) Air Cleaner Starting Variable Speeds - MPH (km/hr) Mower Deck Wheel Diameter - Unleaded 1.1 (1) Paper Element Recoil Electric/Recoil N/A 0 - 3.2 (0 - 5.1) 14 Gauge - in . (cm) Cutting Height - in . (cm... Cu. Stamped Steel 8.38 (21.3) EN - 26 in . (cm) SPECIFICATIONS 911173 911175 Razor Push Self-Propelled 91 (41.3) 70 (177.8) 47 (119.4) 21.5 (54.6) 94 (42.6) 21 (53.3) 1 - 4 (2.5 - 10.2) Ariens 3,300 3,200 ± 100 911179 Self-Propelled Electric Start 100 (45.4) 9.7 (159) ...
lbs (kg) Cutting Width - In. (cc) Cylinder Bore Engine Oil Type Crank Case Capacity - qt (Liter) Air Cleaner Starting Variable Speeds - MPH (km/hr) Mower Deck Wheel Diameter - Unleaded 1.1 (1) Paper Element Recoil Electric/Recoil N/A 0 - 3.2 (0 - 5.1) 14 Gauge - in . (cm) Cutting Height - in . (cm... Cu. Stamped Steel 8.38 (21.3) EN - 26 in . (cm) SPECIFICATIONS 911173 911175 Razor Push Self-Propelled 91 (41.3) 70 (177.8) 47 (119.4) 21.5 (54.6) 94 (42.6) 21 (53.3) 1 - 4 (2.5 - 10.2) Ariens 3,300 3,200 ± 100 911179 Self-Propelled Electric Start 100 (45.4) 9.7 (159) ...
Owners Manual
Page 27
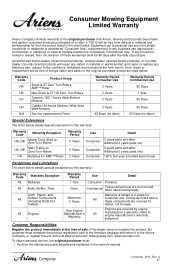
... parts and labor Additional 2 years parts only 3 years parts and labor Additional 2 years parts only 100% first year; An authorized Ariens dealer (Ariens brand products), Gravely dealer (Gravely brand products), or Countax dealer (Countax brand products) will repair any defective part, subject to this warranty...: Warranty Code Warranty Exception HA, HB Mower Deck Shell on Zero-Turn Riders HA, HB Main Frame on or after ...
... parts and labor Additional 2 years parts only 3 years parts and labor Additional 2 years parts only 100% first year; An authorized Ariens dealer (Ariens brand products), Gravely dealer (Gravely brand products), or Countax dealer (Countax brand products) will repair any defective part, subject to this warranty...: Warranty Code Warranty Exception HA, HB Mower Deck Shell on Zero-Turn Riders HA, HB Main Frame on or after ...

Owners Manual
Page 28
... warranty is limited to service within the area originally distributed. • In countries other area. DISCLAIMER OF FURTHER WARRANTY Ariens Company makes no warranty, express or implied, other than what is limited to the specifications in this product to incorporate... spark plugs, oil, oil filters, air filters, fuel filters, brake linings, brake arms, brake shoes, skid shoes, scraper blades, shear bolts, mower blades, mower vanes, brushes, headlights, light bulbs, knives, cutters. • Any misuse, alteration, improper assembly, improper adjustment, neglect, or accident which the...
... warranty is limited to service within the area originally distributed. • In countries other area. DISCLAIMER OF FURTHER WARRANTY Ariens Company makes no warranty, express or implied, other than what is limited to the specifications in this product to incorporate... spark plugs, oil, oil filters, air filters, fuel filters, brake linings, brake arms, brake shoes, skid shoes, scraper blades, shear bolts, mower blades, mower vanes, brushes, headlights, light bulbs, knives, cutters. • Any misuse, alteration, improper assembly, improper adjustment, neglect, or accident which the...
Parts Catalog
Page 3
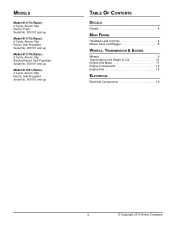
... 911173 (Razor) 4 Cycle, Ariens, 6hp Recoil, Push Serial No. 000101 and up Model 911175 (Razor) 4 Cycle, Ariens, 6hp Recoil, Self Propelled Serial No. 000101 and up Model 911179 (Razor) 4 Cycle, Ariens, 6hp Electric/Recoil, Self Propelled Serial No. 000101 and up Model 911181 (Razor) 4 Cycle, Ariens, 6hp ...Recoil, Self Propelled Serial No. 000101 and up TABLE OF CONTENTS DECALS Decals 4 MAIN FRAME Handlebar and Controls 6 Mower Deck and Bagger 8 ...
... 911173 (Razor) 4 Cycle, Ariens, 6hp Recoil, Push Serial No. 000101 and up Model 911175 (Razor) 4 Cycle, Ariens, 6hp Recoil, Self Propelled Serial No. 000101 and up Model 911179 (Razor) 4 Cycle, Ariens, 6hp Electric/Recoil, Self Propelled Serial No. 000101 and up Model 911181 (Razor) 4 Cycle, Ariens, 6hp ...Recoil, Self Propelled Serial No. 000101 and up TABLE OF CONTENTS DECALS Decals 4 MAIN FRAME Handlebar and Controls 6 Mower Deck and Bagger 8 ...
Parts Catalog
Page 8
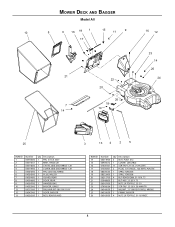
... 19 20 21 22 23 24 25 26 Number 06514900 06900512 07400101 07500301 08300535 08322400 06215700 05946800 06543100 07400034 04540659 04520659 06543500 Qty Description 3 NUT, PUSH .312 1 CLAMP, LM CABLE 11 SCR-TAP 12-14 X .75 PLSTITE 2 PLUG, 5/16 HOLE, .125 MATL PLASTIC 1 SPRG, TORSION 1 SPRG, TORSION 4 BLT-RDHDSQNK .31-18... 2 NUT, LK-TOP-FLG .25-20 2 SCR-TAP .25-20 X .50 HWH TR 1 WLDMT, 21" LM DECK SHELL ARIENS 1 FRAME, BAGGER 4 NUT, LK-TOP-FLG .31-18 YWZC 8 LM 1 COVER, SIDE DISCHARGE - MOWER DECK AND BAGGER Model All 10 8 6 16 19 1 15 11 9 16 12 17 21 7 14 22 20 26 18...
... 19 20 21 22 23 24 25 26 Number 06514900 06900512 07400101 07500301 08300535 08322400 06215700 05946800 06543100 07400034 04540659 04520659 06543500 Qty Description 3 NUT, PUSH .312 1 CLAMP, LM CABLE 11 SCR-TAP 12-14 X .75 PLSTITE 2 PLUG, 5/16 HOLE, .125 MATL PLASTIC 1 SPRG, TORSION 1 SPRG, TORSION 4 BLT-RDHDSQNK .31-18... 2 NUT, LK-TOP-FLG .25-20 2 SCR-TAP .25-20 X .50 HWH TR 1 WLDMT, 21" LM DECK SHELL ARIENS 1 FRAME, BAGGER 4 NUT, LK-TOP-FLG .31-18 YWZC 8 LM 1 COVER, SIDE DISCHARGE - MOWER DECK AND BAGGER Model All 10 8 6 16 19 1 15 11 9 16 12 17 21 7 14 22 20 26 18...

Parts Catalog
Page 11
... 04539400 04544400 05901515 06309300 Qty Description 1 PULLEY, GROUND DRIVE, LM (911175, 179, 181) 2 GUIDE, BELT - INNER 1 GUIDE, BELT CRANKSHAFT (911175, 179, 181) 1 ADAPTOR, BLADE 1 BLADE, MOWER 21" HIGH-LIFT 1 @BLT-HEX .44-20X2.25 GR8 YWZC 1 @WSHR-LK .44X.109 REG YWZC 29 BOM ID 31 32 33 33 34 35...
... 04539400 04544400 05901515 06309300 Qty Description 1 PULLEY, GROUND DRIVE, LM (911175, 179, 181) 2 GUIDE, BELT - INNER 1 GUIDE, BELT CRANKSHAFT (911175, 179, 181) 1 ADAPTOR, BLADE 1 BLADE, MOWER 21" HIGH-LIFT 1 @BLT-HEX .44-20X2.25 GR8 YWZC 1 @WSHR-LK .44X.109 REG YWZC 29 BOM ID 31 32 33 33 34 35...


