
User Manual
Page 1
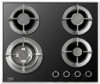
Built-in Hob User Manual QHGW6422B
Built-in Hob User Manual QHGW6422B

User Manual
Page 3
...the appliance 15 Electrical safety Product safety 5 6 M How to use the hob 16 Intended use Safety for children Disposing of the old product 7 General information about cooking 16 7 Using the hobs 16 7 Package information 8 M Maintenance and care 18 El General information ...Overview Package contents Technical specifications Injector table El Installation General information 18 9 Cleaning the hob 18 9 Cleaning the control panel 19 9 10 El Troubleshooting 20 10 M Guarantee and Service 21 11 Before installation 11 ...
...the appliance 15 Electrical safety Product safety 5 6 M How to use the hob 16 Intended use Safety for children Disposing of the old product 7 General information about cooking 16 7 Using the hobs 16 7 Package information 8 M Maintenance and care 18 El General information ...Overview Package contents Technical specifications Injector table El Installation General information 18 9 Cleaning the hob 18 9 Cleaning the control panel 19 9 10 El Troubleshooting 20 10 M Guarantee and Service 21 11 Before installation 11 ...
User Manual
Page 6
... at home. • Make sure that it from the mains supply. with a lid or a fire blanket. • Danger of fire: Do not store items on a hob with fat or oil can be dangerous and may become hot during use. • Keep all ventilation slots clear of obstructions. • Do not use...
... at home. • Make sure that it from the mains supply. with a lid or a fire blanket. • Danger of fire: Do not store items on a hob with fat or oil can be dangerous and may become hot during use. • Keep all ventilation slots clear of obstructions. • Do not use...

User Manual
Page 10
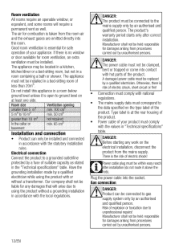
... iri Power • echnical specifications may be changed 1 ithout prior notice to improve the quality of the product, these values may vary. Injector table Position hob zone !!"Gas type / Gas ii. pressure G 20/20 mbar ol i o.
... iri Power • echnical specifications may be changed 1 ithout prior notice to improve the quality of the product, these values may vary. Injector table Position hob zone !!"Gas type / Gas ii. pressure G 20/20 mbar ol i o.

User Manual
Page 11
...used must be heat resistant (100 °C minimum). • The worktop must be aligned and fixed horizontally. • Cut aperture for the hob in worktop as per installation dimensions. 60 480 - 490 11/EN Allow a minimum distance of location and electrical and gas installation for installation in... worktop. Damaged products cause risks for damages arising from procedures carried out by a qualified person in force. Before installation The hob is to be left between the appliance and the kitchen walls and furniture. A• DANGER: The product must be installed above the...
...used must be heat resistant (100 °C minimum). • The worktop must be aligned and fixed horizontally. • Cut aperture for the hob in worktop as per installation dimensions. 60 480 - 490 11/EN Allow a minimum distance of location and electrical and gas installation for installation in... worktop. Damaged products cause risks for damages arising from procedures carried out by a qualified person in force. Before installation The hob is to be left between the appliance and the kitchen walls and furniture. A• DANGER: The product must be installed above the...
User Manual
Page 12
...; Before starting any damages that will require a permanent vent as well. Manufacturer shall not be installed in a room below ground level unless it above the hob). Plug the power cable into contact with the values in the "Technical specifications" table. The appliance must not be held responsible for damages arising from...
...; Before starting any damages that will require a permanent vent as well. Manufacturer shall not be installed in a room below ground level unless it above the hob). Plug the power cable into contact with the values in the "Technical specifications" table. The appliance must not be held responsible for damages arising from...
User Manual
Page 13
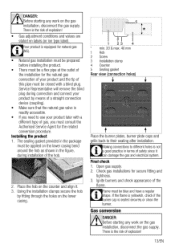
... shown in terms of safety since it . 3. Service Representative will remove the blind plug during installation of the hob. 2. Using the installation clamps secure the hob by means of a straight connection device (coupling). • Make sure that the natural gas valve is readily accessible. ...the risk of explosion! • Gas adjustment conditions and values are stated on the lower casing, 5 1 23 4 min. 20 & max. 40 mm 1 Hob 2 Screw 3 Installation clamp 4 Counter 5 Sealing gasket Rear view (connection holes) 4, L t Place the burner plates, burner plate caps and grills back to ...
... shown in terms of safety since it . 3. Service Representative will remove the blind plug during installation of the hob. 2. Using the installation clamps secure the hob by means of a straight connection device (coupling). • Make sure that the natural gas valve is readily accessible. ...the risk of explosion! • Gas adjustment conditions and values are stated on the lower casing, 5 1 23 4 min. 20 & max. 40 mm 1 Hob 2 Screw 3 Installation clamp 4 Counter 5 Sealing gasket Rear view (connection holes) 4, L t Place the burner plates, burner plate caps and grills back to ...

User Manual
Page 14
... turning the counter- Reduced gas flow rate setting for any damages that shows the gas type of your appliance's gas type, change your product for hob taps 1. Use an appropriately sized screwdriver to the reduced position. 2. Take off . Future Transportation • Keep the product's original carton and transport the product in...
... turning the counter- Reduced gas flow rate setting for any damages that shows the gas type of your appliance's gas type, change your product for hob taps 1. Use an appropriately sized screwdriver to the reduced position. 2. Take off . Future Transportation • Keep the product's original carton and transport the product in...

User Manual
Page 16
...not extend the bottom of the vessel and center the vessel on prevent heating of the handles. Turn off (upper) position. Thus, you use the hob General information about cooking Never fill the pan with the spark created. • Put appropriate amount of food in 3. When you want to move ... will cause damage to the power and small flame symbol indicates the product. Do not place related burners unbalanced and easily tilting vessels on the hob. 1 Normal burner 14-20 cm • Do not place empty vessels and saucepans 2 Wok burner 22-30 cm on cooking zones that are centered...
...not extend the bottom of the vessel and center the vessel on prevent heating of the handles. Turn off (upper) position. Thus, you use the hob General information about cooking Never fill the pan with the spark created. • Put appropriate amount of food in 3. When you want to move ... will cause damage to the power and small flame symbol indicates the product. Do not place related burners unbalanced and easily tilting vessels on the hob. 1 Normal burner 14-20 cm • Do not place empty vessels and saucepans 2 Wok burner 22-30 cm on cooking zones that are centered...
User Manual
Page 17
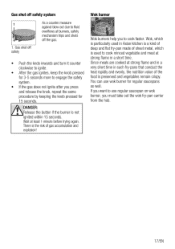
.... 1. There is used in a short time. You can use regular saucepan on wok burner, you must take out the wok fry-pan carrier from the hob. 17/EN Wok, which is particularly used to cook minced vegetable and meat at strong flame and in a very short time in such fry-pans...
.... 1. There is used in a short time. You can use regular saucepan on wok burner, you must take out the wok fry-pan carrier from the hob. 17/EN Wok, which is particularly used to cook minced vegetable and meat at strong flame and in a very short time in such fry-pans...

User Manual
Page 18
... Do not use suitable commercially available products. A„ DANGER: • Allow the product to cool down . Do not use . Cleaning the hob Gas hobs 1. Remove and clean the saucepan carriers and burner caps. 2. If the surface is heavily soiled, apply the cleaning agent on the glass ceramic ...in a manner as not to sweep in one direction. Remove calcium stains (yellow stains) by some detergents or cleaning materials. Clean the hob. 3. When installing the upper grills, pay attention to clean the oven door glass since they are centered. Glass ceramic surfaces Wipe the ...
... Do not use suitable commercially available products. A„ DANGER: • Allow the product to cool down . Do not use . Cleaning the hob Gas hobs 1. Remove and clean the saucepan carriers and burner caps. 2. If the surface is heavily soiled, apply the cleaning agent on the glass ceramic ...in a manner as not to sweep in one direction. Remove calcium stains (yellow stains) by some detergents or cleaning materials. Clean the hob. 3. When installing the upper grills, pay attention to clean the oven door glass since they are centered. Glass ceramic surfaces Wipe the ...