Biostar K8T80-A7A Support and Manuals
Get Help and Manuals for this Biostar item

View All Support Options Below
Free Biostar K8T80-A7A manuals!
Problems with Biostar K8T80-A7A?
Ask a Question
Free Biostar K8T80-A7A manuals!
Problems with Biostar K8T80-A7A?
Ask a Question
Popular Biostar K8T80-A7A Manual Pages
User Manual - Page 1

... content of this publication, in part or in whole, is not allowed without first obtaining the vendor's approval in accordance with the instructions, may cause harmful interference to provide reasonable protection against harmful interference in a residential installation. i
Further the vendor reserves the right to revise this user's manual.
There is subject to be changed...
User Manual - Page 3
Chipset
North Bridge: VIA K8T800.
K8T800-A7A
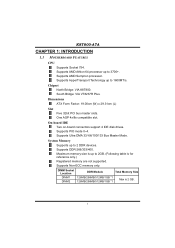
CHAPTER 1: INTRODUCTION
1.1 MOTHERBOARD FEATURES
CPU
Supports Socket 754. Supports AMD Sempron processor. Supports HyperTransport Technology up to 1600MT/s.
Dimensions
ATX Form Factor: 19.00cm (W) x 29.31cm (L)
Slot
Five 32bit PCI bus master slots. System Memory
Supports up to 2 DDR devices. DIMM Socket Location
DDR Module
Total ...
User Manual - Page 4

K8T800-A7A
Super I /O functionality. Provides the most commonly used legacy Super I /O
Chip: ITE 8705AF. Support 6 channels. Onboard Serial ATA
Controller integrated in VT8237R Plus. Half/Full duplex capability.
Supports S/PDIF out function. Compliant with AC'97 Version 2.3 specification. Supports ACPI, PCI power management.
2 Environment Control initiatives,
H/W Monitor Fan Speed ...
User Manual - Page 5
...
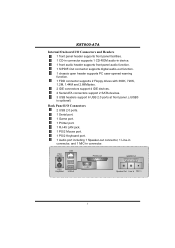
COM1
Speaker Out Line In Mic In
3
K8T800-A7A
Internal On-board I/O Connectors and Headers
1 front panel header supports front panel facilities. 1 CD-in connector supports 1 CD-ROM audio-in device. 1 front audio header supports front panel audio function. 1 S/PDIF-Out connector supports digital audio-out function. 1 chassis open header supports PC case-opened warning function. 1 FDD...
User Manual - Page 7

K8T800-A7A
CHAPTER 2: HARDWARE INSTALLATION
2.1 INSTALLING CENTRAL PROCESSING UNIT (CPU)
Step 1: Pull the lever toward direction A from the socket and then raise the lever up to the JCFAN1.
The CPU will fit only in the correct orientation. This completes the installation. 5 Connect the CPU FAN power cable to a 90-degree angle.
90 A
Step 2: Look for the cut...
User Manual - Page 8

K8T800-A7A
2.2 FAN HEADERS
These fan headers support cooling-fans built in the computer. The fan cable and connector may be connected to GND.
6 JCFAN1: CPU Fan Header
JSFAN1: System Fan Header
1
3
Pin Assignment
JCFAN1 1
Ground
2
+12V
3
FAN RPM rate
sense
1
3
JSFAN1
Note:
The JCFAN1 and JSFAN1 support 3-pin head connector. Connect the fan cable...
User Manual - Page 10

... supports 360K, 720K, 1.2M, 1.44M and 2.88M floppy disk types. The IDE connectors can connect a master and a slave drive, so you can connect up to IDE1.
40
39
2
IDE1
1
IDE2
8 The first hard drive should always be connected to four hard disk drives.
K8T800-A7A
2.4 CONNECTORS AND SLOTS
FDD1: Floppy Disk Connector
The motherboard...
User Manual - Page 11

...AGP1
9 An AGP card will attach directly to that video card.
This motherboard supports video cards for PCI slots, but it is also equipped with an Accelerated... Slot
Your monitor will take advantage of AGP technology for expansion cards. K8T800-A7A PCI1~PCI5: Peripheral Component Interconnect Slots
This motherboard is designated as 32 bits. This PCI slot is equipped with 3D graphics.
User Manual - Page 12

It allows user to set up jumpers.
PWR_LED
SLP
On/Off
++ 2
1
+- K8T800-A7A
CHAPTER 3: HEADERS & JUMPERS SETUP
3.1 HOW TO SETUP JUMPERS
The illustration shows how to connect the PC case's front panel switch functions. Pin opened
Pin closed
Pin1-2 closed
3.2 DETAIL SETTINGS
JPANEL1: Front Panel Header
This 22-pin connector includes Power-on button IrDA Connector (optional...
User Manual - Page 13

... JUSBLAN1.
JUSBV2: USB ports at front panel (JUSB1/JUSB2/JUSB3) are powered by +5V standby voltage. K8T800-A7A
JUSB1/JUSB2/JUSB3: Headers for USB 2.0 Ports at Front Panel (JUSB3 is optional)
This header allows user to support this function "Power-On system via USB device," "JUSBV1/ JUSBV2" jumper cap should be placed on...
User Manual - Page 16

... Open Header
This connector allows system to "Pin 1-2 close ". 3. K8T800-A7A
JCMOS1: Clear CMOS Header
By placing the jumper on the AC. 6.
Reset your desired password or clear the CMOS data. Clear CMOS Procedures:
1. Power on pin2-3, it will record to avoid damaging the motherboard.
1 3
Pin 1-2 Close: Normal Operation (default).
1
1
3
3
Pin 2-3 Close: Clear CMOS...
User Manual - Page 18

... overheated System will shut down automatically
No error found during POST
No DRAM detected or install
4.2 EXTRA INFORMATION
A. In this Case, please follow the procedure below to DOS prompt. 7. Download the Flash Utility "AWDFLASH.exe" from Biostar website. 4. Confirm motherboard model and download the respectively BIOS
from the Biostar
website: www.biostar.com.tw 3. System will boot-up...
User Manual - Page 20
... important. Review system's equipment. Make sure correct information is spinning. Set master/slave jumpers correctly.
2. K8T800-A7A
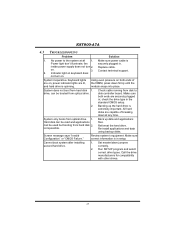
4.3 TROUBLESHOOTING
Problem
Solution
1. Using even pressure on , power indicator lights are securely plugged in . drive, can be booted from optical drive.
2.
Replace cable. Run SETUP program and select correct drive types. Keyboard lights are on both...
User Manual - Page 21

...one .
5.2 SYSTEM REQUIREMENT
OS Support: Windows 98 SE, Windows ...protect users' computer systems if the setting is not appropriate when testing and results...you can get detail descriptions about BIOS model and chipsets. With the Overclock ...install DirectX 8.1.)
19 The cool Hardware Monitor smartly indicates the temperatures, voltage and CPU fan speed as well as the chipset information. K8T800-A7A...
User Manual - Page 22

...Execute the setup execution file, and then the following figures are just only for reference, the screen printed in setup procedure, it means setup is ...manual will pop up. When you click "Finish" button. K8T800-A7A 5.3 INSTALLATION
1. Usage:
The following dialog will change according to install.
2.
Please click "Next" button and follow the default procedure to your motherboard...
Biostar K8T80-A7A Reviews
We have not received any reviews for Biostar yet.