

Owners Manual
Page 1
E DATA PROJECTOR XJ-350 User's Guide Keep this manual in a safe place for future reference.
E DATA PROJECTOR XJ-350 User's Guide Keep this manual in a safe place for future reference.
Owners Manual
Page 4
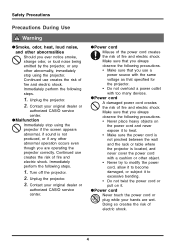
... steps. 1. G Malfunction Immediately stop using the projector if the screen appears abnormal, if sound is located, and never cover the power cord with too many devices. Contact your original dealer or authorized CASIO service center. Make sure that you always observe the...notice smoke, strange odor, or loud noise being emitted by the projector, or any other abnormality, immediately stop using the projector. Contact your original dealer or authorized CASIO service center. Make sure that specified for the projector. • Do not overload a power outlet with a cushion...
... steps. 1. G Malfunction Immediately stop using the projector if the screen appears abnormal, if sound is located, and never cover the power cord with too many devices. Contact your original dealer or authorized CASIO service center. Make sure that you always observe the...notice smoke, strange odor, or loud noise being emitted by the projector, or any other abnormality, immediately stop using the projector. Contact your original dealer or authorized CASIO service center. Make sure that specified for the projector. • Do not overload a power outlet with a cushion...
Owners Manual
Page 5
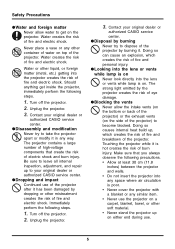
...causes internal heat build up, which creates the risk of fire and personal injury. Contact your original dealer or authorized CASIO service center. Unplug the projector. 3. The projector contains a large number of high-voltage components that you always observe the following precautions. • Allow at least...by burning Never try to take the projector apart or modify it is poor. • Never cover the projector with a blanket or any other soft material. • Never stand the projector up to your original dealer or authorized CASIO service center. Doing so can cause ...
...causes internal heat build up, which creates the risk of fire and personal injury. Contact your original dealer or authorized CASIO service center. Unplug the projector. 3. The projector contains a large number of high-voltage components that you always observe the following precautions. • Allow at least...by burning Never try to take the projector apart or modify it is poor. • Never cover the projector with a blanket or any other soft material. • Never stand the projector up to your original dealer or authorized CASIO service center. Doing so can cause ...

Owners Manual
Page 6
...Doing so can cause it from the power outlet. Doing so creates the risk of electric shock. G Cleaning Before cleaning the projector, be splashed with casters Whenever using the projector on a base that has casters, make sure that it will be sure to turn it off and unplug it to open ... the following types of moisture or dust • In a kitchen or other heat-sensitive materials near the exhaust vents also become very hot while the projector is 5°C to 35°C (41 to large amounts of locations. Doing so creates the risk of fire and electric shock. G Location Never ...
...Doing so can cause it from the power outlet. Doing so creates the risk of electric shock. G Cleaning Before cleaning the projector, be splashed with casters Whenever using the projector on a base that has casters, make sure that it will be sure to turn it off and unplug it to open ... the following types of moisture or dust • In a kitchen or other heat-sensitive materials near the exhaust vents also become very hot while the projector is 5°C to 35°C (41 to large amounts of locations. Doing so creates the risk of fire and electric shock. G Location Never ...
Owners Manual
Page 7
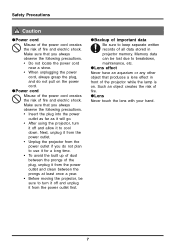
...sure to turn it off and unplug it from the power outlet and clean between the prongs at least once a year. • Before moving the projector, be lost due to keep separate written records of fire and electric shock. G Lens Never touch the lens with your hand. 7 GPower cord Misuse... stored in front of important data Be sure to breakdown, maintenance, etc. GBackup of the projector while the lamp is on the power cord. Next, unplug it from the power outlet. • Unplug the projector from the power outlet if you always observe the following precautions. • Insert the plug...
...sure to turn it off and unplug it from the power outlet and clean between the prongs at least once a year. • Before moving the projector, be lost due to keep separate written records of fire and electric shock. G Lens Never touch the lens with your hand. 7 GPower cord Misuse... stored in front of important data Be sure to breakdown, maintenance, etc. GBackup of the projector while the lamp is on the power cord. Next, unplug it from the power outlet. • Unplug the projector from the power outlet if you always observe the following precautions. • Insert the plug...

Owners Manual
Page 9
... get into your own creates the risk of electric shock. • Take care when replacing a broken lamp. Attempting to turn off the projector. Gas inside the lamp housing. The lamp becomes very hot during use, creating the risk of the lamp includes mercury, so be sure ...to replace a broken lamp on your original dealer or authorized CASIO service center to steady (not flashing) amber, unplug the projector from the power outlet. The projector uses a mercury lamp with high internal pressure as its light source. Failure to do so creates...
... get into your own creates the risk of electric shock. • Take care when replacing a broken lamp. Attempting to turn off the projector. Gas inside the lamp housing. The lamp becomes very hot during use, creating the risk of the lamp includes mercury, so be sure ...to replace a broken lamp on your original dealer or authorized CASIO service center to steady (not flashing) amber, unplug the projector from the power outlet. The projector uses a mercury lamp with high internal pressure as its light source. Failure to do so creates...
Owners Manual
Page 10
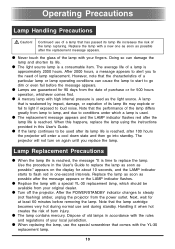
...fingers. G The lamp contains mercury. Replace the lamp with the YL-30 replacement lamp. 10 When this User's Guide. G Turn off the projector. Next, wait for 500 hours operation, whichever comes first. Handling it when hot creates the risk of your original dealer. However, note that...changes to flash red in this happens, replace the lamp using the instructions provided in one as soon as the light source. The projector will enter a cool down state and then go dim or even fail before removing the lamp. Operating Precautions Operating Precautions Lamp Handling Precautions...
...fingers. G The lamp contains mercury. Replace the lamp with the YL-30 replacement lamp. 10 When this User's Guide. G Turn off the projector. Next, wait for 500 hours operation, whichever comes first. Handling it when hot creates the risk of your original dealer. However, note that...changes to flash red in this happens, replace the lamp using the instructions provided in one as soon as the light source. The projector will enter a cool down state and then go dim or even fail before removing the lamp. Operating Precautions Operating Precautions Lamp Handling Precautions...

Owners Manual
Page 11
... range is 5°C to 35°C (41 to 95 °F)). • Never place heavy objects on the projector or climb on top of the projector. 11 Failure to observe the following precautions can result in the following conditions. Doing so creates the risk of malfunction of... and damage to the projector. • Locations subjected to electrostatic charge • Locations subjected to temperature extremes • Locations where there is extreme moisture •...
... range is 5°C to 35°C (41 to 95 °F)). • Never place heavy objects on the projector or climb on top of the projector. 11 Failure to observe the following precautions can result in the following conditions. Doing so creates the risk of malfunction of... and damage to the projector. • Locations subjected to electrostatic charge • Locations subjected to temperature extremes • Locations where there is extreme moisture •...
Owners Manual
Page 12
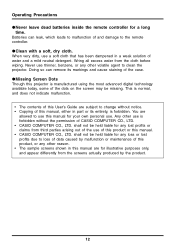
...'s Guide are subject to use a soft cloth that has been dampened in part or its markings and cause staining of CASIO COMPUTER CO., LTD. • CASIO COMPUTER CO., LTD. Batteries can remove its entirety, is manufactured using the most advanced digital technology available today, some of... held liable for any lost profits due to loss of data caused by malfunction or maintenance of and damage to clean the projector. Operating Precautions GNever leave dead batteries inside the remote controller for illustrative purposes only, and appear differently from the screens actually ...
...'s Guide are subject to use a soft cloth that has been dampened in part or its markings and cause staining of CASIO COMPUTER CO., LTD. • CASIO COMPUTER CO., LTD. Batteries can remove its entirety, is manufactured using the most advanced digital technology available today, some of... held liable for any lost profits due to loss of data caused by malfunction or maintenance of and damage to clean the projector. Operating Precautions GNever leave dead batteries inside the remote controller for illustrative purposes only, and appear differently from the screens actually ...

Owners Manual
Page 13
... 23 Loading Remote Controller Batteries 25 Remote Controller Signal Range 27 Getting Ready 28 Setting Up the Projector 28 Setup Precautions 30 Projector Angle to the Screen 31 Adjusting the Projector Elevation Angle 32 Rear Projection (From the Back of the Screen 34 Connecting a Computer to the... Port 35 Connecting to a Standard Video Device 36 Connecting to a Component Video Output Device 37 Turning On the Projector 38 Turning Off the Projector 41 Projection Operations 43 Projecting onto a Screen 43 Keystone Correction (KEYSTONE 50 Adjusting the Volume Level (VOL 53 Enlarging ...
... 23 Loading Remote Controller Batteries 25 Remote Controller Signal Range 27 Getting Ready 28 Setting Up the Projector 28 Setup Precautions 30 Projector Angle to the Screen 31 Adjusting the Projector Elevation Angle 32 Rear Projection (From the Back of the Screen 34 Connecting a Computer to the... Port 35 Connecting to a Standard Video Device 36 Connecting to a Component Video Output Device 37 Turning On the Projector 38 Turning Off the Projector 41 Projection Operations 43 Projecting onto a Screen 43 Keystone Correction (KEYSTONE 50 Adjusting the Volume Level (VOL 53 Enlarging ...

Owners Manual
Page 14
... Settings 85 Option Settings 89 Operational Info 99 Restore All Defaults 100 User Maintenance 101 Cleaning the Projector 101 Reattaching the Lens Cover 101 Replacing the Lamp 102 Troubleshooting 110 Indicators and Alert Tones 110 Projector Troubleshooting 112 Appendix 114 Specifications 114 Computer System Requirements for USB Connection 115 Supported Signals 116...
... Settings 85 Option Settings 89 Operational Info 99 Restore All Defaults 100 User Maintenance 101 Cleaning the Projector 101 Reattaching the Lens Cover 101 Replacing the Lamp 102 Troubleshooting 110 Indicators and Alert Tones 110 Projector Troubleshooting 112 Appendix 114 Specifications 114 Computer System Requirements for USB Connection 115 Supported Signals 116...
Owners Manual
Page 15
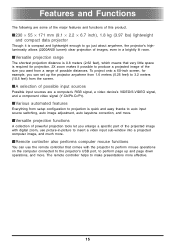
... a video input sub-window into a projected computer image, and much more effective. 15 The remote controller helps to go just about anywhere, the projector's highluminosity allows (2200ANSI lumen) clear projection of possible distances. I230 × 55 × 171 mm (9.1 × 2.2 × 6.7 inch...), 1.8 kg (3.97 lbs) lightweight and compact data projector Though it possible to perform page up the projector anywhere from the screen. IVersatile projection range The shortest projection distance is 0.8 meters (2.62 feet), which means that comes...
... a video input sub-window into a projected computer image, and much more effective. 15 The remote controller helps to go just about anywhere, the projector's highluminosity allows (2200ANSI lumen) clear projection of possible distances. I230 × 55 × 171 mm (9.1 × 2.2 × 6.7 inch...), 1.8 kg (3.97 lbs) lightweight and compact data projector Though it possible to perform page up the projector anywhere from the screen. IVersatile projection range The shortest projection distance is 0.8 meters (2.62 feet), which means that comes...
Owners Manual
Page 16
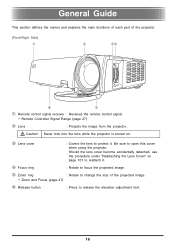
Never look into the lens while the projector is turned on page 101 to reattach it . Caution! General Guide This General Guide section defines the names and explains the main functions of each ... cover become accidentally detached, use the procedure under "Reattaching the Lens Cover" on . 3 Lens cover : Covers the lens to open this cover when using the projector. Be sure to protect it . 4 Focus ring : Rotate to focus the projected image. 5 Zoom ring : Rotate to change the size of the...
Never look into the lens while the projector is turned on page 101 to reattach it . Caution! General Guide This General Guide section defines the names and explains the main functions of each ... cover become accidentally detached, use the procedure under "Reattaching the Lens Cover" on . 3 Lens cover : Covers the lens to open this cover when using the projector. Be sure to protect it . 4 Focus ring : Rotate to focus the projected image. 5 Zoom ring : Rotate to change the size of the...
Owners Manual
Page 17
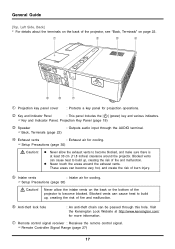
...) Back, Terminals (page 22) 4 Exhaust vents : Exhaust air for cooling. ) Setup Precautions (page 30) Caution! z Never touch the areas around the projector. Visit the Kensington Lock Website at least 30 cm (11.8 inches) clearance around the exhaust vents. General Guide [Top, Left Side, Back] * For details... Precautions (page 30) Caution! These areas can cause heat to build up , creating the risk of the projector to become very hot, and create the risk of the projector, see "Back, Terminals" on the back or the bottom of fire and malfunction. Never allow the exhaust vents...
...) Back, Terminals (page 22) 4 Exhaust vents : Exhaust air for cooling. ) Setup Precautions (page 30) Caution! z Never touch the areas around the projector. Visit the Kensington Lock Website at least 30 cm (11.8 inches) clearance around the exhaust vents. General Guide [Top, Left Side, Back] * For details... Precautions (page 30) Caution! These areas can cause heat to build up , creating the risk of the projector to become very hot, and create the risk of the projector, see "Back, Terminals" on the back or the bottom of fire and malfunction. Never allow the exhaust vents...

Owners Manual
Page 18
... lamp (page 105) 18 Blocked vents can cause heat to build up, creating the risk of the projector to change the angle of the projector. ) To change the projector elevation angle (page 32) 2 Left, right adjustment feet (2) : Rotate for fine adjustment of the ...left and right angle of the projector. ) To change the projector elevation angle (page 32) 3 Intake vents : Intake air for cooling. ) Setup Precautions (page 30) Caution!...
... lamp (page 105) 18 Blocked vents can cause heat to build up, creating the risk of the projector to change the angle of the projector. ) To change the projector elevation angle (page 32) 2 Left, right adjustment feet (2) : Rotate for fine adjustment of the ...left and right angle of the projector. ) To change the projector elevation angle (page 32) 3 Intake vents : Intake air for cooling. ) Setup Precautions (page 30) Caution!...

Owners Manual
Page 19
...lamp status. ) Indicators and Alert Tones (page 110) ) Replacing the Lamp (page 102) 2 TEMP indicator : Indicates the error status of the projector. ) Indicators and Alert Tones (page 110) 3 [AUTO] key : Automatically adjusts the projected image in accordance with RGB input. ) Auto Adjustment of... and remove vertical and horizontal keystoning. ) Keystone Correction (KEYSTONE) (page 50) 8 [MENU] key : Press this key to display the projector setup menu on the projected image. ) Setup Menu Screen Operations (page 65) 19 General Guide [Key and Indicator Panel, Projection Key Panel]...
...lamp status. ) Indicators and Alert Tones (page 110) ) Replacing the Lamp (page 102) 2 TEMP indicator : Indicates the error status of the projector. ) Indicators and Alert Tones (page 110) 3 [AUTO] key : Automatically adjusts the projected image in accordance with RGB input. ) Auto Adjustment of... and remove vertical and horizontal keystoning. ) Keystone Correction (KEYSTONE) (page 50) 8 [MENU] key : Press this key to display the projector setup menu on the projected image. ) Setup Menu Screen Operations (page 65) 19 General Guide [Key and Indicator Panel, Projection Key Panel]...
Owners Manual
Page 21
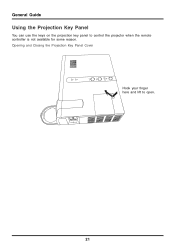
Opening and Closing the Projection Key Panel Cover Hook your finger here and lift to control the projector when the remote controller is not available for some reason. General Guide Using the Projection Key Panel You can use the keys on the projection key panel to open. 21
Opening and Closing the Projection Key Panel Cover Hook your finger here and lift to control the projector when the remote controller is not available for some reason. General Guide Using the Projection Key Panel You can use the keys on the projection key panel to open. 21

Owners Manual
Page 22
...page 37) 2 USB port : For connection to a USB port of a computer using the bundled USB cable. ) Connecting a Computer to the Projector's USB Port (page 35) 3 AUDIO input terminal : For connection to the audio output terminal of a computer or video device using a commercially available... audio cable (∅3.5mm stereo). ) Connecting a Computer to the Projector (Video and Audio) (page 34) ) Connecting to a Standard Video Device (page 36) 4 S-VIDEO input terminal : For connection to the S-...
...page 37) 2 USB port : For connection to a USB port of a computer using the bundled USB cable. ) Connecting a Computer to the Projector's USB Port (page 35) 3 AUDIO input terminal : For connection to the audio output terminal of a computer or video device using a commercially available... audio cable (∅3.5mm stereo). ) Connecting a Computer to the Projector (Video and Audio) (page 34) ) Connecting to a Standard Video Device (page 36) 4 S-VIDEO input terminal : For connection to the S-...
Owners Manual
Page 23
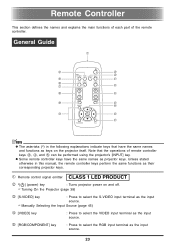
...that the operations of the remote controller. z Some remote controller keys have the same names and functions as keys on and off. ) Turning On the Projector (page 38) 3 [S-VIDEO] key : Press to select the S-VIDEO input terminal as the input source. ) Manually Selecting the Input Source (page...: Press to select the VIDEO input terminal as the input source. 5 [RGB/COMPONENT] key : Press to select the RGB input terminal as projector keys. Remote Controller This section Remote Controller defines the names and explains the main functions of each part of remote controller keys 3, 4, and 5...
...that the operations of the remote controller. z Some remote controller keys have the same names and functions as keys on and off. ) Turning On the Projector (page 38) 3 [S-VIDEO] key : Press to select the S-VIDEO input terminal as the input source. ) Manually Selecting the Input Source (page...: Press to select the VIDEO input terminal as the input source. 5 [RGB/COMPONENT] key : Press to select the RGB input terminal as projector keys. Remote Controller This section Remote Controller defines the names and explains the main functions of each part of remote controller keys 3, 4, and 5...
Owners Manual
Page 24
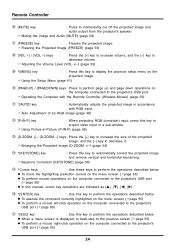
... move the highlighting (selection cursor) on the menu screen ()page 65) z To perform mouse operations on the computer connected to the projector's USB port. ) Operating the Computer with the Remote Controller (Wireless Mouse) (page 59) bl *[AUTO] key : Automatically adjusts ...these keys to perform the operations described below . Remote Controller 6 [MUTE] key : Press to momentarily cut off the projected image and audio output from the projector's speaker. ) Muting the Image and Audio (MUTE) (page 58) 7 [FREEZE] key : Freezes the projected image. ) Freezing the Projected Image (FREEZE...
... move the highlighting (selection cursor) on the menu screen ()page 65) z To perform mouse operations on the computer connected to the projector's USB port. ) Operating the Computer with the Remote Controller (Wireless Mouse) (page 59) bl *[AUTO] key : Automatically adjusts ...these keys to perform the operations described below . Remote Controller 6 [MUTE] key : Press to momentarily cut off the projected image and audio output from the projector's speaker. ) Muting the Image and Audio (MUTE) (page 58) 7 [FREEZE] key : Freezes the projected image. ) Freezing the Projected Image (FREEZE...

