User Manual
Page 3
... Network Setup 26 Dynamic DNS 29 Image Setup 30 Audio and Video 33 Preset 35 Motion Detection 37 Tamper Detection 38 Time and Date 39 Event Setup 40 SD Card 48 Advanced 49 DI and DO 49 HTTPS 50 Access List 51 SNMP 52 Maintenance 54 Device Management 54 System 55 Firmware Upgrade 56 Status 57 Device Info 57 Logs 58 Help 59 Technical Specifications 60 Regulatory Information 64 D-Link DCS-1201 User Manual...
... Network Setup 26 Dynamic DNS 29 Image Setup 30 Audio and Video 33 Preset 35 Motion Detection 37 Tamper Detection 38 Time and Date 39 Event Setup 40 SD Card 48 Advanced 49 DI and DO 49 HTTPS 50 Access List 51 SNMP 52 Maintenance 54 Device Management 54 System 55 Firmware Upgrade 56 Status 57 Device Info 57 Logs 58 Help 59 Technical Specifications 60 Regulatory Information 64 D-Link DCS-1201 User Manual...
User Manual
Page 4
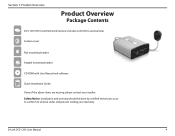
Section 1: Product Overview Product Overview Package Contents DCS-1201 HD Covert Network Camera (includes control box and camera) Camera cover Flat mounting bracket Angled mounting bracket CD-ROM with User Manual and software Quick Installation Guide If any of the above items are missing, please contact your warranty. Safety Notice: Installation and servicing should be done by certified technicians so as to conform to all local codes and prevent voiding your reseller. D-Link DCS-1201 User Manual 4
Section 1: Product Overview Product Overview Package Contents DCS-1201 HD Covert Network Camera (includes control box and camera) Camera cover Flat mounting bracket Angled mounting bracket CD-ROM with User Manual and software Quick Installation Guide If any of the above items are missing, please contact your warranty. Safety Notice: Installation and servicing should be done by certified technicians so as to conform to all local codes and prevent voiding your reseller. D-Link DCS-1201 User Manual 4
User Manual
Page 5
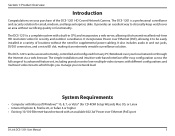
... configurations and multicast video streams which helps you manage your local network or through the Internet via a web browser. The DCS-1201 is a complete system with an available 802.3af Power over your network load. The DCS-1201 is a professional surveillance and security solution for small, medium, and large enterprises alike. It also includes audio in a variety of the DCS-1201 HD Covert Network Camera. System Requirements • Computer with Microsoft Windows...
... configurations and multicast video streams which helps you manage your local network or through the Internet via a web browser. The DCS-1201 is a complete system with an available 802.3af Power over your network load. The DCS-1201 is a professional surveillance and security solution for small, medium, and large enterprises alike. It also includes audio in a variety of the DCS-1201 HD Covert Network Camera. System Requirements • Computer with Microsoft Windows...
User Manual
Page 6
... camera cable gives you a wealth of Platforms With support for Flexible Installation The DCS-1201 can be viewed and managed through most web browsers, including Internet Explorer®. Remote Monitoring Utility The D-ViewCam application adds enhanced features and functionality for a simple and clutter-free installation. Advanced Event Management The DCS-1201 can draw all the power it delivers HD video at 720P, giving you need. Other features include image monitoring, recording images to a hard drive, viewing up to configure...
... camera cable gives you a wealth of Platforms With support for Flexible Installation The DCS-1201 can be viewed and managed through most web browsers, including Internet Explorer®. Remote Monitoring Utility The D-ViewCam application adds enhanced features and functionality for a simple and clutter-free installation. Advanced Event Management The DCS-1201 can draw all the power it delivers HD video at 720P, giving you need. Other features include image monitoring, recording images to a hard drive, viewing up to configure...

User Manual
Page 9
D-Link DCS-1201 User Manual 9 Section 1: Product Overview 12 13 14 15 16 17 12 Camera lens Fixed lens to record video of the surrounding area. 13 Mounting holes Used when mounting camera to a wall or the angled mounting bracket. 14 Camera cable Connects to control box. 15 Camera cover Snaps onto camera when mounted on a wall. 16 Flat mounting bracket Holds camera when doing a discreet wall installation. 17 Angled mounting bracket Allows camera to be mounted on a wall at an angle.
D-Link DCS-1201 User Manual 9 Section 1: Product Overview 12 13 14 15 16 17 12 Camera lens Fixed lens to record video of the surrounding area. 13 Mounting holes Used when mounting camera to a wall or the angled mounting bracket. 14 Camera cable Connects to control box. 15 Camera cover Snaps onto camera when mounted on a wall. 16 Flat mounting bracket Holds camera when doing a discreet wall installation. 17 Angled mounting bracket Allows camera to be mounted on a wall at an angle.

User Manual
Page 11
... control box. Powering the camera through the power terminal: Connect your network. The specifications for the power terminal are as shown below. Connect the other end of the cable to your power source to the power terminal on the control box. Pin + : 8-28 V DC input Pin - : Ground Connect an Ethernet cable to the LAN (PoE) port on the control box. D-Link DCS-1201 User Manual 11 Section 2: Installation Powering the camera through a power adapter (not included): Connect a 12 V 1.5 A power adapter to the power connector...
... control box. Powering the camera through the power terminal: Connect your network. The specifications for the power terminal are as shown below. Connect the other end of the cable to your power source to the power terminal on the control box. Pin + : 8-28 V DC input Pin - : Ground Connect an Ethernet cable to the LAN (PoE) port on the control box. D-Link DCS-1201 User Manual 11 Section 2: Installation Powering the camera through a power adapter (not included): Connect a 12 V 1.5 A power adapter to the power connector...

User Manual
Page 12
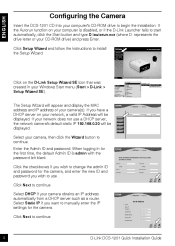
If the Autorun function on the D-Link Setup Wizard SE icon that was created in your Windows Start menu (Start > D-Link > Setup Wizard SE). Section 2: Installation Configuring the Camera Step 1 Insert the DCS-1201 CD into your CD-ROM drive) and press Enter. Step 2 Click on your computer is disabled, or if the D-Link Launcher fails to install the Setup Wizard. D-Link DCS-1201 User Manual 12 Click Setup Wizard and follow the instructions to start automatically, click the Start button and type D:\autorun.exe (where D: represents the drive letter of your computer's CD-ROM drive.
If the Autorun function on the D-Link Setup Wizard SE icon that was created in your Windows Start menu (Start > D-Link > Setup Wizard SE). Section 2: Installation Configuring the Camera Step 1 Insert the DCS-1201 CD into your CD-ROM drive) and press Enter. Step 2 Click on your computer is disabled, or if the D-Link Launcher fails to install the Setup Wizard. D-Link DCS-1201 User Manual 12 Click Setup Wizard and follow the instructions to start automatically, click the Start button and type D:\autorun.exe (where D: represents the drive letter of your computer's CD-ROM drive.

User Manual
Page 13
.... D-Link DCS-1201 User Manual 13 If you wish to use a DHCP server, the network camera's default static IP 192.168.0.20 will be displayed. Step 4 Enter the Admin ID and password. If your camera(s). Click the checkboxes if you wish to change the admin ID and password for the first time, the default Admin ID is admin with the password left blank. Section 2: Installation Step 3 The Setup Wizard will appear and display the MAC address and...
.... D-Link DCS-1201 User Manual 13 If you wish to use a DHCP server, the network camera's default static IP 192.168.0.20 will be displayed. Step 4 Enter the Admin ID and password. If your camera(s). Click the checkboxes if you wish to change the admin ID and password for the first time, the default Admin ID is admin with the password left blank. Section 2: Installation Step 3 The Setup Wizard will appear and display the MAC address and...
User Manual
Page 14
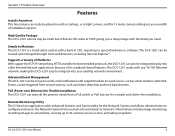
Select Static IP if you want to continue. Click Next to manually enter the IP settings for the camera. Step 6 Take a moment to confirm your camera obtains an IP address automatically from a DHCP server such as a router. D-Link DCS-1201 User Manual 14 Section 2: Installation Step 5 Select DHCP if your settings and click Restart.
Select Static IP if you want to continue. Click Next to manually enter the IP settings for the camera. Step 6 Take a moment to confirm your camera obtains an IP address automatically from a DHCP server such as a router. D-Link DCS-1201 User Manual 14 Section 2: Installation Step 5 Select DHCP if your settings and click Restart.

User Manual
Page 15
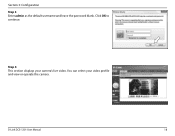
... secure the camera in the desired location, then attach the camera cover. Mounting directly on the flat mounting bracket and attach it . Section 2: Installation Mounting the Camera It is highly recommended that you configure and test your camera before mounting it to the inside of the wall/ceiling. D-Link DCS-1201 User Manual 15 Peel off the adhesive backing on a wall/ceiling Use the included screws to mount the camera in the mounting bracket...
... secure the camera in the desired location, then attach the camera cover. Mounting directly on the flat mounting bracket and attach it . Section 2: Installation Mounting the Camera It is highly recommended that you configure and test your camera before mounting it to the inside of the wall/ceiling. D-Link DCS-1201 User Manual 15 Peel off the adhesive backing on a wall/ceiling Use the included screws to mount the camera in the mounting bracket...

User Manual
Page 16
You can adjust the pivot of the angled mounting bracket by using the included screw. D-Link DCS-1201 User Manual 16 Mounting the control box Use 4 screws to attach the mounting plates to the control box, then use 2 screws to the angled mounting bracket with the included screws as shown. Section 2: Installation Mounting using the angled mounting bracket Attach the angled mounting bracket to the wall/ceiling using the included hex wrench. Attach the camera to mount the control box in the desired location.
You can adjust the pivot of the angled mounting bracket by using the included screw. D-Link DCS-1201 User Manual 16 Mounting the control box Use 4 screws to attach the mounting plates to the control box, then use 2 screws to the angled mounting bracket with the included screws as shown. Section 2: Installation Mounting using the angled mounting bracket Attach the angled mounting bracket to the wall/ceiling using the included hex wrench. Attach the camera to mount the control box in the desired location.
User Manual
Page 18
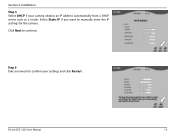
Click OK to continue. Step 4 This section displays your video profile and view or operate the camera. D-Link DCS-1201 User Manual 18 Section 3: Configuration Step 3 Enter admin as the default username and leave the password blank. You can select your camera's live video.
Click OK to continue. Step 4 This section displays your video profile and view or operate the camera. D-Link DCS-1201 User Manual 18 Section 3: Configuration Step 3 Enter admin as the default username and leave the password blank. You can select your camera's live video.

User Manual
Page 19
... language using this indicator will change color. This control pad can zoom in progress, this menu. Note: The video motion feature for your camera must be used to operate the camera. Global View: This window indicates the total field of view (FOV) of interest (ROI). Language: You may also select your language using the drop-down menu on the image. ePTZ Speed: You may select any of the screen. D-Link DCS-1201 User Manual 19...
... language using this indicator will change color. This control pad can zoom in progress, this menu. Note: The video motion feature for your camera must be used to operate the camera. Global View: This window indicates the total field of view (FOV) of interest (ROI). Language: You may also select your language using the drop-down menu on the image. ePTZ Speed: You may select any of the screen. D-Link DCS-1201 User Manual 19...

User Manual
Page 21
Alternatively, you want to enter your Network Camera, click Internet Connection Setup Wizard. To quickly configure your Network Camera and skip to "Network Setup" on page 37. D-Link DCS-1201 User Manual 21 Section 3: Configuration Setup Setup Wizard To configure your settings without running the wizard, click Manual Motion Detection Setup and skip to"Motion Detection" on page 26. If you may click Manual Internet Connection Setup to manually configure your Network Camera's motion detection settings, click Motion Detection Setup Wizard.
Alternatively, you want to enter your Network Camera, click Internet Connection Setup Wizard. To quickly configure your Network Camera and skip to "Network Setup" on page 37. D-Link DCS-1201 User Manual 21 Section 3: Configuration Setup Setup Wizard To configure your settings without running the wizard, click Manual Motion Detection Setup and skip to"Motion Detection" on page 26. If you may click Manual Internet Connection Setup to manually configure your Network Camera's motion detection settings, click Motion Detection Setup Wizard.
User Manual
Page 22
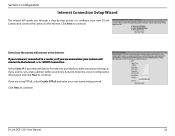
... to set a static address within your home network. Select Static IP if your Internet Service Provider has provided you with connection settings, or if you through a step-by-step process to configure your new D-Link Camera and connect the camera to the Internet, select DHCP Connection. D-Link DCS-1201 User Manual 22 If your camera is connected to a router, or if you are unsure how your user name and password. Click Next to the Internet. Select...
... to set a static address within your home network. Select Static IP if your Internet Service Provider has provided you with connection settings, or if you through a step-by-step process to configure your new D-Link Camera and connect the camera to the Internet, select DHCP Connection. D-Link DCS-1201 User Manual 22 If your camera is connected to a router, or if you are unsure how your user name and password. Click Next to the Internet. Select...
User Manual
Page 24
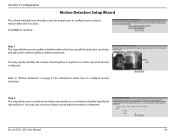
Click Next to configure motion detection. Refer to "Motion Detection" on a customized schedule. Section 3: Configuration Motion Detection Setup Wizard This wizard will allow you through a step-by-step process to configure your camera's motion detection functions. Step 1 This step will guide you to enable or disable motion detection, specify the detection sensitivity, and adjust the camera's ability to always record whenever motion is detected. You may also choose to detect movement. D-Link DCS-1201 User Manual 24 You may specify...
Click Next to configure motion detection. Refer to "Motion Detection" on a customized schedule. Section 3: Configuration Motion Detection Setup Wizard This wizard will allow you through a step-by-step process to configure your camera's motion detection functions. Step 1 This step will guide you to enable or disable motion detection, specify the detection sensitivity, and adjust the camera's ability to always record whenever motion is detected. You may also choose to detect movement. D-Link DCS-1201 User Manual 24 You may specify...

User Manual
Page 27
... camera. The default port number is the number of the camera. Secondary DNS: Enter the secondary domain name server used to the HTTPS port of the stream. You may obtain this setting if your network. D-Link DCS-1201 User Manual 27 The default port number is 80. Section 3: Configuration Primary DNS: Enter the primary domain name server that translates names to add port forwarding entries into the router automatically on your network uses PPPoE. User Name / Password: Enter the username and password...
... camera. The default port number is the number of the camera. Secondary DNS: Enter the secondary domain name server used to the HTTPS port of the stream. You may obtain this setting if your network. D-Link DCS-1201 User Manual 27 The default port number is 80. Section 3: Configuration Primary DNS: Enter the primary domain name server that translates names to add port forwarding entries into the router automatically on your network uses PPPoE. User Name / Password: Enter the username and password...
User Manual
Page 56
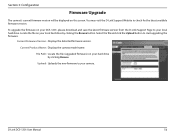
...: Displays the camera model name. Upload: Uploads the new firmware to check for the latest available firmware version. D-Link DCS-1201 User Manual 56 Select the file and click the Upload button to your local hard drive. File Path: Locate the file (upgraded firmware) on your DCS-1201, please download and save the latest firmware version from the D-Link Support Page to start upgrading the firmware. Locate the file on this screen. Current Firmware Version: Displays the detected firmware version. Section 3: Configuration Firmware Upgrade...
...: Displays the camera model name. Upload: Uploads the new firmware to check for the latest available firmware version. D-Link DCS-1201 User Manual 56 Select the file and click the Upload button to your local hard drive. File Path: Locate the file (upgraded firmware) on your DCS-1201, please download and save the latest firmware version from the D-Link Support Page to start upgrading the firmware. Locate the file on this screen. Current Firmware Version: Displays the detected firmware version. Section 3: Configuration Firmware Upgrade...
Quick Installation Guide
Page 5
... new ID and password you want to use a DHCP server, the network camera's default static IP 192.168.0.20 will be displayed. Click Next to install the Setup Wizard. Click Setup Wizard and follow the instructions to continue. 4 D-Link DCS-1201 Quick Installation Guide Enter the Admin ID and password. ENGLISH Configuring the Camera Insert the DCS-1201 CD into your computer's CD-ROM drive to start automatically, click the Start button and type...
... new ID and password you want to use a DHCP server, the network camera's default static IP 192.168.0.20 will be displayed. Click Next to install the Setup Wizard. Click Setup Wizard and follow the instructions to continue. 4 D-Link DCS-1201 Quick Installation Guide Enter the Admin ID and password. ENGLISH Configuring the Camera Insert the DCS-1201 CD into your computer's CD-ROM drive to start automatically, click the Start button and type...

Quick Installation Guide
Page 6
... D-Link Setup Wizard SE icon that was created in your settings and click Restart. D-Link DCS-1201 Quick Installation Guide 5 The Setup Wizard will automatically open your web browser to confirm your Windows Start menu (Start > D-Link > Setup Wizard SE). This section displays your video profile and view or operate the camera. Take a moment to the IP address of the camera. Select the camera and click Link to access the web configuration. Enter admin as the default username and leave the password...
... D-Link Setup Wizard SE icon that was created in your settings and click Restart. D-Link DCS-1201 Quick Installation Guide 5 The Setup Wizard will automatically open your web browser to confirm your Windows Start menu (Start > D-Link > Setup Wizard SE). This section displays your video profile and view or operate the camera. Take a moment to the IP address of the camera. Select the camera and click Link to access the web configuration. Enter admin as the default username and leave the password...

