User Manual
Page 2
... or its subsidiaries in the content hereof without prior expressed written permission from D-Link Corporation. Information in this publication and to make changes in the United States or other countries. This publication may become obsolete as our services and websites develop and change. D-Link DCS-1201 User Manual 2 All rights reserved. Copyright © 2015...
... or its subsidiaries in the content hereof without prior expressed written permission from D-Link Corporation. Information in this publication and to make changes in the United States or other countries. This publication may become obsolete as our services and websites develop and change. D-Link DCS-1201 User Manual 2 All rights reserved. Copyright © 2015...
User Manual
Page 3
... Maintenance 54 Device Management 54 System 55 Firmware Upgrade 56 Status 57 Device Info 57 Logs 58 Help 59 Technical Specifications 60 Regulatory Information 64 D-Link DCS-1201 User Manual 3
... Maintenance 54 Device Management 54 System 55 Firmware Upgrade 56 Status 57 Device Info 57 Logs 58 Help 59 Technical Specifications 60 Regulatory Information 64 D-Link DCS-1201 User Manual 3
User Manual
Page 4
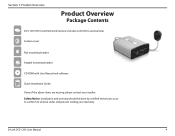
Safety Notice: Installation and servicing should be done by certified technicians so as to conform to all local codes and prevent voiding your reseller. Section 1: Product Overview Product Overview Package Contents DCS-1201 HD Covert Network Camera (includes control box and camera) Camera cover Flat mounting bracket Angled mounting bracket CD-ROM with User Manual and software Quick Installation Guide If any of the above items are missing, please contact your warranty. D-Link DCS-1201 User Manual 4
Safety Notice: Installation and servicing should be done by certified technicians so as to conform to all local codes and prevent voiding your reseller. Section 1: Product Overview Product Overview Package Contents DCS-1201 HD Covert Network Camera (includes control box and camera) Camera cover Flat mounting bracket Angled mounting bracket CD-ROM with User Manual and software Quick Installation Guide If any of the above items are missing, please contact your warranty. D-Link DCS-1201 User Manual 4
User Manual
Page 5
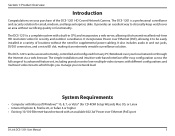
...The simple installation and intuitive web-based interface offer easy configuration across the full range of locations without sacrificing quality or functionality. The DCS-1201 is a complete system with an available 802.3af Power over an area without the need for small, medium, and large enterprises alike...-in and out jacks, DI/DO connectors, and a microSD slot, making it to discreetly keep watch over Ethernet (PoE) port D-Link DCS-1201 User Manual 5 Section 1: Product Overview Introduction Congratulations on your local network or through the Internet via a web browser. The...
...The simple installation and intuitive web-based interface offer easy configuration across the full range of locations without sacrificing quality or functionality. The DCS-1201 is a complete system with an available 802.3af Power over an area without the need for small, medium, and large enterprises alike...-in and out jacks, DI/DO connectors, and a microSD slot, making it to discreetly keep watch over Ethernet (PoE) port D-Link DCS-1201 User Manual 5 Section 1: Product Overview Introduction Congratulations on your local network or through the Internet via a web browser. The...
User Manual
Page 6
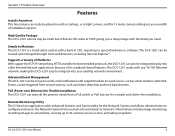
... networking, HTTP, and other Internet related protocols, the DCS-1201 can also be integrated easily into your existing network environment. The DCS-1201 can be viewed and managed through most web browsers, including Internet Explorer®. D-Link DCS-1201 User Manual 6 Events can be triggered from a PoE...free installation. Other features include image monitoring, recording images to a hard drive, viewing up to Maintain The DCS-1201 is detected. High Quality Footage The DCS-1201 camera may be small, but it needs from several sources, such as when motion is a stand-alone system...
... networking, HTTP, and other Internet related protocols, the DCS-1201 can also be integrated easily into your existing network environment. The DCS-1201 can be viewed and managed through most web browsers, including Internet Explorer®. D-Link DCS-1201 User Manual 6 Events can be triggered from a PoE...free installation. Other features include image monitoring, recording images to a hard drive, viewing up to Maintain The DCS-1201 is detected. High Quality Footage The DCS-1201 camera may be small, but it needs from several sources, such as when motion is a stand-alone system...

User Manual
Page 7
Section 1: Product Overview Hardware Overview Back 12345 1 DC power connector Connects to an optional 12 V / 1.5 A power adapter (not included). 2 Power terminal Connects to a power source. (Pin +: 8-28 V DC input, Pin -: Ground) 3 LAN status LED Indicates connection to a wired network and traffic status. 4 LAN (PoE) port RJ-45 connector for Ethernet which can also be used to power the camera using Power over Ethernet (PoE). 5 microSD card slot Insert a microSD card for storing recorded images and video locally. D-Link DCS-1201 User Manual 7
Section 1: Product Overview Hardware Overview Back 12345 1 DC power connector Connects to an optional 12 V / 1.5 A power adapter (not included). 2 Power terminal Connects to a power source. (Pin +: 8-28 V DC input, Pin -: Ground) 3 LAN status LED Indicates connection to a wired network and traffic status. 4 LAN (PoE) port RJ-45 connector for Ethernet which can also be used to power the camera using Power over Ethernet (PoE). 5 microSD card slot Insert a microSD card for storing recorded images and video locally. D-Link DCS-1201 User Manual 7

User Manual
Page 8
D-Link DCS-1201 User Manual 8 Section 1: Product Overview Front 6 7 8 9 10 11 6 Audio in jack Connects to a microphone. 7 Audio out jack Connects to a speaker. 8 Status LED Indicates the camera's current status. 9 Camera port Connects to camera cable. 10 DI/DO connectors I/O connectors for external devices. 11 Reset button Press and hold for 10 seconds to reset camera back to the factory default settings.
D-Link DCS-1201 User Manual 8 Section 1: Product Overview Front 6 7 8 9 10 11 6 Audio in jack Connects to a microphone. 7 Audio out jack Connects to a speaker. 8 Status LED Indicates the camera's current status. 9 Camera port Connects to camera cable. 10 DI/DO connectors I/O connectors for external devices. 11 Reset button Press and hold for 10 seconds to reset camera back to the factory default settings.

User Manual
Page 9
Section 1: Product Overview 12 13 14 15 16 17 12 Camera lens Fixed lens to record video of the surrounding area. 13 Mounting holes Used when mounting camera to a wall or the angled mounting bracket. 14 Camera cable Connects to control box. 15 Camera cover Snaps onto camera when mounted on a wall. 16 Flat mounting bracket Holds camera when doing a discreet wall installation. 17 Angled mounting bracket Allows camera to be mounted on a wall at an angle. D-Link DCS-1201 User Manual 9
Section 1: Product Overview 12 13 14 15 16 17 12 Camera lens Fixed lens to record video of the surrounding area. 13 Mounting holes Used when mounting camera to a wall or the angled mounting bracket. 14 Camera cable Connects to control box. 15 Camera cover Snaps onto camera when mounted on a wall. 16 Flat mounting bracket Holds camera when doing a discreet wall installation. 17 Angled mounting bracket Allows camera to be mounted on a wall at an angle. D-Link DCS-1201 User Manual 9

User Manual
Page 10
Powering the camera through a power adapter. D-Link DCS-1201 User Manual 10 Connect the other end of the cable to your PoE switch or PoE injector. You can power the DCS-1201 three different ways: through PoE, through the power terminal, or through PoE (Class 2): Connect an Ethernet cable to the LAN (PoE) port on the control box. Section 2: Installation Connecting the Camera Connect the camera cable to the CAM port on the control box.
Powering the camera through a power adapter. D-Link DCS-1201 User Manual 10 Connect the other end of the cable to your PoE switch or PoE injector. You can power the DCS-1201 three different ways: through PoE, through the power terminal, or through PoE (Class 2): Connect an Ethernet cable to the LAN (PoE) port on the control box. Section 2: Installation Connecting the Camera Connect the camera cable to the CAM port on the control box.

User Manual
Page 11
... control box. Connect the other end of the cable to your power source to the power connector of the cable to your network. D-Link DCS-1201 User Manual 11 Pin + : 8-28 V DC input Pin - : Ground Connect an Ethernet cable to the LAN (PoE) port on the control box. Connect an Ethernet cable to the...
... control box. Connect the other end of the cable to your power source to the power connector of the cable to your network. D-Link DCS-1201 User Manual 11 Pin + : 8-28 V DC input Pin - : Ground Connect an Ethernet cable to the LAN (PoE) port on the control box. Connect an Ethernet cable to the...

User Manual
Page 12
If the Autorun function on the D-Link Setup Wizard SE icon that was created in your CD-ROM drive) and press Enter. Step 2 Click on your computer is disabled, or if the D-Link Launcher fails to install the Setup Wizard. Section 2: Installation Configuring the Camera Step 1 Insert the DCS-1201 CD into your computer's CD-ROM drive. D-Link DCS-1201 User Manual 12 Click Setup Wizard and follow the instructions to start automatically, click the Start button and type D:\autorun.exe (where D: represents the drive letter of your Windows Start menu (Start > D-Link > Setup Wizard SE).
If the Autorun function on the D-Link Setup Wizard SE icon that was created in your CD-ROM drive) and press Enter. Step 2 Click on your computer is disabled, or if the D-Link Launcher fails to install the Setup Wizard. Section 2: Installation Configuring the Camera Step 1 Insert the DCS-1201 CD into your computer's CD-ROM drive. D-Link DCS-1201 User Manual 12 Click Setup Wizard and follow the instructions to start automatically, click the Start button and type D:\autorun.exe (where D: represents the drive letter of your Windows Start menu (Start > D-Link > Setup Wizard SE).

User Manual
Page 13
Section 2: Installation Step 3 The Setup Wizard will be displayed. Step 4 Enter the Admin ID and password. D-Link DCS-1201 User Manual 13 Click Next to change the admin ID and password for the first time, the default Admin ID is admin with the password ...
Section 2: Installation Step 3 The Setup Wizard will be displayed. Step 4 Enter the Admin ID and password. D-Link DCS-1201 User Manual 13 Click Next to change the admin ID and password for the first time, the default Admin ID is admin with the password ...
User Manual
Page 14
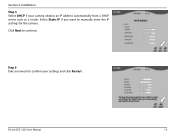
Step 6 Take a moment to manually enter the IP settings for the camera. Select Static IP if you want to confirm your camera obtains an IP address automatically from a DHCP server such as a router. D-Link DCS-1201 User Manual 14 Click Next to continue. Section 2: Installation Step 5 Select DHCP if your settings and click Restart.
Step 6 Take a moment to manually enter the IP settings for the camera. Select Static IP if you want to confirm your camera obtains an IP address automatically from a DHCP server such as a router. D-Link DCS-1201 User Manual 14 Click Next to continue. Section 2: Installation Step 5 Select DHCP if your settings and click Restart.

User Manual
Page 15
... adhesive backing on a wall/ceiling Use the included screws to secure the camera in the wall/ceiling, which should be no more than 5 mm thick. D-Link DCS-1201 User Manual 15 Covert installation Drill a hole 9 mm in diameter in the mounting bracket as shown. Mounting directly on the flat mounting bracket and attach...
... adhesive backing on a wall/ceiling Use the included screws to secure the camera in the wall/ceiling, which should be no more than 5 mm thick. D-Link DCS-1201 User Manual 15 Covert installation Drill a hole 9 mm in diameter in the mounting bracket as shown. Mounting directly on the flat mounting bracket and attach...

User Manual
Page 16
Attach the camera to mount the control box in the desired location. D-Link DCS-1201 User Manual 16 Mounting the control box Use 4 screws to attach the mounting plates to the control box, then use 2 screws to the angled mounting bracket with the included screws as shown. You can adjust the pivot of the angled mounting bracket by using the included screw. Section 2: Installation Mounting using the angled mounting bracket Attach the angled mounting bracket to the wall/ceiling using the included hex wrench.
Attach the camera to mount the control box in the desired location. D-Link DCS-1201 User Manual 16 Mounting the control box Use 4 screws to attach the mounting plates to the control box, then use 2 screws to the angled mounting bracket with the included screws as shown. You can adjust the pivot of the angled mounting bracket by using the included screw. Section 2: Installation Mounting using the angled mounting bracket Attach the angled mounting bracket to the wall/ceiling using the included hex wrench.

User Manual
Page 17
...password you created in your Windows Start menu (Start > D-Link > Setup Wizard SE). Step 2 Select the camera and click Link to the IP address of your password, click OK. D-Link DCS-1201 User Manual 17 At the end of the wizard, click Link, or enter the IP address of the camera. The ...Setup Wizard, you are ready to easily access and configure your DCS-1201. The camera's built-in Web configuration utility is designed to allow you did not create a password, the default password is blank. Step 1 Click on the D-Link Setup Wizard SE icon that was created in the Installation Wizard....
...password you created in your Windows Start menu (Start > D-Link > Setup Wizard SE). Step 2 Select the camera and click Link to the IP address of your password, click OK. D-Link DCS-1201 User Manual 17 At the end of the wizard, click Link, or enter the IP address of the camera. The ...Setup Wizard, you are ready to easily access and configure your DCS-1201. The camera's built-in Web configuration utility is designed to allow you did not create a password, the default password is blank. Step 1 Click on the D-Link Setup Wizard SE icon that was created in the Installation Wizard....
User Manual
Page 18
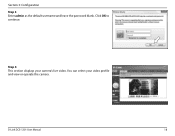
D-Link DCS-1201 User Manual 18 Section 3: Configuration Step 3 Enter admin as the default username and leave the password blank. You can select your camera's live video. Step 4 This section displays your video profile and view or operate the camera. Click OK to continue.
D-Link DCS-1201 User Manual 18 Section 3: Configuration Step 3 Enter admin as the default username and leave the password blank. You can select your camera's live video. Step 4 This section displays your video profile and view or operate the camera. Click OK to continue.

User Manual
Page 19
... ROI will change color. Global View: This window indicates the total field of view (FOV) of the available icons listed below to operate the camera. D-Link DCS-1201 User Manual 19 Note: The video motion feature for your camera must be used to zoom in and out on the live video. When a recording...
... ROI will change color. Global View: This window indicates the total field of view (FOV) of the available icons listed below to operate the camera. D-Link DCS-1201 User Manual 19 Note: The video motion feature for your camera must be used to zoom in and out on the live video. When a recording...

User Manual
Page 20
D-Link DCS-1201 User Manual 20 Section 3: Configuration Video Profile 1 Video Profile 2 Full screen mode Take a Snapshot Record a Video Clip Set a Storage Folder Enable/Mute Audio In (from a microphone) Enable/Mute Audio Out (to a speaker) Start/Stop Digital Output Go To: If any presets have been defined, you can select them here to move the (Preset List) camera to the selected preset.
D-Link DCS-1201 User Manual 20 Section 3: Configuration Video Profile 1 Video Profile 2 Full screen mode Take a Snapshot Record a Video Clip Set a Storage Folder Enable/Mute Audio In (from a microphone) Enable/Mute Audio Out (to a speaker) Start/Stop Digital Output Go To: If any presets have been defined, you can select them here to move the (Preset List) camera to the selected preset.

User Manual
Page 21
To quickly configure your Network Camera, click Internet Connection Setup Wizard. Alternatively, you want to enter your Network Camera and skip to "Motion Detection" on page 26. D-Link DCS-1201 User Manual 21 Section 3: Configuration Setup Setup Wizard To configure your Network Camera's motion detection settings, click Motion Detection Setup Wizard. If you may click Manual Internet Connection Setup to manually configure your settings without running the wizard, click Manual Motion Detection Setup and skip to "Network Setup" on page 37.
To quickly configure your Network Camera, click Internet Connection Setup Wizard. Alternatively, you want to enter your Network Camera and skip to "Motion Detection" on page 26. D-Link DCS-1201 User Manual 21 Section 3: Configuration Setup Setup Wizard To configure your Network Camera's motion detection settings, click Motion Detection Setup Wizard. If you may click Manual Internet Connection Setup to manually configure your settings without running the wizard, click Manual Motion Detection Setup and skip to "Network Setup" on page 37.


