Setup and Quick Reference Guide
Page 5
... Battery Disposal 11 Getting Started/Setup 12 Determine the Computer's Placement and Orientation 12 Installing a Device in the Module Bay 13 Attaching the Stand 14 Connecting the AC Adapter 14 Connecting External Devices 16 Attaching the Cable Cover 17 Attaching the Stand to the Mounting Plate 19 Finding Information and Assistance 21 Solving Problems 23 Using the Dell Drivers and Utilities CD 24 Running the Dell Diagnostics 24 Running the Dell IDE Hard-Drive Diagnostics...
... Battery Disposal 11 Getting Started/Setup 12 Determine the Computer's Placement and Orientation 12 Installing a Device in the Module Bay 13 Attaching the Stand 14 Connecting the AC Adapter 14 Connecting External Devices 16 Attaching the Cable Cover 17 Attaching the Stand to the Mounting Plate 19 Finding Information and Assistance 21 Solving Problems 23 Using the Dell Drivers and Utilities CD 24 Running the Dell Diagnostics 24 Running the Dell IDE Hard-Drive Diagnostics...
Setup and Quick Reference Guide
Page 7
About This Guide This document contains getting started/setup; Regulatory Model Number and Chassis Type DCT = Ultra small formfactor (USF) computer Features 2 USB slots, headphone and microphone connectors power button mounting slot (insert stand for vertical position) mounting slot (insert stand for hanging horizontal position) mounting slot (insert stand for hanging vertical position) module release button module bay diagnostic LEDs computer cover/hard-drive cover release button Setup and Quick Reference Guide 5 and safety, regulatory...
About This Guide This document contains getting started/setup; Regulatory Model Number and Chassis Type DCT = Ultra small formfactor (USF) computer Features 2 USB slots, headphone and microphone connectors power button mounting slot (insert stand for vertical position) mounting slot (insert stand for hanging horizontal position) mounting slot (insert stand for hanging vertical position) module release button module bay diagnostic LEDs computer cover/hard-drive cover release button Setup and Quick Reference Guide 5 and safety, regulatory...
Setup and Quick Reference Guide
Page 11
... power available in your location. A fixed-voltage power supply - Computers with a fixed-voltage power supply do not have a voltage selection switch on the back panel must be manually set the switch for its operating voltage). - When Using Your Computer As you use your computer with any time the computer is connected to operate at only one of the computer for the voltage that your monitor and attached devices...
... power available in your location. A fixed-voltage power supply - Computers with a fixed-voltage power supply do not have a voltage selection switch on the back panel must be manually set the switch for its operating voltage). - When Using Your Computer As you use your computer with any time the computer is connected to operate at only one of the computer for the voltage that your monitor and attached devices...
Setup and Quick Reference Guide
Page 12
.... Replace the battery only with care. Always follow installation and service instructions closely. Also, disconnect any telephone or telecommunication lines from the computer. 1 Perform an orderly computer shutdown using the operating system menu. 2 Turn off the computer before removing a component from the system board or disconnecting a device from the computer. While you are correctly oriented and aligned. • Handle components and cards with...
.... Replace the battery only with care. Always follow installation and service instructions closely. Also, disconnect any telephone or telecommunication lines from the computer. 1 Perform an orderly computer shutdown using the operating system menu. 2 Turn off the computer before removing a component from the system board or disconnecting a device from the computer. While you are correctly oriented and aligned. • Handle components and cards with...
Setup and Quick Reference Guide
Page 14
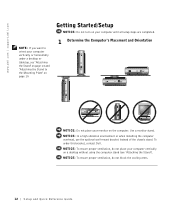
... to orient your monitor on the computer. To order this bracket, contact Dell. Getting Started/Setup NOTICE: Do not turn on your computer until all setup steps are completed. 1 Determine the Computer's Placement and Orientation NOTICE: Do not place your computer vertically or horizontally under a desktop or tabletop, see "Attaching the Stand"). www.dell.com | support.dell.com NOTE: If...
... to orient your monitor on the computer. To order this bracket, contact Dell. Getting Started/Setup NOTICE: Do not turn on your computer until all setup steps are completed. 1 Determine the Computer's Placement and Orientation NOTICE: Do not place your computer vertically or horizontally under a desktop or tabletop, see "Attaching the Stand"). www.dell.com | support.dell.com NOTE: If...

Setup and Quick Reference Guide
Page 16
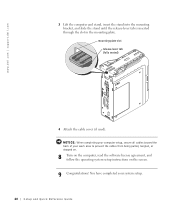
... the stand is in place, tighten the screw. NOTICE: The following steps apply to the power adapter. www.dell.com | support.dell.com NOTE: If you are installing the computer under a desktop or tabletop and is in a high-vibration environment, use the optional wall-mount bracket instead of the computer. 2 Connect the power cable to Japan only. 14 Setup and Quick Re ference Guide
... the stand is in place, tighten the screw. NOTICE: The following steps apply to the power adapter. www.dell.com | support.dell.com NOTE: If you are installing the computer under a desktop or tabletop and is in a high-vibration environment, use the optional wall-mount bracket instead of the computer. 2 Connect the power cable to Japan only. 14 Setup and Quick Re ference Guide

Setup and Quick Reference Guide
Page 18
www.dell.com | support.dell.com NOTE: Connect only one keyboard and one mouse. 5 Connecting External Devices CAUTION: To help prevent electric shock, use only the power adapter and power cable provided, and ensure that they are plugged into a properly grounded power source. 16 Setup and Quick Re ference Guide
www.dell.com | support.dell.com NOTE: Connect only one keyboard and one mouse. 5 Connecting External Devices CAUTION: To help prevent electric shock, use only the power adapter and power cable provided, and ensure that they are plugged into a properly grounded power source. 16 Setup and Quick Re ference Guide

Setup and Quick Reference Guide
Page 20
To remove the cable cover, remove the device installed in the security cable slot (optional). www.dell.com | support.dell.com 5 Insert the tabs into the slots and slide the piece toward the diagnostic lights (see the illustration). 6 Install a security device in the security cable slot (optional). 1 Grasp the top piece of the cable cover and slide it to the left until it stops, and then lift it up and away. 2 To remove the...
To remove the cable cover, remove the device installed in the security cable slot (optional). www.dell.com | support.dell.com 5 Insert the tabs into the slots and slide the piece toward the diagnostic lights (see the illustration). 6 Install a security device in the security cable slot (optional). 1 Grasp the top piece of the cable cover and slide it to the left until it stops, and then lift it up and away. 2 To remove the...
Setup and Quick Reference Guide
Page 22
... your system setup. 20 Setup and Quick Re ference Guide mounting-plate slot release-lever tab (fully seated) 4 Attach the cable cover (if used). You have completed your work area to prevent the cables from being pulled, tangled, or stepped on. 8 Turn on the computer, read the software license agreement, and follow the operating system setup instructions on the screen. 9 Congratulations! www.dell.com | support.dell.com 3 Lift...
... your system setup. 20 Setup and Quick Re ference Guide mounting-plate slot release-lever tab (fully seated) 4 Attach the cable cover (if used). You have completed your work area to prevent the cables from being pulled, tangled, or stepped on. 8 Turn on the computer, read the software license agreement, and follow the operating system setup instructions on the screen. 9 Congratulations! www.dell.com | support.dell.com 3 Lift...

Setup and Quick Reference Guide
Page 23
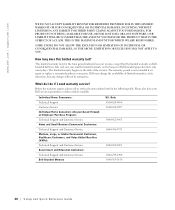
... drivers, or run diagnostics tools. • Express Service Code and Service Tag Number • Microsoft® Windows® License Label Express Service Code and Product Key Located on your computer. • How to remove and replace parts • Technical specifications • How to configure system settings • How to troubleshoot and solve problems User's Guide Depending on your operating system, double-click the User's Guides icon on your desktop or click the Start button and then click Help and Support...
... drivers, or run diagnostics tools. • Express Service Code and Service Tag Number • Microsoft® Windows® License Label Express Service Code and Product Key Located on your computer. • How to remove and replace parts • Technical specifications • How to configure system settings • How to troubleshoot and solve problems User's Guide Depending on your operating system, double-click the User's Guides icon on your desktop or click the Start button and then click Help and Support...

Setup and Quick Reference Guide
Page 24
... Guide upgrade information for the devices that describes your problem. 4 Follow the instructions shown on my computer's configuration • Service contract for my computer • How to use Windows XP • Documentation for my computer and devices If you reinstall your operating system, use the Drivers and Utilities CD to reinstall drivers for components, such as memory, the hard drive, and the operating system • Customer Care - www.dell.com | support.dell...
... Guide upgrade information for the devices that describes your problem. 4 Follow the instructions shown on my computer's configuration • Service contract for my computer • How to use Windows XP • Documentation for my computer and devices If you reinstall your operating system, use the Drivers and Utilities CD to reinstall drivers for components, such as memory, the hard drive, and the operating system • Customer Care - www.dell.com | support.dell...

Setup and Quick Reference Guide
Page 26
... drive. Running the Dell Diagnostics The Dell Diagnostics is displayed on this program whenever you have a computer problem to the prompts offered by the installation program. 4 Click Next at the Welcome Dell System Owner screen. 5 Choose the appropriate System Model, Operating System, Device Type, and Topic. www.dell.com | support.dell.com NOTE: To access device drivers and user documentation, you must use the Dell Drivers and Utilities CD while you are running Windows. Using the Dell Drivers and Utilities CD To use the Drivers...
... drive. Running the Dell Diagnostics The Dell Diagnostics is displayed on this program whenever you have a computer problem to the prompts offered by the installation program. 4 Click Next at the Welcome Dell System Owner screen. 5 Choose the appropriate System Model, Operating System, Device Type, and Topic. www.dell.com | support.dell.com NOTE: To access device drivers and user documentation, you must use the Dell Drivers and Utilities CD while you are running Windows. Using the Dell Drivers and Utilities CD To use the Drivers...
Setup and Quick Reference Guide
Page 28
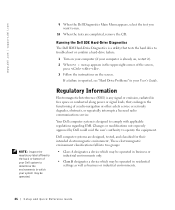
... Dell Diagnostics Main Menu appears, select the test you want to comply with applicable regulations regarding EMI. NOTE: Inspect the regulatory label affixed to troubleshoot or confirm a hard-drive failure. 1 Turn on your computer (if your User's Guide. Regulatory Information Electromagnetic Interference (EMI) is any signal or emission, radiated in which may be operated in your computer is reported, see "Hard Drive Problems" in residential settings...
... Dell Diagnostics Main Menu appears, select the test you want to comply with applicable regulations regarding EMI. NOTE: Inspect the regulatory label affixed to troubleshoot or confirm a hard-drive failure. 1 Turn on your computer (if your User's Guide. Regulatory Information Electromagnetic Interference (EMI) is any signal or emission, radiated in which may be operated in your computer is reported, see "Hard Drive Problems" in residential settings...

Setup and Quick Reference Guide
Page 31
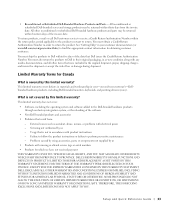
... REPLACEMENT AS SET FORTH IN THIS WARRANTY STATEMENT. Servicing not authorized by this limited warranty? Failure to follow the product instructions or failure to the Dell-branded hardware products through our factory-integration system, third-party software, or the reloading of software • Non-Dell-branded products and accessories • Problems that accompanied your -our end-user customer's-Dellbranded hardware products, including Dell-branded monitors, keyboards, and pointing devices...
... REPLACEMENT AS SET FORTH IN THIS WARRANTY STATEMENT. Servicing not authorized by this limited warranty? Failure to follow the product instructions or failure to the Dell-branded hardware products through our factory-integration system, third-party software, or the reloading of software • Non-Dell-branded products and accessories • Problems that accompanied your -our end-user customer's-Dellbranded hardware products, including Dell-branded monitors, keyboards, and pointing devices...
Setup and Quick Reference Guide
Page 32
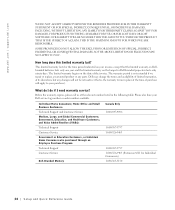
... 1-800-234-1490 1-888-363-5150 30 Setup and Quick Re ference Guide Dell may change the availability of the invoice. What do I do if I need warranty service? Before the warranty expires, please call us at its discretion, but any parts. THIS IS THE MAXIMUM AMOUNT FOR WHICH WE...Dellbranded batteries lasts only one year and the limited warranty on the date of limited warranties, at the relevant number listed in the following table. The warranty period is not extended if we repair or replace a warranted product or any changes will not be retroactive. www.dell.com | support.dell....
... 1-800-234-1490 1-888-363-5150 30 Setup and Quick Re ference Guide Dell may change the availability of the invoice. What do I do if I need warranty service? Before the warranty expires, please call us at its discretion, but any parts. THIS IS THE MAXIMUM AMOUNT FOR WHICH WE...Dellbranded batteries lasts only one year and the limited warranty on the date of limited warranties, at the relevant number listed in the following table. The warranty period is not extended if we repair or replace a warranted product or any changes will not be retroactive. www.dell.com | support.dell....
Setup and Quick Reference Guide
Page 34
... sealed package, excluding the products listed below, may be returned within thirty days from Dell. All new hardware, accessories, parts, and unopened software still in its Code of the arbitrator(s) shall be final and binding on Dell-branded memory may be transferred. To return applications software or an operating system that you and want to make sure that the best way to...
... sealed package, excluding the products listed below, may be returned within thirty days from Dell. All new hardware, accessories, parts, and unopened software still in its Code of the arbitrator(s) shall be final and binding on Dell-branded memory may be transferred. To return applications software or an operating system that you and want to make sure that the best way to...
Setup and Quick Reference Guide
Page 35
... cover: • Software, including the operating system and software added to receive a Credit Return Authorization Number within fourteen days of the software • Non-Dell branded products and accessories • Problems that is not covered by this limited warranty? Failure to follow the product instructions or failure to return the product. DELL'S RESPONSIBILITY FOR MALFUNCTIONS AND DEFECTS IN PRODUCT IS LIMITED TO REPAIR AND REPLACEMENT AS SET...
... cover: • Software, including the operating system and software added to receive a Credit Return Authorization Number within fourteen days of the software • Non-Dell branded products and accessories • Problems that is not covered by this limited warranty? Failure to follow the product instructions or failure to return the product. DELL'S RESPONSIBILITY FOR MALFUNCTIONS AND DEFECTS IN PRODUCT IS LIMITED TO REPAIR AND REPLACEMENT AS SET...
Setup and Quick Reference Guide
Page 36
... if we repair or replace a warranted product or any changes will not be retroactive (that the limited warranty on Dellbranded batteries lasts only one year and the limited warranty on the date of purchase will apply to your Dell service tag number or order number available. Before the warranty expires, please call us at the relevant number listed in place...
... if we repair or replace a warranted product or any changes will not be retroactive (that the limited warranty on Dellbranded batteries lasts only one year and the limited warranty on the date of purchase will apply to your Dell service tag number or order number available. Before the warranty expires, please call us at the relevant number listed in place...
Setup and Quick Reference Guide
Page 38
.../topics/sbtopic_016_ccare.htm If you and Dell. If you are an end-user customer who bought the products under this policy. 36 Setup and Quick Re ference Guide If you are not satisfied with the NAF at P.O. In either case, the refund or credit will be transferred if the current owner transfers ownership of the product...
.../topics/sbtopic_016_ccare.htm If you and Dell. If you are an end-user customer who bought the products under this policy. 36 Setup and Quick Re ference Guide If you are not satisfied with the NAF at P.O. In either case, the refund or credit will be transferred if the current owner transfers ownership of the product...
Setup and Quick Reference Guide
Page 40
... - Dell uses new and reconditioned parts made will, at Dell's option, be repaired or replaced at the time of malfunction, including peripherals and software used. Otherwise, Dell may refuse the guarantee claim. The end user must always supply proof of purchase, indicating name and address of the seller, date of purchase, model and serial number, name and address of the customer, and details of symptoms and configuration...
... - Dell uses new and reconditioned parts made will, at Dell's option, be repaired or replaced at the time of malfunction, including peripherals and software used. Otherwise, Dell may refuse the guarantee claim. The end user must always supply proof of purchase, indicating name and address of the seller, date of purchase, model and serial number, name and address of the customer, and details of symptoms and configuration...


