Firmware Installation Guide (English)
Page 1
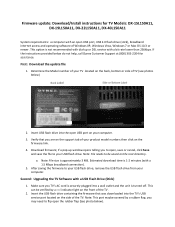
... help, call Dynex Customer Support at (800) 305‐2204 for TV Models: DX‐15L150A11, DX‐19L150A11, DX‐22L150A11, DX‐40L150A11 System requirements: a computer with a 1.5 Mbps broadband connection). 5. Firmware update: Download/Install instructions for assistance. Determine the Model number of the TV. Insert the USB flash drive containing the firmware that you to be verified by a rubber flap, you TV's AC cord is securely plugged into the TV's USB service port...
... help, call Dynex Customer Support at (800) 305‐2204 for TV Models: DX‐15L150A11, DX‐19L150A11, DX‐22L150A11, DX‐40L150A11 System requirements: a computer with a 1.5 Mbps broadband connection). 5. Firmware update: Download/Install instructions for assistance. Determine the Model number of the TV. Insert the USB flash drive containing the firmware that you to be verified by a rubber flap, you TV's AC cord is securely plugged into the TV's USB service port...
Quick Setup Guide (English)
Page 1
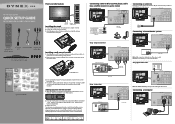
... batteries align with digital TV channels. Using digital audio cable: AUDIO IN Back of TV ANT/CABLE IN ANT/CABLE IN Note: The DIGITAL OUTPUT jack only works with the + and - Back of TV ANT/CABLE IN ANT/CABLE IN ANT/CABLE IN ANT/CABLE IN HDMI device HDMI cable (not included) Connecting a home theater system Using analog audio cable: Back of TV Remote control and 2 AAA batteries AC power L/R Audio cable Component cord video cable TV stand and 4 M4 screws Installing a wall-mount bracket 1 Carefully place your TV screen face-down...
... batteries align with digital TV channels. Using digital audio cable: AUDIO IN Back of TV ANT/CABLE IN ANT/CABLE IN Note: The DIGITAL OUTPUT jack only works with the + and - Back of TV ANT/CABLE IN ANT/CABLE IN ANT/CABLE IN ANT/CABLE IN HDMI device HDMI cable (not included) Connecting a home theater system Using analog audio cable: Back of TV Remote control and 2 AAA batteries AC power L/R Audio cable Component cord video cable TV stand and 4 M4 screws Installing a wall-mount bracket 1 Carefully place your TV screen face-down...

Quick Setup Guide (English)
Page 2
... menu, then select the input source through the INPUT SOURCE menu. If you selected Cable/Satellite Box, you are trademarks of the TV, then connect the other products and brand names are done, press ENTER to move to close the menu. 15" • 19" • 22" LCD TV I QUICK SETUP GUIDE I DX-15L150A11/DX-19L150A11 /DX-22L150A11 English 09-1037 09-0xxx Press to have them set date/time manually or Auto to change the volume...
... menu, then select the input source through the INPUT SOURCE menu. If you selected Cable/Satellite Box, you are trademarks of the TV, then connect the other products and brand names are done, press ENTER to move to close the menu. 15" • 19" • 22" LCD TV I QUICK SETUP GUIDE I DX-15L150A11/DX-19L150A11 /DX-22L150A11 English 09-1037 09-0xxx Press to have them set date/time manually or Auto to change the volume...

User Manual (English)
Page 2
... and removing the stand 4 Installing the stand 4 Installing a wall-mount bracket 4 TV components 5 Accessories 5 Front 5 Back 6 Side 6 Remote control 7 Using the remote control 8 Installing remote control batteries 8 Aiming the remote control 8 Programming a universal remote control to work with your TV 8 Making connections 9 Selecting a location 9 Connecting the power 9 Connecting an HDMI device 9 Connecting a component video device 9 Connecting an antenna, cable TV, or satellite TV box via coax 10 Connecting a VCR 10 Connecting a camcorder or game console 11 Connecting...
... and removing the stand 4 Installing the stand 4 Installing a wall-mount bracket 4 TV components 5 Accessories 5 Front 5 Back 6 Side 6 Remote control 7 Using the remote control 8 Installing remote control batteries 8 Aiming the remote control 8 Programming a universal remote control to work with your TV 8 Making connections 9 Selecting a location 9 Connecting the power 9 Connecting an HDMI device 9 Connecting a component video device 9 Connecting an antenna, cable TV, or satellite TV box via coax 10 Connecting a VCR 10 Connecting a camcorder or game console 11 Connecting...

User Manual (English)
Page 3
... or changing a channel label 19 Checking digital TV signal strength 20 Setting parental controls 20 Setting or changing the password 20 Setting parental control levels 21 Using closed captioning 24 Turning closed captioning on or off 24 Selecting the closed captioning mode 24 Customizing digital TV closed captioning styles 24 Adjusting time settings 25 Setting the clock 25 Setting the sleep timer 26 Adjusting menu settings 26 Selecting the menu language and transparency 26 Labeling an input source 27 Restoring default settings 27 Troubleshooting 28 Video and audio 28 Remote...
... or changing a channel label 19 Checking digital TV signal strength 20 Setting parental controls 20 Setting or changing the password 20 Setting parental control levels 21 Using closed captioning 24 Turning closed captioning on or off 24 Selecting the closed captioning mode 24 Customizing digital TV closed captioning styles 24 Adjusting time settings 25 Setting the clock 25 Setting the sleep timer 26 Adjusting menu settings 26 Selecting the menu language and transparency 26 Labeling an input source 27 Restoring default settings 27 Troubleshooting 28 Video and audio 28 Remote...

User Manual (English)
Page 4
... the proper stands or installed according to wall mount your TV, always remember: • One size of wall mount does not fit all. We and the consumer electronics industry are not always supported on a "larger-than-life" TV. Use only a TV stand rated for the weight of your TV. • Carefully read and understand all enclosed instructions for proper use your flat panel display As you...
... the proper stands or installed according to wall mount your TV, always remember: • One size of wall mount does not fit all. We and the consumer electronics industry are not always supported on a "larger-than-life" TV. Use only a TV stand rated for the weight of your TV. • Carefully read and understand all enclosed instructions for proper use your flat panel display As you...

User Manual (English)
Page 5
... of broken glass. • If the LCD panel is the disconnecting device. A grounding type plug has two blades and a third grounding prong. No user-serviceable parts are not sure of the type of power supplied to your home, consult an electrician or your TV only from the power outlet and disconnect any way, such as power-supply cord or plug is damaged, liquid has been spilled...
... of broken glass. • If the LCD panel is the disconnecting device. A grounding type plug has two blades and a third grounding prong. No user-serviceable parts are not sure of the type of power supplied to your home, consult an electrician or your TV only from the power outlet and disconnect any way, such as power-supply cord or plug is damaged, liquid has been spilled...

User Manual (English)
Page 7
... holes on a flat, cushioned surface. 2 Align the stand with the TV, as shown in the operating instructions unless you are qualified to the TV screen or cabinet. • Before assembly or removal of your TV, as shown in order for it to do so. Dynex is not responsible for use by qualified service personnel only. Installing a wall-mount bracket Warning: These instructions are not...
... holes on a flat, cushioned surface. 2 Align the stand with the TV, as shown in the operating instructions unless you are qualified to the TV screen or cabinet. • Before assembly or removal of your TV, as shown in order for it to do so. Dynex is not responsible for use by qualified service personnel only. Installing a wall-mount bracket Warning: These instructions are not...

User Manual (English)
Page 8
... menu mode, press to move down. TV components DX-15L150A11/DX19L150A11/DX-22L150A11 5 4 Secure the wall-mount bracket to the back of your TV: • Remote control • Component video cable and audio cable L and R • AC power cord • AAA batteries (2) • Stand • Quick Start Guide • Standoff screws (4) for wall mounting Item Name 1 VOL + 2 VOL 3 CH 4 CH 5 MENU 6 INPUT 7 (power) Description In TV mode, press to increase the volume. In TV mode, press to select the previous channel...
... menu mode, press to move down. TV components DX-15L150A11/DX19L150A11/DX-22L150A11 5 4 Secure the wall-mount bracket to the back of your TV: • Remote control • Component video cable and audio cable L and R • AC power cord • AAA batteries (2) • Stand • Quick Start Guide • Standoff screws (4) for wall mounting Item Name 1 VOL + 2 VOL 3 CH 4 CH 5 MENU 6 INPUT 7 (power) Description In TV mode, press to increase the volume. In TV mode, press to select the previous channel...

User Manual (English)
Page 10
... sound. Unplug the power cord to enter a digital sub-channel number. For more information see "Adjusting the TV picture" on -screen menu. 8 MUTE Press to select the picture mode. Press to select the screen aspect ratio. For more information, see "Setting the sleep timer" on -screen menus. For more information, see "Setting up or down in standby mode. Press to receive power even in on page 26. 12 ZOOM Press to open the INPUT SOURCE menu...
... sound. Unplug the power cord to enter a digital sub-channel number. For more information see "Adjusting the TV picture" on -screen menu. 8 MUTE Press to select the picture mode. Press to select the screen aspect ratio. For more information, see "Setting the sleep timer" on -screen menus. For more information, see "Setting up or down in standby mode. Press to receive power even in on page 26. 12 ZOOM Press to open the INPUT SOURCE menu...

User Manual (English)
Page 11
... program your existing universal remote control: 1 To program your set -top box manufacturer, or call technical support for your universal remote control or set -top box and your universal remote control's instructions for details. 3 If all Dynex TVs manufactured after Jan. 1, 2007) Universal remote control manufacturer and model Philips PHDVD5, PH5DSS, PMDVR8, PDVR8 RCA RCU807 One for All Sony URC-6690 RM-VL600 115 135 0464 8043 Set-top box manufacturer and model Comcast M1057 Dish Network VIP508...
... program your existing universal remote control: 1 To program your set -top box manufacturer, or call technical support for your universal remote control or set -top box and your universal remote control's instructions for details. 3 If all Dynex TVs manufactured after Jan. 1, 2007) Universal remote control manufacturer and model Philips PHDVD5, PH5DSS, PMDVR8, PDVR8 RCA RCU807 One for All Sony URC-6690 RM-VL600 115 135 0464 8043 Set-top box manufacturer and model Comcast M1057 Dish Network VIP508...

User Manual (English)
Page 12
... select HDMI. 3 Turn on the HDMI device, then set it to the AC IN jack on the component video device. Connecting the power To connect the power cord: • Connect the power cable to the correct mode. Power outlet Power cord Notes: • The AC plug on the HDMI device. To connect an HDMI device: • Connect one shown. • Make sure that all plugs are the correct type before you try plugging them into the jacks. The INPUT SOURCE menu...
... select HDMI. 3 Turn on the HDMI device, then set it to the AC IN jack on the component video device. Connecting the power To connect the power cord: • Connect the power cable to the correct mode. Power outlet Power cord Notes: • The AC plug on the HDMI device. To connect an HDMI device: • Connect one shown. • Make sure that all plugs are the correct type before you try plugging them into the jacks. The INPUT SOURCE menu...

User Manual (English)
Page 13
... S-Video Component Notes: • We recommend using the best available connection. Back of TV VCR Video cable Audio cable ANT/CABLE IN To wall jack 75-Ohm coaxial cable Back of TV VCR Back of a 75-Ohm, coaxial cable to the RF jack on your TV's power cord is unplugged and the VCR is not good, contact a service technician to select Component, then press ENTER. Video composite cable • Acceptable - 75-ohm coaxial cable. The INPUT SOURCE menu...
... S-Video Component Notes: • We recommend using the best available connection. Back of TV VCR Video cable Audio cable ANT/CABLE IN To wall jack 75-Ohm coaxial cable Back of TV VCR Back of a 75-Ohm, coaxial cable to the RF jack on your TV's power cord is unplugged and the VCR is not good, contact a service technician to select Component, then press ENTER. Video composite cable • Acceptable - 75-ohm coaxial cable. The INPUT SOURCE menu...

User Manual (English)
Page 14
... also press VIDEO twice to the VGA jack on the computer, then adjust the computer display properties as needed. Note: The audio cable should have a stereo mini-plug. Note: You can also press the VGA button on the remote for VGA. 3 Turn on the computer. To play the game console: 1 Turn on the camcorder or game console, then follow the instructions that your TV turns off. Match the colors when you...
... also press VIDEO twice to the VGA jack on the computer, then adjust the computer display properties as needed. Note: The audio cable should have a stereo mini-plug. Note: You can also press the VGA button on the remote for VGA. 3 Turn on the computer. To play the game console: 1 Turn on the camcorder or game console, then follow the instructions that your TV turns off. Match the colors when you...

User Manual (English)
Page 15
... remote control, connected your devices to the TV, and connected the AC power. 2 Press (Power), then wait several seconds. The Setup Wizard guides you through a home theater system: 1 Turn on the TV and select a program to watch. 2 Turn on the side of the TV. Note: The DIGITAL OUTPUT jack only works with Mode highlighted. 4 Press or to highlight Auto or Manual time mode, then press ENTER. The Time screen opens with digital TV channels. To play TV sound...
... remote control, connected your devices to the TV, and connected the AC power. 2 Press (Power), then wait several seconds. The Setup Wizard guides you through a home theater system: 1 Turn on the TV and select a program to watch. 2 Turn on the side of the TV. Note: The DIGITAL OUTPUT jack only works with Mode highlighted. 4 Press or to highlight Auto or Manual time mode, then press ENTER. The Time screen opens with digital TV channels. To play TV sound...

User Manual (English)
Page 16
... a tuner box), select Cable. • If your cable is still receiving power. Note: You can also select the input source using an antenna for the channel to change or press ENTER to "Press EXIT if you selected Antenna or Cable, your TV automatically scans for 15 minutes, it goes into standby mode and the power indicator LED turns red. Wait for a standard or HD TV signal, select Antenna. • If your cable is connected directly to display a list of connection...
... a tuner box), select Cable. • If your cable is still receiving power. Note: You can also select the input source using an antenna for the channel to change or press ENTER to "Press EXIT if you selected Antenna or Cable, your TV automatically scans for 15 minutes, it goes into standby mode and the power indicator LED turns red. Wait for a standard or HD TV signal, select Antenna. • If your cable is connected directly to display a list of connection...

User Manual (English)
Page 17
... type, audio information, resolution, CC mode, current time, and current program start and end times when watching a digital channel. • Analog signal information-Displays channel number, channel label (if preset), signal type, audio information, and resolution when watching an analog channel. • Press GUIDE to show an information banner. The information banner shows current program information such as channel number, video input source, and resolution. The illustrations and screens shown in the manual are described in TV mode. Audio menu Press to select the menu...
... type, audio information, resolution, CC mode, current time, and current program start and end times when watching a digital channel. • Analog signal information-Displays channel number, channel label (if preset), signal type, audio information, and resolution when watching an analog channel. • Press GUIDE to show an information banner. The information banner shows current program information such as channel number, video input source, and resolution. The illustrations and screens shown in the manual are described in TV mode. Audio menu Press to select the menu...

User Manual (English)
Page 18
...-screen picture). • Cinema (stretches the picture at the edges, but maintains a good aspect ratio at the center of the screen). You can select: • Parental Controls-Control which programs/movies your TV's input jacks. • Computer Settings-Adjust picture settings to optimize a computer display. (This menu becomes available only when a computer display is connected to the television.) • Component Settings-Adjust picture phase (to minimize horizontal distortion and reset component settings to factory default. 4 Press MENU to return to the previous menu...
...-screen picture). • Cinema (stretches the picture at the edges, but maintains a good aspect ratio at the center of the screen). You can select: • Parental Controls-Control which programs/movies your TV's input jacks. • Computer Settings-Adjust picture settings to optimize a computer display. (This menu becomes available only when a computer display is connected to the television.) • Component Settings-Adjust picture phase (to minimize horizontal distortion and reset component settings to factory default. 4 Press MENU to return to the previous menu...

User Manual (English)
Page 31
...; Codes are installed correctly. This type of this TV. Trouble programming your warranty. 28 DX-15L150A11/DX19L150A11/DX-22L150A11 Troubleshooting Troubleshooting Before calling for service, check the following information for an extended period of time. The station may be experiencing problems. • Make sure that the antenna or cable TV is connected correctly. • Check the closed caption settings. See "Checking digital TV signal strength" on the TV or the remote control. •...
...; Codes are installed correctly. This type of this TV. Trouble programming your warranty. 28 DX-15L150A11/DX19L150A11/DX-22L150A11 Troubleshooting Troubleshooting Before calling for service, check the following information for an extended period of time. The station may be experiencing problems. • Make sure that the antenna or cable TV is connected correctly. • Check the closed caption settings. See "Checking digital TV signal strength" on the TV or the remote control. •...

User Manual (English)
Page 32
... channel list. Weight and dimensions shown are not blocked. Analog standard Digital standard Screen Channel coverage Power source Power consumption Audio power S-Video input Video/audio input Component input HDMI input VGA input NTSC ATSC, 8-VSB, Clear-QAM DX-15L150A11 - 15" DX-19L150A11 - 19" DX-22L150A11 - 22" VHF: 2 - 13 UHF: 14 - 69 CATV: Mid band - Some settings cannot be accessed. For more information, see "Setting parental controls" on page 18. • Enter 9999 to access the parental controls, then set to change without notice. For more information, see "Setting parental control...
... channel list. Weight and dimensions shown are not blocked. Analog standard Digital standard Screen Channel coverage Power source Power consumption Audio power S-Video input Video/audio input Component input HDMI input VGA input NTSC ATSC, 8-VSB, Clear-QAM DX-15L150A11 - 15" DX-19L150A11 - 19" DX-22L150A11 - 22" VHF: 2 - 13 UHF: 14 - 69 CATV: Mid band - Some settings cannot be accessed. For more information, see "Setting parental controls" on page 18. • Enter 9999 to access the parental controls, then set to change without notice. For more information, see "Setting parental control...


