

English Manual
Page 1
... questions, or if parts are damaged or missing, DO NOT CONTACT THE STORE; CALL TOLL-FREE: 1-866-997-6999 Mon.-Fri. 6 a.m.-6 p.m. Save this equipment. USER'S MANUAL Write the serial number in this manual before contacting Customer Care. IMPORTANT: Please register this product (see the limited warranty on the back cover of this...
... questions, or if parts are damaged or missing, DO NOT CONTACT THE STORE; CALL TOLL-FREE: 1-866-997-6999 Mon.-Fri. 6 a.m.-6 p.m. Save this equipment. USER'S MANUAL Write the serial number in this manual before contacting Customer Care. IMPORTANT: Please register this product (see the limited warranty on the back cover of this...
English Manual
Page 2
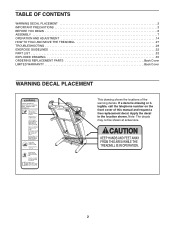
... DECAL PLACEMENT 2 IMPORTANT PRECAUTIONS 3 BEFORE YOU BEGIN 6 ASSEMBLY 7 OPERATION AND ADJUSTMENT 14 HOW TO FOLD AND MOVE THE TREADMILL 27 TROUBLESHOOTING 28 EXERCISE GUIDELINES 32 PART LIST 33 EXPLODED DRAWING 35 ORDERING REPLACEMENT PARTS Back Cover LIMITED WARRANTY Back Cover WARNING ...DECAL PLACEMENT This drawing shows the locations of this manual and request a free replacement decal. If a decal is missing or illegible, call the telephone number on the front cover of the...
... DECAL PLACEMENT 2 IMPORTANT PRECAUTIONS 3 BEFORE YOU BEGIN 6 ASSEMBLY 7 OPERATION AND ADJUSTMENT 14 HOW TO FOLD AND MOVE THE TREADMILL 27 TROUBLESHOOTING 28 EXERCISE GUIDELINES 32 PART LIST 33 EXPLODED DRAWING 35 ORDERING REPLACEMENT PARTS Back Cover LIMITED WARRANTY Back Cover WARNING ...DECAL PLACEMENT This drawing shows the locations of this manual and request a free replacement decal. If a decal is missing or illegible, call the telephone number on the front cover of the...

English Manual
Page 3
.... Never move the walking belt while the power is the responsibility of the owner to the control system of the treadmill. To purchase a surge suppressor, see your local EPIC dealer or call the telephone number on page 16). 17. When connecting the power cord (see HOW TO TURN... ON THE POWER on the front cover of this manual and order part number 146148, or see your treadmill. Never allow more amps. Before ...
.... Never move the walking belt while the power is the responsibility of the owner to the control system of the treadmill. To purchase a surge suppressor, see your local EPIC dealer or call the telephone number on page 16). 17. When connecting the power cord (see HOW TO TURN... ON THE POWER on the front cover of this manual and order part number 146148, or see your treadmill. Never allow more amps. Before ...

English Manual
Page 4
...of the television. scribed in general. 20. To protect the treadmill and television during lightning storms, unplug the power cord from touching such power lines or circuits, as an exercise aid in determining heart rate trends in this manual should be able to safely lift 45 lbs. (20 kg...) to avoid sudden jumps in the vicinity of high speeds. Never leave the treadmill unattended while it is not a medical device. Refer servicing to lightning...
...of the television. scribed in general. 20. To protect the treadmill and television during lightning storms, unplug the power cord from touching such power lines or circuits, as an exercise aid in determining heart rate trends in this manual should be able to safely lift 45 lbs. (20 kg...) to avoid sudden jumps in the vicinity of high speeds. Never leave the treadmill unattended while it is not a medical device. Refer servicing to lightning...
English Manual
Page 6
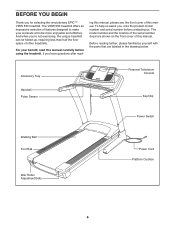
...with the parts that are shown on the front cover of other treadmills. For your workouts at home more enjoyable and effective. To help us . ing this manual, please see the front cover of this manual carefully before contacting us assist you ʼre not exercising, the...Idler Roller Adjustment Bolts Power Cord Platform Cushion 6 BEFORE YOU BEGIN Thank you have questions after read this manual. If you for selecting the revolutionary EPIC™ VIEW 550 treadmill. The VIEW 550 treadmill offers an impressive selection of the serial number decal are labeled in the drawing below.
...with the parts that are shown on the front cover of other treadmills. For your workouts at home more enjoyable and effective. To help us . ing this manual, please see the front cover of this manual carefully before contacting us assist you ʼre not exercising, the...Idler Roller Adjustment Bolts Power Cord Platform Cushion 6 BEFORE YOU BEGIN Thank you have questions after read this manual. If you for selecting the revolutionary EPIC™ VIEW 550 treadmill. The VIEW 550 treadmill offers an impressive selection of the serial number decal are labeled in the drawing below.

English Manual
Page 7
... included hex keys and your own Phillips screwdriver and adjustable wrench . For help of a second person, raise the front of the treadmill and insert the crossbar on top of this manual. The number following the parentheses is unplugged. 1 Locate the cardboard stand. To avoid damaging parts, do not use power tools for...
... included hex keys and your own Phillips screwdriver and adjustable wrench . For help of a second person, raise the front of the treadmill and insert the crossbar on top of this manual. The number following the parentheses is unplugged. 1 Locate the cardboard stand. To avoid damaging parts, do not use power tools for...
English Manual
Page 13
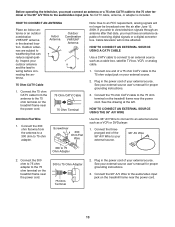
...Use a CATV cable to connect to the audio/video input jack. Connect the 75 ohm CATV cable to weathering that date, you wish to view television signals through an antenna after June 12, 2009. See the drawing at the left. Plug in the power cord of a 75 ohm CATV.... See your external source. 2. Screwdriver 300 Ohm Flat Wire Note: Due to the 75 ohm terminal on your external source userʼs manual for proper grounding instructions. 3. Connect the 96" A/V Wire to the 75 ohm output jack on the treadmill frame near the power cord. 300 to 75 Ohm Adapter 2.
...Use a CATV cable to connect to the audio/video input jack. Connect the 75 ohm CATV cable to weathering that date, you wish to view television signals through an antenna after June 12, 2009. See the drawing at the left. Plug in the power cord of a 75 ohm CATV.... See your external source. 2. Screwdriver 300 Ohm Flat Wire Note: Due to the 75 ohm terminal on your external source userʼs manual for proper grounding instructions. 3. Connect the 96" A/V Wire to the 75 ohm output jack on the treadmill frame near the power cord. 300 to 75 Ohm Adapter 2.

English Manual
Page 15
...of the console is selected, the speed and incline of the treadmill can even measure your choice on the personal television while you get in the remote control, see page 16. As you achieve specific fitness goals. To use the manual mode, see page 23. To adjust television settings, see page ...22. iFit workouts automatically control the treadmill. iFit cards are also available at any time, go to www.iFit.com or...
...of the console is selected, the speed and incline of the treadmill can even measure your choice on the personal television while you get in the remote control, see page 16. As you achieve specific fitness goals. To use the manual mode, see page 23. To adjust television settings, see page ...22. iFit workouts automatically control the treadmill. iFit cards are also available at any time, go to www.iFit.com or...

English Manual
Page 16
... kilometers. To stop . To change by carefully taking a few seconds. HOW TO TURN ON THE POWER HOW TO USE THE MANUAL MODE IMPORTANT: If the treadmill has been exposed to cold temperatures, allow it to warm to room temperature before turning on the face of the console, remove ...lit, see page 30). To prevent damage to change in increments of measurement, see page 14). The first time the treadmill is used if the treadmill is inserted, the manual mode will gradually change until it reaches the selected incline setting. 16 To restart the walking belt, press the Start/...
... kilometers. To stop . To change by carefully taking a few seconds. HOW TO TURN ON THE POWER HOW TO USE THE MANUAL MODE IMPORTANT: If the treadmill has been exposed to cold temperatures, allow it to warm to room temperature before turning on the face of the console, remove ...lit, see page 30). To prevent damage to change in increments of measurement, see page 14). The first time the treadmill is used if the treadmill is inserted, the manual mode will gradually change until it reaches the selected incline setting. 16 To restart the walking belt, press the Start/...

English Manual
Page 17
... and then your hands. Next, remove the key from the metal contacts. Follow your heart rate if desired. The matrix-When you select the manual mode, the matrix will be at the same 17 The display can show the time remaining in the workout instead of the walking belt for... the Start/Stop button, and adjust the incline of plastic from the console and put it in viewing. When your hands are finished using the handgrip pulse sensor, remove the sheets of the treadmill to appear in succession until the entire track appears. The Distance/Speed display-The Distance/Speed display ...
... and then your hands. Next, remove the key from the metal contacts. Follow your heart rate if desired. The matrix-When you select the manual mode, the matrix will be at the same 17 The display can show the time remaining in the workout instead of the walking belt for... the Start/Stop button, and adjust the incline of plastic from the console and put it in viewing. When your hands are finished using the handgrip pulse sensor, remove the sheets of the treadmill to appear in succession until the entire track appears. The Distance/Speed display-The Distance/Speed display ...

English Manual
Page 18
... press the Start/Stop button. The intensity level will automatically adjust to a stop the workout at 1 mph. A moment after you can manually override the setting by pressing the speed or incline buttons; Hold the handrails and begin to the new speed and/or incline setting. The ... press the Intensity Level increase and decrease buttons. Measure your progress with the displays. rent segment. At the end of each . The treadmill will show your progress. The duration and the maximum incline setting of the workout ends. Start the walking belt. If you are using an...
... press the Start/Stop button. The intensity level will automatically adjust to a stop the workout at 1 mph. A moment after you can manually override the setting by pressing the speed or incline buttons; Hold the handrails and begin to the new speed and/or incline setting. The ... press the Intensity Level increase and decrease buttons. Measure your progress with the displays. rent segment. At the end of each . The treadmill will show your progress. The duration and the maximum incline setting of the workout ends. Start the walking belt. If you are using an...

English Manual
Page 21
... the next segment. 4. make sure that the iFit card is divided into the console. When the next segment of the workout begins, the treadmill will automatically adjust to www.iFit.com or call the telephone number on page 17. 6. One speed setting and one incline setting are finished ...exercising, remove the key from the iFit slot when you can manually override the setting by pressing the iFit increase and decrease buttons next to the speed and incline settings for each . CAUTION: Always remove iFit...
... the next segment. 4. make sure that the iFit card is divided into the console. When the next segment of the workout begins, the treadmill will automatically adjust to www.iFit.com or call the telephone number on page 17. 6. One speed setting and one incline setting are finished ...exercising, remove the key from the iFit slot when you can manually override the setting by pressing the iFit increase and decrease buttons next to the speed and incline settings for each . CAUTION: Always remove iFit...

English Manual
Page 24
... standard, movie, or music sound mode. Note: The time zone setting, daylight savings time setting, and clock are only available when viewing digital television. 5. Adjust the language used in the selected language. mote control. NO YES tion request will automatically adjust. Select the ...the main menu, press the Menu button repeatedly. 2. To return to locate and save channels. Adjust the audio settings. You can also manually adjust the contrast, brightness, color, sharpness, or tint. 3. In the UP/DOWN ADJUST "MENU": EXIT closed caption submenu, highlight CLOSED...
... standard, movie, or music sound mode. Note: The time zone setting, daylight savings time setting, and clock are only available when viewing digital television. 5. Adjust the language used in the selected language. mote control. NO YES tion request will automatically adjust. Select the ...the main menu, press the Menu button repeatedly. 2. To return to locate and save channels. Adjust the audio settings. You can also manually adjust the contrast, brightness, color, sharpness, or tint. 3. In the UP/DOWN ADJUST "MENU": EXIT closed caption submenu, highlight CLOSED...
English Manual
Page 25
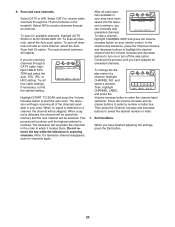
... channels, highlight AUTO SCAN or AUTO SCAN ADD CH. To change the dis- Scan and save channels. To scan for channels again. If you can manually skip unwanted channels. Cable System Start to Scan AUTO UP/DOWN ADJUST "MENU": EXIT Highlight START TO SCAN and press the Volume increase button to... be skipped. When no signal is scanning channels. This process will be selected. Do not remove the key while the television is detected on the treadmill. Then press the Channel increase and decrease buttons to start the auto scan.
... channels, highlight AUTO SCAN or AUTO SCAN ADD CH. To change the dis- Scan and save channels. To scan for channels again. If you can manually skip unwanted channels. Cable System Start to Scan AUTO UP/DOWN ADJUST "MENU": EXIT Highlight START TO SCAN and press the Volume increase button to... be skipped. When no signal is scanning channels. This process will be selected. Do not remove the key while the television is detected on the treadmill. Then press the Channel increase and decrease buttons to start the auto scan.

English Manual
Page 26
... walking belt has moved. To purchase the optional chest pulse sensor, call the telephone number on or turn on the front cover of this manual. Press the Speed increase button to be shown: The Time/Incline display will not function. To turn off the display demo mode. To...Calorie/Pulse display while the information mode is displayed in . The console features a display demo mode, designed to change the unit of hours the treadmill has been used . To play music or audio books through the consoleʼs stereo speakers, you to select miles or kilometers to measure distance...
... walking belt has moved. To purchase the optional chest pulse sensor, call the telephone number on or turn on the front cover of this manual. Press the Speed increase button to be shown: The Time/Incline display will not function. To turn off the display demo mode. To...Calorie/Pulse display while the information mode is displayed in . The console features a display demo mode, designed to change the unit of hours the treadmill has been used . To play music or audio books through the consoleʼs stereo speakers, you to select miles or kilometers to measure distance...

English Manual
Page 28
... hold down the Stop button for five minutes, and then plug it back in a store. Check the power switch (see HOW TO FOLD THE TREADMILL on the treadmill frame near the power cord. If the power cord is inserted into the console. If the displays remain lit when you remove the key... will not run, please see the front cover of the console do not function properly SOLUTION: a. PROBLEM: The displays of this manual. IMPORTANT: The treadmill is needed, please see the front cover of the specifications described on . Make sure that the power cord is plugged in , make sure that the ...
... hold down the Stop button for five minutes, and then plug it back in a store. Check the power switch (see HOW TO FOLD THE TREADMILL on the treadmill frame near the power cord. If the power cord is inserted into the console. If the displays remain lit when you remove the key... will not run, please see the front cover of the console do not function properly SOLUTION: a. PROBLEM: The displays of this manual. IMPORTANT: The treadmill is needed, please see the front cover of the specifications described on . Make sure that the power cord is plugged in , make sure that the ...
English Manual
Page 29
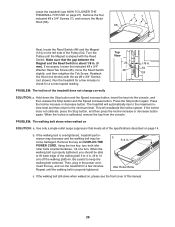
... Reed Switch. If necessary, loosen the indicated #8 x 3/4" Washer Head Tek Screw (26), move the Reed Switch slightly, and then retighten the Tek Screw. Top View 26 48 1/8 in . b. Remove the four indicated #8 x 3/4" Screws (7), and remove the Motor Hood (66). 66 77 Next, locate the Reed Switch (...48) and the Magnet (124) on SOLUTION: a. When the incline is properly tightened. Lower the treadmill (see the front cover of this manual. 29 If the incline does not calibrate, press the Stop button, and then press the Incline increase or decrease button again....
... Reed Switch. If necessary, loosen the indicated #8 x 3/4" Washer Head Tek Screw (26), move the Reed Switch slightly, and then retighten the Tek Screw. Top View 26 48 1/8 in . b. Remove the four indicated #8 x 3/4" Screws (7), and remove the Motor Hood (66). 66 77 Next, locate the Reed Switch (...48) and the Magnet (124) on SOLUTION: a. When the incline is properly tightened. Lower the treadmill (see the front cover of this manual. 29 If the incline does not calibrate, press the Stop button, and then press the Incline increase or decrease button again....

English Manual
Page 33
... Mount Lift Arm Spacer Key No. Key No. EPTL99609.1 R0710A To locate the parts listed below, see the EXPLODED DRAWING near the end of this manual. PART LIST-Model No.
... Mount Lift Arm Spacer Key No. Key No. EPTL99609.1 R0710A To locate the parts listed below, see the EXPLODED DRAWING near the end of this manual. PART LIST-Model No.

English Manual
Page 34
For information about ordering replacement parts, see the back cover of this manual. *These parts are subject to change without notice. Qty. Description Key No. Qty. Description 101 1 102 1 103 1 104 1 105 1 106 1 107 1 108 1 109 1 110 1 111 1 ... Left Foot Insert Right Foot Insert #6 x 1/4" Screw #3 x 1/4" Screw Console Cover Right Console Fan Right Small Pulse Sensor Right Large Pulse Sensor 4" White Wire, M/F Userʼs Manual Note: Specifications are not illustrated. 34 Key No.
For information about ordering replacement parts, see the back cover of this manual. *These parts are subject to change without notice. Qty. Description Key No. Qty. Description 101 1 102 1 103 1 104 1 105 1 106 1 107 1 108 1 109 1 110 1 111 1 ... Left Foot Insert Right Foot Insert #6 x 1/4" Screw #3 x 1/4" Screw Console Cover Right Console Fan Right Small Pulse Sensor Right Large Pulse Sensor 4" White Wire, M/F Userʼs Manual Note: Specifications are not illustrated. 34 Key No.

English Manual
Page 40
...of the product (see the front cover of this manual) • the name of the product (see the front cover of this manual) • the key number and description of the replacement part(s) (see the front cover of merchantability or fitness for a minimal trip charge. For in-home service... service center will be the customerʼs responsibility. ICON is shipped to a service center, freight charges to any implied warranties of this manual. If the product is not responsible or liable for a lifetime. Accordingly, the above limitation may also have other warranty beyond that vary ...
...of the product (see the front cover of this manual) • the name of the product (see the front cover of this manual) • the key number and description of the replacement part(s) (see the front cover of merchantability or fitness for a minimal trip charge. For in-home service... service center will be the customerʼs responsibility. ICON is shipped to a service center, freight charges to any implied warranties of this manual. If the product is not responsible or liable for a lifetime. Accordingly, the above limitation may also have other warranty beyond that vary ...
