
User Guide
Page 3
Refer to your 'Quick start guide'. For operating instructions, see your 'Quick start guide' for information on the back cover. If you can download it from our local website, listed on : Starting a wash Wash programs and when to use them Controls Dos and don'ts of loading Preference options and how to change their settings This user guide is an accompaniment to your 'Quick start guide' which is included with your 'Quick start guide', you no longer have your dishwasher.
Refer to your 'Quick start guide'. For operating instructions, see your 'Quick start guide' for information on the back cover. If you can download it from our local website, listed on : Starting a wash Wash programs and when to use them Controls Dos and don'ts of loading Preference options and how to change their settings This user guide is an accompaniment to your 'Quick start guide' which is included with your 'Quick start guide', you no longer have your dishwasher.
User Guide
Page 5
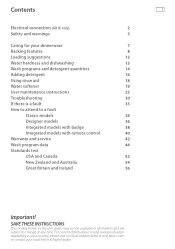
... and warnings 3 Caring for your local Fisher & Paykel dealer. SAVE THESE INSTRUCTIONS The models shown in this user guide may not be available in your country, please visit our local website listed on the back cover or contact your dinnerware 7 Racking features 8 Loading suggestions 12 Water hardness and dishwashing 13 Wash programs and detergent quantities 14 Adding detergent 16 Using rinse aid 18 Water softener 19 User maintenance instructions 22 Troubleshooting 30 If...
... and warnings 3 Caring for your local Fisher & Paykel dealer. SAVE THESE INSTRUCTIONS The models shown in this user guide may not be available in your country, please visit our local website listed on the back cover or contact your dinnerware 7 Racking features 8 Loading suggestions 12 Water hardness and dishwashing 13 Wash programs and detergent quantities 14 Adding detergent 16 Using rinse aid 18 Water softener 19 User maintenance instructions 22 Troubleshooting 30 If...

User Guide
Page 6
...: 1 Remove the fuse cover and fuse. 2 Fit the replacement 13A fuse into the fuse cover. 3 Refit both countries) If the fitted plug is also used until a correct replacement is fitted with the manufacturer's instructions and current standard safety regulations. This procedure must be earthed. Socket outlet / plug (valid for your local electrical store. The fuse cover must be refitted when changing a fuse and if the fuse...
...: 1 Remove the fuse cover and fuse. 2 Fit the replacement 13A fuse into the fuse cover. 3 Refit both countries) If the fitted plug is also used until a correct replacement is fitted with the manufacturer's instructions and current standard safety regulations. This procedure must be earthed. Socket outlet / plug (valid for your local electrical store. The fuse cover must be refitted when changing a fuse and if the fuse...
User Guide
Page 7
.... The information in this user guide and in the dishwasher base) during normal dishwashing procedures. Do not touch the filter plate (the round metal disc in your dishwasher unless all instructions before using the dishwasher. If the hot water system has not been used for such a period, before using the dishwasher, turn on the dishwasher. Do not operate your 'Quick start guide'. Check that has not been used for two weeks or...
.... The information in this user guide and in the dishwasher base) during normal dishwashing procedures. Do not touch the filter plate (the round metal disc in your dishwasher unless all instructions before using the dishwasher. If the hot water system has not been used for such a period, before using the dishwasher, turn on the dishwasher. Do not operate your 'Quick start guide'. Check that has not been used for two weeks or...
User Guide
Page 8
... service must be replaced by a qualified technician. Make sure that the power supply cord is located so that is secured to avoid electrical overload. This appliance must be run with all local codes and ordinances. This appliance must be connected to a grounded metal, permanent wiring system, or an equipment-grounding conductor must be grounded. If you did not receive Installation instructions with your dishwasher...
... service must be replaced by a qualified technician. Make sure that the power supply cord is located so that is secured to avoid electrical overload. This appliance must be run with all local codes and ordinances. This appliance must be connected to a grounded metal, permanent wiring system, or an equipment-grounding conductor must be grounded. If you did not receive Installation instructions with your dishwasher...

User Guide
Page 9
... control: Do not attempt to arrange service. We recommend that you open the drawer whilst the dishwasher is necessary if this user guide. When disconnecting the appliance pull the plug rather than the power supply cord or junction of the appliance or attempt any discarded appliance. Close supervision is in its use the appliance, should be played with the motor assembly, filter plate, drain filter and spray arm(s) in...
... control: Do not attempt to arrange service. We recommend that you open the drawer whilst the dishwasher is necessary if this user guide. When disconnecting the appliance pull the plug rather than the power supply cord or junction of the appliance or attempt any discarded appliance. Close supervision is in its use the appliance, should be played with the motor assembly, filter plate, drain filter and spray arm(s) in...
User Guide
Page 11
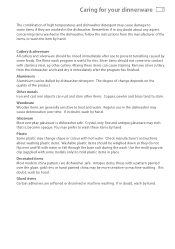
The Rinse wash program is dishwasher safe. The degree of change shape or colour with stainless steel, eg other items. Copper, pewter and brass tend to stain. If in machine washing. Cutlery & silverware All cutlery and silverware should be weighed down so they are washed in doubt, wash by hand. Remove silver cutlery from the dishwasher and hand dry it immediately after use in...
The Rinse wash program is dishwasher safe. The degree of change shape or colour with stainless steel, eg other items. Copper, pewter and brass tend to stain. If in machine washing. Cutlery & silverware All cutlery and silverware should be weighed down so they are washed in doubt, wash by hand. Remove silver cutlery from the dishwasher and hand dry it immediately after use in...
User Guide
Page 16
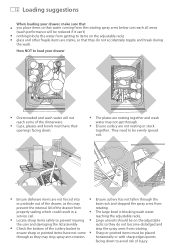
... down . They need to prevent injuring the user and damaging the lid assembly. 12 Loading suggestions When loading your drawer Overcrowded and wash water will be reduced if it can reach all areas (wash performance will not ...rack and stopped the spray arms from properly sealing which could result in a service call. The plates are not nesting or stuck together. Locate sharp items safely to be on the adjustable racks glass and other fragile items are not forced into or protrude out of the drawer from rotating. The large bowl is blocking wash water reaching the adjustable racks...
... down . They need to prevent injuring the user and damaging the lid assembly. 12 Loading suggestions When loading your drawer Overcrowded and wash water will be reduced if it can reach all areas (wash performance will not ...rack and stopped the spray arms from properly sealing which could result in a service call. The plates are not nesting or stuck together. Locate sharp items safely to be on the adjustable racks glass and other fragile items are not forced into or protrude out of the drawer from rotating. The large bowl is blocking wash water reaching the adjustable racks...
User Guide
Page 22
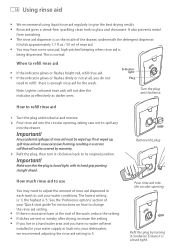
... enough rinse aid for instructions on the inside of rinse aid. Indicator light Plug Turn the plug anticlockwise. If not wiped up . Ensure it clockwise back to suit your 'Quick start guide' for the wash. It also prevents metal from tarnishing. You may need to spill any into your dishwasher, we recommend adjusting the rinse aid setting to 5. If the indicator glows or flashes dimly or not at the end of rinse aid dispensed in each wash to...
... enough rinse aid for instructions on the inside of rinse aid. Indicator light Plug Turn the plug anticlockwise. If not wiped up . Ensure it clockwise back to suit your 'Quick start guide' for the wash. It also prevents metal from tarnishing. You may need to spill any into your dishwasher, we recommend adjusting the rinse aid setting to 5. If the indicator glows or flashes dimly or not at the end of rinse aid dispensed in each wash to...
User Guide
Page 26
... components that the drain filter is cleaned whenever there is to wet the control panel. 2 Dry with a clean damp cloth. 22 User maintenance instructions - DD24/DD60 models Important! Turn off at the circuit breaker) and allow air to the dishwasher. We do not recommend the use of water into the drawer before any cleaning or maintenance. When using your dishwasher as they may damage the surfaces: Plastic or stainless steel scouring pads...
... components that the drain filter is cleaned whenever there is to wet the control panel. 2 Dry with a clean damp cloth. 22 User maintenance instructions - DD24/DD60 models Important! Turn off at the circuit breaker) and allow air to the dishwasher. We do not recommend the use of water into the drawer before any cleaning or maintenance. When using your dishwasher as they may damage the surfaces: Plastic or stainless steel scouring pads...
User Guide
Page 28
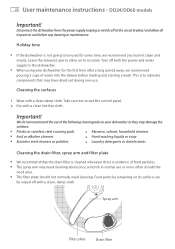
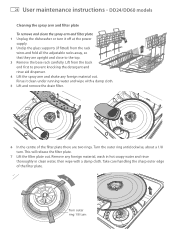
... foreign material out. 24 User maintenance instructions - This will release the filter plate. 7 Lift the filter plate out. Rinse it off at the power 2 1 supply. 2 Unclip the glass supports (if fitted) from the back end first to the top. 3 Remove the base rack carefully. DD24/DD60 models Cleaning the spray arm and filter plate To remove and clean the spray arm and filter plate 1 Unplug the dishwasher or turn it clean under running water and wipe with a damp...
... foreign material out. 24 User maintenance instructions - This will release the filter plate. 7 Lift the filter plate out. Rinse it off at the power 2 1 supply. 2 Unclip the glass supports (if fitted) from the back end first to the top. 3 Remove the base rack carefully. DD24/DD60 models Cleaning the spray arm and filter plate To remove and clean the spray arm and filter plate 1 Unplug the dishwasher or turn it clean under running water and wipe with a damp...

User Guide
Page 30
... the power and water supply to wet the control panel. 2 Dry with a clean lint-free cloth. Take care not to the dishwasher. We do not recommend the use of the following cleaning aids on its parts to allow all its surface can be used for the first time after a long period away, we recommend you leave it clean and empty. Wash pump housing Filter plate Spray arm Drain filter Important! 26 User maintenance instructions - The filter plate should the need cleaning. Turn...
... the power and water supply to wet the control panel. 2 Dry with a clean lint-free cloth. Take care not to the dishwasher. We do not recommend the use of the following cleaning aids on its parts to allow all its surface can be used for the first time after a long period away, we recommend you leave it clean and empty. Wash pump housing Filter plate Spray arm Drain filter Important! 26 User maintenance instructions - The filter plate should the need cleaning. Turn...

User Guide
Page 34
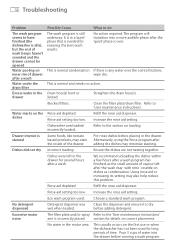
.... Rinse aid dispenser plug not closed properly. Decrease the rinse aid setting. See section 'Using rinse aid'. Reconnect the drain hose to do Wash program unsuitable for contact details. Refer to rotate. Detergent put in the wrong compartment of detergent. Clean the spray arm. See your 'Service and warranty' booklet for the load. Spray arm unable to the section on and dishes may need soaking. Ensure no items are blocked. Drawer overloaded/ incorrectly loaded. Excess food not removed...
.... Rinse aid dispenser plug not closed properly. Decrease the rinse aid setting. See section 'Using rinse aid'. Reconnect the drain hose to do Wash program unsuitable for contact details. Refer to rotate. Detergent put in the wrong compartment of detergent. Clean the spray arm. See your 'Service and warranty' booklet for the load. Spray arm unable to the section on and dishes may need soaking. Ensure no items are blocked. Drawer overloaded/ incorrectly loaded. Excess food not removed...

User Guide
Page 35
...'t start Dishwasher is over control buttons. The fan will automatically stop after the set period of time after a wash program has finished This is a fault'. In some cases, the drying fan will run for a set time is in pause mode. Hold down the / button until the symbol disappears from the display or the light above the / button goes out. Water over . The drawer is being dispensed. Rinse aid is not closed again...
...'t start Dishwasher is over control buttons. The fan will automatically stop after the set period of time after a wash program has finished This is a fault'. In some cases, the drying fan will run for a set time is in pause mode. Hold down the / button until the symbol disappears from the display or the light above the / button goes out. Water over . The drawer is being dispensed. Rinse aid is not closed again...
User Guide
Page 36
.... Clean the filter plate/drain filter. Refill the rinse aid dispenser. Increase the rinse aid setting. Refer to have finished (the dishwasher is idle), but the end of wash beeps haven't sounded and the drawer cannot be opened Water pooling on inner rim of time. Dishes did not dry Incorrect loading. No water in the Drain hose(s) bent or drawer kinked. Straighten the drain hose(s). Using rinse aid or increasing its setting may minimise staining. Increase the rinse aid setting. 32 Troubleshooting Problem Possible...
.... Clean the filter plate/drain filter. Refill the rinse aid dispenser. Increase the rinse aid setting. Refer to have finished (the dishwasher is idle), but the end of wash beeps haven't sounded and the drawer cannot be opened Water pooling on inner rim of time. Dishes did not dry Incorrect loading. No water in the Drain hose(s) bent or drawer kinked. Straighten the drain hose(s). Using rinse aid or increasing its setting may minimise staining. Increase the rinse aid setting. 32 Troubleshooting Problem Possible...

User Guide
Page 38
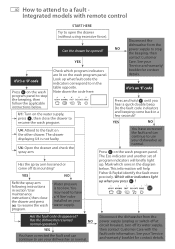
... at circuit breaker), turn off its water supply, then contact Customer Care with the fault code information. Has the dishwasher resumed normal operation? Water pressure is not faulty. You can continue to the fault on the other drawer. YES NO Refit the spray arm following instructions in the display. Another number will help Fisher & Paykel Customer Care identify the fault more precisely. It will briefly appear in section 'User maintenance instructions', then close the drawer and...
... at circuit breaker), turn off its water supply, then contact Customer Care with the fault code information. Has the dishwasher resumed normal operation? Water pressure is not faulty. You can continue to the fault on the other drawer. YES NO Refit the spray arm following instructions in the display. Another number will help Fisher & Paykel Customer Care identify the fault more precisely. It will briefly appear in section 'User maintenance instructions', then close the drawer and...

User Guide
Page 40
... section 'User maintenance instructions', then close the drawer and press to use your 'Service and warranty' booklet for contact details. Disconnect the dishwasher from the power supply (unplug or switch off at circuit breaker), turn off its water supply, NO then contact Customer Care with the fault code information. See your dishwasher as normal. You have a '4 litre' valve installed on the wash program panel. If it as normal. Is the light above the button still red...
... section 'User maintenance instructions', then close the drawer and press to use your 'Service and warranty' booklet for contact details. Disconnect the dishwasher from the power supply (unplug or switch off at circuit breaker), turn off its water supply, NO then contact Customer Care with the fault code information. See your dishwasher as normal. You have a '4 litre' valve installed on the wash program panel. If it as normal. Is the light above the button still red...

User Guide
Page 41
... have a tempering valve installed on . the water supply hasn't been turned on your water supply, to a fault ‐ Designer models 37 Wash program panel Fault Code U1 U4 U6 Wash program panel Fault Code E1 E2 E3 E4 E5 E6 E7 E8 E9 EC Possible cause of this drawer. Electronics fault-communication between drawers. Electronics fault-detergent dispensing system. Temperature sensor fault. Electronics fault-other drawer preventing the use of fault No water - Heating element failed. Motor fault. Fault in the...
... have a tempering valve installed on . the water supply hasn't been turned on your water supply, to a fault ‐ Designer models 37 Wash program panel Fault Code U1 U4 U6 Wash program panel Fault Code E1 E2 E3 E4 E5 E6 E7 E8 E9 EC Possible cause of this drawer. Electronics fault-communication between drawers. Electronics fault-detergent dispensing system. Temperature sensor fault. Electronics fault-other drawer preventing the use of fault No water - Heating element failed. Motor fault. Fault in the...

User Guide
Page 42
... the spray arm following instructions in section 'User maintenance instructions', then close the drawer and press to resume the wash program. The Eco indicator and another set of program indicators will help Fisher & Paykel identify the fault more precisely. Press . You can continue to use it as normal. Disconnect the dishwasher from the power supply (unplug or switch off at circuit breaker), turn off its water supply, NO then contact Customer Care with badge START...
... the spray arm following instructions in section 'User maintenance instructions', then close the drawer and press to resume the wash program. The Eco indicator and another set of program indicators will help Fisher & Paykel identify the fault more precisely. Press . You can continue to use it as normal. Disconnect the dishwasher from the power supply (unplug or switch off at circuit breaker), turn off its water supply, NO then contact Customer Care with badge START...
User Guide
Page 44
... a quick double beep. Has the spray arm loosened or come back in section 'User maintenance instructions', then close the drawer to stop the beeping, then contact Customer Care. You may need to in the diagram below . Press on the wash program panel. Which other drawer. The Eco indicator and another set of program indicators will help Fisher & Paykel identify the fault more precisely. Check which ones in the table opposite. Do the fault code indicators...
... a quick double beep. Has the spray arm loosened or come back in section 'User maintenance instructions', then close the drawer to stop the beeping, then contact Customer Care. You may need to in the diagram below . Press on the wash program panel. Which other drawer. The Eco indicator and another set of program indicators will help Fisher & Paykel identify the fault more precisely. Check which ones in the table opposite. Do the fault code indicators...


