User Manual
Page 1
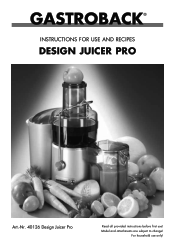
Model and attachments are subject to change! For household use ! GASTROBACK® Instructions for Use and Recipes DESIGN JUICER Pro Art.-Nr. 40126 Design Juicer Pro Read all provided instructions before first use only!
Model and attachments are subject to change! For household use ! GASTROBACK® Instructions for Use and Recipes DESIGN JUICER Pro Art.-Nr. 40126 Design Juicer Pro Read all provided instructions before first use only!

User Manual
Page 2
...Information and service 55 Warranty...55 Recipe ideas...56 34 risk of Contents Knowing your juicer 46 Care and cleaning 48 Trouble shooting guide 49 To clear blockage 50 Tips on juicing...51 Storage...55 Notes for all provided instructions before you... start running the appliance and pay attention to the warnings mentioned in these instructions. Carefully read all electrical appliances 39 Movable and sharp-edged parts...
...Information and service 55 Warranty...55 Recipe ideas...56 34 risk of Contents Knowing your juicer 46 Care and cleaning 48 Trouble shooting guide 49 To clear blockage 50 Tips on juicing...51 Storage...55 Notes for all provided instructions before you... start running the appliance and pay attention to the warnings mentioned in these instructions. Carefully read all electrical appliances 39 Movable and sharp-edged parts...

User Manual
Page 3
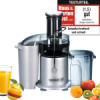
... peeled oranges. For quick and easy juicing of fruit and vegetables. 3. Rubberfeet 35 1. 2. 3. 4. 5. 7. 9. Patented extra wide feed chute: You can fill in place. 4. Filter bowl surround with 2 speed settings 10. Large pulp container (dishwasher safe) 7. Knowing Your Design juicer PRO 1. Safety arm 8. On-/Off-switch with juice spout 6. 6. Food pusher with cannelure: for pushing whole fruit...
... peeled oranges. For quick and easy juicing of fruit and vegetables. 3. Rubberfeet 35 1. 2. 3. 4. 5. 7. 9. Patented extra wide feed chute: You can fill in place. 4. Filter bowl surround with 2 speed settings 10. Large pulp container (dishwasher safe) 7. Knowing Your Design juicer PRO 1. Safety arm 8. On-/Off-switch with juice spout 6. 6. Food pusher with cannelure: for pushing whole fruit...

User Manual
Page 4
... other than described in these instructions may only be cleaned easily after use , described in these instructions. Only use the food pusher provided. This instruction is plugged into the feed chute when the appliance is an essential part of the appliance. Cut the fruit in smaller pieces and try smaller amounts at an authorised service centre. Do not push products...
... other than described in these instructions may only be cleaned easily after use , described in these instructions. Only use the food pusher provided. This instruction is plugged into the feed chute when the appliance is an essential part of the appliance. Cut the fruit in smaller pieces and try smaller amounts at an authorised service centre. Do not push products...

User Manual
Page 5
... use parts, spare parts and supplies which might causes damages to operate the appliance. • Do not leave food leftovers dehumidify on the base of the stainless steel micro mesh filter and inside the feed chute are provided and recommended by the manufacturer. Only use the appliance indoors. • Store and use the appliance in a clean, frost free...
... use parts, spare parts and supplies which might causes damages to operate the appliance. • Do not leave food leftovers dehumidify on the base of the stainless steel micro mesh filter and inside the feed chute are provided and recommended by the manufacturer. Only use the appliance indoors. • Store and use the appliance in a clean, frost free...
User Manual
Page 6
...the parts of the appliance. • The appliance is not suitable to make sure the appliance is 950 Watt. The appliance is not suitable for operation or cleaning. Do not use any abrasive cleaners, corrosive chemicals (i.e. When proceeding hard or stringily food or... which might causes damages to avoid overheating. • While proceeding Do not push the food pusher too hard down . Operate according to the instructions ›Trouble shooting guide‹. • Never clean or operate the appliance or units of the appliance with adequate electric power supply (alternating...
...the parts of the appliance. • The appliance is not suitable to make sure the appliance is 950 Watt. The appliance is not suitable for operation or cleaning. Do not use any abrasive cleaners, corrosive chemicals (i.e. When proceeding hard or stringily food or... which might causes damages to avoid overheating. • While proceeding Do not push the food pusher too hard down . Operate according to the instructions ›Trouble shooting guide‹. • Never clean or operate the appliance or units of the appliance with adequate electric power supply (alternating...

User Manual
Page 7
... when cleaning with the nylon bristle brush. Do not attempt to the power cord not hanging of the food before ...putting them into the feed chute. Only store the appliance completely assembled. This way the blades will be thrown out of the feed chute. • The blades...Remove all inedible parts (such as hair, clothing, brushes, cloths) into the feed chute when the appliance is plugged into the power outlet. • Always turn the appliance off, wait for a little while after turning the appliance off the lid of the outlet. • Only use the provided food pusher to push food...
... when cleaning with the nylon bristle brush. Do not attempt to the power cord not hanging of the food before ...putting them into the feed chute. Only store the appliance completely assembled. This way the blades will be thrown out of the feed chute. • The blades...Remove all inedible parts (such as hair, clothing, brushes, cloths) into the feed chute when the appliance is plugged into the power outlet. • Always turn the appliance off, wait for a little while after turning the appliance off the lid of the outlet. • Only use the provided food pusher to push food...
User Manual
Page 8
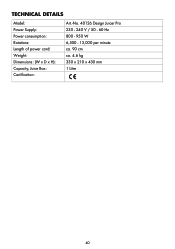
Technical details Model: Power Supply: Power consumption: Rotations: Length of power cord: Weight: Dimensions: (W x D x H): Capacity, Juice Box: Certification: Art.-No. 40126 Design Juicer Pro 230 - 240 V / 50 - 60 Hz 800 - 950 W 6,500 - 13,000 per minute ca. 90 cm ca. 4.6 kg 330 x 210 x 430 mm 1 Litre 40
Technical details Model: Power Supply: Power consumption: Rotations: Length of power cord: Weight: Dimensions: (W x D x H): Capacity, Juice Box: Certification: Art.-No. 40126 Design Juicer Pro 230 - 240 V / 50 - 60 Hz 800 - 950 W 6,500 - 13,000 per minute ca. 90 cm ca. 4.6 kg 330 x 210 x 430 mm 1 Litre 40
User Manual
Page 9
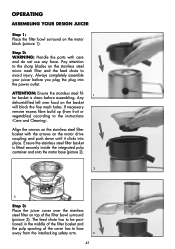
...blades on the basket will block the fine mesh holes. ATTENTION: Ensure the stainless steel fil- 1 ter basket is fitted securely inside the integrated pulp container and onto the motor base (picture 2). 2 2 Step 3: Place the juicer cover over food on the stainless steel micro mesh filter and the feed chute to be posi- If necessary remove... instructions ›Care and Cleaning‹. Any dehumidified left over the stainless steel filter on the stainless steel filter basket with care and do not use any force. Ensure the stainless steel filter basket is clean before...
...blades on the basket will block the fine mesh holes. ATTENTION: Ensure the stainless steel fil- 1 ter basket is fitted securely inside the integrated pulp container and onto the motor base (picture 2). 2 2 Step 3: Place the juicer cover over food on the stainless steel micro mesh filter and the feed chute to be posi- If necessary remove... instructions ›Care and Cleaning‹. Any dehumidified left over the stainless steel filter on the stainless steel filter basket with care and do not use any force. Ensure the stainless steel filter basket is clean before...

User Manual
Page 11
NOTE: To minimise cleaning, line the pulp container with a plastic bag to the right. Insert the container under the motor base (picture 6). Pulp can then be used in other dishes, or as compost for the garden or discarded. 6 Step 7: Place the juice jug underneith the spout (picture 7). 7 43 Slide the food pusher all the way down the feed chute (picture 5b). 5b Step 6: Place the pulp container into position by the container support extending from under the juicer cover on the left-hand side ensuring it is supported by tilting the motor base slightly to collect the pulp.
NOTE: To minimise cleaning, line the pulp container with a plastic bag to the right. Insert the container under the motor base (picture 6). Pulp can then be used in other dishes, or as compost for the garden or discarded. 6 Step 7: Place the juice jug underneith the spout (picture 7). 7 43 Slide the food pusher all the way down the feed chute (picture 5b). 5b Step 6: Place the pulp container into position by the container support extending from under the juicer cover on the left-hand side ensuring it is supported by tilting the motor base slightly to collect the pulp.

User Manual
Page 12
... according to stop moving before removing the lid of the jug with scale, a froth separator and the lid. Ensure you can run into a 220-2240V power outlet and turn the power on. Step 2 a: Working with the juice jug The juice jug consist of the juicer. NOTE: Most fruit and ... Operating your selection of fruit and vegetables before juicing. Always turn off and wait for the motor to the instructions ›Trouble shooting guide‹. Keep the working place clean and dry. Step 3: Plug the power cord into the motor block. When juicing carrots place the tip of the carrot into the...
... according to stop moving before removing the lid of the jug with scale, a froth separator and the lid. Ensure you can run into a 220-2240V power outlet and turn the power on. Step 2 a: Working with the juice jug The juice jug consist of the juicer. NOTE: Most fruit and ... Operating your selection of fruit and vegetables before juicing. Always turn off and wait for the motor to the instructions ›Trouble shooting guide‹. Keep the working place clean and dry. Step 3: Plug the power cord into the motor block. When juicing carrots place the tip of the carrot into the...

User Manual
Page 13
... juicing. Clean the appliance in accordance to the instructions in use force removing the pulp container to avoid damage to the juicer cover. Do not leave any food dry on the surfaces of juice, always push the food pusher down , stumbles or stops all of the appliance (refer to disassembling instructions).... basket. 45 NOTE: In case that the appliance slows down slowly. Remove the pulp container by turning the appliance off . Replace the empty pulp container into the feed chute. Empty the pulp container during juicing The pulp container can be emptied during juicing...
... juicing. Clean the appliance in accordance to the instructions in use force removing the pulp container to avoid damage to the juicer cover. Do not leave any food dry on the surfaces of juice, always push the food pusher down , stumbles or stops all of the appliance (refer to disassembling instructions).... basket. 45 NOTE: In case that the appliance slows down slowly. Remove the pulp container by turning the appliance off . Replace the empty pulp container into the feed chute. Empty the pulp container during juicing The pulp container can be emptied during juicing...

User Manual
Page 14
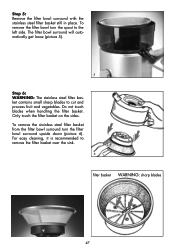
... the filter basket to stop spinning before continuing to step 2 Carefully remove the pulp container by tilting the pulp container slightly to ›OFF‹ and then switch off at the power outlet and unplug. Move the locking arm down. 3 Step 3: Lift the juicer cover off...Disassembling your Design Juicer WARNING: Always turn the appliance off the juicer (picture 4). 4 46 Never clean the power cord or the motor block in the dishwasher, pour liquids over the grooves on the juicer to the right and unlatch it in use or when disassembling, moving or cleaning the appliance. ...
... the filter basket to stop spinning before continuing to step 2 Carefully remove the pulp container by tilting the pulp container slightly to ›OFF‹ and then switch off at the power outlet and unplug. Move the locking arm down. 3 Step 3: Lift the juicer cover off...Disassembling your Design Juicer WARNING: Always turn the appliance off the juicer (picture 4). 4 46 Never clean the power cord or the motor block in the dishwasher, pour liquids over the grooves on the juicer to the right and unlatch it in use or when disassembling, moving or cleaning the appliance. ...
User Manual
Page 15
... automatically get loose (picture 5). 5 Step 6: WARNING: The stainless steel filter basket contains small sharp blades to remove the filter basket over the sink. 6 filter basket WARNING: sharp blades 47 Only touch the filter basket on the sides. Do not touch blades when handling the filter basket. For easy cleaning, it is recommended to cut and process fruit and vegetables. Step...
... automatically get loose (picture 5). 5 Step 6: WARNING: The stainless steel filter basket contains small sharp blades to remove the filter basket over the sink. 6 filter basket WARNING: sharp blades 47 Only touch the filter basket on the sides. Do not touch blades when handling the filter basket. For easy cleaning, it is recommended to cut and process fruit and vegetables. Step...
User Manual
Page 16
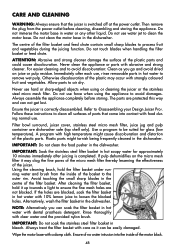
... minutes immediately after each use force when using or cleaning the juicer or the stainless steel micro mesh filter. Alternatively, wash the filter basket in water or any other liquid. Do not use , rinse removable parts in hot soapy water ...juicer. Never clean the appliance or parts with clear water and the provided nylon brush. For easier cleaning and to be easily damaged. Use a program to avoid discolouration: Clean as it may occur with care as you can soak the filter basket in hot water with food during the juicing function. IMPORTANT: Do not clean the food pusher...
... minutes immediately after each use force when using or cleaning the juicer or the stainless steel micro mesh filter. Alternatively, wash the filter basket in water or any other liquid. Do not use , rinse removable parts in hot soapy water ...juicer. Never clean the appliance or parts with clear water and the provided nylon brush. For easier cleaning and to be easily damaged. Use a program to avoid discolouration: Clean as it may occur with care as you can soak the filter basket in hot water with food during the juicing function. IMPORTANT: Do not clean the food pusher...

User Manual
Page 17
... when turned on juice or pulp residue. Disassemble the Design Juicer Pro (refer to ›OFF‹. After every fifth usage put some vaseline onto the balls of hot water with a clean cloth. Trouble Shooting Guide Possible problem Easy solution Machine will remove excess fibre build up (from spout Try a slower juicing by pushing the food pusher down more slowly...
... when turned on juice or pulp residue. Disassemble the Design Juicer Pro (refer to ›OFF‹. After every fifth usage put some vaseline onto the balls of hot water with a clean cloth. Trouble Shooting Guide Possible problem Easy solution Machine will remove excess fibre build up (from spout Try a slower juicing by pushing the food pusher down more slowly...

User Manual
Page 18
... not touch blades when handling the filter basket. 3. Try slower juicing by pushing the food pusher down more slowly. • Avoid overloading pulp in the pulp container. The pulp has to be able to the instruction ›Care and Cleaning‹. Follow Disassembling and Cleaning instructions and clean the filter bowl surround, the stainless steel filter basket and the juicer cover. 1. If...
... not touch blades when handling the filter basket. 3. Try slower juicing by pushing the food pusher down more slowly. • Avoid overloading pulp in the pulp container. The pulp has to be able to the instruction ›Care and Cleaning‹. Follow Disassembling and Cleaning instructions and clean the filter bowl surround, the stainless steel filter basket and the juicer cover. 1. If...
User Manual
Page 19
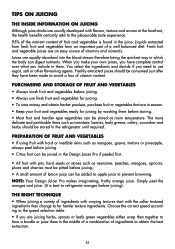
...type vegetables can be juiced in the refrigerator until required. The right technique • When juicing a variety of fruit and vegetables is best to avoid a loss of a well balanced diet. Liquids extracted from fresh fruit and vegetables form an important part of vitamin content. You select the ingredients and decide if you need to use... according to the speed selection table. • If you include in them before juicing. • Citrus fruit can be stored at the forefront, the health benefits certainly add to the pleasurable taste experience. 95% of the nutrient content of...
...type vegetables can be juiced in the refrigerator until required. The right technique • When juicing a variety of fruit and vegetables is best to avoid a loss of a well balanced diet. Liquids extracted from fresh fruit and vegetables form an important part of vitamin content. You select the ingredients and decide if you need to use... according to the speed selection table. • If you include in them before juicing. • Citrus fruit can be stored at the forefront, the health benefits certainly add to the pleasurable taste experience. 95% of the nutrient content of...

User Manual
Page 20
...recipes. 52 Using the pulp The remaining pulp left after juicing fruit or vegetables is mostly fibre and cellulose which, like the juice, pulp should be removed before using the pulp, there may be used in a bowl topped with a combination of other fruit and vegetables. • All fruit and vegetables produce different... over power the more juice than another batch. Some of the uses of pulp are a personal thing. These should be some of juice always push the food pusher down slowly. NOTE: To extract the maximum amount of your own vegetable and fruit juices, then you have been...
...recipes. 52 Using the pulp The remaining pulp left after juicing fruit or vegetables is mostly fibre and cellulose which, like the juice, pulp should be removed before using the pulp, there may be used in a bowl topped with a combination of other fruit and vegetables. • All fruit and vegetables produce different... over power the more juice than another batch. Some of the uses of pulp are a personal thing. These should be some of juice always push the food pusher down slowly. NOTE: To extract the maximum amount of your own vegetable and fruit juices, then you have been...

User Manual
Page 23
... loads (such as unsorted municipal waste, use separate collection facilities. Please contact your local government for disposal at the time of the transport. 55 Information and service Please check www.gastroback.de for disposal Dispose of the appliance and packaging must be to the instructions ›Care and cleaning‹. Warranty We guarantee that all...
... loads (such as unsorted municipal waste, use separate collection facilities. Please contact your local government for disposal at the time of the transport. 55 Information and service Please check www.gastroback.de for disposal Dispose of the appliance and packaging must be to the instructions ›Care and cleaning‹. Warranty We guarantee that all...

