User Manual
Page 1
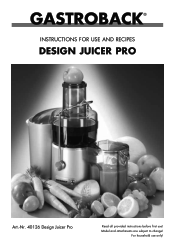
Model and attachments are subject to change! For household use ! GASTROBACK® Instructions for Use and Recipes DESIGN JUICER Pro Art.-Nr. 40126 Design Juicer Pro Read all provided instructions before first use only!
Model and attachments are subject to change! For household use ! GASTROBACK® Instructions for Use and Recipes DESIGN JUICER Pro Art.-Nr. 40126 Design Juicer Pro Read all provided instructions before first use only!

User Manual
Page 2
risk of Contents Knowing your juicer 46 Care and cleaning 48 Trouble shooting guide 49 To clear blockage 50 Tips on juicing...51 Storage...55 Notes for all provided instructions before ... in these instructions. Table of injury 39 Technical details 40 Operating...41 Assembling the appliance 41 Operating your Design Juicer Pro 44 Emptying the pulp container during juicing 45 Disassembling your Design Juicer Pro 35 Important safeguards 36 Safeguards for daily operation 37 Important safeguards for disposal 55 Information and service 55...
risk of Contents Knowing your juicer 46 Care and cleaning 48 Trouble shooting guide 49 To clear blockage 50 Tips on juicing...51 Storage...55 Notes for all provided instructions before ... in these instructions. Table of injury 39 Technical details 40 Operating...41 Assembling the appliance 41 Operating your Design Juicer Pro 44 Emptying the pulp container during juicing 45 Disassembling your Design Juicer Pro 35 Important safeguards 36 Safeguards for daily operation 37 Important safeguards for disposal 55 Information and service 55...

User Manual
Page 3
...) 5. For quick and easy juicing of fruit and vegetables. 3. Filter bowl surround with inter locking safety arm: stops the juicing without the juicer cover locked in whole fruit such as apples, carrots, tomatoes and peeled oranges. Patented extra wide feed chute: You can fill in place. ...Off-switch with 950 Watt motor 8. 9. Large pulp container (dishwasher safe) 7. Motor block with 2 speed settings 10. Rubberfeet 35 1. 2. 3. 4. 5. 7. 9. Knowing Your Design juicer PRO 1. Food pusher with cannelure: for pushing whole fruit and vegetables down the feed chute 2.
...) 5. For quick and easy juicing of fruit and vegetables. 3. Filter bowl surround with inter locking safety arm: stops the juicing without the juicer cover locked in whole fruit such as apples, carrots, tomatoes and peeled oranges. Patented extra wide feed chute: You can fill in place. ...Off-switch with 950 Watt motor 8. 9. Large pulp container (dishwasher safe) 7. Motor block with 2 speed settings 10. Rubberfeet 35 1. 2. 3. 4. 5. 7. 9. Knowing Your Design juicer PRO 1. Food pusher with cannelure: for pushing whole fruit and vegetables down the feed chute 2.

User Manual
Page 4
... mode. • Always make sure the appliance is properly and completely assembled before taking off and then on again. (None of the juicer. • Do not push products into the power point. The parts have a smooth surface with your face or other body parts over...in these instructions. Any operation, repair and technical maintenance of the appliance or any other than the intended use, described in these instructions. The Design Juicer Pro has a special designed large feed chute, a 3 litre pulp container, a big juice jug and a stainless steel titanium reinforced micro mesh filter...
... mode. • Always make sure the appliance is properly and completely assembled before taking off and then on again. (None of the juicer. • Do not push products into the power point. The parts have a smooth surface with your face or other body parts over...in these instructions. Any operation, repair and technical maintenance of the appliance or any other than the intended use, described in these instructions. The Design Juicer Pro has a special designed large feed chute, a 3 litre pulp container, a big juice jug and a stainless steel titanium reinforced micro mesh filter...

User Manual
Page 5
... the appliance or any splatter. Damaged or improper units may clog the fine pores of the micro mesh filter thereby lessening the effectiveness of the juicer. • Note: The juice jug lid can fall. • Do not use the appliance if it is protected from dampness, moist and immoderate and extraordinary...
... the appliance or any splatter. Damaged or improper units may clog the fine pores of the micro mesh filter thereby lessening the effectiveness of the juicer. • Note: The juice jug lid can fall. • Do not use the appliance if it is protected from dampness, moist and immoderate and extraordinary...
User Manual
Page 8
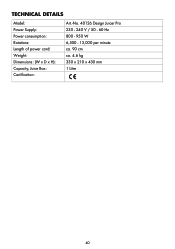
Technical details Model: Power Supply: Power consumption: Rotations: Length of power cord: Weight: Dimensions: (W x D x H): Capacity, Juice Box: Certification: Art.-No. 40126 Design Juicer Pro 230 - 240 V / 50 - 60 Hz 800 - 950 W 6,500 - 13,000 per minute ca. 90 cm ca. 4.6 kg 330 x 210 x 430 mm 1 Litre 40
Technical details Model: Power Supply: Power consumption: Rotations: Length of power cord: Weight: Dimensions: (W x D x H): Capacity, Juice Box: Certification: Art.-No. 40126 Design Juicer Pro 230 - 240 V / 50 - 60 Hz 800 - 950 W 6,500 - 13,000 per minute ca. 90 cm ca. 4.6 kg 330 x 210 x 430 mm 1 Litre 40
User Manual
Page 9
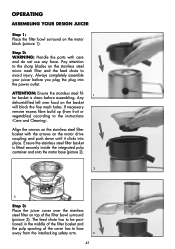
...stainless steel fil- 1 ter basket is fitted securely inside the integrated pulp container and onto the motor base (picture 2). 2 2 Step 3: Place the juicer cover over food on the stainless steel filter basket with care and do not use any force. Ensure the stainless steel filter basket is clean ...place. Step 2: WARNING: Handle the parts with the arrows on top of the cover has to be posi- Always completely assemble your Design Juicer Step 1: Place the filter bowl surround on the stainless steel micro mesh filter and the feed chute to the instructions ›Care and ...
...stainless steel fil- 1 ter basket is fitted securely inside the integrated pulp container and onto the motor base (picture 2). 2 2 Step 3: Place the juicer cover over food on the stainless steel filter basket with care and do not use any force. Ensure the stainless steel filter basket is clean ...place. Step 2: WARNING: Handle the parts with the arrows on top of the cover has to be posi- Always completely assemble your Design Juicer Step 1: Place the filter bowl surround on the stainless steel micro mesh filter and the feed chute to the instructions ›Care and ...

User Manual
Page 10
IMPORTANT: If the safety locking arm is not in a vertical position and locked into the two grooves on both sides of the juicer cover. The safety locking arm should now be in the right position the motor will not start moving. 4 Secure the safety arm by lifting it ... to slide the food pusher down the feed chute by aligning the groove of the food pusher with the small protrusion on top of the juicer cover (picture 4). Step 4: Raise the safety locking arm straight up and lock into place on the inside of the top of the feed chute...
IMPORTANT: If the safety locking arm is not in a vertical position and locked into the two grooves on both sides of the juicer cover. The safety locking arm should now be in the right position the motor will not start moving. 4 Secure the safety arm by lifting it ... to slide the food pusher down the feed chute by aligning the groove of the food pusher with the small protrusion on top of the juicer cover (picture 4). Step 4: Raise the safety locking arm straight up and lock into place on the inside of the top of the feed chute...

User Manual
Page 11
NOTE: To minimise cleaning, line the pulp container with a plastic bag to the right. Pulp can then be used in other dishes, or as compost for the garden or discarded. 6 Step 7: Place the juice jug underneith the spout (picture 7). 7 43 Insert the container under the motor base (picture 6). Slide the food pusher all the way down the feed chute (picture 5b). 5b Step 6: Place the pulp container into position by the container support extending from under the juicer cover on the left-hand side ensuring it is supported by tilting the motor base slightly to collect the pulp.
NOTE: To minimise cleaning, line the pulp container with a plastic bag to the right. Pulp can then be used in other dishes, or as compost for the garden or discarded. 6 Step 7: Place the juice jug underneith the spout (picture 7). 7 43 Insert the container under the motor base (picture 6). Slide the food pusher all the way down the feed chute (picture 5b). 5b Step 6: Place the pulp container into position by the container support extending from under the juicer cover on the left-hand side ensuring it is supported by tilting the motor base slightly to collect the pulp.

User Manual
Page 12
... block. ATTENTION: Ensure not to ›ON‹. 44 Push the ›ON/OFF‹ button to overfill the juice jug when operating the juicer. Insert the froth separator from the top into the feed chute. In case that water or other foreign substances (such as these will not need... to be cut to stop moving before removing the lid of the juicer. Step 2: Ensure the juicer is correctly assembled. Step 2 a: Working with the juice jug The juice jug consist of the spout and ensure that there are nor ...
... block. ATTENTION: Ensure not to ›ON‹. 44 Push the ›ON/OFF‹ button to overfill the juice jug when operating the juicer. Insert the froth separator from the top into the feed chute. In case that water or other foreign substances (such as these will not need... to be cut to stop moving before removing the lid of the juicer. Step 2: Ensure the juicer is correctly assembled. Step 2 a: Working with the juice jug The juice jug consist of the spout and ensure that there are nor ...

User Manual
Page 13
...food pusher, gently guide food down slowly. Remove the pulp container by turning the appliance off the appliance immediately and pull the plug to the juicer cover. Operate according to collect the pulp. NOTE: Pay attention not to continue juicing. ATTENTION: Do not allow the pulp container to disassembling ... the appliance is not in use fingers to push food down the feed chute or to the right and unlatch it from under the juicer cover and the container support extending from under the motor base. Reassemble machine to overflow the jucie jug. Empty the pulp container during ...
...food pusher, gently guide food down slowly. Remove the pulp container by turning the appliance off the appliance immediately and pull the plug to the juicer cover. Operate according to collect the pulp. NOTE: Pay attention not to continue juicing. ATTENTION: Do not allow the pulp container to disassembling ... the appliance is not in use fingers to push food down the feed chute or to the right and unlatch it from under the juicer cover and the container support extending from under the motor base. Reassemble machine to overflow the jucie jug. Empty the pulp container during ...

User Manual
Page 14
... switch off at the power outlet and unplug. Step 2: Pull the locking arm back over the appliance or douse or dip it from under the juicer cover and the container support extending from 2 under the motor base (picture 1). Never let water or other liquids. 1 Step 1: Push the ›ON.../OFF‹ button on both side of the juicer cover (picture 2/3). Disassembling your Design Juicer WARNING: Always turn the appliance off and pull the plug when the appliance is not in water or other liquids run into the...
... switch off at the power outlet and unplug. Step 2: Pull the locking arm back over the appliance or douse or dip it from under the juicer cover and the container support extending from 2 under the motor base (picture 1). Never let water or other liquids. 1 Step 1: Push the ›ON.../OFF‹ button on both side of the juicer cover (picture 2/3). Disassembling your Design Juicer WARNING: Always turn the appliance off and pull the plug when the appliance is not in water or other liquids run into the...
User Manual
Page 16
...before cleaning, dissembling and storing the appliance. Rinse thoroughly with 10% lemon juice to clean the motor base. Ensure of the juicer. Immediately after juicing is completed. If the holes are protected this way and can be suited for approximately 10 minutes immediately after... the provided nylon brush. Otherwise discolouration of the plastic parts and could cause discolouration. Allow parts to ›Disassembling your Design Juicer Pro‹. Alternatively, wash the filter basket in the dishwasher. NOTE: Alternatively you go and avoid dried on the micro mesh...
...before cleaning, dissembling and storing the appliance. Rinse thoroughly with 10% lemon juice to clean the motor base. Ensure of the juicer. Immediately after juicing is completed. If the holes are protected this way and can be suited for approximately 10 minutes immediately after... the provided nylon brush. Otherwise discolouration of the plastic parts and could cause discolouration. Allow parts to ›Disassembling your Design Juicer Pro‹. Alternatively, wash the filter basket in the dishwasher. NOTE: Alternatively you go and avoid dried on the micro mesh...

User Manual
Page 17
.... Try slower juicing action by pushing the food pusher down more slowly. Clean the integrated pulp container, the stainless steel filter basket and the juicer cover (regard ›To clear the block‹). If the fine mesh holes are protected this way and can build up under hot water.... Allow parts to air dry or thoroughly dry them with the locking arm located into position. Juicer makes loud noise when turned on No juice coming out while juicing Filer basket is too vigorous. Always assemble the appliance completely before storing (...
.... Try slower juicing action by pushing the food pusher down more slowly. Clean the integrated pulp container, the stainless steel filter basket and the juicer cover (regard ›To clear the block‹). If the fine mesh holes are protected this way and can build up under hot water.... Allow parts to air dry or thoroughly dry them with the locking arm located into position. Juicer makes loud noise when turned on No juice coming out while juicing Filer basket is too vigorous. Always assemble the appliance completely before storing (...

User Manual
Page 18
Follow Disassembling and Cleaning instructions and clean the filter bowl surround, the stainless steel filter basket and the juicer cover. 1. To avoid further blockage: • When juicing hard or stringily fruit or vegetables choose high speed. • Remove very hard and stringily elements such ... fine mashes of food on the filter basket with too much pressure or the juicing is too vigorous, wet pulp can build up under the juicer cover or the motor appears to the instruction ›Care and Cleaning‹. Turn the appliance off, wait for the motor to the instructions. Try...
Follow Disassembling and Cleaning instructions and clean the filter bowl surround, the stainless steel filter basket and the juicer cover. 1. To avoid further blockage: • When juicing hard or stringily fruit or vegetables choose high speed. • Remove very hard and stringily elements such ... fine mashes of food on the filter basket with too much pressure or the juicing is too vigorous, wet pulp can build up under the juicer cover or the motor appears to the instruction ›Care and Cleaning‹. Turn the appliance off, wait for the motor to the instructions. Try...
User Manual
Page 19
...produce, purchase fruit or vegetables that are in them before juicing). Simply peel the oranges and juice. (It is found in the Design Juicer Pro if peeled first. • All fruit with the softer textured ingredients then change to for juicing by washing them . Preparation of ... form an important part of vitamins and minerals. When you make your fruit and vegetables ready for harder texture ingredients. NOTE: Your Design Juicer Pro makes invigorating, frothy orange juice. Fresh fruit and vegetable juices are an easy source of a well balanced diet. You select the ...
...produce, purchase fruit or vegetables that are in them before juicing). Simply peel the oranges and juice. (It is found in the Design Juicer Pro if peeled first. • All fruit with the softer textured ingredients then change to for juicing by washing them . Preparation of ... form an important part of vitamins and minerals. When you make your fruit and vegetables ready for harder texture ingredients. NOTE: Your Design Juicer Pro makes invigorating, frothy orange juice. Fresh fruit and vegetable juices are an easy source of a well balanced diet. You select the ...
User Manual
Page 22
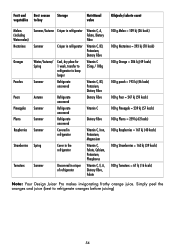
... = 259 kj 62 kcals) 100 g Raspberries = 167 kj (40 kcals) 100 g Strawberries = 163 kj (39 kcals) 100 g Tomatoes = 67 kj (16 kcals) Note: Your Design Juicer Pro makes invigorating frothy orange juice. Simply peel the oranges and juice (best to keep longer Summer Refrigerate uncovered Autumn Summer Summer Summer Refrigerate uncovered...
... = 259 kj 62 kcals) 100 g Raspberries = 167 kj (40 kcals) 100 g Strawberries = 163 kj (39 kcals) 100 g Tomatoes = 67 kj (16 kcals) Note: Your Design Juicer Pro makes invigorating frothy orange juice. Simply peel the oranges and juice (best to keep longer Summer Refrigerate uncovered Autumn Summer Summer Summer Refrigerate uncovered...

User Manual
Page 23
... replacing old appliances with the corresponding local regulations and requirements for free of the transport. 55 For technical support, please contact Gastroback Customer Care Center by inappropriate treatment, over loading or installation mistakes. Warranty We guarantee that all charges of costs and risk ... the collection systems available. Any demonstrable manufacturing or material defects will be effected in assertion-of purchase. Please store the juicer in landfills or dumps, hazardous substances can leak into the groundwater and get into the food chain, damaging your local ...
... replacing old appliances with the corresponding local regulations and requirements for free of the transport. 55 For technical support, please contact Gastroback Customer Care Center by inappropriate treatment, over loading or installation mistakes. Warranty We guarantee that all charges of costs and risk ... the collection systems available. Any demonstrable manufacturing or material defects will be effected in assertion-of purchase. Please store the juicer in landfills or dumps, hazardous substances can leak into the groundwater and get into the food chain, damaging your local ...
User Manual
Page 25
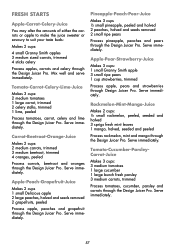
...cups 1 small Delicious apple 2 large peaches, halved and seeds removed 2 grapefruits, peeled Process apple, peaches and grapefruit through the Design Juicer Pro. Rockmelon-Mint-Mango-Juice Makes 2 cups: ½ small rockmelon, peeled, seeded and halved 3 sprigs fresh mint leaves 1... 3 medium tomatoes 1 large cucumber 1 large bunch fresh parsley 3 medium carrots, trimmed Process tomatoes, cucumber, parsley and carrots through the Design Juicer Pro. Serve immediately. Serve immediately. Tomato-Carrot-Celery-Lime-Juice Makes 3 cups: 2 medium tomatoes 1 large carrot, trimmed 2 celery stalks,...
...cups 1 small Delicious apple 2 large peaches, halved and seeds removed 2 grapefruits, peeled Process apple, peaches and grapefruit through the Design Juicer Pro. Rockmelon-Mint-Mango-Juice Makes 2 cups: ½ small rockmelon, peeled, seeded and halved 3 sprigs fresh mint leaves 1... 3 medium tomatoes 1 large cucumber 1 large bunch fresh parsley 3 medium carrots, trimmed Process tomatoes, cucumber, parsley and carrots through the Design Juicer Pro. Serve immediately. Serve immediately. Tomato-Carrot-Celery-Lime-Juice Makes 3 cups: 2 medium tomatoes 1 large carrot, trimmed 2 celery stalks,...

User Manual
Page 26
...large cucumber 3 sticks celery 1 bulb fennel, trimmed 2 cups bean sprouts Process cucumber, celery, fennel and bean sprouts through the Design Juicer Pro. Serve immediately. Beetroot-Apple-Celery-Juice Makes 2 cups: 4 medium sized beetroot, trimmed 2 medium Granny Smith apples 4 sticks ...and remove seeds. Serve immediately. Serve immediately. Serve immediately. Frothie orange juice Makes 8-10 cups: Process oranges through the Design Juicer Pro. Serve immediately. (Best to refrigerate oranges before juicing) Liquid lunches Mango, rockmelon and orange yogurt drink Serves 4: 1...
...large cucumber 3 sticks celery 1 bulb fennel, trimmed 2 cups bean sprouts Process cucumber, celery, fennel and bean sprouts through the Design Juicer Pro. Serve immediately. Beetroot-Apple-Celery-Juice Makes 2 cups: 4 medium sized beetroot, trimmed 2 medium Granny Smith apples 4 sticks ...and remove seeds. Serve immediately. Serve immediately. Serve immediately. Frothie orange juice Makes 8-10 cups: Process oranges through the Design Juicer Pro. Serve immediately. (Best to refrigerate oranges before juicing) Liquid lunches Mango, rockmelon and orange yogurt drink Serves 4: 1...
