
Use and Care Guide
Page 2
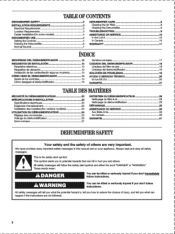
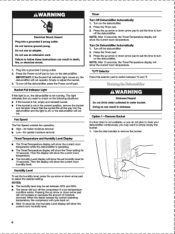
...: A DANGER You can be killed or seriously injured if you don't follow instructions. TABLE OF CONTENTS DEHUMIDIFIER SAFETY 2 DEHUMIDIFIER CARE 8 INSTALLATION REQUIREMENTS 3 Cleaning the Air Filter 8 Electrical Requirements 3 Cleaning the Dehumidifier 9 Location Requirements 3 TROUBLESHOOTING 9 Caster Installation(On some models) 4 ASSISTANCE OR SERVICE 10 DEHUMIDIFIER USE 4 In the U.S.A. 10 Setting the Controls 4 In Canada 10 Draining the Dehumidifier 6 WARRANTY 11 Normal Sounds 7 INVOICE SEGURIDAD DEL DESHUMIDIFICADOR 12 Sonidos normales 17 REQUISITOS...
...: A DANGER You can be killed or seriously injured if you don't follow instructions. TABLE OF CONTENTS DEHUMIDIFIER SAFETY 2 DEHUMIDIFIER CARE 8 INSTALLATION REQUIREMENTS 3 Cleaning the Air Filter 8 Electrical Requirements 3 Cleaning the Dehumidifier 9 Location Requirements 3 TROUBLESHOOTING 9 Caster Installation(On some models) 4 ASSISTANCE OR SERVICE 10 DEHUMIDIFIER USE 4 In the U.S.A. 10 Setting the Controls 4 In Canada 10 Draining the Dehumidifier 6 WARRANTY 11 Normal Sounds 7 INVOICE SEGURIDAD DEL DESHUMIDIFICADOR 12 Sonidos normales 17 REQUISITOS...
Use and Care Guide
Page 3
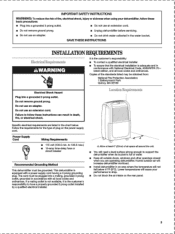
... dehumidifier workload. ■ Install dehumidifier in conformance with a power supply cord having a 3 prong grounding plug. Do not use an adapter. Do not remove ground prong. Failure to have a properly grounded 3 prong outlet installed by a qualified electrical installer. If a mating outlet is not available, it is equipped with National Electrical Code, ANSI/NFPA 70 - LocationRequirements Specific electrical requirements are operating dehumidifier. IMPORTANT SAFETY INSTRUCTIONS...
... dehumidifier workload. ■ Install dehumidifier in conformance with a power supply cord having a 3 prong grounding plug. Do not use an adapter. Do not remove ground prong. Failure to have a properly grounded 3 prong outlet installed by a qualified electrical installer. If a mating outlet is not available, it is equipped with National Electrical Code, ANSI/NFPA 70 - LocationRequirements Specific electrical requirements are operating dehumidifier. IMPORTANT SAFETY INSTRUCTIONS...
Use and Care Guide
Page 4
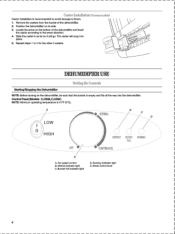
... the dehumidifier. 2. Control Panel (Models CJ30M,CJ35M) NOTE: Minimum operating temperature is empty and fits all the way into place. 5. Bucket Full indicator light D. A • NORMAL LOW HIGH OFF • DEFROST BUCKET RUNNING FULL CONTINUOUS E A. Running indicator light E. Position the dehumidifier on the dehumidifier, be sure that the bucket is 41°F (5°C). DEHU1VIIDIFIER USE Settingthe Controls Starting/Stopping the Dehumidifier NOTE: Before turning on its side. 3. Caster Installation...
... the dehumidifier. 2. Control Panel (Models CJ30M,CJ35M) NOTE: Minimum operating temperature is empty and fits all the way into place. 5. Bucket Full indicator light D. A • NORMAL LOW HIGH OFF • DEFROST BUCKET RUNNING FULL CONTINUOUS E A. Running indicator light E. Position the dehumidifier on the dehumidifier, be sure that the bucket is 41°F (5°C). DEHU1VIIDIFIER USE Settingthe Controls Starting/Stopping the Dehumidifier NOTE: Before turning on its side. 3. Caster Installation...
Use and Care Guide
Page 5
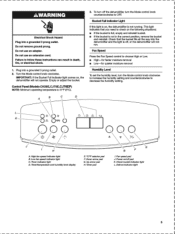
...; Low-for quieter moisture removal Humidity Level To set the humidity level, turn off , or the dehumidifier will not operate. Power on , the dehumidifier will not run. Check bucket indicator light L. Control Panel (Models CK50E,CJ70E,CJ70EP) NOTE: Minimum operating temperature is not in death, fire, or electrical shock. 1. A B C D 3. Defrost indicator light 5 IMPORTANT: If the Bucket Full indicator light comes on /offpad K. Fan Speed Press the Fan Speed control to OFF. Fan speedpad J. Do not use...
...; Low-for quieter moisture removal Humidity Level To set the humidity level, turn off , or the dehumidifier will not operate. Power on , the dehumidifier will not run. Check bucket indicator light L. Control Panel (Models CK50E,CJ70E,CJ70EP) NOTE: Minimum operating temperature is not in death, fire, or electrical shock. 1. A B C D 3. Defrost indicator light 5 IMPORTANT: If the Bucket Full indicator light comes on /offpad K. Fan Speed Press the Fan Speed control to OFF. Fan speedpad J. Do not use...
Use and Care Guide
Page 6
... need to switch between 30% and 90%. ■ The deicer will not run. Turn off the dehumidifier. NOTE: After 10 seconds, the Timer/Temperature display will show the current room humidity level. Option1-Remove Bucket If a floor drain is operating. ■ The Timer/Temperature display will show the current room humidity level. Empty or adjust the bucket. 3. Bucket Full Indicator Light If this selector pad to...
... need to switch between 30% and 90%. ■ The deicer will not run. Turn off the dehumidifier. NOTE: After 10 seconds, the Timer/Temperature display will show the current room humidity level. Option1-Remove Bucket If a floor drain is operating. ■ The Timer/Temperature display will show the current room humidity level. Empty or adjust the bucket. 3. Bucket Full Indicator Light If this selector pad to...
Use and Care Guide
Page 7
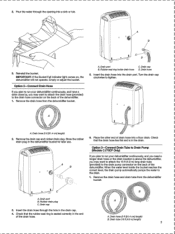
... Drain Tube to Drain Pump (Models CJ70EP Only) If you plan to run your dehumidifier continuously, and you need a longer drain hose or the drain location is above the dehumidifier, you may want to attach the drain hose (provided) to the drain pump connector on the back of the dehumidifier. 1. Remove the drain hose and drain tube from the dehumidifier bucket. Reinstall the bucket. A. Drain cap 3. Drain tube (16 ft [4.9 m] length) 7 Drain hose 5. Check that the drain hose lies...
... Drain Tube to Drain Pump (Models CJ70EP Only) If you plan to run your dehumidifier continuously, and you need a longer drain hose or the drain location is above the dehumidifier, you may want to attach the drain hose (provided) to the drain pump connector on the back of the dehumidifier. 1. Remove the drain hose and drain tube from the dehumidifier bucket. Reinstall the bucket. A. Drain cap 3. Drain tube (16 ft [4.9 m] length) 7 Drain hose 5. Check that the drain hose lies...
Use and Care Guide
Page 8
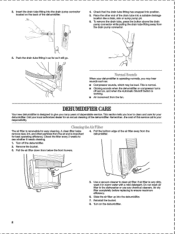
... is working. ■ Air movement from the drain pump connector. 3. DEHUMIDIFIER CARE Your new dehumidifier is important for easy cleaning. a 5. Turn off and on the dehumidifier. 8 If air filter is operating normally, you how to see whether it in the dishwasher or use any chemical cleaners. To remove the drain tube, press the button above the drain pump connector while pulling the drain tube fitting away from the fan. Call your dehumidifier is...
... is working. ■ Air movement from the drain pump connector. 3. DEHUMIDIFIER CARE Your new dehumidifier is important for easy cleaning. a 5. Turn off and on the dehumidifier. 8 If air filter is operating normally, you how to see whether it in the dishwasher or use any chemical cleaners. To remove the drain tube, press the button above the drain pump connector while pulling the drain tube fitting away from the fan. Call your dehumidifier is...
Use and Care Guide
Page 9
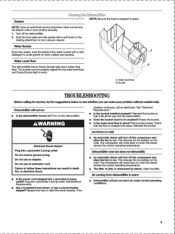
... the dehumidifier. Clean the filter. Exterior Cleaning the Dehumidifier NOTE: Be sure the float is snapped in place? See "Electrical Requirements." ■ Is the bucket installed properly? The compressor will turn off the dehumidifier. 2. Remove the bucket. Do not remove ground prong. Bucket TROUBLESHOOTING Before calling for service, try the suggestions below to be properly aligned for the water level float and Empty Bucket light...
... the dehumidifier. Clean the filter. Exterior Cleaning the Dehumidifier NOTE: Be sure the float is snapped in place? See "Electrical Requirements." ■ Is the bucket installed properly? The compressor will turn off the dehumidifier. 2. Remove the bucket. Do not remove ground prong. Bucket TROUBLESHOOTING Before calling for service, try the suggestions below to be properly aligned for the water level float and Empty Bucket light...
Use and Care Guide
Page 10
... work right because they are made with any questions or concerns to order replacement parts, we recommend that you need to : Haier America 1356 Broadway New York, NY 10018 ■ Repair parts sales. You can find this book and the sales slip together for assistance or service, please check "Troubleshooting." In theU.S.' If you use only factory-specified replacement parts. Factory-specified replacement parts will help , follow the instructions...
... work right because they are made with any questions or concerns to order replacement parts, we recommend that you need to : Haier America 1356 Broadway New York, NY 10018 ■ Repair parts sales. You can find this book and the sales slip together for assistance or service, please check "Troubleshooting." In theU.S.' If you use only factory-specified replacement parts. Factory-specified replacement parts will help , follow the instructions...
Use and Care Guide
Page 11
charges for the removal of defective parts and installation of a replacement part, beyond the You must be performed by other than an authorized dealer or service center. In commercial or rental use for a period of purchase • Damages from state to provide initial 12 month period. Haier America will repair or replace in your home, any mechanical, electrical part or the compressor, which...
charges for the removal of defective parts and installation of a replacement part, beyond the You must be performed by other than an authorized dealer or service center. In commercial or rental use for a period of purchase • Damages from state to provide initial 12 month period. Haier America will repair or replace in your home, any mechanical, electrical part or the compressor, which...


