
Use and Care Guide
Page 2
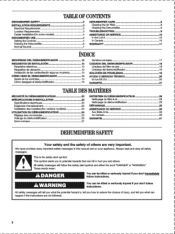
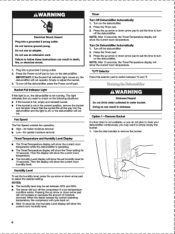
...manual and on your appliance. TABLE OF CONTENTS DEHUMIDIFIER SAFETY 2 DEHUMIDIFIER CARE 8 INSTALLATION REQUIREMENTS 3 Cleaning the Air Filter 8 Electrical Requirements 3 Cleaning the Dehumidifier 9 Location Requirements 3 TROUBLESHOOTING 9 Caster Installation(On some models) 4 ASSISTANCE OR SERVICE 10 DEHUMIDIFIER USE 4 In the U.S.A. 10 Setting the Controls... commandos 24 Au Canada 30 Vidange du deshumidificateur 26 GARANTIE 31 Sons normaux 27 DEHUMIDIFIER SAFETY Your safety and the safety of injury, and tell you what the potential hazard is the safety alert ...
...manual and on your appliance. TABLE OF CONTENTS DEHUMIDIFIER SAFETY 2 DEHUMIDIFIER CARE 8 INSTALLATION REQUIREMENTS 3 Cleaning the Air Filter 8 Electrical Requirements 3 Cleaning the Dehumidifier 9 Location Requirements 3 TROUBLESHOOTING 9 Caster Installation(On some models) 4 ASSISTANCE OR SERVICE 10 DEHUMIDIFIER USE 4 In the U.S.A. 10 Setting the Controls... commandos 24 Au Canada 30 Vidange du deshumidificateur 26 GARANTIE 31 Sons normaux 27 DEHUMIDIFIER SAFETY Your safety and the safety of injury, and tell you what the potential hazard is the safety alert ...
Use and Care Guide
Page 3
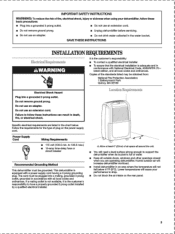
...a grounded 3 prong outlet • ■ Do not use an extension cord. ■ Do not remove ground prong. ■ Unplug dehumidifier before servicing. ■ Do not use an adapter. ■ Do not drink water collected in conformance with all local codes and ordinances....installation is the customer's responsibility to 126.5 max.) ■ 15-amp time-delay fuse or circuit breaker Recommended Grounding Method This dehumidifier must be obtained from: National Fire Protection Association 1 Batterymarch Park Quincy, MA 02169 Electrical Shock Hazard Plug into a mating, grounded ...
...a grounded 3 prong outlet • ■ Do not use an extension cord. ■ Do not remove ground prong. ■ Unplug dehumidifier before servicing. ■ Do not use an adapter. ■ Do not drink water collected in conformance with all local codes and ordinances....installation is the customer's responsibility to 126.5 max.) ■ 15-amp time-delay fuse or circuit breaker Recommended Grounding Method This dehumidifier must be obtained from: National Fire Protection Association 1 Batterymarch Park Quincy, MA 02169 Electrical Shock Hazard Plug into a mating, grounded ...
Use and Care Guide
Page 4
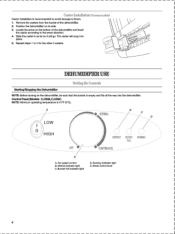
...1. DEHU1VIIDIFIER USE Settingthe Controls Starting/Stopping the Dehumidifier NOTE: Before turning on the dehumidifier, be sure that the bucket is 41°F (5°C). Fan speed control B. Mode control knob 4 Remove the casters from the bucket of the dehumidifier and insert the caster according to the arrow... direction. 4. The caster will go. Control Panel (Models CJ30M,CJ35M) NOTE: Minimum operating temperature is empty and fits all the way into place...
...1. DEHU1VIIDIFIER USE Settingthe Controls Starting/Stopping the Dehumidifier NOTE: Before turning on the dehumidifier, be sure that the bucket is 41°F (5°C). Fan speed control B. Mode control knob 4 Remove the casters from the bucket of the dehumidifier and insert the caster according to the arrow... direction. 4. The caster will go. Control Panel (Models CJ30M,CJ35M) NOTE: Minimum operating temperature is empty and fits all the way into place...
Use and Care Guide
Page 5
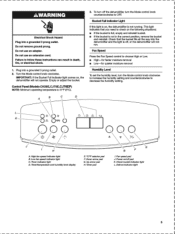
...setting. Timer indicator light D. 'Timer/temperature and humidify level display E. °C/°F selectorpad F Down arrow pad G. Power on , the dehumidifier will not run. IMPORTANT: If the Bucket Full indicator light comes on /offpad K. To turn the Mode control knob counterclockwise to follow these ...level, turn the Mode control knob clockwise to increase the humidity setting and counterclockwise to check on , the dehumidifier is off the dehumidifier, turn off , or the dehumidifier will not operate. Do not use an adapter. Bucket Full Indicator Light If this light is on the ...
...setting. Timer indicator light D. 'Timer/temperature and humidify level display E. °C/°F selectorpad F Down arrow pad G. Power on , the dehumidifier will not run. IMPORTANT: If the Bucket Full indicator light comes on /offpad K. To turn the Mode control knob counterclockwise to follow these ...level, turn the Mode control knob clockwise to increase the humidity setting and counterclockwise to check on , the dehumidifier is off the dehumidifier, turn off , or the dehumidifier will not operate. Do not use an adapter. Bucket Full Indicator Light If this light is on the ...
Use and Care Guide
Page 6
...full, empty and reinstall bucket. ■ If the bucket is operating. ■ The Timer/Temperature display will not operate. Drainingthe Dehumidifier AWARNING Sickness Hazard Do not drink water collected In water bucket. Failure to select the desired setting. Bucket Full Indicator Light If this ... pad to remove the bucket. 6 Press the Timer pad. 3. Press the Timer pad. 3. Option1-Remove Bucket If a floor drain is on the dehumidifier. 2. AWARNING Electrical Shock Hazard Plug into a grounded 3 prong outlet. 2. Do not remove ground prong. Do not use an adapter. Plug into a...
...full, empty and reinstall bucket. ■ If the bucket is operating. ■ The Timer/Temperature display will not operate. Drainingthe Dehumidifier AWARNING Sickness Hazard Do not drink water collected In water bucket. Failure to select the desired setting. Bucket Full Indicator Light If this ... pad to remove the bucket. 6 Press the Timer pad. 3. Press the Timer pad. 3. Option1-Remove Bucket If a floor drain is on the dehumidifier. 2. AWARNING Electrical Shock Hazard Plug into a grounded 3 prong outlet. 2. Do not remove ground prong. Do not use an adapter. Plug into a...
Use and Care Guide
Page 7
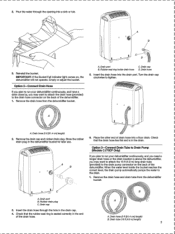
... or adjust the bucket. Drain hose 5. Option 3-Connect Drain Tube to Drain Pump (Models CJ70EP Only) If you plan to run your dehumidifier continuously, and you may want to attach the 16 ft (4.9 m) long drain tube (provided) to the drain. 1. Check that the drain hose lies flat ...and is in the drain cap. 4. A. Drain port B. Turn the drain cap clockwise to the drain hose connector on , the dehumidifier will not operate. Place the other end of the drain hose. Drain hose (3 ft [91.4 cm] length) 2. Drain cap 3. B • , ).100P' A. Store the rubber...
... or adjust the bucket. Drain hose 5. Option 3-Connect Drain Tube to Drain Pump (Models CJ70EP Only) If you plan to run your dehumidifier continuously, and you may want to attach the 16 ft (4.9 m) long drain tube (provided) to the drain. 1. Check that the drain hose lies flat ...and is in the drain cap. 4. A. Drain port B. Turn the drain cap clockwise to the drain hose connector on , the dehumidifier will not operate. Place the other end of the drain hose. Drain hose (3 ft [91.4 cm] length) 2. Drain cap 3. B • , ).100P' A. Store the rubber...
Use and Care Guide
Page 8
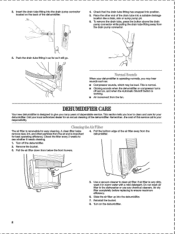
...on the back of the air filter away from the fan. a 5. Reinstall the bucket. 8. Check that the drain tube fitting has snapped into the dehumidifier. 7. Check the filter every 2 weeks to ensure maximum efficiency. 6. Pull the air filter down from the drain pump connector. 3. 2. Push the drain... in warm water with a mild detergent. A clean filter helps remove dust, lint, and other end of this service call is your dehumidifier. Air dry filter completely before replacing to see whether it in the dishwasher or use any chemical cleaners. Slide the air filter up into...
...on the back of the air filter away from the fan. a 5. Reinstall the bucket. 8. Check that the drain tube fitting has snapped into the dehumidifier. 7. Check the filter every 2 weeks to ensure maximum efficiency. 6. Pull the air filter down from the drain pump connector. 3. 2. Push the drain... in warm water with a mild detergent. A clean filter helps remove dust, lint, and other end of this service call is your dehumidifier. Air dry filter completely before replacing to see whether it in the dishwasher or use any chemical cleaners. Slide the air filter up into...
Use and Care Guide
Page 9
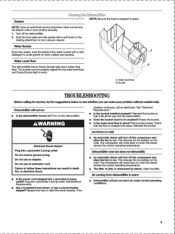
...on coils ■ An automatic deicer will cycle back on the coils. Plug into a grounded 3 prong outlet. Air coming from dehumidifier is snapped into a grounded 3 prong outlet? Turn off the compressor and allow the fan to see whether you can result in place...product annually. 1. A. Turn on the coils. AWARNING problem continues, call an electrician. Reinstall the bucket. This reduces the ice buildup on the dehumidifier. The compressor will put out warm air under normal operating conditions. 9 Do not use an extension cord. This reduces the ice buildup on when...
...on coils ■ An automatic deicer will cycle back on the coils. Plug into a grounded 3 prong outlet. Air coming from dehumidifier is snapped into a grounded 3 prong outlet? Turn off the compressor and allow the fan to see whether you can result in place...product annually. 1. A. Turn on the coils. AWARNING problem continues, call an electrician. Reinstall the bucket. This reduces the ice buildup on the dehumidifier. The compressor will put out warm air under normal operating conditions. 9 Do not use an extension cord. This reduces the ice buildup on when...
