
User Manual
Page 1
Fully Automatic Washing Machine User's manual This manual is for future reference. Retain it for HWM58-020 Please read this manual carefully before using.
Fully Automatic Washing Machine User's manual This manual is for future reference. Retain it for HWM58-020 Please read this manual carefully before using.
User Manual
Page 2
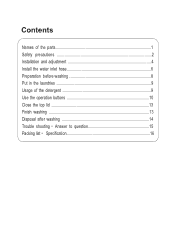
Contents Names of the parts 1 Safety precautions 2 Installation and adjustment 4 Install the water inlet hose 6 Preparation before washing 8 Put in the laundries 9 Usage of the detergent 9 Use the operation buttons 10 Close the top lid 13 Finish washing ...13 Disposal after washing 14 Trouble shooting Answer to question 15 Packing list Specification 16
Contents Names of the parts 1 Safety precautions 2 Installation and adjustment 4 Install the water inlet hose 6 Preparation before washing 8 Put in the laundries 9 Usage of the detergent 9 Use the operation buttons 10 Close the top lid 13 Finish washing ...13 Disposal after washing 14 Trouble shooting Answer to question 15 Packing list Specification 16
User Manual
Page 3
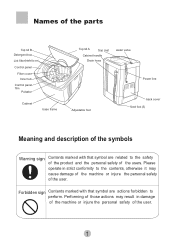
... with that symbol are related to the safety of the product and the personal safety of the users. Names of the parts Top lid B Detergent box Lint filter(Installed by user) Control panel Filter cover Inner tub Control panel film Pulsator Cabinet base frame Top lid A Sop mat Cabinet handle Drain hose water valve Power line Adjustable foot back cover fixed foot (3) Meaning and description of the symbols Warning sign Contents marked...
... with that symbol are related to the safety of the product and the personal safety of the users. Names of the parts Top lid B Detergent box Lint filter(Installed by user) Control panel Filter cover Inner tub Control panel film Pulsator Cabinet base frame Top lid A Sop mat Cabinet handle Drain hose water valve Power line Adjustable foot back cover fixed foot (3) Meaning and description of the symbols Warning sign Contents marked...
User Manual
Page 4
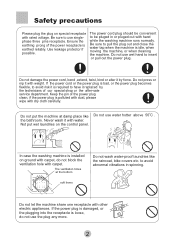
... case the washing machine is earthed reliably. soft items Do not let the machine share one receptacle with rated voltage. Do not put wet laundries on the control panel. the bathroom. to insert or pull out the power plug. If the power cord or the power plug is bad, or the power plug becomes flexible, to have it with dry cloth carefully. Do not use water hotter above 50...
... case the washing machine is earthed reliably. soft items Do not let the machine share one receptacle with rated voltage. Do not put wet laundries on the control panel. the bathroom. to insert or pull out the power plug. If the power cord or the power plug is bad, or the power plug becomes flexible, to have it with dry cloth carefully. Do not use water hotter above 50...
User Manual
Page 5
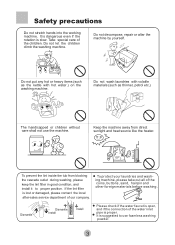
... the lint inside the tub from direct sunlight and heat source like the heater. Do not decompose, repair or alter the machine by yourself. Safety precautions Do not stretch hands into the working machine. Do not wash laundries with volatile materials (such as the kettle with hot water ) on the washing machine. Dismantle Dismantle Install Install Please check if the water faucet is open, and if the...
... the lint inside the tub from direct sunlight and heat source like the heater. Do not decompose, repair or alter the machine by yourself. Safety precautions Do not stretch hands into the working machine. Do not wash laundries with volatile materials (such as the kettle with hot water ) on the washing machine. Dismantle Dismantle Install Install Please check if the water faucet is open, and if the...
User Manual
Page 6
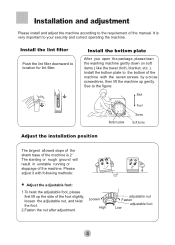
... in unstable running or stoppage of the manual. Install the bottom plate After you open the package, please lean the washing machine gently down on soft items ( like the towel cloth, blanket, etc. ). Loosen High adjustable nut Fasten adjustable foot Low 4 Installation and adjustment Please install and adjust the machine according to location for lint filter. Install the lint filter Push the lint filter downward to...
... in unstable running or stoppage of the manual. Install the bottom plate After you open the package, please lean the washing machine gently down on soft items ( like the towel cloth, blanket, etc. ). Loosen High adjustable nut Fasten adjustable foot Low 4 Installation and adjustment Please install and adjust the machine according to location for lint filter. Install the lint filter Push the lint filter downward to...

User Manual
Page 7
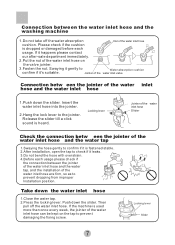
... change the direction of the drain hose 1.Dismantle the back cover of the drain hose shall be smooth, and cost such long time that the machine may stop at mid way. 2.Do not trample or press the drain hose. 4.If extra drain hose is too long, cut it at the other hand. (As indicated in Figure 5) Drain outlet protecting cover Outer drain hose Drain hose frame Drain hose bushing Figure 2 Figure 1 Cabinet Drain hose...
... change the direction of the drain hose 1.Dismantle the back cover of the drain hose shall be smooth, and cost such long time that the machine may stop at mid way. 2.Do not trample or press the drain hose. 4.If extra drain hose is too long, cut it at the other hand. (As indicated in Figure 5) Drain outlet protecting cover Outer drain hose Drain hose frame Drain hose bushing Figure 2 Figure 1 Cabinet Drain hose...
User Manual
Page 8
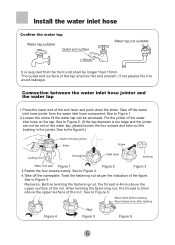
...set on the tap. See to Figure 4. 4.Take off the water inlet hose jointer from the water inlet hose component. Take off the nameplate. See to the figure3.) Water inlet pipe jointer Slider Screw Locking lever Screwdriver Mark label bushing Water inlet pipe Figure 1 Figure 2 Figure 3 3.Fasten the four screws evenly. Connection between the water inlet hose jointer and the water...that the front end shall be longer than 10mm. Install the water inlet hose Confirm the water tap Water tap,suitable Outlet end surface >10mm Water tap,not suitable It is too large and the jointer can ...
...set on the tap. See to Figure 4. 4.Take off the water inlet hose jointer from the water inlet hose component. Take off the nameplate. See to the figure3.) Water inlet pipe jointer Slider Screw Locking lever Screwdriver Mark label bushing Water inlet pipe Figure 1 Figure 2 Figure 3 3.Fasten the four screws evenly. Connection between the water inlet hose jointer and the water...that the front end shall be longer than 10mm. Install the water inlet hose Confirm the water tap Water tap,suitable Outlet end surface >10mm Water tap,not suitable It is too large and the jointer can ...
User Manual
Page 9
... the water inlet hose and the water inlet hose 1.Push down the slider. If it leaks. 3.Do not bend the hose with overstrain. 4.Before each usage. If the machine is fastened stable. 2.After installation, open the tap to prevent dropping from improper Installation position. Release the slider till a click sound is dropped or damaged before each usage please check if the connection between the water inlet hose and the washing machine...
... the water inlet hose and the water inlet hose 1.Push down the slider. If it leaks. 3.Do not bend the hose with overstrain. 4.Before each usage. If the machine is fastened stable. 2.After installation, open the tap to prevent dropping from improper Installation position. Release the slider till a click sound is dropped or damaged before each usage please check if the connection between the water inlet hose and the washing machine...

User Manual
Page 10
... put the laundries polluted with long fiber, please first turn the inside out before putting them into the washing machine. When the pulsator is earthed reliably . b. You can add detergent on the part with much easier to be put in unstable working or abnormal noise. f. Preparation before washing Preparation before washing 1.Connect the water inlet hose and open the water tap . 2.Confirm that mean. Fasten the buttons and zippers...
... put the laundries polluted with long fiber, please first turn the inside out before putting them into the washing machine. When the pulsator is earthed reliably . b. You can add detergent on the part with much easier to be put in unstable working or abnormal noise. f. Preparation before washing Preparation before washing 1.Connect the water inlet hose and open the water tap . 2.Confirm that mean. Fasten the buttons and zippers...

User Manual
Page 11
... cloth will influence the actual washing capacity. It is suitable for one time. The whitener shall not touch the laundries directly. The instant dissolving of the washing powder: 1.Prepare warm water of the whitener. Pour it . Select suitable water level. Washing powder with container. Please pay attention to cleaning the detergent box in the machine 1.Fill water to "Low" water level. 2.Add the power. The thickness, size, type of the detergent How to use high sudsing detergent...
... cloth will influence the actual washing capacity. It is suitable for one time. The whitener shall not touch the laundries directly. The instant dissolving of the washing powder: 1.Prepare warm water of the whitener. Pour it . Select suitable water level. Washing powder with container. Please pay attention to cleaning the detergent box in the machine 1.Fill water to "Low" water level. 2.Add the power. The thickness, size, type of the detergent How to use high sudsing detergent...
User Manual
Page 12
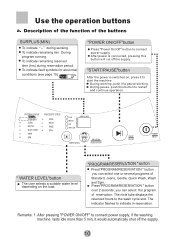
... wash cycle end. Remarks: 1. Use the operation buttons a. PROGRAM STATUS STANDARD JEANS GENTLE QUICK WASH WASH SPIN PROCEDURE STATUS SOAK WASH RINSE SPIN WATER LEVEL PROGRAM RESERVATION START PAUSE POWER ON/OFF " WATER LEVEL"button The user selects a suitable water level depending on , press it to start the machine During working . "START/PAUSE"button After the power is connected, pressing this button to connect power supply, if the washing machine lasts idle more than 5 min, it to connect power supply. The nixie tube displays...
... wash cycle end. Remarks: 1. Use the operation buttons a. PROGRAM STATUS STANDARD JEANS GENTLE QUICK WASH WASH SPIN PROCEDURE STATUS SOAK WASH RINSE SPIN WATER LEVEL PROGRAM RESERVATION START PAUSE POWER ON/OFF " WATER LEVEL"button The user selects a suitable water level depending on , press it to start the machine During working . "START/PAUSE"button After the power is connected, pressing this button to connect power supply, if the washing machine lasts idle more than 5 min, it to connect power supply. The nixie tube displays...
User Manual
Page 13
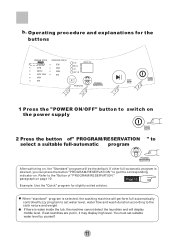
... program is water inside the tub, the machine cannot detect the laundries and will display middle level. If wet laundries are put in, it may display high level. Refer to select a suitable full-automatic program PROGRAM RESERVATION After switching on page 10. Page 10 Example: Use the "Quick" program for the buttons PROGRAM STATUS STANDARD JEANS GENTLE QUICK WASH WASH SPIN PROCEDURE STATUS SOAK WASH RINSE SPIN WATER LEVEL PROGRAM RESERVATION START PAUSE POWER ON...
... program is water inside the tub, the machine cannot detect the laundries and will display middle level. If wet laundries are put in, it may display high level. Refer to select a suitable full-automatic program PROGRAM RESERVATION After switching on page 10. Page 10 Example: Use the "Quick" program for the buttons PROGRAM STATUS STANDARD JEANS GENTLE QUICK WASH WASH SPIN PROCEDURE STATUS SOAK WASH RINSE SPIN WATER LEVEL PROGRAM RESERVATION START PAUSE POWER ON...
User Manual
Page 14
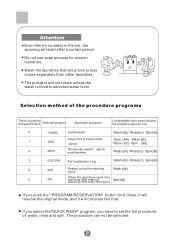
... not use soak process for 6 times, it will resume the original mode, and it will circulate like that are prone to lose colors separately from other laundries. Wash the laundries that . If you select the"QUICK WASH" program, you push the " PROGRAM/RESERVATION" button for woolen laundries. Attention Even there's no water in the tub, the spinning will start after manual Spin(dd) washing (first drain then spin) If...
... not use soak process for 6 times, it will resume the original mode, and it will circulate like that are prone to lose colors separately from other laundries. Wash the laundries that . If you select the"QUICK WASH" program, you push the " PROGRAM/RESERVATION" button for woolen laundries. Attention Even there's no water in the tub, the spinning will start after manual Spin(dd) washing (first drain then spin) If...
User Manual
Page 15
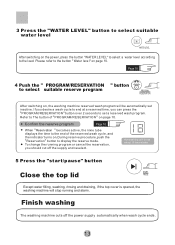
..." button Close the top lid START PAUSE START PAUSE Except water filling ,washing, rinsing and draining, if the top cover is opened, the washing machine will be automatically set a reserved wash program. 3 Press the "WATER LEVEL" button to select suitable water level WATER LEVEL After sw itchi ng on the po wer, press the bu tton "WATER LE VEL" to sel ect a wat er leve l acc ordi ng to display the reserve mode...
..." button Close the top lid START PAUSE START PAUSE Except water filling ,washing, rinsing and draining, if the top cover is opened, the washing machine will be automatically set a reserved wash program. 3 Press the "WATER LEVEL" button to select suitable water level WATER LEVEL After sw itchi ng on the po wer, press the bu tton "WATER LE VEL" to sel ect a wat er leve l acc ordi ng to display the reserve mode...
User Manual
Page 16
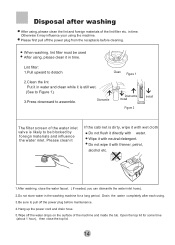
... after washing After using the machine. Open the top lid for some time (about 1 hour), then close the water faucet. ( If needed, you can dismantle the water inlet hose). 2.Do not store water in time. Please first pull off the power plug from the receptacle before maintenance. 4.Hang up the power cord and drain hose. 5.Wipe off the power plug before cleaning. Wipe it directly with thinner, petrol, alcohol etc. Dismantle Dismantle Install Figure 2 Install The filter...
... after washing After using the machine. Open the top lid for some time (about 1 hour), then close the water faucet. ( If needed, you can dismantle the water inlet hose). 2.Do not store water in time. Please first pull off the power plug from the receptacle before maintenance. 4.Hang up the power cord and drain hose. 5.Wipe off the power plug before cleaning. Wipe it directly with thinner, petrol, alcohol etc. Dismantle Dismantle Install Figure 2 Install The filter...
User Manual
Page 17
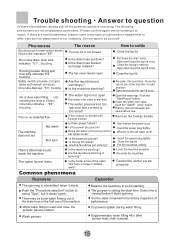
... wash and rinse, the pulsator pauses rotation Balance the laundries to select "Spin", but it doesn't work. Please confirm again before it by foreign material? Do not repair it starts spinning. Are the laundries put down the drain hose. Wait for the normal water pressure before checking) The following phenomena are real breakdowns, please come to the special maintenance department or after sensor tests cloth material. 15 Remove the foreign bodies Use...
... wash and rinse, the pulsator pauses rotation Balance the laundries to select "Spin", but it doesn't work. Please confirm again before it by foreign material? Do not repair it starts spinning. Are the laundries put down the drain hose. Wait for the normal water pressure before checking) The following phenomena are real breakdowns, please come to the special maintenance department or after sensor tests cloth material. 15 Remove the foreign bodies Use...


