
User Manual
Page 1
... product. Using an engine indoors CAN KILL YOU IN MINUTES. Read this material before using this manual and the receipt in the back of the manual near the assembly diagram (or month and year of Harbor Freight Tools. Failure to continuing improvements, actual product may not be drawn proportionally. Owner's Manual & Safety Instructions Save This Manual Keep this manual for future reference. Only use inside a home or...
... product. Using an engine indoors CAN KILL YOU IN MINUTES. Read this material before using this manual and the receipt in the back of the manual near the assembly diagram (or month and year of Harbor Freight Tools. Failure to continuing improvements, actual product may not be drawn proportionally. Owner's Manual & Safety Instructions Save This Manual Keep this manual for future reference. Only use inside a home or...

User Manual
Page 2
... Compression Ratio Rotation viewed from PTO (power takeoff - Environmental Protection Agency. ITEM 61614 OpERATION MAINTENANCE Page 2 For technical questions, please call 1-888-866-5797. SAFETY SETUp Table of this Engine is warranted for this manual. For warranty information, refer to the last pages of Contents Specifications 2 Safety 3 Setup 6 Operation 16 Maintenance 20 Troubleshooting 24 Warranties 26 Parts Lists and Diagrams 28 Specifications Displacement Engine Type Cooling System Fuel Type Engine Oil Type Capacity Sound Level at 32...
... Compression Ratio Rotation viewed from PTO (power takeoff - Environmental Protection Agency. ITEM 61614 OpERATION MAINTENANCE Page 2 For technical questions, please call 1-888-866-5797. SAFETY SETUp Table of this Engine is warranted for this manual. For warranty information, refer to the last pages of Contents Specifications 2 Safety 3 Setup 6 Operation 16 Maintenance 20 Troubleshooting 24 Warranties 26 Parts Lists and Diagrams 28 Specifications Displacement Engine Type Cooling System Fuel Type Engine Oil Type Capacity Sound Level at 32...

User Manual
Page 3
... all instructions. Read the manual before set-up and/or use. Indicates a hazardous situation which cannot be built into this product, but must be supplied by the operator that may result in minor or moderate injury. Symbol Definitions Symbol property or Statement RpM Revolutions Per Minute Hp Horsepower WARNING marking concerning Risk of Fire while handling fuel. Operate engine OUTSIDE...
... all instructions. Read the manual before set-up and/or use. Indicates a hazardous situation which cannot be built into this product, but must be supplied by the operator that may result in minor or moderate injury. Symbol Definitions Symbol property or Statement RpM Revolutions Per Minute Hp Horsepower WARNING marking concerning Risk of Fire while handling fuel. Operate engine OUTSIDE...

User Manual
Page 4
... in moving parts. Set up precautions 1. Do not wear loose clothing or jewelry. This is a poison you are doing and use only on a flat, level, well-ventilated surface. 5. SAFETY SETUp Set up and use common sense when operating this equipment may create sparks that are recommended by Harbor Freight Tools for your model. Wear ANSI-approved safety goggles, heavy-duty work area. 11...
... in moving parts. Set up precautions 1. Do not wear loose clothing or jewelry. This is a poison you are doing and use only on a flat, level, well-ventilated surface. 5. SAFETY SETUp Set up and use common sense when operating this equipment may create sparks that are recommended by Harbor Freight Tools for your model. Wear ANSI-approved safety goggles, heavy-duty work area. 11...

User Manual
Page 5
... manufacturer or distributor. Store oil rags in a well-ventilated area only. 5. Before service, maintenance, or cleaning: a. Use of children. 8. If unreadable or missing, contact Harbor Freight Tools for the application. Follow scheduled engine and equipment maintenance. Refueling: 1. Turn the engine switch to expand as per any spilled fuel and allow sparks, flames, or other reproductive harm. (California Health & Safety Code § 25249.5, et...
... manufacturer or distributor. Store oil rags in a well-ventilated area only. 5. Before service, maintenance, or cleaning: a. Use of children. 8. If unreadable or missing, contact Harbor Freight Tools for the application. Follow scheduled engine and equipment maintenance. Refueling: 1. Turn the engine switch to expand as per any spilled fuel and allow sparks, flames, or other reproductive harm. (California Health & Safety Code § 25249.5, et...

User Manual
Page 8
... instructions in a well-ventilated area away from use, shut the engine off the engine. 2. At high altitudes, the engine's carburetor, governor (if so equipped), and any other parts that control the fuel-air ratio will need to the engine and any other devices used with the proper main jet. Turn off and wait for high altitude use and to prevent damage to be adjusted by installing an altitude kit at...
... instructions in a well-ventilated area away from use, shut the engine off the engine. 2. At high altitudes, the engine's carburetor, governor (if so equipped), and any other parts that control the fuel-air ratio will need to the engine and any other devices used with the proper main jet. Turn off and wait for high altitude use and to prevent damage to be adjusted by installing an altitude kit at...

User Manual
Page 11
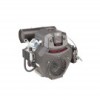
... wire connector Figure L: Disconnect Solenoid Valve wire connector 21. Keep it upright, it may contain fuel. SETUp OpERATION MAINTENANCE ITEM 61614 For technical questions, please call 1-888-866-5797. Underneath where the Fuel Pump Bracket was, the Solenoid Valve (138) is connected. Remove Bolt (133) and two Bolts (132) from the engine. See Figure K. Remove the Carburetor assembly from the Carburetor Intake Elbow (131). Carburetor...
... wire connector Figure L: Disconnect Solenoid Valve wire connector 21. Keep it upright, it may contain fuel. SETUp OpERATION MAINTENANCE ITEM 61614 For technical questions, please call 1-888-866-5797. Underneath where the Fuel Pump Bracket was, the Solenoid Valve (138) is connected. Remove Bolt (133) and two Bolts (132) from the engine. See Figure K. Remove the Carburetor assembly from the Carburetor Intake Elbow (131). Carburetor...
User Manual
Page 12
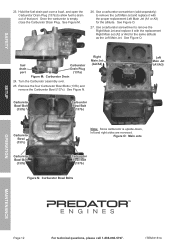
...) and remove the Carburetor Bowl (137c). ITEM 61614 See Figure O. Hold the fuel drain port over . 25. Once the carburetor is upside-down, left and right sides are reversed. See Figure N. See Figure M. 26. Turn the Carburetor assembly over a bowl, and open the Carburetor Drain Plug (137a) to allow fuel to remove the Right Main Jet and replace it with the replacement Right Main Jet...
...) and remove the Carburetor Bowl (137c). ITEM 61614 See Figure O. Hold the fuel drain port over . 25. Once the carburetor is upside-down, left and right sides are reversed. See Figure N. See Figure M. 26. Turn the Carburetor assembly over a bowl, and open the Carburetor Drain Plug (137a) to allow fuel to remove the Right Main Jet and replace it with the replacement Right Main Jet...
User Manual
Page 13
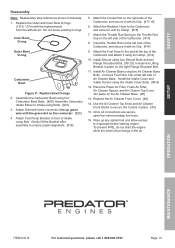
... starting engine. Once all connections are secure, open fuel valve/unclamp fuel hose. 16. SAFETY Reassembly Note: Reassembly step references shown in the air. Replace the Outer and Inner Bowl O-rings (137d, 137e) with its Clamp. [#12] 10. Inner Bowl O-ring Outer Bowl O-ring Carburetor Bowl Figure p: Replace Bowl O-rings 2. Install Shroud using its Clip. [#17,18] 6. Connect Fuel Filter Clip under left side of fuel...
... starting engine. Once all connections are secure, open fuel valve/unclamp fuel hose. 16. SAFETY Reassembly Note: Reassembly step references shown in the air. Replace the Outer and Inner Bowl O-rings (137d, 137e) with its Clamp. [#12] 10. Inner Bowl O-ring Outer Bowl O-ring Carburetor Bowl Figure p: Replace Bowl O-rings 2. Install Shroud using its Clip. [#17,18] 6. Connect Fuel Filter Clip under left side of fuel...
User Manual
Page 14
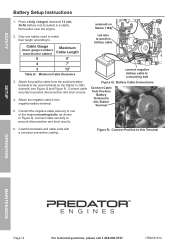
... the engine mounting bolts, as shown in a stable, flat location near the engine. Connect the negative cable securely to . SAFETY Battery Setup Instructions 1. solenoid on the Starter's (164) solenoid, see Figure Q and Figure R. Attach the positive cable from positive Battery Terminal to this Starter Terminal 6. Attach the negative cable to prevent disconnection and short circuits. 4. ITEM 61614 Place a fully charged, lead...
... the engine mounting bolts, as shown in a stable, flat location near the engine. Connect the negative cable securely to . SAFETY Battery Setup Instructions 1. solenoid on the Starter's (164) solenoid, see Figure Q and Figure R. Attach the positive cable from positive Battery Terminal to this Starter Terminal 6. Attach the negative cable to prevent disconnection and short circuits. 4. ITEM 61614 Place a fully charged, lead...

User Manual
Page 16
...-5797. If any problems are found, do not use . Before each use equipment until the oil level is recommended for damaged, loose, and missing parts before set up to the upper mark on page 21 in different average temperatures.) Replace the Oil Fill Plug. 6. ITEM 61614 Do not run the engine with low or no or low engine oil WILL permanently damage the engine. 1. Clean the top...
...-5797. If any problems are found, do not use . Before each use equipment until the oil level is recommended for damaged, loose, and missing parts before set up to the upper mark on page 21 in different average temperatures.) Replace the Oil Fill Plug. 6. ITEM 61614 Do not run the engine with low or no or low engine oil WILL permanently damage the engine. 1. Clean the top...
User Manual
Page 18
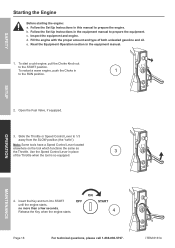
... the engine starts. d. To start a cold engine, pull the Choke Knob out to the RUN position. 2. SETUp OpERATION MAINTENANCE 4. ITEM 61614 Follow the Set Up Instructions in this manual to 1/3 away from the SLOW position (the "turtle"). b. Note: Some tools have a Speed Control Lever located elsewhere on the tool which functions the same as the Throttle. Inspect the equipment and engine. Open the Fuel Valve, if equipped. 3. Use...
... the engine starts. d. To start a cold engine, pull the Choke Knob out to the RUN position. 2. SETUp OpERATION MAINTENANCE 4. ITEM 61614 Follow the Set Up Instructions in this manual to 1/3 away from the SLOW position (the "turtle"). b. Note: Some tools have a Speed Control Lever located elsewhere on the tool which functions the same as the Throttle. Inspect the equipment and engine. Open the Fuel Valve, if equipped. 3. Use...

User Manual
Page 20
... each piece of use Every 3 mo. Clean fuel tank, strainer and carburetor 4. ITEM 61614 Follow all service instructions in addition to safely service the equipment or engine, have the problem corrected before performing any doubts about your ability to the regular checks and maintenance explained as a general guide. of engine Check engine oil level Check air cleaner Check sediment cup Change engine oil and oil filter Clean/replace air filter 1. Many maintenance...
... each piece of use Every 3 mo. Clean fuel tank, strainer and carburetor 4. ITEM 61614 Follow all service instructions in addition to safely service the equipment or engine, have the problem corrected before performing any doubts about your ability to the regular checks and maintenance explained as a general guide. of engine Check engine oil level Check air cleaner Check sediment cup Change engine oil and oil filter Clean/replace air filter 1. Many maintenance...
User Manual
Page 22
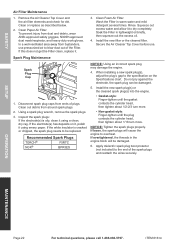
... tighten about 1/16 turn more. When installing a new spark plug(s), adjust the plug's gap to overheat. Clean or replace as described below. 2. Soak the Filter in warm water and mild detergent several times. Disconnect spark plug caps from bystanders, use . Remove the Air Cleaner Top Cover and the air filter elements and check for dirt. If the electrode(s) has deposits on the Specifications chart. If the...
... tighten about 1/16 turn more. When installing a new spark plug(s), adjust the plug's gap to overheat. Clean or replace as described below. 2. Soak the Filter in warm water and mild detergent several times. Disconnect spark plug caps from bystanders, use . Remove the Air Cleaner Top Cover and the air filter elements and check for dirt. If the electrode(s) has deposits on the Specifications chart. If the...
User Manual
Page 23
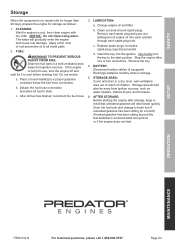
... engine oil into the ignition. FUEL: WARNING! b. Change engine oil and filter. Insert the key into each cylinder through each spark plug and pour one or two revolutions. Page 23 a. d. Remove the key. 4. SETUp OpERATION MAINTENANCE ITEM 61614 For technical questions, please call 1-888-866-5797. CLEANING: Wait for storage as water heaters, clothes dryers, and furnaces. 6. After all fuel to drain. b. Replace spark plugs, but leave spark plug...
... engine oil into the ignition. FUEL: WARNING! b. Change engine oil and filter. Insert the key into each cylinder through each spark plug and pour one or two revolutions. Page 23 a. d. Remove the key. 4. SETUp OpERATION MAINTENANCE ITEM 61614 For technical questions, please call 1-888-866-5797. CLEANING: Wait for storage as water heaters, clothes dryers, and furnaces. 6. After all fuel to drain. b. Replace spark plugs, but leave spark plug...

User Manual
Page 24
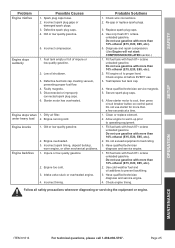
... spark plugs. 3. Crank engine a few times and try to start to air out the chambers. Have qualified technician adjust/ repair valves and tappets. Spark plug caps not connected securely. 2. Incorrect spark plug gaps. 4. Gently tap side of oil into each spark plug hole. Turn Choke to prime. 6. Replace Fuel Filter. COMPRESSION RELATED: 1. Follow all safety precautions whenever diagnosing or servicing the equipment or engine. Clogged Fuel Filter. Circuit breaker tripped. 6. Problem after long storage periods. 2. Do not use gasoline...
... spark plugs. 3. Crank engine a few times and try to start to air out the chambers. Have qualified technician adjust/ repair valves and tappets. Spark plug caps not connected securely. 2. Incorrect spark plug gaps. 4. Gently tap side of oil into each spark plug hole. Turn Choke to prime. 6. Replace Fuel Filter. COMPRESSION RELATED: 1. Follow all safety precautions whenever diagnosing or servicing the equipment or engine. Clogged Fuel Filter. Circuit breaker tripped. 6. Problem after long storage periods. 2. Do not use gasoline...
User Manual
Page 25
... connected spark plug caps. 6. under heavy load 2. Impure or low quality gasoline. 2. Do not use gasoline with fresh 87+ octane unleaded gasoline. Allow starter motor to operating equipment. 1. SAFETY SETUp problem Engine misfires possible Causes 1. Have qualified technician service magneto. 5. Allow engine to warm up prior to cool, then press circuit breaker button on control panel. Page 25 Defective fuel tank cap creating vacuum, preventing proper fuel flow. 4. Engine...
... connected spark plug caps. 6. under heavy load 2. Impure or low quality gasoline. 2. Do not use gasoline with fresh 87+ octane unleaded gasoline. Allow starter motor to operating equipment. 1. SAFETY SETUp problem Engine misfires possible Causes 1. Have qualified technician service magneto. 5. Allow engine to warm up prior to cool, then press circuit breaker button on control panel. Page 25 Defective fuel tank cap creating vacuum, preventing proper fuel flow. 4. Engine...
User Manual
Page 26
... emissions control parts defects, subject to a HFT warranty station as soon as the carburetor or fuel-injection system, and the ignition system. OpERATION MAINTENANCE Page 26 For technical questions, please call 1-888-866-5797. ITEM 61614 Emissions Control System Warranty United States Emissions Control Defects Warranty Statement The United States Environmental Protection Agency (herein EPA) and Harbor Freight Tools (herein HFT) are pleased to explain the emissions control system warranty on your engine...
... emissions control parts defects, subject to a HFT warranty station as soon as the carburetor or fuel-injection system, and the ignition system. OpERATION MAINTENANCE Page 26 For technical questions, please call 1-888-866-5797. ITEM 61614 Emissions Control System Warranty United States Emissions Control Defects Warranty Statement The United States Environmental Protection Agency (herein EPA) and Harbor Freight Tools (herein HFT) are pleased to explain the emissions control system warranty on your engine...
User Manual
Page 27
... damage to goods, loss of "repair or replace as outlined in the Inspection, Cleaning, and Maintenance section in the Owner's Manual ii) Air cleaner. 3) Ignition System i) Spark plugs. SETUp OpERATION MAINTENANCE pLEASE READ THE FOLLOWING CAREFULLY THE MANUFACTURER AND/OR DISTRIBUTOR HAS PROVIDED THE PARTS LIST AND ASSEMBLY DIAGRAM IN THIS MANUAL AS A REFERENCE TOOL ONLY. Service and Maintenance Defects Warranty provisions 1. ITEM 61614 For technical questions, please call...
... damage to goods, loss of "repair or replace as outlined in the Inspection, Cleaning, and Maintenance section in the Owner's Manual ii) Air cleaner. 3) Ignition System i) Spark plugs. SETUp OpERATION MAINTENANCE pLEASE READ THE FOLLOWING CAREFULLY THE MANUFACTURER AND/OR DISTRIBUTOR HAS PROVIDED THE PARTS LIST AND ASSEMBLY DIAGRAM IN THIS MANUAL AS A REFERENCE TOOL ONLY. Service and Maintenance Defects Warranty provisions 1. ITEM 61614 For technical questions, please call...
User Manual
Page 28
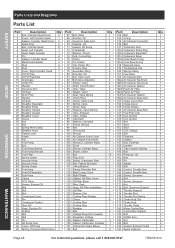
ITEM 61614 SAFETY SETUp parts Lists and Diagrams parts List part Description Qty part Description Qty part Description Qty 1 Bolt, Cylinder Head Cover 2 67 Ball, Steel 1 133 Bolt 1 2 Cover, Left Cylinder Head 1 68 Strainer, Oil 1 134 O-ring 1 3 Gasket, Cylinder Head Cover 2 69 Governor Gear Asm. 1 135 Air Cleaner Connector 1 4 Spark Plug 2 70 Dipstick, Oil 1 136 Bolt 4 5 Bolt, Cylinder Head 8 71 Gasket, Oil Pump 1 137 Carburetor Asm. 1 6 Head, Left...
ITEM 61614 SAFETY SETUp parts Lists and Diagrams parts List part Description Qty part Description Qty part Description Qty 1 Bolt, Cylinder Head Cover 2 67 Ball, Steel 1 133 Bolt 1 2 Cover, Left Cylinder Head 1 68 Strainer, Oil 1 134 O-ring 1 3 Gasket, Cylinder Head Cover 2 69 Governor Gear Asm. 1 135 Air Cleaner Connector 1 4 Spark Plug 2 70 Dipstick, Oil 1 136 Bolt 4 5 Bolt, Cylinder Head 8 71 Gasket, Oil Pump 1 137 Carburetor Asm. 1 6 Head, Left...


