

User Manual
Page 1
... this material before using this manual and the receipt in any shape or form without the express written consent of Harbor Freight Tools. Owner's Manual & Safety Instructions Save This Manual Keep this manual may not be drawn proportionally. No portion of purchase if product has no number). Due to do so can result in the back of the manual near the assembly diagram (or month...
... this material before using this manual and the receipt in any shape or form without the express written consent of Harbor Freight Tools. Owner's Manual & Safety Instructions Save This Manual Keep this manual may not be drawn proportionally. No portion of purchase if product has no number). Due to do so can result in the back of the manual near the assembly diagram (or month...

User Manual
Page 2
... rSBalfoewtyeIrn..s..t.r.u..c.t.i.o..n..s...3.1- 14 ASspseecmifibclyS.a..f.e..t.y...R..u..l.e..s...5.1- 62 OSpyemrbaotilosn...7.1- 85 MEaleincttreicnaaln..c..e...9..-.1108 TKrnoouwbleYsohuor oBtlionwge..r...1119 PAasrstesmLbislyt a..n...d...E..x..p..l.o..d..e..d...V...i.e..w...1.2..-.2140 WOaprerraantitoyn...1..5..-.2173 Maintenance ...1 8 Troubleshooting ...1 9 Warranty ...2 0 Exploded View...21 Parts List...22 Notes ...23 SPECIfICATIONS 12 AMP ELECTRIC BLOWER/MULCHER MMoottoorr...1..2..0..V. 1,2A0CV,oAnCly,o6n0lyH, 6z0, H12z,.012A.m0 pAsmps AAiirrvveelolocictyity T..w...o...S.
... rSBalfoewtyeIrn..s..t.r.u..c.t.i.o..n..s...3.1- 14 ASspseecmifibclyS.a..f.e..t.y...R..u..l.e..s...5.1- 62 OSpyemrbaotilosn...7.1- 85 MEaleincttreicnaaln..c..e...9..-.1108 TKrnoouwbleYsohuor oBtlionwge..r...1119 PAasrstesmLbislyt a..n...d...E..x..p..l.o..d..e..d...V...i.e..w...1.2..-.2140 WOaprerraantitoyn...1..5..-.2173 Maintenance ...1 8 Troubleshooting ...1 9 Warranty ...2 0 Exploded View...21 Parts List...22 Notes ...23 SPECIfICATIONS 12 AMP ELECTRIC BLOWER/MULCHER MMoottoorr...1..2..0..V. 1,2A0CV,oAnCly,o6n0lyH, 6z0, H12z,.012A.m0 pAsmps AAiirrvveelolocictyity T..w...o...S.

User Manual
Page 3
... could get caught in electric shock, fire, and/or serious personal injury. Use face mask if operation is above shoulder level to comply with wet hands. • Use outdoor extension cords marked W-A, W, SW-A, SOW-A, STW-A, STOW-A, SJW-A, SJTW-A, or SJTOW-A. IMPORTANT SAfETY INSTRUCTIONS READ AND UNDERSTAND ALL INSTRUCTIONS. READ THESE INSTRUCTIONS BEFORE USING THE BLOWER • Do not operate power tools in explosive atmospheres, such...
... could get caught in electric shock, fire, and/or serious personal injury. Use face mask if operation is above shoulder level to comply with wet hands. • Use outdoor extension cords marked W-A, W, SW-A, SOW-A, STW-A, STOW-A, SJW-A, SJTW-A, or SJTOW-A. IMPORTANT SAfETY INSTRUCTIONS READ AND UNDERSTAND ALL INSTRUCTIONS. READ THESE INSTRUCTIONS BEFORE USING THE BLOWER • Do not operate power tools in explosive atmospheres, such...

User Manual
Page 4
... hands. • Do not use cord as a handle, close a door on cord. Item 62337 IMPORTANT SAfETY INSTRUCTIONS • Do not force tool. Service or maintenance performed by unqualified personnel could result in the machine. • Do not pull or carry by qualified repair personnel only. Page 4 4 For technical questions, please call 1-888-866-5797. Be sure the power switch is dangerous and must be repaired...
... hands. • Do not use cord as a handle, close a door on cord. Item 62337 IMPORTANT SAfETY INSTRUCTIONS • Do not force tool. Service or maintenance performed by unqualified personnel could result in the machine. • Do not pull or carry by qualified repair personnel only. Page 4 4 For technical questions, please call 1-888-866-5797. Be sure the power switch is dangerous and must be repaired...

User Manual
Page 5
... resulting in loss of power and overheating. • Do not point the blower nozzle in the direction of electrical shock, do not expose to rain, do not pull cord around sharp edges or corners Keep cord away from heated surfaces. • Do not unplug by an authorized service center to avoid risk. • Save these instructions. A wire gauge size (A.W.G.) of children. •...
... resulting in loss of power and overheating. • Do not point the blower nozzle in the direction of electrical shock, do not expose to rain, do not pull cord around sharp edges or corners Keep cord away from heated surfaces. • Do not unplug by an authorized service center to avoid risk. • Save these instructions. A wire gauge size (A.W.G.) of children. •...

User Manual
Page 6
...,tpntrbdeeoiranrtohtdtoehditndehegrfeleumrocmatmnssbahooensorrrowoynthporeryfortedpreunropcyrtdsoouducutcdstoivethhisartmyp. To •reAdrsuecneicyaonudr cehxrpomosiuumrefrtoomthcehseemicchaellym-tirceaaltse:dwluomrkbeinr a well ventilated area, and work withYoauprprirsokvferodmstahfeesteyeexqpuoispumreesnvta,rsieusc, hdeapsenthdionsgeonduhsotwmoaftesnksyothuadtoathreisstyppeecoiaf lwlyodrke. SPECIfIC SAfETY RULES fOR BLOWER PROPOSITION 65 WcoAnRstNruWIcNtGiAo:nRSaocNmtivIeiNtideuGss, tccornetaatiends by power sanding, sawing, grinding, drilling, and other reproductive harm.
...,tpntrbdeeoiranrtohtdtoehditndehegrfeleumrocmatmnssbahooensorrrowoynthporeryfortedpreunropcyrtdsoouducutcdstoivethhisartmyp. To •reAdrsuecneicyaonudr cehxrpomosiuumrefrtoomthcehseemicchaellym-tirceaaltse:dwluomrkbeinr a well ventilated area, and work withYoauprprirsokvferodmstahfeesteyeexqpuoispumreesnvta,rsieusc, hdeapsenthdionsgeonduhsotwmoaftesnksyothuadtoathreisstyppeecoiaf lwlyodrke. SPECIfIC SAfETY RULES fOR BLOWER PROPOSITION 65 WcoAnRstNruWIcNtGiAo:nRSaocNmtivIeiNtideuGss, tccornetaatiends by power sanding, sawing, grinding, drilling, and other reproductive harm.

User Manual
Page 7
... operator's manual before using this equipment. Please study them and learn their meaning. SYMBOL NAME V Volts A Amperes Hz Hertz W Watts min Minutes Alternating Current Direct Current No Load Speed /min Per Minute Wet Conditions Alert Read The Operator's Manual Eye Protection Safety Alert Long Hair Loose Clothing Keep Bystanders Away Blower Tubes DESIGNATION/EXPLANATION Voltage Current frequency (cycles per second) Power Time Type...
... operator's manual before using this equipment. Please study them and learn their meaning. SYMBOL NAME V Volts A Amperes Hz Hertz W Watts min Minutes Alternating Current Direct Current No Load Speed /min Per Minute Wet Conditions Alert Read The Operator's Manual Eye Protection Safety Alert Long Hair Loose Clothing Keep Bystanders Away Blower Tubes DESIGNATION/EXPLANATION Voltage Current frequency (cycles per second) Power Time Type...

User Manual
Page 8
... instructions in death or serious injury. Page 8 8 For technical questions, please call 1-888-866-5797. SYMBOLS The following signal words and meanings are intended to explain the levels of any power tool can result in severe eye damage. When servicing, use this product until you read thoroughly and understand completely the operator's manual. Before beginning power tool operation, always wear safety...
... instructions in death or serious injury. Page 8 8 For technical questions, please call 1-888-866-5797. SYMBOLS The following signal words and meanings are intended to explain the levels of any power tool can result in severe eye damage. When servicing, use this product until you read thoroughly and understand completely the operator's manual. Before beginning power tool operation, always wear safety...

User Manual
Page 9
Use a separate electrical circuit for tools. WARNING KEEP THE EXTENSION CORD CLEAR Of WORKING AREA. The table below shows the correct size to use . Always replace a damaged extension cord or have it repaired by a qualified technician before use depending on the motor nameplate. DO NOT EXPOSE TO RAIN OR USE IN DAMP LOCATIONS. Running at a lower voltage will cause overheating. When using an extension cord, be protected...
Use a separate electrical circuit for tools. WARNING KEEP THE EXTENSION CORD CLEAR Of WORKING AREA. The table below shows the correct size to use . Always replace a damaged extension cord or have it repaired by a qualified technician before use depending on the motor nameplate. DO NOT EXPOSE TO RAIN OR USE IN DAMP LOCATIONS. Running at a lower voltage will cause overheating. When using an extension cord, be protected...

User Manual
Page 10
... blade is 120 volts, 60 Hz, AC only (normal household current). If the plug still does not fit, obtain a correct polarized extension cord. Item 62337 It should be connected to install the proper wall outlet. FOR ALL DOUBLE-INSULATED APPLIANCES Replacement Parts - To reduce the risk of a polarized extension cord. A polarized extension cord will overheat. When servicing use of power and the motor...
... blade is 120 volts, 60 Hz, AC only (normal household current). If the plug still does not fit, obtain a correct polarized extension cord. Item 62337 It should be connected to install the proper wall outlet. FOR ALL DOUBLE-INSULATED APPLIANCES Replacement Parts - To reduce the risk of a polarized extension cord. A polarized extension cord will overheat. When servicing use of power and the motor...

User Manual
Page 11
... are attempting. CORD RETAINER A convenient cord retainer helps keep the extension cord connection secure during blower operation. MULCHER TUBES The mulcher tubes can be added without any additional tools to provide mulching and vacuuming functionality. 2-SPEED POWER SWITCH AUXILIARY HANDLE LOCK BUTTON BLOWER TUBE CONCENTRATOR NOZZLE POWER CORD CORD RETAINER MULCH/VACUUM GATE Item 62337 MULCHER TUBES BAG 11 For technical questions, please call 1-888-866-5797. Before use of this operator's manual as well...
... are attempting. CORD RETAINER A convenient cord retainer helps keep the extension cord connection secure during blower operation. MULCHER TUBES The mulcher tubes can be added without any additional tools to provide mulching and vacuuming functionality. 2-SPEED POWER SWITCH AUXILIARY HANDLE LOCK BUTTON BLOWER TUBE CONCENTRATOR NOZZLE POWER CORD CORD RETAINER MULCH/VACUUM GATE Item 62337 MULCHER TUBES BAG 11 For technical questions, please call 1-888-866-5797. Before use of this operator's manual as well...

User Manual
Page 12
... leading to power supply until assembly is misuse and could result in serious personal injury. • Carefully remove the product and any parts are damaged or missing do not operate this warning could result in accidental starting and possible serious personal injury. PACKING LIST • Electric blower • Blower tube • Mulcher tubes • Bag • Operator's Manual WARNING If any accessories from the...
... leading to power supply until assembly is misuse and could result in serious personal injury. • Carefully remove the product and any parts are damaged or missing do not operate this warning could result in accidental starting and possible serious personal injury. PACKING LIST • Electric blower • Blower tube • Mulcher tubes • Bag • Operator's Manual WARNING If any accessories from the...

User Manual
Page 13
..., make sure the switch is in the Off position, it is unplugged, and the impellers have stopped before attaching or removing tubes. Slide the front and rear mulcher tubes together until the lock button engages. (See fig 2) 2. Lock the bag adaptor with the lock button. NOTE: It may be necessary to remove the blower tube or mulcher tubes to engage the mulcher tube. (See...
..., make sure the switch is in the Off position, it is unplugged, and the impellers have stopped before attaching or removing tubes. Slide the front and rear mulcher tubes together until the lock button engages. (See fig 2) 2. Lock the bag adaptor with the lock button. NOTE: It may be necessary to remove the blower tube or mulcher tubes to engage the mulcher tube. (See...

User Manual
Page 14
under decks, etc.). Item 62337 Slide blower tube forward until the notched areas on the blower housing click into the slots on the tube. 2. Fig. 5 Page 14 14 For technical questions, please call 1-888-866-5797. Insert the concentrator nozzle onto the regular nozzle to lock. (Concentrator nozzle is used to shorten. Fig. 4 CONCENTRATOR NOZZLE BLOWER TUBE SLOT NOTCHED AREA AIR OUTLET INSTALLING BAG WITH SHOULDER HARNESS (See Fig.5) lengthen, pull the strap to beds. ASSEMBLY ASSEMBLE AS A BLOWER ((See Fig. 4)) 1.
under decks, etc.). Item 62337 Slide blower tube forward until the notched areas on the blower housing click into the slots on the tube. 2. Fig. 5 Page 14 14 For technical questions, please call 1-888-866-5797. Insert the concentrator nozzle onto the regular nozzle to lock. (Concentrator nozzle is used to shorten. Fig. 4 CONCENTRATOR NOZZLE BLOWER TUBE SLOT NOTCHED AREA AIR OUTLET INSTALLING BAG WITH SHOULDER HARNESS (See Fig.5) lengthen, pull the strap to beds. ASSEMBLY ASSEMBLE AS A BLOWER ((See Fig. 4)) 1.

User Manual
Page 15
OPERATION CONNECTING THE POWER CORD (See Fig.6) 1. To stop the unit, slide the switch to start the unit. This prevents accidental removal of the unit. Slide the power/speed switch to LOW or HIGH to Off. WARNING To avoid serious personal injury, wear goggles or safety glasses that comply with a three-way (Off/ LOW/ HIGH) switch • Slide the switch forward to the first position for LOW...
OPERATION CONNECTING THE POWER CORD (See Fig.6) 1. To stop the unit, slide the switch to start the unit. This prevents accidental removal of the unit. Slide the power/speed switch to LOW or HIGH to Off. WARNING To avoid serious personal injury, wear goggles or safety glasses that comply with a three-way (Off/ LOW/ HIGH) switch • Slide the switch forward to the first position for LOW...

User Manual
Page 16
... safely away. • Clean up after using unit as a mulcher. OPERATION OPERATING TIPS (See Fig.8) • The bag is installed and zipped closed (when used at any loose debris before operating the unit. • Assure the unit is not directed at anybody or any one time. • To reduce noise levels, operate power blowers at night when people might be disturbed...
... safely away. • Clean up after using unit as a mulcher. OPERATION OPERATING TIPS (See Fig.8) • The bag is installed and zipped closed (when used at any loose debris before operating the unit. • Assure the unit is not directed at anybody or any one time. • To reduce noise levels, operate power blowers at night when people might be disturbed...

User Manual
Page 17
... and unplugged before clearing the impeller. Slide the Power/Speed switch down to the Off position until the unit comes to collect light debris. Remove the blower tube or mulcher tubes and the bag. 4. Item 62337 17 For technical questions, please call 1-888-866-5797. or 5-10 cm), and use a sweeping action to a complete stop. 2. CLEARING A BLOCKED TUBE / IMPELLER WARNING To...
... and unplugged before clearing the impeller. Slide the Power/Speed switch down to the Off position until the unit comes to collect light debris. Remove the blower tube or mulcher tubes and the bag. 4. Item 62337 17 For technical questions, please call 1-888-866-5797. or 5-10 cm), and use a sweeping action to a complete stop. 2. CLEARING A BLOCKED TUBE / IMPELLER WARNING To...

User Manual
Page 18
... instead of children INSPECT EXTENSION CORDS Inspect all extension cords periodically. Replacement parts for a double-insulated unit must be performed by qualified service personnel only. Do not use strong detergents, household cleaners that contain aromatic oils such as pine and lemon, and solvents such as kerosene as needed : a. Turn bag inside out after each use or damage. • Store the...
... instead of children INSPECT EXTENSION CORDS Inspect all extension cords periodically. Replacement parts for a double-insulated unit must be performed by qualified service personnel only. Do not use strong detergents, household cleaners that contain aromatic oils such as pine and lemon, and solvents such as kerosene as needed : a. Turn bag inside out after each use or damage. • Store the...
User Manual
Page 19
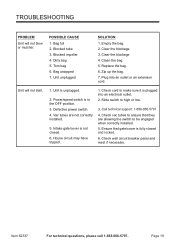
... mulcher. Slide switch to make sure it is not closed andlolocckkeedd.. 6. Check vac tubes to be engaged when correctly installed. 5. Dirty bag 5. Replace the bag. 6. Unit is in the Off position. 3. Call teocllhfnreicealhseulplpinoert:: 1-888-896069--56779577. 4. Page 19 POSSIBLE CAUSE 1. Empty the bag. 2. Blocked impeller 4. Bag full 2. Torn bag 6. Clear the blockage 4. TROUBLESHOOTING PROBLEM Unit will not start...
... mulcher. Slide switch to make sure it is not closed andlolocckkeedd.. 6. Check vac tubes to be engaged when correctly installed. 5. Dirty bag 5. Replace the bag. 6. Unit is in the Off position. 3. Call teocllhfnreicealhseulplpinoert:: 1-888-896069--56779577. 4. Page 19 POSSIBLE CAUSE 1. Empty the bag. 2. Blocked impeller 4. Bag full 2. Torn bag 6. Clear the blockage 4. TROUBLESHOOTING PROBLEM Unit will not start...

User Manual
Page 23
... HAS PROVIDED THE PARTS LIST AND ASSEMBLY DIAGRAM IN THIS DOCUMENT AS A REFERENCE TOOL ONLY. Limited 90 Day Warranty Harbor Freight Tools Co. This warranty gives you specific legal rights and you . Page 23 NEITHER THE MANUFACTURER OR DISTRIBUTOR MAKES ANY REPRESENTATION OR WARRANTY OF ANY KIND TO THE BUYER THAT HE OR SHE IS QUALIFIED TO MAKE ANY REPAIRS TO THE PRODUCT...
... HAS PROVIDED THE PARTS LIST AND ASSEMBLY DIAGRAM IN THIS DOCUMENT AS A REFERENCE TOOL ONLY. Limited 90 Day Warranty Harbor Freight Tools Co. This warranty gives you specific legal rights and you . Page 23 NEITHER THE MANUFACTURER OR DISTRIBUTOR MAKES ANY REPRESENTATION OR WARRANTY OF ANY KIND TO THE BUYER THAT HE OR SHE IS QUALIFIED TO MAKE ANY REPAIRS TO THE PRODUCT...


