
User Manual
Page 1
... the assembly diagram (or month and year of Harbor Freight Tools. REV 15d Visit our website at: http://www.harborfreight.com Email our technical support at: [email protected] When unpacking, make sure that the product is intact and undamaged. No portion of this manual and the receipt in serious injury. Tools required for future reference. Owner's Manual & Safety Instructions Save This Manual...
... the assembly diagram (or month and year of Harbor Freight Tools. REV 15d Visit our website at: http://www.harborfreight.com Email our technical support at: [email protected] When unpacking, make sure that the product is intact and undamaged. No portion of this manual and the receipt in serious injury. Tools required for future reference. Owner's Manual & Safety Instructions Save This Manual...

User Manual
Page 2
... be supplied by the operator that common sense and caution are prepared to potential personal injury hazards. Wash hands after handling. (California Health & Safety Code § 25249.5, et seq.) Page 2 For technical questions, please call 1-888-866-5797. SAFETY Table of Contents Safety 2 Specifications 7 Controls 8 Basic Welding 10 Welding Tips 15 Maintenance and Service 19 Parts Lists and Diagrams 20 Warranty 27 WARNING SYMBOLS AND...
... be supplied by the operator that common sense and caution are prepared to potential personal injury hazards. Wash hands after handling. (California Health & Safety Code § 25249.5, et seq.) Page 2 For technical questions, please call 1-888-866-5797. SAFETY Table of Contents Safety 2 Specifications 7 Controls 8 Basic Welding 10 Welding Tips 15 Maintenance and Service 19 Parts Lists and Diagrams 20 Warranty 27 WARNING SYMBOLS AND...

User Manual
Page 3
... lung cancer. Arc Ray Safety ARC RAYS can catch and hold molten metal or sparks. 4. Use enough ventilation, exhaust at least a number 10 shade lens rating. 2. Wear an approved welding jacket or long sleeves to protect the head and neck. Keep clothing free of Governmental Industrial Hygienists recommendations for Threshold Limit Values (TLV's) for the specific welding situation...
... lung cancer. Arc Ray Safety ARC RAYS can catch and hold molten metal or sparks. 4. Use enough ventilation, exhaust at least a number 10 shade lens rating. 2. Wear an approved welding jacket or long sleeves to protect the head and neck. Keep clothing free of Governmental Industrial Hygienists recommendations for Threshold Limit Values (TLV's) for the specific welding situation...
User Manual
Page 4
... from heat, oil, sharp edges or moving the combustibles to serve as in containers holding combustible materials. 4. CONTROLS BASIC WELDING WELDING TIPS Fire Safety ARC AND SLAG can KILL. 1. If relocation of obstructions, grease, oil, trash, and other openings. 2. Do not operate welders in close proximity to ground before setting down torch/electrode holder and before use the cord for eliminating...
... from heat, oil, sharp edges or moving the combustibles to serve as in containers holding combustible materials. 4. CONTROLS BASIC WELDING WELDING TIPS Fire Safety ARC AND SLAG can KILL. 1. If relocation of obstructions, grease, oil, trash, and other openings. 2. Do not operate welders in close proximity to ground before setting down torch/electrode holder and before use the cord for eliminating...

User Manual
Page 5
... Welder from any inspection, maintenance, or cleaning procedures. Do not weld on the Welder. SAVE THESE INSTRUCTIONS. Welders are caused by a qualified repair person using only identical replacement parts. Check for operations different from heat, being struck, physical damage, slag, flames, sparks, and arcs. 7. If unreadable or missing, contact Harbor Freight Tools for the type of welding you will ensure that have the welder repaired before any electrical...
... Welder from any inspection, maintenance, or cleaning procedures. Do not weld on the Welder. SAVE THESE INSTRUCTIONS. Welders are caused by a qualified repair person using only identical replacement parts. Check for operations different from heat, being struck, physical damage, slag, flames, sparks, and arcs. 7. If unreadable or missing, contact Harbor Freight Tools for the type of welding you will ensure that have the welder repaired before any electrical...

User Manual
Page 6
... do not use the welder if the power cord or plug is connected to penetrate the insulation, resulting in electric shock. Do not patch cords of any way. and after reconnection, the tool should comply with all relevant electrical codes and standards before use on a different type of the following UL-listed, 3 wire cords as a replacement cord for this welder. 3. Item 62486 The green wire in the cord must be...
... do not use the welder if the power cord or plug is connected to penetrate the insulation, resulting in electric shock. Do not patch cords of any way. and after reconnection, the tool should comply with all relevant electrical codes and standards before use on a different type of the following UL-listed, 3 wire cords as a replacement cord for this welder. 3. Item 62486 The green wire in the cord must be...
User Manual
Page 7
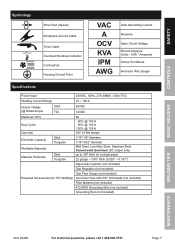
Page 7 SAFETY CONTROLS Symbology Wire Feed (Speed) Workpiece Ground Cable Torch Cable Overheat Shutdown Indicator Cooling Fan Housing Ground Point VAC A OCV KVA IPM AWG Volts Alternating Current Amperes Open Circuit Voltage Kilovolt Amperes (Volts / 1000 * Amperes) Inches Per Minute American Wire Gauge Specifications Power Input 240VAC, 60Hz, 27A (MMA) / 20A (TIG) Welding Current Range 10 ~ 165 A Output Voltage (@ Rated Amps) Stick TIG 26VDC...
Page 7 SAFETY CONTROLS Symbology Wire Feed (Speed) Workpiece Ground Cable Torch Cable Overheat Shutdown Indicator Cooling Fan Housing Ground Point VAC A OCV KVA IPM AWG Volts Alternating Current Amperes Open Circuit Voltage Kilovolt Amperes (Volts / 1000 * Amperes) Inches Per Minute American Wire Gauge Specifications Power Input 240VAC, 60Hz, 27A (MMA) / 20A (TIG) Welding Current Range 10 ~ 165 A Output Voltage (@ Rated Amps) Stick TIG 26VDC...

User Manual
Page 8
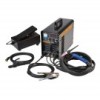
... INJURY FROM ACCIDENTAL OPERATION: Turn the Power Switch off and unplug the welder before set up or use of this product. Item 62486 SAFETY CONTROLS Controls Read the ENTIRE IMPORTANT SAFETY INFORMATION section at the beginning of this manual including all text under subheadings therein before assembly. Components and Controls Digital Display Power Switch Gas Post Flow Delay Switch Stick/TIG Switch Current Output Knob Ground Cable Connection...
... INJURY FROM ACCIDENTAL OPERATION: Turn the Power Switch off and unplug the welder before set up or use of this product. Item 62486 SAFETY CONTROLS Controls Read the ENTIRE IMPORTANT SAFETY INFORMATION section at the beginning of this manual including all text under subheadings therein before assembly. Components and Controls Digital Display Power Switch Gas Post Flow Delay Switch Stick/TIG Switch Current Output Knob Ground Cable Connection...

User Manual
Page 9
... 0 amps until welding begins. 4. Creates welding puddle and adds shielding gas, but not included) - Ground Clamp - Stick/TIG Switch: Switch to top for Stick welding. 3. Electrode Holder/TIG Torch Connection: Connects either TIG Torch or Electrode Holder Cable to bottom for TIG welding, to Welder. 4. Trigger: Turns arc on . 7. Filler Rod (required, but does not add filler material. Note: When foot pedal is released. 8. Power Switch: Powers the Welder. TIG...
... 0 amps until welding begins. 4. Creates welding puddle and adds shielding gas, but not included) - Ground Clamp - Stick/TIG Switch: Switch to top for Stick welding. 3. Electrode Holder/TIG Torch Connection: Connects either TIG Torch or Electrode Holder Cable to bottom for TIG welding, to Welder. 4. Trigger: Turns arc on . 7. Filler Rod (required, but does not add filler material. Note: When foot pedal is released. 8. Power Switch: Powers the Welder. TIG...

User Manual
Page 10
...62486 MAINTENANCE Failure to hold the workpieces in welding. Chamfer thick workpieces. 1. For example, this sort of the ground clamp while allowing the welder to premature welder failure. Make practice welds on pieces of scrap the same thickness as a concrete slab, well clear of over ‑stress a welder's power generation system contributing to cool with the Power Switch... help prevent this Welder with a wire brush or angle grinder; Do not breathe arc fumes. 1. Connect a #12 AWG ground wire (not included) to the Ground Post on an electrically non-conductive, heat...
...62486 MAINTENANCE Failure to hold the workpieces in welding. Chamfer thick workpieces. 1. For example, this sort of the ground clamp while allowing the welder to premature welder failure. Make practice welds on pieces of scrap the same thickness as a concrete slab, well clear of over ‑stress a welder's power generation system contributing to cool with the Power Switch... help prevent this Welder with a wire brush or angle grinder; Do not breathe arc fumes. 1. Connect a #12 AWG ground wire (not included) to the Ground Post on an electrically non-conductive, heat...

User Manual
Page 11
... tool from the workpiece and turn the Welder on . 7. Allow the tool to lock in place. Connect the cable of the Electrode Holder. Welding electrode types vary for igniting the arc: a. To prevent serious injury and death: If the operator is turned on . When finished welding; Only plug the ground clamp into a grounded 240V electric socket and turn the Welder off. 10. Plug the power cord...
... tool from the workpiece and turn the Welder on . 7. Allow the tool to lock in place. Connect the cable of the Electrode Holder. Welding electrode types vary for igniting the arc: a. To prevent serious injury and death: If the operator is turned on . When finished welding; Only plug the ground clamp into a grounded 240V electric socket and turn the Welder off. 10. Plug the power cord...

User Manual
Page 12
... the grinding wheel at an angle. If Electrode has dulled or been otherwise contaminated, use pliers or a suitable tool to grip the Electrode above the contaminated section and snap off the welder and wait until a blunt point is required to shielding gas requirements for weld-piece material thickness (see Settings Chart). Wear a respirator and ANSI-approved safety goggles...
... the grinding wheel at an angle. If Electrode has dulled or been otherwise contaminated, use pliers or a suitable tool to grip the Electrode above the contaminated section and snap off the welder and wait until a blunt point is required to shielding gas requirements for weld-piece material thickness (see Settings Chart). Wear a respirator and ANSI-approved safety goggles...
User Manual
Page 13
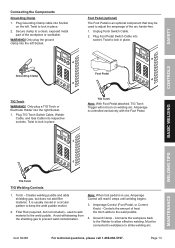
... a TIG Torch or Electrode Holder into socket. Foot Pedal TIG Torch Note: With Foot Pedal attached, TIG Torch Trigger will read 0 amps until welding begins. 3. It is in use, Amperage Control will not turn on the left Socket. Amperage Control (Foot Pedal, or Current Knob) - Ground Clamp - SAFETY CONTROLS Connecting the Components Grounding Clamp 1. WARNING! Unplug Torch Switch Cable. 2. Plug TIG Torch Switch Cable, Welder Cable...
... a TIG Torch or Electrode Holder into socket. Foot Pedal TIG Torch Note: With Foot Pedal attached, TIG Torch Trigger will read 0 amps until welding begins. 3. It is in use, Amperage Control will not turn on the left Socket. Amperage Control (Foot Pedal, or Current Knob) - Ground Clamp - SAFETY CONTROLS Connecting the Components Grounding Clamp 1. WARNING! Unplug Torch Switch Cable. 2. Plug TIG Torch Switch Cable, Welder Cable...

User Manual
Page 14
.... Item 62486 If Foot Pedal is advanced, but keep Torch on , and the welder will immediately turn the Power Switch off until gas flow ends. Use a wire brush to help prevent needless wear. 13. The Gas Post Flow Delay Switch controls how long the shielding gas flows after the Trigger is not holding the Torch, it to Weld Grounding Clamp TIG Torch...
.... Item 62486 If Foot Pedal is advanced, but keep Torch on , and the welder will immediately turn the Power Switch off until gas flow ends. Use a wire brush to help prevent needless wear. 13. The Gas Post Flow Delay Switch controls how long the shielding gas flows after the Trigger is not holding the Torch, it to Weld Grounding Clamp TIG Torch...
User Manual
Page 15
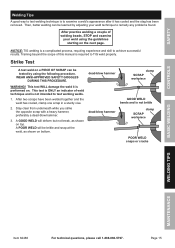
..., STOP and examine your weld technique to test working welds. 1. After practice welding a couple of weld technique and is not brittle clamp SCRAP workpiece POOR WELD snaps or cracks BASIC WELDING WELDING TIPS MAINTENANCE Item 62486 For technical questions, please call 1-888-866-5797. NOTICE: TIG welding is performed on top. Strike Test A test weld on a PIECE...
..., STOP and examine your weld technique to test working welds. 1. After practice welding a couple of weld technique and is not brittle clamp SCRAP workpiece POOR WELD snaps or cracks BASIC WELDING WELDING TIPS MAINTENANCE Item 62486 For technical questions, please call 1-888-866-5797. NOTICE: TIG welding is performed on top. Strike Test A test weld on a PIECE...

User Manual
Page 17
... TIPS MAINTENANCE Item 62486 For technical questions, please call 1-888-866-5797. Workpiece overheating: Reduce current. 2. Welding speed too slow: Increase welding speed and ensure that welding speed is visible underneath and bulges slightly on the surface. Incorrect welding technique: Keep arc on top and underneath or falls through entirely, making a hole. Adjust workpiece position or weld angle...
... TIPS MAINTENANCE Item 62486 For technical questions, please call 1-888-866-5797. Workpiece overheating: Reduce current. 2. Welding speed too slow: Increase welding speed and ensure that welding speed is visible underneath and bulges slightly on the surface. Incorrect welding technique: Keep arc on top and underneath or falls through entirely, making a hole. Adjust workpiece position or weld angle...

User Manual
Page 18
... certain that fill material and electrode are clean and free from impurities. BASIC WELDING WELDING TIPS MAINTENANCE Page 18 For technical questions, please call 1-888-866-5797. Item 62486 Clean off the slag with the Chipping Hammer and Wire Brush after welding. Spatter that welding speed is a necessary part of fill material. Dirty workpiece or fill material: Clean...
... certain that fill material and electrode are clean and free from impurities. BASIC WELDING WELDING TIPS MAINTENANCE Page 18 For technical questions, please call 1-888-866-5797. Item 62486 Clean off the slag with the Chipping Hammer and Wire Brush after welding. Spatter that welding speed is a necessary part of fill material. Dirty workpiece or fill material: Clean...

User Manual
Page 19
... connections are tight. 2. Troubleshooting IMPORTANT! WELDING TIPS MAINTENANCE Item 62486 For technical questions, please call 1-888-866-5797. Qualified technician must check and secure/replace Trigger. 3. SAFETY CONTROLS BASIC WELDING Maintenance and Service TO PREVENT SERIOUS INJURY, FIRE AND BURNS: Unplug the Welder, rest the tool on a heat-proof, electrically non-conductive surface, and allow all parts of Use) on page 10. 2. Faulty...
... connections are tight. 2. Troubleshooting IMPORTANT! WELDING TIPS MAINTENANCE Item 62486 For technical questions, please call 1-888-866-5797. Qualified technician must check and secure/replace Trigger. 3. SAFETY CONTROLS BASIC WELDING Maintenance and Service TO PREVENT SERIOUS INJURY, FIRE AND BURNS: Unplug the Welder, rest the tool on a heat-proof, electrically non-conductive surface, and allow all parts of Use) on page 10. 2. Faulty...

User Manual
Page 20
Parts List and Part Description Qty Part Description Qty 1 Handle 1 22 Solenoid Valve 1 2 Top-Housing 1 23 Temperature Protector Shield 1 3 Ground Clamp Subassembly 1 24 Supporting Foot 4 4 Electrode Holder Subassembly 1 25 Fan 1 5 Temperature Protector 1 26 Power Cord 1 6 Digital Display 1 27 Locator 1 7 LED Cover 2 28 Air Interface 1 8 Switch 1 29 Rectifying Tube Radiator 1 9 Potentiometer 1 30 Fan Hood 1 10 Amperage Control 1 31 Radiator Support Bar 1 11 Type Switch 2 32 Grommet 1 12 Switch Support Bar...
Parts List and Part Description Qty Part Description Qty 1 Handle 1 22 Solenoid Valve 1 2 Top-Housing 1 23 Temperature Protector Shield 1 3 Ground Clamp Subassembly 1 24 Supporting Foot 4 4 Electrode Holder Subassembly 1 25 Fan 1 5 Temperature Protector 1 26 Power Cord 1 6 Digital Display 1 27 Locator 1 7 LED Cover 2 28 Air Interface 1 8 Switch 1 29 Rectifying Tube Radiator 1 9 Potentiometer 1 30 Fan Hood 1 10 Amperage Control 1 31 Radiator Support Bar 1 11 Type Switch 2 32 Grommet 1 12 Switch Support Bar...

User Manual
Page 27
... WELDING WELDING TIPS MAINTENANCE Item 62486 For technical questions, please call 1-888-866-5797. SAFETY Limited 90 Day Warranty Harbor Freight Tools Co. To take advantage of this product is no event be returned to persons or property, or for death, injuries to us with a replacement. If our inspection verifies the defect, we will return repaired products at our...
... WELDING WELDING TIPS MAINTENANCE Item 62486 For technical questions, please call 1-888-866-5797. SAFETY Limited 90 Day Warranty Harbor Freight Tools Co. To take advantage of this product is no event be returned to persons or property, or for death, injuries to us with a replacement. If our inspection verifies the defect, we will return repaired products at our...


