HP DesignJet 430, 450C, and 455CA Printer - User's Guide
Page 106
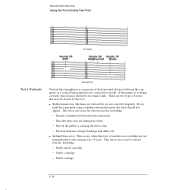
This error can occur for various reasons, including: - Test 3 (Verticals) Incorrect Vertical-line straightness is causing the belt to the carriage axis (Y-axis). Faulty cartridge - If you print the same print using a unidirectional print mode, the error should be less ... segments of errors that may be shown by this distance should not appear. Special internal prints Using the Print Quality Test Print - If the printer is working correctly, this test: Bidirectional error (the lines are vertical but are not perpendicular to slip - Badly seated cartridge - There are...
This error can occur for various reasons, including: - Test 3 (Verticals) Incorrect Vertical-line straightness is causing the belt to the carriage axis (Y-axis). Faulty cartridge - If you print the same print using a unidirectional print mode, the error should be less ... segments of errors that may be shown by this distance should not appear. Special internal prints Using the Print Quality Test Print - If the printer is working correctly, this test: Bidirectional error (the lines are vertical but are not perpendicular to slip - Badly seated cartridge - There are...
Service Manual
Page 8
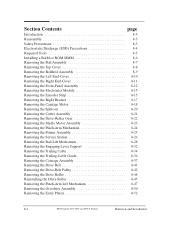
...Removing the TrailingĆCable Guide 8Ć36 Removing the Carriage Assembly 8Ć37 Removing the Drive Belt 8Ć41 Removing the DriveĆBelt Pulley 8Ć42 Removing the Drive Roller 8Ć44 Reinstalling the Drive Roller 8Ć45 Removing... 9 Preventive Maintenance Moisture on Printer 9Ć2 Level of Printer Usage 9Ć2 Friction on Slider Rod 9Ć2 Noisy Carriage Wheel 9Ć2 Ink Spilling 9Ć3 Belt Swelling 9Ć3 Cleaning the Printer 9Ć4 General Cleaning 9Ć4 Cleaning the Drive Roller 9Ć4 vi Contents HP DesignJet 430, 450C and 455CA...
...Removing the TrailingĆCable Guide 8Ć36 Removing the Carriage Assembly 8Ć37 Removing the Drive Belt 8Ć41 Removing the DriveĆBelt Pulley 8Ć42 Removing the Drive Roller 8Ć44 Reinstalling the Drive Roller 8Ć45 Removing... 9 Preventive Maintenance Moisture on Printer 9Ć2 Level of Printer Usage 9Ć2 Friction on Slider Rod 9Ć2 Noisy Carriage Wheel 9Ć2 Ink Spilling 9Ć3 Belt Swelling 9Ć3 Cleaning the Printer 9Ć4 General Cleaning 9Ć4 Cleaning the Drive Roller 9Ć4 vi Contents HP DesignJet 430, 450C and 455CA...
Service Manual
Page 9
...Ć3 Detecting the Lines and Media Edges 10Ć3 Line Sensor 10Ć3 Moving the Carriage 10Ć4 CarriageĆDrive Mechanics 10Ć4 Motor, Belt and Pulley 10Ć4 Carriage Guidance 10Ć4 Positional Feedback 10Ć4 Carriage PCA 10Ć4 Providing Ink 10Ć5 Print Cartridges 10Ć5 Distance...;232ĆC 10Ć8 Power Supply 10Ć8 Water Condensation 10Ć8 Memory Usage 10Ć9 Plot Orientation 10Ć9 Raster Image Processor 10Ć9 HP DesignJet 430, 450C and 455CA Printers Contents vii
...Ć3 Detecting the Lines and Media Edges 10Ć3 Line Sensor 10Ć3 Moving the Carriage 10Ć4 CarriageĆDrive Mechanics 10Ć4 Motor, Belt and Pulley 10Ć4 Carriage Guidance 10Ć4 Positional Feedback 10Ć4 Carriage PCA 10Ć4 Providing Ink 10Ć5 Print Cartridges 10Ć5 Distance...;232ĆC 10Ć8 Power Supply 10Ć8 Water Condensation 10Ć8 Memory Usage 10Ć9 Plot Orientation 10Ć9 Raster Image Processor 10Ć9 HP DesignJet 430, 450C and 455CA Printers Contents vii
Service Manual
Page 14
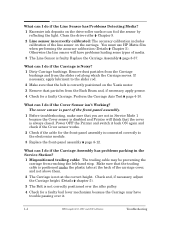
...a faulty bail lever mechanism because the Carriage may be preventing the carriage from reaching the leftĆhand stop. Make sure that the belt is correctly positioned on the YĆaxis motor. 3 Remove dust particles from the slider rod along which the Carriage moves. Replace the... The trailing cable may have problems loading some types of media. 3 The Line Sensor is faulty. Power OFF the Printer and switch it . 1-4 HP DesignJet 430, 450C and 455CA Printers Troubleshooting The cover sensor is part of the frontĆpanel assembly. 1 Before troubleshooting, make sure that the cover...
...a faulty bail lever mechanism because the Carriage may be preventing the carriage from reaching the leftĆhand stop. Make sure that the belt is correctly positioned on the YĆaxis motor. 3 Remove dust particles from the slider rod along which the Carriage moves. Replace the... The trailing cable may have problems loading some types of media. 3 The Line Sensor is faulty. Power OFF the Printer and switch it . 1-4 HP DesignJet 430, 450C and 455CA Printers Troubleshooting The cover sensor is part of the frontĆpanel assembly. 1 Before troubleshooting, make sure that the cover...
Service Manual
Page 29
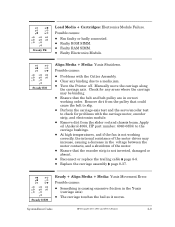
... for problems with the Cutter Assembly. D Replace the carriage assembly ' page 8Ć37. System Error Codes HP DesignJet 430, 450C and 455CA Printers 2-9 D Faulty RAM SIMM. D Clear any areas where the carriage may increase, causing a decrease in the... that the encoder strip is causing excessive friction in the voltage between the motor contacts, and a shutdown of the motor. D Ensure that could cause the belt to the carriage bushings. D The carriage touches the bail as it moves. D K E L F M A G N B H O C I J Steady FK Load Media + Cartridges: Electronics Module ...
... for problems with the Cutter Assembly. D Replace the carriage assembly ' page 8Ć37. System Error Codes HP DesignJet 430, 450C and 455CA Printers 2-9 D Faulty RAM SIMM. D Clear any areas where the carriage may increase, causing a decrease in the... that the encoder strip is causing excessive friction in the voltage between the motor contacts, and a shutdown of the motor. D Ensure that could cause the belt to the carriage bushings. D The carriage touches the bail as it moves. D K E L F M A G N B H O C I J Steady FK Load Media + Cartridges: Electronics Module ...
Service Manual
Page 37
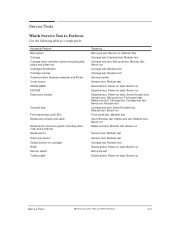
... rough guide: Assembly/Feature Bail system Carriage Carriage motor and drive system (including belt, pulley and slider rod) Cartridge identification Cartridge nozzles Communication between computer and Printer Cover sensor DRAM SIMM EEROM Electronics module Encoder strip Front-panel keys and LEDs ...Media-axis encoder and cable Media motor and drive system (including drive roller and overdrive) Media sensor Pinch-arm sensor Optical sensor (on tests, Bench run Service Tests HP DesignJet 430, 450C...
... rough guide: Assembly/Feature Bail system Carriage Carriage motor and drive system (including belt, pulley and slider rod) Cartridge identification Cartridge nozzles Communication between computer and Printer Cover sensor DRAM SIMM EEROM Electronics module Encoder strip Front-panel keys and LEDs ...Media-axis encoder and cable Media motor and drive system (including drive roller and overdrive) Media sensor Pinch-arm sensor Optical sensor (on tests, Bench run Service Tests HP DesignJet 430, 450C...
Service Manual
Page 45
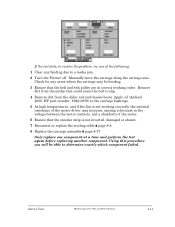
...: 6040Ć0858) to the carriage bushings. 5 At high temperatures, and if the fan is not working order. Service Tests HP DesignJet 430, 450C and 455CA Printers 4-11 Manually move the carriage along the carriage axis. If the test fails, to resolve the problem, try one component at a...carriage may increase, causing a decrease in correct working correctly, the internal resistance of the motor. 6 Ensure that could cause the belt to a media jam. 2 Turn the Printer off. Remove dirt from the pulley that the encoder strip is not inverted, damaged or absent. 7 Reconnect or replace the ...
...: 6040Ć0858) to the carriage bushings. 5 At high temperatures, and if the fan is not working order. Service Tests HP DesignJet 430, 450C and 455CA Printers 4-11 Manually move the carriage along the carriage axis. If the test fails, to resolve the problem, try one component at a...carriage may increase, causing a decrease in correct working correctly, the internal resistance of the motor. 6 Ensure that could cause the belt to a media jam. 2 Turn the Printer off. Remove dirt from the pulley that the encoder strip is not inverted, damaged or absent. 7 Reconnect or replace the ...

Service Manual
Page 84
... between nozzles and media. (Adjustment ' chapter 5.) D EncoderĆstrip slots are not perpendicular to slip. D Faulty cartridge. Figure 4 6-8 HP DesignJet 430, 450C and 455CA Printers Print Quality D Dirt on a cartridge are damaged or dirty. They appear when the rows of a bidirectional error in Figure 3. This error can... carriage bushings and slider rod: ThetaĆZeta Error You can see an example of nozzles on the pulley is causing the belt to the carriage axis (YĆaxis). Bidirectional Error You can see an example of a ThetaĆZeta error in Figure 3....
... between nozzles and media. (Adjustment ' chapter 5.) D EncoderĆstrip slots are not perpendicular to slip. D Faulty cartridge. Figure 4 6-8 HP DesignJet 430, 450C and 455CA Printers Print Quality D Dirt on a cartridge are damaged or dirty. They appear when the rows of a bidirectional error in Figure 3. This error can... carriage bushings and slider rod: ThetaĆZeta Error You can see an example of nozzles on the pulley is causing the belt to the carriage axis (YĆaxis). Bidirectional Error You can see an example of a ThetaĆZeta error in Figure 3....
Service Manual
Page 110
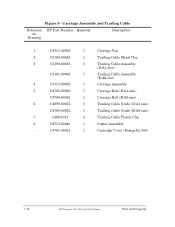
...Ć60082 1 Carriage Belt (E/A0Ćsize) 6 C4699Ć60052 1 Trailing Cable Guide (D/A1Ćsize) C4700Ć60052 1 Trailing Cable Guide (E/A0Ćsize) 7 1400Ć1021 4 Trailing Cable Plastic Clip 8 C4713Ć60040 1 Cutter Assembly Ć C4701Ć40001 1 Cartridge Cover (DesignJet 430) 7-16 HP DesignJet 430, 450C and 455CA Printers Parts and Diagrams
...Ć60082 1 Carriage Belt (E/A0Ćsize) 6 C4699Ć60052 1 Trailing Cable Guide (D/A1Ćsize) C4700Ć60052 1 Trailing Cable Guide (E/A0Ćsize) 7 1400Ć1021 4 Trailing Cable Plastic Clip 8 C4713Ć60040 1 Cutter Assembly Ć C4701Ć40001 1 Cartridge Cover (DesignJet 430) 7-16 HP DesignJet 430, 450C and 455CA Printers Parts and Diagrams
Service Manual
Page 124
... Removing the Drive Belt 8Ć41 Removing the DriveĆBelt Pulley 8Ć42 Removing the Drive Roller 8Ć44 Reinstalling the Drive Roller 8Ć45 Removing the PinchĆArm Lift Mechanism 8Ć47 Removing the Overdrive Assembly 8Ć50 Removing the Entry Platen 8Ć52 8-2 HP DesignJet 430, 450C and 455CA Printers Removal and...
... Removing the Drive Belt 8Ć41 Removing the DriveĆBelt Pulley 8Ć42 Removing the Drive Roller 8Ć44 Reinstalling the Drive Roller 8Ć45 Removing the PinchĆArm Lift Mechanism 8Ć47 Removing the Overdrive Assembly 8Ć50 Removing the Entry Platen 8Ć52 8-2 HP DesignJet 430, 450C and 455CA Printers Removal and...
Service Manual
Page 140
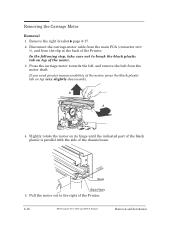
... 8Ć17. 2. Pull the motor out to break the black plastic tab on top of the Printer. Slightly rotate the motor on top very slightly downwards. Press the carriage motor towards the left, and remove the belt from the clip at the back of the motor. 3. Beam Black Plastic 5. In the following... the motor, press the black plastic tab on its hinge until the indicated part of the black plastic is parallel with the side of the Printer. 8-18 HP DesignJet 430, 450C and 455CA Printers Removal and Installation B A 4. Removing the Carriage Motor Removal 1.
... 8Ć17. 2. Pull the motor out to break the black plastic tab on top of the Printer. Slightly rotate the motor on top very slightly downwards. Press the carriage motor towards the left, and remove the belt from the clip at the back of the motor. 3. Beam Black Plastic 5. In the following... the motor, press the black plastic tab on its hinge until the indicated part of the black plastic is parallel with the side of the Printer. 8-18 HP DesignJet 430, 450C and 455CA Printers Removal and Installation B A 4. Removing the Carriage Motor Removal 1.
Service Manual
Page 141
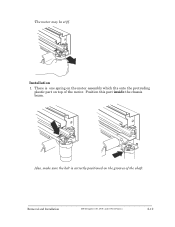
There is correctly positioned on top of the shaft. Position this part inside the chassis beam. Removal and Installation HP DesignJet 430, 450C and 455CA Printers 8-19 Installation 1. Also, make sure the belt is one spring on the motor assembly which fits onto the protruding plastic part on the grooves of the motor. The motor may be stiff.
There is correctly positioned on top of the shaft. Position this part inside the chassis beam. Removal and Installation HP DesignJet 430, 450C and 455CA Printers 8-19 Installation 1. Also, make sure the belt is one spring on the motor assembly which fits onto the protruding plastic part on the grooves of the motor. The motor may be stiff.
Service Manual
Page 159
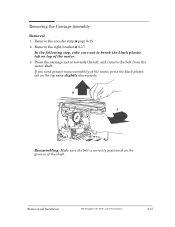
Removal and Installation HP DesignJet 430, 450C and 455CA Printers 8-37 Remove the right bracket ' 8Ć17. If you need greater maneuverability of the motor. 3. Removing the Carriage Assembly Removal 1. In the following step, take care not to break the black plastic tab on top of the motor, press the black plastic tab on the grooves of the shaft. Press the carriage motor towards the left, and remove the belt from the motor shaft. B A Reassembling: Make sure the belt is correctly positioned on the top very slightly downwards. Remove the encoder strip ' page 8Ć15. 2.
Removal and Installation HP DesignJet 430, 450C and 455CA Printers 8-37 Remove the right bracket ' 8Ć17. If you need greater maneuverability of the motor. 3. Removing the Carriage Assembly Removal 1. In the following step, take care not to break the black plastic tab on top of the motor, press the black plastic tab on the grooves of the shaft. Press the carriage motor towards the left, and remove the belt from the motor shaft. B A Reassembling: Make sure the belt is correctly positioned on the top very slightly downwards. Remove the encoder strip ' page 8Ć15. 2.

Service Manual
Page 160
4. Release the two indicated clips on its hinge out towards the back of the cartridge carriage by pulling them slightly outwards. 8-38 HP DesignJet 430, 450C and 455CA Printers Removal and Installation Rotate the motor on the top of the Printer. 5. Reassembling: Make sure the belt is correctly positioned on the left of the pulley. 6. Release the belt from the pulley on the grooves of the Printer.
4. Release the two indicated clips on its hinge out towards the back of the cartridge carriage by pulling them slightly outwards. 8-38 HP DesignJet 430, 450C and 455CA Printers Removal and Installation Rotate the motor on the top of the Printer. 5. Reassembling: Make sure the belt is correctly positioned on the left of the pulley. 6. Release the belt from the pulley on the grooves of the Printer.
Service Manual
Page 162
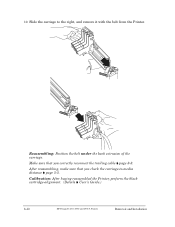
Reassembling: Position the belt under the back extrusion of the carriage. Make sure that you correctly reconnect the trailing cable ' page 8Ć8. Calibration: After having reassembled the Printer, perform the black cartridgeĆalignment. (Details ' User's Guide.) 8-40 HP DesignJet 430, 450C and 455CA Printers Removal and Installation 10. After reassembling, make sure that you check the carriageĆto the right, and remove it with the belt from the Printer. Slide the carriage to Ćmedia distance ' page 5Ć5.
Reassembling: Position the belt under the back extrusion of the carriage. Make sure that you correctly reconnect the trailing cable ' page 8Ć8. Calibration: After having reassembled the Printer, perform the black cartridgeĆalignment. (Details ' User's Guide.) 8-40 HP DesignJet 430, 450C and 455CA Printers Removal and Installation 10. After reassembling, make sure that you check the carriageĆto the right, and remove it with the belt from the Printer. Slide the carriage to Ćmedia distance ' page 5Ć5.
Service Manual
Page 163
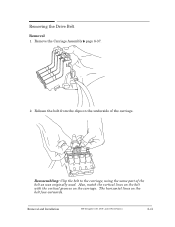
The horizontal lines on the carriage. Reassembling: Clip the belt to the carriage, using the same part of the carriage. Also, match the vertical lines on the belt with the vertical grooves on the belt face outwards. Removing the Drive Belt Removal 1. Release the belt from the clips on the underside of the belt as was originally used. Removal and Installation HP DesignJet 430, 450C and 455CA Printers 8-41 Remove the Carriage Assembly ' page 8Ć37. 2.
The horizontal lines on the carriage. Reassembling: Clip the belt to the carriage, using the same part of the carriage. Also, match the vertical lines on the belt with the vertical grooves on the belt face outwards. Removing the Drive Belt Removal 1. Release the belt from the clips on the underside of the belt as was originally used. Removal and Installation HP DesignJet 430, 450C and 455CA Printers 8-41 Remove the Carriage Assembly ' page 8Ć37. 2.
Service Manual
Page 164
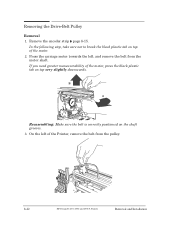
If you need greater maneuverability of the motor, press the black plastic tab on top of the Printer, remove the belt from the motor shaft. On the left , and remove the belt from the pulley. 8-42 HP DesignJet 430, 450C and 455CA Printers Removal and Installation Remove the encoder strip ' page 8Ć15. Press the carriage motor towards...
If you need greater maneuverability of the motor, press the black plastic tab on top of the Printer, remove the belt from the motor shaft. On the left , and remove the belt from the pulley. 8-42 HP DesignJet 430, 450C and 455CA Printers Removal and Installation Remove the encoder strip ' page 8Ć15. Press the carriage motor towards...
Service Manual
Page 165
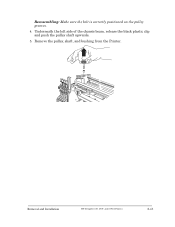
Remove the pulley, shaft, and bushing from the Printer. Removal and Installation HP DesignJet 430, 450C and 455CA Printers 8-43 Underneath the left side of the chassis beam, release the black plastic clip and push the pulley shaft upwards. 5. Reassembling: Make sure the belt is correctly positioned on the pulley grooves. 4.
Remove the pulley, shaft, and bushing from the Printer. Removal and Installation HP DesignJet 430, 450C and 455CA Printers 8-43 Underneath the left side of the chassis beam, release the black plastic clip and push the pulley shaft upwards. 5. Reassembling: Make sure the belt is correctly positioned on the pulley grooves. 4.
Service Manual
Page 179
...HP DesignJet 430, 450C and 455CA Printers 9-3 Keep in mind that if you need to install them in their bags with dissicant until you clear the EEROM or replace the electronics module, the factory spittoon value is almost full. About 880 primes are needed to 0% used. Belt Swelling To prevent new belts... from swelling incorrectly, keep them . Ink Spilling The service configuration plot gives an estimation of the amount of ink in the Printer's spittoon. (Details ' page 4Ć29.) To prevent ...
...HP DesignJet 430, 450C and 455CA Printers 9-3 Keep in mind that if you need to install them in their bags with dissicant until you clear the EEROM or replace the electronics module, the factory spittoon value is almost full. About 880 primes are needed to 0% used. Belt Swelling To prevent new belts... from swelling incorrectly, keep them . Ink Spilling The service configuration plot gives an estimation of the amount of ink in the Printer's spittoon. (Details ' page 4Ć29.) To prevent ...
Service Manual
Page 184
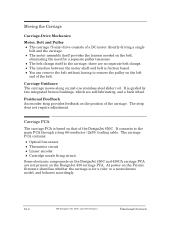
... feedback on just one stainless steel slider rod. At powerĆon the belt, eliminating the need for a color or a monochrome model, and behaves accordingly. 10-4 HP DesignJet 430, 450C and 455CA Printers Functional Overview D The belt clamps itself provides the tension needed on the Printer firmware identifies whether the carriage is friction based. D The interface between the...
... feedback on just one stainless steel slider rod. At powerĆon the belt, eliminating the need for a color or a monochrome model, and behaves accordingly. 10-4 HP DesignJet 430, 450C and 455CA Printers Functional Overview D The belt clamps itself provides the tension needed on the Printer firmware identifies whether the carriage is friction based. D The interface between the...


