HP DesignJet 430, 450C, and 455CA Printer - User's Guide
Page 9
... 6-4 To upgrade the HP DesignJet 430 printer with color 6-5 Recalibrating the printer for accuracy 6-11 When to recalibrate the printer 6-11 To recalibrate the printer 6-11 7 Maintaining your printer Replacing cartridges 7-2 When to replace cartridges 7-2 Using genuine HP supplies 7-3 Before replacing cartridges 7-4 To replace one or more cartridges 7-5 Cleaning the cartridge nozzles (priming) 7-7 Cleaning the printer 7-9 8 Front-panel lights and keys Front-panel lights 8-2 Front-panel keys...
... 6-4 To upgrade the HP DesignJet 430 printer with color 6-5 Recalibrating the printer for accuracy 6-11 When to recalibrate the printer 6-11 To recalibrate the printer 6-11 7 Maintaining your printer Replacing cartridges 7-2 When to replace cartridges 7-2 Using genuine HP supplies 7-3 Before replacing cartridges 7-4 To replace one or more cartridges 7-5 Cleaning the cartridge nozzles (priming) 7-7 Cleaning the printer 7-9 8 Front-panel lights and keys Front-panel lights 8-2 Front-panel keys...
HP DesignJet 430/450C/488CA Printer - UserÂ’s Guide
Page 9
... size and memory usage 6-4 To upgrade your printer with a network interface 6-4 To upgrade the HP DesignJet 430 printer with color 6-5 7 Maintaining your printer Replacing cartridges 7-2 When to replace cartridges 7-2 Using genuine HP supplies 7-3 Before replacing cartridges 7-4 To replace one or more cartridges 7-5 Cleaning the cartridge nozzles (priming) 7-7 Cleaning the printer 7-9 8 Front-panel lights and keys Front-panel lights 8-2 Front-panel keys 8-7 9 Troubleshooting Using the documentation...
... size and memory usage 6-4 To upgrade your printer with a network interface 6-4 To upgrade the HP DesignJet 430 printer with color 6-5 7 Maintaining your printer Replacing cartridges 7-2 When to replace cartridges 7-2 Using genuine HP supplies 7-3 Before replacing cartridges 7-4 To replace one or more cartridges 7-5 Cleaning the cartridge nozzles (priming) 7-7 Cleaning the printer 7-9 8 Front-panel lights and keys Front-panel lights 8-2 Front-panel keys 8-7 9 Troubleshooting Using the documentation...
Service Manual
Page 42
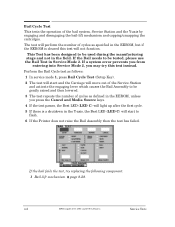
... in the EEROM, unless you may try replacing the following component: 1 BailĆlift mechanism ' page 8Ć28. 4-8 HP DesignJet 430, 450C and 455CA Printers Service Tests The test will move out of the Service Station and activate the engaging lever which causes the Bail Assembly to be ...cartridges. If a system error prevents you from entering into Service Mode 2, you press the Cancel and Media Source keys. 4 If the test passes, the Best LED (LED C) will light up after the first cycle. 5 If there is cleared this test instead. If the Bail needs to flash. 6 If the Printer...
... in the EEROM, unless you may try replacing the following component: 1 BailĆlift mechanism ' page 8Ć28. 4-8 HP DesignJet 430, 450C and 455CA Printers Service Tests The test will move out of the Service Station and activate the engaging lever which causes the Bail Assembly to be ...cartridges. If a system error prevents you from entering into Service Mode 2, you press the Cancel and Media Source keys. 4 If the test passes, the Best LED (LED C) will light up after the first cycle. 5 If there is cleared this test instead. If the Bail needs to flash. 6 If the Printer...
Service Manual
Page 79
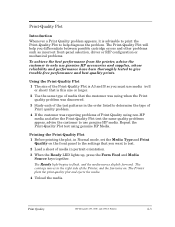
...HP media. Print Quality HP DesignJet 430, 450C and 455CA Printers 6-3 Repeat the PrintĆQuality Plot test using nonĆHP...genuine HP Media. The Printer plots the print-quality plot and ejects the media. 4 Unload the media. The Ready light begins...is A3 and B so you differentiate between possible cartridge errors and other problems such as incorrect frontĆ... problems. To achieve the best performance from the printer, advise the customer to determine the type of ...patterns in portrait orientation. 3 When the Ready LED lights up, press the Form Feed and Media Source keys...
...HP media. Print Quality HP DesignJet 430, 450C and 455CA Printers 6-3 Repeat the PrintĆQuality Plot test using nonĆHP...genuine HP Media. The Printer plots the print-quality plot and ejects the media. 4 Unload the media. The Ready light begins...is A3 and B so you differentiate between possible cartridge errors and other problems such as incorrect frontĆ... problems. To achieve the best performance from the printer, advise the customer to determine the type of ...patterns in portrait orientation. 3 When the Ready LED lights up, press the Form Feed and Media Source keys...


