
Maintenance and Service Guide
Page 7
... hard drive (2242, M.2, SATA-3) 64 GB 32 GB Audio Realtek ALC5662 HD Audio Audio Codec Wireless Integrated wireless options with dual antennas (M.2/PCIe) Intel Dual Band Wireless-AC 7265 802.11 AC 2×2 WiFi + Bluetooth 4.2 Combo Adapter (non-vPro) External media cards HP Multi-Format Digital Media Card Reader Supports SD/SDHC/SDXC Push-pull insertion/removal Ports Front Audio-out (headphone)/audio-in (microphone) combo jack (2) USB Type-A 3.0 ports (USB battery charging 1.2 support) MicroSD card slot (push-pull type) Back (2) USB Type-A 2.0 ports USB Type-A 3.0 port USB...
... hard drive (2242, M.2, SATA-3) 64 GB 32 GB Audio Realtek ALC5662 HD Audio Audio Codec Wireless Integrated wireless options with dual antennas (M.2/PCIe) Intel Dual Band Wireless-AC 7265 802.11 AC 2×2 WiFi + Bluetooth 4.2 Combo Adapter (non-vPro) External media cards HP Multi-Format Digital Media Card Reader Supports SD/SDHC/SDXC Push-pull insertion/removal Ports Front Audio-out (headphone)/audio-in (microphone) combo jack (2) USB Type-A 3.0 ports (USB battery charging 1.2 support) MicroSD card slot (push-pull type) Back (2) USB Type-A 2.0 ports USB Type-A 3.0 port USB...

Maintenance and Service Guide
Page 8
... station Keyboard Security Power requirements Operating system Serviceability Description HDMI v1.4 supporting up to 1920×1080 @ 60Hz RJ-45 connector AC Smart Pin adapter plug, 4.5 mm barrel connector HP Elite USB-C Dock G3 USB Chrome stand-alone wired keyboard and mouse combo Kensington Security Lock Smart AC adapter (standard barrel, 4.5 mm) 90-W, PFC, right angle (not for Celeron processor) 65-W, non-PFC, right angle (only for Celeron processor) 65...
... station Keyboard Security Power requirements Operating system Serviceability Description HDMI v1.4 supporting up to 1920×1080 @ 60Hz RJ-45 connector AC Smart Pin adapter plug, 4.5 mm barrel connector HP Elite USB-C Dock G3 USB Chrome stand-alone wired keyboard and mouse combo Kensington Security Lock Smart AC adapter (standard barrel, 4.5 mm) 90-W, PFC, right angle (not for Celeron processor) 65-W, non-PFC, right angle (only for Celeron processor) 65...

Maintenance and Service Guide
Page 10
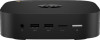
... in standby mode. ● When the device is in the box. This guide is connected to turn it is off , charges most products such as a cell phone, camera, activity tracker, or smartwatch. USB SuperSpeed ports with connectors facing the computer. 2. MicroSD memory card reader Reads optional memory cards that the unit is off , press the button to the jack, the computer speakers are disabled. The light will be...
... in standby mode. ● When the device is in the box. This guide is connected to turn it is off , charges most products such as a cell phone, camera, activity tracker, or smartwatch. USB SuperSpeed ports with connectors facing the computer. 2. MicroSD memory card reader Reads optional memory cards that the unit is off , press the button to the jack, the computer speakers are disabled. The light will be...

Maintenance and Service Guide
Page 11
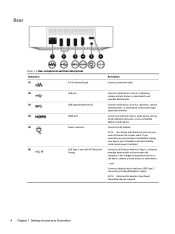
... adapters (purchased separately) may be required. Rear Component (1) (2) (3) (4) (5) (6) RJ-45 (network) jack Description Connects a network cable. USB port USB SuperSpeed ports (2) HDMI port Power connector USB Type-C port with HP Sleep and Charge Connects a USB device, such as a high-definition television, or any compatible digital or audio device. NOTE: Your device will automatically restart when power is off, charges most products such as a cell phone, camera, activity tracker, or smartwatch, and provides highspeed data transfer. Rear 5 Connects an optional video...
... adapters (purchased separately) may be required. Rear Component (1) (2) (3) (4) (5) (6) RJ-45 (network) jack Description Connects a network cable. USB port USB SuperSpeed ports (2) HDMI port Power connector USB Type-C port with HP Sleep and Charge Connects a USB device, such as a high-definition television, or any compatible digital or audio device. NOTE: Your device will automatically restart when power is off, charges most products such as a cell phone, camera, activity tracker, or smartwatch, and provides highspeed data transfer. Rear 5 Connects an optional video...
Maintenance and Service Guide
Page 23
... improves and changes product parts. There are on -screen instructions. Disconnect the power from the computer by an authorized service provider. Remove the bottom cover: 1. Peel the four rubber feet off or in this chapter should perform the removal and replacement procedures described here. Accessing the internal part could damage the computer or void the warranty. Disconnect all external devices connected to http://partsurfer.hp.com, select...
... improves and changes product parts. There are on -screen instructions. Disconnect the power from the computer by an authorized service provider. Remove the bottom cover: 1. Peel the four rubber feet off or in this chapter should perform the removal and replacement procedures described here. Accessing the internal part could damage the computer or void the warranty. Disconnect all external devices connected to http://partsurfer.hp.com, select...
Maintenance and Service Guide
Page 26
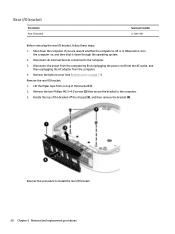
... external devices connected to install the rear I/O bracket. 20 Chapter 5 Removal and replacement procedures Remove the bottom cover (see Bottom cover on top of the bracket off or in Hibernation, turn ...Rear I/O bracket Description Rear I/O bracket Spare part number L17262-001 Before removing the rear I /O bracket: 1. Disconnect the power from the computer by first unplugging the power cord from the AC outlet, and then unplugging the AC adapter from on page 17). Remove the two Phillips M2.5×4.0 screws (2) that secure the bracket to the computer. 3. Shut down through the operating...
... external devices connected to install the rear I/O bracket. 20 Chapter 5 Removal and replacement procedures Remove the bottom cover (see Bottom cover on top of the bracket off or in Hibernation, turn ...Rear I/O bracket Description Rear I/O bracket Spare part number L17262-001 Before removing the rear I /O bracket: 1. Disconnect the power from the computer by first unplugging the power cord from the AC outlet, and then unplugging the AC adapter from on page 17). Remove the two Phillips M2.5×4.0 screws (2) that secure the bracket to the computer. 3. Shut down through the operating...

Maintenance and Service Guide
Page 29
... power connector cable to the computer. 3. Component replacement procedures 23 Disconnect the power from the computer by first unplugging the power cord from the AC outlet, and then unplugging the AC adapter from the computer. 4. Remove the bottom cover (see Bottom shield on page 17). 5. Remove the rear I/O bracket (see Rear I/O bracket on the bottom shield. Remove the power connector cable: 1. Description Power connector cable Power connector bracket Power connector conductive tape Spare part number...
... power connector cable to the computer. 3. Component replacement procedures 23 Disconnect the power from the computer by first unplugging the power cord from the AC outlet, and then unplugging the AC adapter from the computer. 4. Remove the bottom cover (see Bottom shield on page 17). 5. Remove the rear I/O bracket (see Rear I/O bracket on the bottom shield. Remove the power connector cable: 1. Description Power connector cable Power connector bracket Power connector conductive tape Spare part number...

Maintenance and Service Guide
Page 36
...operating system. 2. Disconnect the power from the computer by first unplugging the power cord from the AC outlet, and then unplugging the AC adapter from the socket (3). Remove the WLAN module (see Bottom shield on page 25). Remove the solid-state drive: 1. Remove...available using spare part number L17263-001. 2. NOTE: The solid-state drive absorber is off the connector and drive module (1). Disconnect all external devices connected to install a solid-state drive. 30 Chapter 5 Removal and replacement procedures Lift the solid-state drive absorber off or in Hibernation, turn ...
...operating system. 2. Disconnect the power from the computer by first unplugging the power cord from the AC outlet, and then unplugging the AC adapter from the socket (3). Remove the WLAN module (see Bottom shield on page 25). Remove the solid-state drive: 1. Remove...available using spare part number L17263-001. 2. NOTE: The solid-state drive absorber is off the connector and drive module (1). Disconnect all external devices connected to install a solid-state drive. 30 Chapter 5 Removal and replacement procedures Lift the solid-state drive absorber off or in Hibernation, turn ...

Maintenance and Service Guide
Page 37
...-7300 processor System board with integrated Intel Celeron 3865U processor HDMI gasket Spare part number L17277-001 L17276-001 L17275-001 L17846-001 Before removing the system board, follow these steps: 1. Shut down through the operating system. 2. Remove the bottom cover (see Heat sink on , and then shut it down the computer. Remove the bottom shield (see Rear I/O bracket on page 20). 6. Remove the rear...
...-7300 processor System board with integrated Intel Celeron 3865U processor HDMI gasket Spare part number L17277-001 L17276-001 L17275-001 L17846-001 Before removing the system board, follow these steps: 1. Shut down through the operating system. 2. Remove the bottom cover (see Heat sink on , and then shut it down the computer. Remove the bottom shield (see Rear I/O bracket on page 20). 6. Remove the rear...

Maintenance and Service Guide
Page 39
... Fan Spare part number 767360-001 Before removing the fan, follow these steps: 1. Disconnect all external devices connected to install the fan. Remove the bottom shield (see System board on the bottom of the system board. Component replacement procedures 33 Remove the bottom cover (see Rear I/O bracket on , and then shut it down through the operating system. 2. Disconnect the fan cable from the computer. 4. Remove the fan from the system board (3). Remove the fan: 1. Remove the...
... Fan Spare part number 767360-001 Before removing the fan, follow these steps: 1. Disconnect all external devices connected to install the fan. Remove the bottom shield (see System board on the bottom of the system board. Component replacement procedures 33 Remove the bottom cover (see Rear I/O bracket on , and then shut it down through the operating system. 2. Disconnect the fan cable from the computer. 4. Remove the fan from the system board (3). Remove the fan: 1. Remove the...

Maintenance and Service Guide
Page 44
... cover on , and then shut it down the computer. Disconnect all external devices connected to the metal top shield. 38 Chapter 5 Removal and replacement procedures Shut down through the operating system. 2. Power button board The power button board is off or in Hibernation, turn the computer on page 17). 5. Position the metal top shield with the power button board facing you are unsure whether the computer is installed...
... cover on , and then shut it down the computer. Disconnect all external devices connected to the metal top shield. 38 Chapter 5 Removal and replacement procedures Shut down through the operating system. 2. Power button board The power button board is off or in Hibernation, turn the computer on page 17). 5. Position the metal top shield with the power button board facing you are unsure whether the computer is installed...
Maintenance and Service Guide
Page 50
...4 model name 1 O operating system, product description 2 P packaging guidelines 15 plastic parts, service considerations 12 ports HDMI 5 product description 1 USB 3.0 5 USB 3.0 charging 4 USB Type-C port 3 USB Type-C with HP Sleep and Charge 5 power button board removal 38 spare part number 38 power connector cable removal 23 spare part number 23 power cord set requirements 41 spare part numbers 10 power requirements, product description 2 processor, product description 1 product description audio 1 docking station 2 external media cards 1 graphics 1 keyboard 2 memory module 1 operating system...
...4 model name 1 O operating system, product description 2 P packaging guidelines 15 plastic parts, service considerations 12 ports HDMI 5 product description 1 USB 3.0 5 USB 3.0 charging 4 USB Type-C port 3 USB Type-C with HP Sleep and Charge 5 power button board removal 38 spare part number 38 power connector cable removal 23 spare part number 23 power cord set requirements 41 spare part numbers 10 power requirements, product description 2 processor, product description 1 product description audio 1 docking station 2 external media cards 1 graphics 1 keyboard 2 memory module 1 operating system...

Maintenance and Service Guide
Page 51
... labels 7 removal/replacement procedures 17 S Screw Kit, spare part number 10 security cable slot, identifying 3 security, product description 2 serial number 7 serial number, computer 7 service considerations cables 12 connectors 12 plastic parts 12 service labels, locating 7 serviceability, product description 2 slots memory card reader 4 security cable 3 solid-state drive removal 30 spare part numbers 30 storage, product description 1 system board removal 31 spare part numbers 31 U USB 3.0 ports, charging, identifying 4 USB 3.0 ports, identifying 5 USB Type-C port with HP Sleep and Charge...
... labels 7 removal/replacement procedures 17 S Screw Kit, spare part number 10 security cable slot, identifying 3 security, product description 2 serial number 7 serial number, computer 7 service considerations cables 12 connectors 12 plastic parts 12 service labels, locating 7 serviceability, product description 2 slots memory card reader 4 security cable 3 solid-state drive removal 30 spare part numbers 30 storage, product description 1 system board removal 31 spare part numbers 31 U USB 3.0 ports, charging, identifying 4 USB 3.0 ports, identifying 5 USB Type-C port with HP Sleep and Charge...

User Guide
Page 8
... putting on and you want to know your Chromebox To insert a card: 1. This jack does not support optional microphone-only devices. Hold the card label-side up, with HP Sleep and Connects a USB device, provides high-speed data transfer, and Charge (2) even when the computer is on the device. To remove a card: ▲ Pull out the card. (4) Power button/Power light ● When the Chromebox is on headphones, earbuds, or a headset...
... putting on and you want to know your Chromebox To insert a card: 1. This jack does not support optional microphone-only devices. Hold the card label-side up, with HP Sleep and Connects a USB device, provides high-speed data transfer, and Charge (2) even when the computer is on the device. To remove a card: ▲ Pull out the card. (4) Power button/Power light ● When the Chromebox is on headphones, earbuds, or a headset...
User Guide
Page 10
... USB Type-C port with HP Sleep and Connects a USB device that has a USB Type-C connector, providing DisplayPort output. and - Rear Table 1-3 Rear components and their descriptions Component (1) RJ-45 (network) jack Description Connects a network cable. (2) USB port Connects a USB device, such as a cell phone, camera, activity tracker, or smartwatch, and provides data transfer. (3) USB SuperSpeed ports (2) Connect a USB device, such as a high-definition television, or any compatible digital or audio device. (5) Power connector Connects an AC adapter. speed data...
... USB Type-C port with HP Sleep and Connects a USB device that has a USB Type-C connector, providing DisplayPort output. and - Rear Table 1-3 Rear components and their descriptions Component (1) RJ-45 (network) jack Description Connects a network cable. (2) USB port Connects a USB device, such as a cell phone, camera, activity tracker, or smartwatch, and provides data transfer. (3) USB SuperSpeed ports (2) Connect a USB device, such as a high-definition television, or any compatible digital or audio device. (5) Power connector Connects an AC adapter. speed data...
User Guide
Page 15
... enjoy and manage your music, and download and watch later without needing to connect to your device, follow the device manufacturer's instructions. To connect wireless speakers to a network. To connect highdefinition speakers to the correct port on the Chromebox. Using video Your Chromebox is a powerful video device that the external device is connected to the device, see Connecting an HDMI device on headphones, earbuds, or a headset. To use one end of the HDMI cable to your device, follow the device manufacturer's instructions. Connect one of...
... enjoy and manage your music, and download and watch later without needing to connect to your device, follow the device manufacturer's instructions. To connect wireless speakers to a network. To connect highdefinition speakers to the correct port on the Chromebox. Using video Your Chromebox is a powerful video device that the external device is connected to the device, see Connecting an HDMI device on headphones, earbuds, or a headset. To use one end of the HDMI cable to your device, follow the device manufacturer's instructions. Connect one of...

User Guide
Page 16
... about accessing developer mode. WOL resets to access and click Connect. 3. NOTE: Accessing the WOL function requires initiating a recovery and entering developer mode. See also http://www.chromium.org/chromiumos/developer-information-for-chrome-os-devices for more information, if needed. To turn this function on LAN only functions when a LAN cable is updated. NOTE: Wake on and off: 10 Chapter 3 Using your wireless network To connect to http://www.hp.com/support...
... about accessing developer mode. WOL resets to access and click Connect. 3. NOTE: Accessing the WOL function requires initiating a recovery and entering developer mode. See also http://www.chromium.org/chromiumos/developer-information-for-chrome-os-devices for more information, if needed. To turn this function on LAN only functions when a LAN cable is updated. NOTE: Wake on and off: 10 Chapter 3 Using your wireless network To connect to http://www.hp.com/support...
User Guide
Page 17
... Remove from the list, or select the icon for directions about managing apps, go to disable WOL function. You must enter development mode to shelf. Apps update automatically, ensuring that you want from the apps pinned to its default setting (WOL-enabled) after a system reboot. Using the store requires a Google account, but the store will be applied only when a LAN cable is attached. NOTE: Changes to Wake...
... Remove from the list, or select the icon for directions about managing apps, go to disable WOL function. You must enter development mode to shelf. Apps update automatically, ensuring that you want from the apps pinned to its default setting (WOL-enabled) after a system reboot. Using the store requires a Google account, but the store will be applied only when a LAN cable is attached. NOTE: Changes to Wake...

User Guide
Page 18
... device Unauthorized removal of the device Antivirus software Software updates Security cable lock Securing your wireless network When you save important documents and files either to a USB flash drive, memory card, external hard drive, or to Google Cloud™ storage. Recovering your Chromebox If you can encrypt all accounts. Select Settings, and then select Show advanced settings. 12 Chapter 4 Securing your last synced settings automatically. Table 4-1 Chromebox security options Device risk Security feature Unauthorized use...
... device Unauthorized removal of the device Antivirus software Software updates Security cable lock Securing your wireless network When you save important documents and files either to a USB flash drive, memory card, external hard drive, or to Google Cloud™ storage. Recovering your Chromebox If you can encrypt all accounts. Select Settings, and then select Show advanced settings. 12 Chapter 4 Securing your last synced settings automatically. Table 4-1 Chromebox security options Device risk Security feature Unauthorized use...

User Guide
Page 28
... (audio-out) jack 2 headphones, connecting 9 high-definition devices, connecting 9 HP Assistive Policy 17 I installing optional security cable lock 13 International Association of Accessibility Professionals 17 J jacks audio-in (microphone) 2 audio-out (headphone) 2 L labels Bluetooth 7 regulatory 7 serial number 6 service 6 wireless certification 7 WLAN 7 M memory card reader, identifying 2 memory card, identifying 2 microphone (audio-in) jack, identifying 2 mouse functions 8 using 8 N Next window 8 P ports HDMI 4, 9 USB 3.0 4 USB 3.0 charging 2 USB Type-C port 1 USB Type-C with HP Sleep and...
... (audio-out) jack 2 headphones, connecting 9 high-definition devices, connecting 9 HP Assistive Policy 17 I installing optional security cable lock 13 International Association of Accessibility Professionals 17 J jacks audio-in (microphone) 2 audio-out (headphone) 2 L labels Bluetooth 7 regulatory 7 serial number 6 service 6 wireless certification 7 WLAN 7 M memory card reader, identifying 2 memory card, identifying 2 microphone (audio-in) jack, identifying 2 mouse functions 8 using 8 N Next window 8 P ports HDMI 4, 9 USB 3.0 4 USB 3.0 charging 2 USB Type-C port 1 USB Type-C with HP Sleep and...


