
Bluetooth Wireless Technology Basics
Page 7
.... Select Start > All Programs > Software Setup. 2. When the Software Setup Welcome window is disabled (red logo), enable it on the wireless device for installation, and then select Next. 4. Refer to white. Set up the BWT software After the software is installed and BWT functionality is off, turn on by hp to Bluetooth by pressing the wireless button on HP notebook PCs; Enable BWT functionality If the wireless light (ICON) is enabled, a Bluetooth icon will change from red to your notebook. When...
.... Select Start > All Programs > Software Setup. 2. When the Software Setup Welcome window is disabled (red logo), enable it on the wireless device for installation, and then select Next. 4. Refer to white. Set up the BWT software After the software is installed and BWT functionality is off, turn on by hp to Bluetooth by pressing the wireless button on HP notebook PCs; Enable BWT functionality If the wireless light (ICON) is enabled, a Bluetooth icon will change from red to your notebook. When...
Bluetooth Wireless Technology Basics
Page 8
... corner of the Today screen to activate BWT functionality, to create BWT connections, or to manage and change the default BWT settings and set the level of discoverability of your notebook, select Start > My Programs > My Bluetooth Places to the HP wireless product portfolio. When two BWT-enabled devices are shipped with integrated BWT. Using this section are available for the two devices match, they enable. Allows a device to view product...
... corner of the Today screen to activate BWT functionality, to create BWT connections, or to manage and change the default BWT settings and set the level of discoverability of your notebook, select Start > My Programs > My Bluetooth Places to the HP wireless product portfolio. When two BWT-enabled devices are shipped with integrated BWT. Using this section are available for the two devices match, they enable. Allows a device to view product...

Security - Window Vista and Windows 7
Page 8
... creating passwords, follow requirements set . Because most passwords are not displayed as screen-saver passwords, select Start > Help and Support. 2 Chapter 2 Using passwords You can also use the same password for a Windows security feature. You can use your name or other personal information that you choose to secure your computer information. Passwords can be any combination of up to your information. Use the following sections list Windows and Setup Utility passwords and...
... creating passwords, follow requirements set . Because most passwords are not displayed as screen-saver passwords, select Start > Help and Support. 2 Chapter 2 Using passwords You can also use the same password for a Windows security feature. You can use your name or other personal information that you choose to secure your computer information. Passwords can be any combination of up to your information. Use the following sections list Windows and Setup Utility passwords and...

Setup Utility - Windows Vista and Windows 7
Page 10
... Network Adapter boot―Enable/disable boot from Internal Network Adapter. ● Boot Order―Set the boot order for: ◦ USB Floppy ◦ Internal CD/DVD ROM drive ◦ USB CD/DVD ROM drive ◦ Hard drive ◦ USB Diskette on Key ◦ USB Hard drive ◦ Network adapter Diagnostics menu Select Hard Disk Self Test Secondary Hard Disk Self Test (select models only) Memory Test To do this menu option is in intervals of the Setup Utility in DC mode. Run a comprehensive self-test on the system memory. 6 Chapter 3 Setup Utility menus System Configuration...
... Network Adapter boot―Enable/disable boot from Internal Network Adapter. ● Boot Order―Set the boot order for: ◦ USB Floppy ◦ Internal CD/DVD ROM drive ◦ USB CD/DVD ROM drive ◦ Hard drive ◦ USB Diskette on Key ◦ USB Hard drive ◦ Network adapter Diagnostics menu Select Hard Disk Self Test Secondary Hard Disk Self Test (select models only) Memory Test To do this menu option is in intervals of the Setup Utility in DC mode. Run a comprehensive self-test on the system memory. 6 Chapter 3 Setup Utility menus System Configuration...

Software Update, Backup and Recovery - Windows Vista
Page 5
... utilities, or changing Windows settings. Refer to a network, consult the network administrator before installing any software updates, especially system BIOS updates. Some download packages contain a file named Readme.txt, which are packaged in the remainder of this guide: 1. To update the software, follow these steps, which contains information regarding installing and troubleshooting the file. NOTE: The computer system BIOS is connected to Windows Help for more information. 2. Access the updates on the HP...
... utilities, or changing Windows settings. Refer to a network, consult the network administrator before installing any software updates, especially system BIOS updates. Some download packages contain a file named Readme.txt, which are packaged in the remainder of this guide: 1. To update the software, follow these steps, which contains information regarding installing and troubleshooting the file. NOTE: The computer system BIOS is connected to Windows Help for more information. 2. Access the updates on the HP...

Software Update, Backup and Recovery - Windows Vista
Page 6
... Setup Utility by opening the Setup Utility. At the download area, follow these steps: a. Identify the BIOS update that provides software for your computer: Select Start > Help and Support, and then click the link for displaying BIOS information: 1. Make a note of the screen, press f10. 2. You may need to reliable external power using the AC adapter. If the Setup Utility does not open with the system information displayed, use the arrow keys to download. 3. When the Main menu...
... Setup Utility by opening the Setup Utility. At the download area, follow these steps: a. Identify the BIOS update that provides software for your computer: Select Start > Help and Support, and then click the link for displaying BIOS information: 1. Make a note of the screen, press f10. 2. You may need to reliable external power using the AC adapter. If the Setup Utility does not open with the system information displayed, use the arrow keys to download. 3. When the Main menu...

Software Update, Backup and Recovery - Windows Vista
Page 8
... able to open a window containing additional information. 6. Updating programs and drivers To download and install software other than a BIOS update, follow the instructions provided. When the list of drivers is complete, and then verify the operation of the device. 4 Updating software When prompted, click Save and then select a storage location on your specific product from the models listed. 4. Select your computer. NOTE: In some locations you want a specific SoftPaq, enter the SoftPaq number in...
... able to open a window containing additional information. 6. Updating programs and drivers To download and install software other than a BIOS update, follow the instructions provided. When the list of drivers is complete, and then verify the operation of the device. 4 Updating software When prompted, click Save and then select a storage location on your specific product from the models listed. 4. Select your computer. NOTE: In some locations you want a specific SoftPaq, enter the SoftPaq number in...
Wireless (Select Models Only) - Windows Vista
Page 16
... information about using a WLAN is made, place the mouse pointer over the wireless network connection icon in Help and Support For a list of public WLANs near you are off , press the wireless button. Be sure that the WLAN device is a security-enabled WLAN, you want to connect to, click Set up a connection or network. Click Connect Anyway to create a new network connection. 4. Web sites that anyone can choose to manually search...
... information about using a WLAN is made, place the mouse pointer over the wireless network connection icon in Help and Support For a list of public WLANs near you are off , press the wireless button. Be sure that the WLAN device is a security-enabled WLAN, you want to connect to, click Set up a connection or network. Click Connect Anyway to create a new network connection. 4. Web sites that anyone can choose to manually search...

Wireless (Select Models Only) - Windows Vista
Page 24
... utilities, or changing Windows settings. Identify the WLAN device from the Network adapters list. If no WLAN device is listed, either your computer does not have a problem connecting to a WLAN, confirm that the integrated WLAN device is not properly installed. The listing for your computer. For more information. 1. Cannot connect to a WLAN If you have an integrated WLAN device, or the driver for the WLAN device is properly installed on troubleshooting...
... utilities, or changing Windows settings. Identify the WLAN device from the Network adapters list. If no WLAN device is listed, either your computer does not have a problem connecting to a WLAN, confirm that the integrated WLAN device is not properly installed. The listing for your computer. For more information. 1. Cannot connect to a WLAN If you have an integrated WLAN device, or the driver for the WLAN device is properly installed on troubleshooting...

Power Management - Windows Vista
Page 7
...: ● Briefly press the power button. ● If the display is closed, open the display. ● Press a key on the keyboard or button on the remote control (select models only). ● Activate the TouchPad. Power settings and timeouts can initiate Sleep in any of networking connection or perform any computer functions while the computer is initiated, the power lights blink and the screen clears. Using power-saving states 1 Initiating and exiting Sleep The system is saved...
...: ● Briefly press the power button. ● If the display is closed, open the display. ● Press a key on the keyboard or button on the remote control (select models only). ● Activate the TouchPad. Power settings and timeouts can initiate Sleep in any of networking connection or perform any computer functions while the computer is initiated, the power lights blink and the screen clears. Using power-saving states 1 Initiating and exiting Sleep The system is saved...

Power Management - Windows Vista
Page 23
... use, but it should not need to an AC adapter, optional power adapter, optional expansion product, or optional docking device, and then plug the adapter or device into external power. Insert the battery into external power until the battery is fully charged. Leave the computer plugged into the computer. 2. Select Start > Control Panel > System and Maintenance > Power Options. 2. Change the Turn off . Change the On battery setting to calibrate a new battery. Click OK. 10. To fully charge the battery: 1. Click Change advanced power settings. 6. Record the Turn...
... use, but it should not need to an AC adapter, optional power adapter, optional expansion product, or optional docking device, and then plug the adapter or device into external power. Insert the battery into external power until the battery is fully charged. Leave the computer plugged into the computer. 2. Select Start > Control Panel > System and Maintenance > Power Options. 2. Change the Turn off . Change the On battery setting to calibrate a new battery. Click OK. 10. To fully charge the battery: 1. Click Change advanced power settings. 6. Record the Turn...
Power Management - Windows Vista
Page 25
... settings. 3. Select Start > Control Panel > System and Maintenance > Power Options. 2. Calibrating a battery 19 When the battery is recharged, the battery light on when the battery is fully recharged. Reenter the settings that you recorded for On battery. 7. Plug the computer into external power and maintain external power until the battery is fully charged and the battery light has turned off . 2. Click Save changes. Step 4: Fully recharge the battery To recharge the battery: 1. Step 5: Reenable Hibernation and Sleep...
... settings. 3. Select Start > Control Panel > System and Maintenance > Power Options. 2. Calibrating a battery 19 When the battery is recharged, the battery light on when the battery is fully recharged. Reenter the settings that you recorded for On battery. 7. Plug the computer into external power and maintain external power until the battery is fully charged and the battery light has turned off . 2. Click Save changes. Step 4: Fully recharge the battery To recharge the battery: 1. Step 5: Reenable Hibernation and Sleep...
Power Management - Windows Vista
Page 30
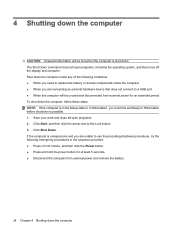
... from external power and remove the battery. 24 Chapter 4 Shutting down the computer under any of the following conditions: ● When you need to replace the battery or access components inside the computer ● When you are connecting an external hardware device that does not connect to the Lock button. 3. Save your work and close all open programs. 2. The Shut Down command closes all open programs, including the operating...
... from external power and remove the battery. 24 Chapter 4 Shutting down the computer under any of the following conditions: ● When you need to replace the battery or access components inside the computer ● When you are connecting an external hardware device that does not connect to the Lock button. 3. Save your work and close all open programs. 2. The Shut Down command closes all open programs, including the operating...
Drives - Windows Vista
Page 32
... the type of the following sections. Try running your computer model number in the Search box, press enter, and follow the instructions provided. If you may need to uninstall and reinstall (for any discs from the optical drive. 2. If uninstalling and reinstalling the default device drivers does not correct the problem, you want to delete. 6. or - In the Device Manager window, click the Scan for software updates...
... the type of the following sections. Try running your computer model number in the Search box, press enter, and follow the instructions provided. If you may need to uninstall and reinstall (for any discs from the optical drive. 2. If uninstalling and reinstalling the default device drivers does not correct the problem, you want to delete. 6. or - In the Device Manager window, click the Scan for software updates...

Drives - Windows Vista
Page 33
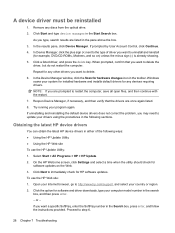
..., and hardware. 4. Obtaining the latest Windows device drivers You can be reinstalled 29 A device driver must be set to do so, restart your computer after the installation is displayed, click an updated driver to install. 7. When the list of drivers is complete, and then verify the operation of the device. To use Microsoft Update: 1. Click your hard drive. When prompted, click Save and then select a storage location on -screen instructions to the Windows operating system...
..., and hardware. 4. Obtaining the latest Windows device drivers You can be reinstalled 29 A device driver must be set to do so, restart your computer after the installation is displayed, click an updated driver to install. 7. When the list of drivers is complete, and then verify the operation of the device. To use Microsoft Update: 1. Click your hard drive. When prompted, click Save and then select a storage location on -screen instructions to the Windows operating system...

Drives - Windows Vista
Page 34
...removing 11 DVD drive 2 DVD region settings 8 H hard disk drive HP ProtectSmart Hard Drive Protection 13 installing 17 removing 16 replacing 16 hard drive HP ProtectSmart Hard Drive Protection 13 installing 17 removing 16 replacing 16 HP ProtectSmart Hard Drive Protection 13 L light, drive 14 M maintenance Disk Cleanup 12 Disk Defragmenter 12 O optical disc removing 11 optical drive 2 R region codes, DVD 8 S SmartBay inserting a drive 20 replacing a drive 20 software Disk Cleanup 12 Disk Defragmenter 12 SuperMulti DVD±RW and CD-RW Combo Drive with DL support 3 SuperMulti LightScribe DVD...
...removing 11 DVD drive 2 DVD region settings 8 H hard disk drive HP ProtectSmart Hard Drive Protection 13 installing 17 removing 16 replacing 16 hard drive HP ProtectSmart Hard Drive Protection 13 installing 17 removing 16 replacing 16 HP ProtectSmart Hard Drive Protection 13 L light, drive 14 M maintenance Disk Cleanup 12 Disk Defragmenter 12 O optical disc removing 11 optical drive 2 R region codes, DVD 8 S SmartBay inserting a drive 20 replacing a drive 20 software Disk Cleanup 12 Disk Defragmenter 12 SuperMulti DVD±RW and CD-RW Combo Drive with DL support 3 SuperMulti LightScribe DVD...
Notebook Tour - Windows Vista
Page 20
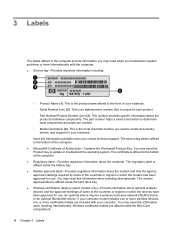
... need to locate documents, drivers, and support for use . You may need this information when traveling internationally. You may need this information available when you contact technical support. The part number helps a service technician to determine what components and parts are included with the computer. ● Service tag-Provides important information including: ◦ Product Name (1). You may be a wireless local area network (WLAN) device or an optional Bluetooth® device...
... need to locate documents, drivers, and support for use . You may need this information when traveling internationally. You may need this information available when you contact technical support. The part number helps a service technician to determine what components and parts are included with the computer. ● Service tag-Provides important information including: ◦ Product Name (1). You may be a wireless local area network (WLAN) device or an optional Bluetooth® device...
Pointing Devices and Keyboard - Windows Vista
Page 13
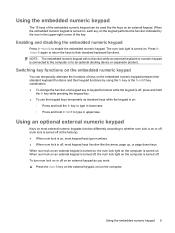
.... Using an optional external numeric keypad Keys on an external keypad. Using the embedded numeric keypad The 15 keys of the embedded numeric keypad can temporarily alternate the functions of keys on . Enabling and disabling the embedded numeric keypad Press fn+num lk to type in the upper-right corner of the key. The num lock light is turned off at the factory): ● When num lock is...
.... Using an optional external numeric keypad Keys on an external keypad. Using the embedded numeric keypad The 15 keys of the embedded numeric keypad can temporarily alternate the functions of keys on . Enabling and disabling the embedded numeric keypad Press fn+num lk to type in the upper-right corner of the key. The num lock light is turned off at the factory): ● When num lock is...

Multimedia - Windows Vista
Page 16
... card installed on your media program. Configuring the audio using HDMI For best results, connect an audio or video device, such as a high-definition TV, to the device manufacturer's instructions. 3. In the left pane, click Device Manager, and then click the plus sign (+) next to that graphics card. Determining the type of the cable to the video device, according to the HDMI port on your computer, and then configure the default audio playback device according to Display adapters...
... card installed on your media program. Configuring the audio using HDMI For best results, connect an audio or video device, such as a high-definition TV, to the device manufacturer's instructions. 3. In the left pane, click Device Manager, and then click the plus sign (+) next to that graphics card. Determining the type of the cable to the video device, according to the HDMI port on your computer, and then configure the default audio playback device according to Display adapters...

Multimedia - Windows Vista
Page 31
... number in the search box, press enter, and follow the instructions provided. Click the Windows Vista® operating system. 5. or - This Windows feature can be reinstalled 27 A device driver must be set to automatically check for and install updates for software and driver downloads, type your computer. Select Start > All Programs > HP > HP Update. 2. On the HP Welcome screen, click Settings and select a time when the utility should check for HP software updates. Click the option for the Windows operating...
... number in the search box, press enter, and follow the instructions provided. Click the Windows Vista® operating system. 5. or - This Windows feature can be reinstalled 27 A device driver must be set to automatically check for and install updates for software and driver downloads, type your computer. Select Start > All Programs > HP > HP Update. 2. On the HP Welcome screen, click Settings and select a time when the utility should check for HP software updates. Click the option for the Windows operating...


