
Bluetooth Wireless Technology Basics
Page 7
... specific instructions about discovering and connecting to other BWT-enabled devices, refer to Bluetooth by pressing the wireless button on the wireless device for installation, and then select Next. 4. The following 3 steps activate your notebook user documentation if you need help locating the wireless button and light. Enable BWT functionality. 3. These steps are explained below. Select the check box next to the Documentation Library Bluetooth CD that came in the lower-right part...
... specific instructions about discovering and connecting to other BWT-enabled devices, refer to Bluetooth by pressing the wireless button on the wireless device for installation, and then select Next. 4. The following 3 steps activate your notebook user documentation if you need help locating the wireless button and light. Enable BWT functionality. 3. These steps are explained below. Select the check box next to the Documentation Library Bluetooth CD that came in the lower-right part...
Bluetooth Wireless Technology Basics
Page 8
... BWT-enabled device. 8 Cellular phones Activating BWT functionality on performing the functions listed in the documentation that are within range, they perform a service discovery during which they can change the BWT settings. The BWT connection can also perform these wireless technologies by selecting the Start menu, and then the IPAQ Wireless option. If any of these functions by HP BWT-enabled products. Detailed instructions on a cell phone can enable or disable...
... BWT-enabled device. 8 Cellular phones Activating BWT functionality on performing the functions listed in the documentation that are within range, they perform a service discovery during which they can change the BWT settings. The BWT connection can also perform these wireless technologies by selecting the Start menu, and then the IPAQ Wireless option. If any of these functions by HP BWT-enabled products. Detailed instructions on a cell phone can enable or disable...
Security - Windows Vista
Page 8
...A password must be set , changed, or deleted, it with keyboard number keys, your computer information. Use the following guidelines when setting a password in a secure place. Because most passwords are not displayed as screen-saver passwords, select Start > Help and Support. 2 Chapter 2 Using passwords ENWW NOTE: Select models include a separate numeric keypad, which functions exactly like the keyboard number keys. ● A password must be entered at a Setup Utility prompt. The following topics list Windows and Setup Utility passwords and describe their functions. Passwords...
...A password must be set , changed, or deleted, it with keyboard number keys, your computer information. Use the following guidelines when setting a password in a secure place. Because most passwords are not displayed as screen-saver passwords, select Start > Help and Support. 2 Chapter 2 Using passwords ENWW NOTE: Select models include a separate numeric keypad, which functions exactly like the keyboard number keys. ● A password must be entered at a Setup Utility prompt. The following topics list Windows and Setup Utility passwords and describe their functions. Passwords...

HP Pavilion dv2000 Notebook PC Maintenance and Service Guide
Page 11
...; External monitor ❏ IEEE 1394 digital (select models only) ❏ Memory Reader Slot (select models only) ❏ Power ❏ RJ-11 (modem) ❏ RJ-45 (network) ❏ S-Video-out (select models only) ❏ Universal Serial Bus (USB) v. 2.0 1.2 Resetting the Computer If the computer you are servicing has an unknown password, follow these steps to the computer. Connect AC power to clear the password. These steps also clear CMOS: 1. Do not reinsert any batteries...
...; External monitor ❏ IEEE 1394 digital (select models only) ❏ Memory Reader Slot (select models only) ❏ Power ❏ RJ-11 (modem) ❏ RJ-45 (network) ❏ S-Video-out (select models only) ❏ Universal Serial Bus (USB) v. 2.0 1.2 Resetting the Computer If the computer you are servicing has an unknown password, follow these steps to the computer. Connect AC power to clear the password. These steps also clear CMOS: 1. Do not reinsert any batteries...

HP Pavilion dv2000 Notebook PC Maintenance and Service Guide
Page 17
...digital card formats: Secure Digital (SD) Memory Card, MultiMediaCard (MMC), Secure Digital Input/Output (SD I/O), Memory Stick (MS), Memory Stick Pro (MSP), xD-Picture Card (XD), xDPicture Card (XD) Type M. ExpressCard slot Supports optional ExpressCard/54 cards. 1-10 Maintenance and Service Guide External monitor port Connects an external VGA monitor or projector. USB port Connects an optional USB device. 1394 port Connects an optional IEEE 1394 or 1394a device, such as a television, VCR, camcorder, overhead projector, or video capture card. Digital Media Slot light On...
...digital card formats: Secure Digital (SD) Memory Card, MultiMediaCard (MMC), Secure Digital Input/Output (SD I/O), Memory Stick (MS), Memory Stick Pro (MSP), xD-Picture Card (XD), xDPicture Card (XD) Type M. ExpressCard slot Supports optional ExpressCard/54 cards. 1-10 Maintenance and Service Guide External monitor port Connects an external VGA monitor or projector. USB port Connects an optional USB device. 1394 port Connects an optional IEEE 1394 or 1394a device, such as a television, VCR, camcorder, overhead projector, or video capture card. Digital Media Slot light On...

HP Pavilion dv2000 Notebook PC Maintenance and Service Guide
Page 19
... numeric keypad keys (15) Can be used system functions when pressed in combination with a function key or the esc key. num lock key Enables numeric lock, turns on the embedded numeric keypad, and turns on the caps lock light. Arrow keys Move the cursor around the screen. caps lock key Enables caps lock and turns on the num lock light. 1-12 Maintenance and Service Guide Windows logo key Displays the Microsoft Windows Start menu. fn key Executes frequently used like the keys on an external numeric...
... numeric keypad keys (15) Can be used system functions when pressed in combination with a function key or the esc key. num lock key Enables numeric lock, turns on the embedded numeric keypad, and turns on the caps lock light. Arrow keys Move the cursor around the screen. caps lock key Enables caps lock and turns on the num lock light. 1-12 Maintenance and Service Guide Windows logo key Displays the Microsoft Windows Start menu. fn key Executes frequently used like the keys on an external numeric...

HP Pavilion dv2000 Notebook PC Maintenance and Service Guide
Page 39
... the computer, and then press f10 while "Press to enter setup" is displayed, press enter to save your preferences. 4. Using Advanced Setup Utility Features This guide describes the Setup Utility features recommended for boot order preferences. Maintenance and Service Guide 2-11 To start the Setup Utility, turn on the screen. The Setup Utility features available for advanced users include a hard drive self-test, a Network Service Boot, and settings for all users. If the Setup Utility is not already running , begin at step 2. 1.
... the computer, and then press f10 while "Press to enter setup" is displayed, press enter to save your preferences. 4. Using Advanced Setup Utility Features This guide describes the Setup Utility features recommended for boot order preferences. Maintenance and Service Guide 2-11 To start the Setup Utility, turn on the screen. The Setup Utility features available for advanced users include a hard drive self-test, a Network Service Boot, and settings for all users. If the Setup Utility is not already running , begin at step 2. 1.
HP Pavilion dv2000 Notebook PC Maintenance and Service Guide
Page 197
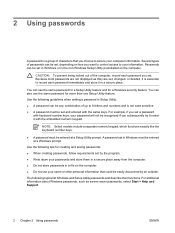
The fan/heat sink assembly mounting bracket is available using Intel processors: The fan/heat sink assembly mounting bracket should be replaced as shown in the following illustration when installing the fan/heat sink assembly. Removal and Replacement Procedures ✎ The following note applies only to computer models using spare part number 417114-001. Removing the Fan/Heat Sink Assembly Mounting Bracket 5-84 Maintenance and Service Guide
The fan/heat sink assembly mounting bracket is available using Intel processors: The fan/heat sink assembly mounting bracket should be replaced as shown in the following illustration when installing the fan/heat sink assembly. Removal and Replacement Procedures ✎ The following note applies only to computer models using spare part number 417114-001. Removing the Fan/Heat Sink Assembly Mounting Bracket 5-84 Maintenance and Service Guide

HP Pavilion dv2000 Notebook PC Maintenance and Service Guide
Page 198
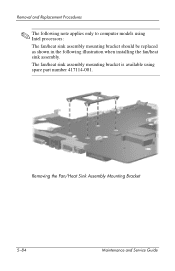
Maintenance and Service Guide 5-85 Removing the Fan/Heat Sink Assembly Mounting Bracket Reverse the above procedure to computer models using spare part number 417114-001. The fan/heat sink assembly mounting bracket is available using AMD processors: The fan/heat sink assembly mounting bracket should be replaced as shown in the following note applies only to install the fan/heat sink assembly. Removal and Replacement Procedures ✎ The following illustration when installing the fan/heat sink assembly.
Maintenance and Service Guide 5-85 Removing the Fan/Heat Sink Assembly Mounting Bracket Reverse the above procedure to computer models using spare part number 417114-001. The fan/heat sink assembly mounting bracket is available using AMD processors: The fan/heat sink assembly mounting bracket should be replaced as shown in the following note applies only to install the fan/heat sink assembly. Removal and Replacement Procedures ✎ The following illustration when installing the fan/heat sink assembly.

HP Pavilion dv2000 Notebook PC Maintenance and Service Guide
Page 274
... -screen instructions. d. C-6 Maintenance and Service Guide Select Start > Control Panel > Programs > Uninstall a program. Recovery Manager opens. Click either Software program re-installation or Hardware driver re-installation, and then click Next. Reinstalling Programs from your computer, the reinstallation process reinstalls the program or utility to remove, and then click Uninstall. 2. b. Click Advanced Options. Follow the on the screen. 3. Backup and Recovery in Windows Vista ■ In all cases, if a program has been deleted from Discs 1. Remove...
... -screen instructions. d. C-6 Maintenance and Service Guide Select Start > Control Panel > Programs > Uninstall a program. Recovery Manager opens. Click either Software program re-installation or Hardware driver re-installation, and then click Next. Reinstalling Programs from your computer, the reinstallation process reinstalls the program or utility to remove, and then click Uninstall. 2. b. Click Advanced Options. Follow the on the screen. 3. Backup and Recovery in Windows Vista ■ In all cases, if a program has been deleted from Discs 1. Remove...
Software Update, Backup, and Recovery - Windows Vista
Page 5
... system BIOS is connected to a network, consult the network administrator before installing any software updates, especially system BIOS updates. Refer to improve the security of the software provided with the hardware devices, and provides for data transfer among hardware devices, including the time and date. 1 Updating software Updated versions of your computer model, product category, and series or family. If your permission or password for a system BIOS update by visiting the HP Web...
... system BIOS is connected to a network, consult the network administrator before installing any software updates, especially system BIOS updates. Refer to improve the security of the software provided with the hardware devices, and provides for data transfer among hardware devices, including the time and date. 1 Updating software Updated versions of your computer model, product category, and series or family. If your permission or password for a system BIOS update by visiting the HP Web...
Software Update, Backup, and Recovery - Windows Vista
Page 6
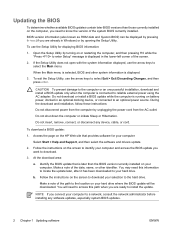
... BIOS) can be downloaded. Do not insert, remove, connect, or disconnect any software updates, especially system BIOS updates. 2 Chapter 1 Updating software ENWW You will be displayed by opening the Setup Utility. To use the Setup Utility for your computer: Select Start > Help and Support, and then select the software and drivers update. 2. To exit the Setup Utility, use the arrow keys to select the Main menu. Do not download or install a BIOS update while the computer is running on battery power, docked in Windows...
... BIOS) can be downloaded. Do not insert, remove, connect, or disconnect any software updates, especially system BIOS updates. 2 Chapter 1 Updating software ENWW You will be displayed by opening the Setup Utility. To use the Setup Utility for your computer: Select Start > Help and Support, and then select the software and drivers update. 2. To exit the Setup Utility, use the arrow keys to select the Main menu. Do not download or install a BIOS update while the computer is running on battery power, docked in Windows...

Wireless (Select Models Only) - Windows Vista
Page 11
...: NOTE Windows includes the User Account Control feature to Windows online Help for tasks such as installing applications, running utilities, or changing Windows settings. Refer to improve the security of your permission or password for more information. 1. You may include the term wireless, wireless LAN, WLAN, or 802.11. Select Start > Computer > System properties tab. 2. Identify the WLAN device from the Network adapters list. The listing for a WLAN device may...
...: NOTE Windows includes the User Account Control feature to Windows online Help for tasks such as installing applications, running utilities, or changing Windows settings. Refer to improve the security of your permission or password for more information. 1. You may include the term wireless, wireless LAN, WLAN, or 802.11. Select Start > Computer > System properties tab. 2. Identify the WLAN device from the Network adapters list. The listing for a WLAN device may...
Drives - Windows Vista
Page 3
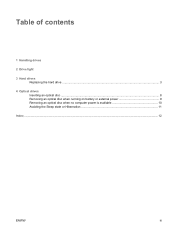
Table of contents 1 Handling drives 2 Drive light 3 Hard drives Replacing the hard drive ...3 4 Optical drives Inserting an optical disc ...8 Removing an optical disc when running on battery or external power 9 Removing an optical disc when no computer power is available 10 Avoiding the Sleep state or Hibernation 11 Index ...12 ENWW iii
Table of contents 1 Handling drives 2 Drive light 3 Hard drives Replacing the hard drive ...3 4 Optical drives Inserting an optical disc ...8 Removing an optical disc when running on battery or external power 9 Removing an optical disc when no computer power is available 10 Avoiding the Sleep state or Hibernation 11 Index ...12 ENWW iii

Drives - Windows Vista
Page 16
Index A airport security devices 1 C CD inserting 8 removing, with power 9 removing, without power 10 CD drive 7 O optical disc inserting 8 removing, with power 9 removing, without power 10 optical drive 7 S Sleep 11 D drive light 2 drives caring for 1 drive light 2 hard 3, 5 optical 7 See also hard drive, optical drive DVD inserting 8 removing, with power 9 removing, without power 10 DVD drive 7 H hard disk drive installing 5 removing 3 replacing 3 hard drive installing 5 removing 3 replacing 3 Hibernation 11 L light, drive 2 12 Index ENWW
Index A airport security devices 1 C CD inserting 8 removing, with power 9 removing, without power 10 CD drive 7 O optical disc inserting 8 removing, with power 9 removing, without power 10 optical drive 7 S Sleep 11 D drive light 2 drives caring for 1 drive light 2 hard 3, 5 optical 7 See also hard drive, optical drive DVD inserting 8 removing, with power 9 removing, without power 10 DVD drive 7 H hard disk drive installing 5 removing 3 replacing 3 hard drive installing 5 removing 3 replacing 3 Hibernation 11 L light, drive 2 12 Index ENWW
Notebook Tour - Windows Vista
Page 7
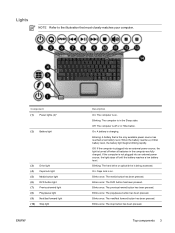
... 3 Blinking: A battery that most closely matches your computer. Component (1) Power lights (2)* (2) Battery light (3) Drive light (4) Caps lock light (5) Media button light (6) DVD button light (7) Previous/rewind light (8) Play/pause light (9) Next/fast forward light (10) Stop light ENWW Description On: The computer is in the computer are fully charged. Blinking: The computer is on . If the computer is not plugged into an external power source, the light is off when all batteries in the Sleep state. Blinks once...
... 3 Blinking: A battery that most closely matches your computer. Component (1) Power lights (2)* (2) Battery light (3) Drive light (4) Caps lock light (5) Media button light (6) DVD button light (7) Previous/rewind light (8) Play/pause light (9) Next/fast forward light (10) Stop light ENWW Description On: The computer is in the computer are fully charged. Blinking: The computer is on . If the computer is not plugged into an external power source, the light is off when all batteries in the Sleep state. Blinks once...

Notebook Tour - Windows Vista
Page 27
... wireless certification labels 19 release latch, battery 15 RJ-11 (modem) jack, identifying 12 RJ-45 (network) jack, identifying 13, 14 S S-Video-out jack, identifying 13, 14 scrolling regions, TouchPad 2 security cable slot, identifying 13, 14 serial number, computer 19 service tag 19 slots Digital Media 13 ExpressCard 13, 14 memory module 15 security cable 13, 14 speakers, identifying 6, 7 specifications operating environment 20 rated input power 21 stop button, identifying 7 stop light, identifying 3 T temperature specifications...
... wireless certification labels 19 release latch, battery 15 RJ-11 (modem) jack, identifying 12 RJ-45 (network) jack, identifying 13, 14 S S-Video-out jack, identifying 13, 14 scrolling regions, TouchPad 2 security cable slot, identifying 13, 14 serial number, computer 19 service tag 19 slots Digital Media 13 ExpressCard 13, 14 memory module 15 security cable 13, 14 speakers, identifying 6, 7 specifications operating environment 20 rated input power 21 stop button, identifying 7 stop light, identifying 3 T temperature specifications...

Multimedia - Windows Vista
Page 24
... 18 DVD button, identifying 7 DVD region settings 19 E earbuds 9 external monitor port, identifying 12 H headphones 9 J jacks audio-in (microphone) 9, 10 audio-out (headphone) 9, 10 S-Video-out 13 M media activity buttons, identifying 6 media activity hotkeys, identifying 5 media button, identifying 7 microphones, supported 10 monitor, connecting 12 multimedia software described 16 identifying 17 installing 17 using 17 mute button 8, 11 O optical disc inserting 2 removing, with power 3 removing, without power 4 writing to 18 optical drive playing 18 protecting 18 P ports, external monitor 12...
... 18 DVD button, identifying 7 DVD region settings 19 E earbuds 9 external monitor port, identifying 12 H headphones 9 J jacks audio-in (microphone) 9, 10 audio-out (headphone) 9, 10 S-Video-out 13 M media activity buttons, identifying 6 media activity hotkeys, identifying 5 media button, identifying 7 microphones, supported 10 monitor, connecting 12 multimedia software described 16 identifying 17 installing 17 using 17 mute button 8, 11 O optical disc inserting 2 removing, with power 3 removing, without power 4 writing to 18 optical drive playing 18 protecting 18 P ports, external monitor 12...

Notebook Tour
Page 7
... being accessed. When the battery reaches a critical low-battery condition, the battery light begins blinking rapidly. Blinking: The hard drive or optical drive is off or in hibernation. Blinks once: The DVD button has been pressed. If the computer is turned on. Blinks once: The media button has been pressed. Blue: Computer sound is not plugged into an external power source, the light is charging. On: A battery is turned off until the battery reaches a low-battery...
... being accessed. When the battery reaches a critical low-battery condition, the battery light begins blinking rapidly. Blinking: The hard drive or optical drive is off or in hibernation. Blinks once: The DVD button has been pressed. If the computer is turned on. Blinks once: The media button has been pressed. Blue: Computer sound is not plugged into an external power source, the light is charging. On: A battery is turned off until the battery reaches a low-battery...
TouchPad and Keyboard
Page 16
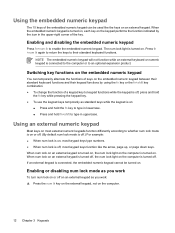
... their standard keyboard functions and their standard keyboard functions. Enabling or disabling num lock mode as you work To turn num lock on or off on an external keypad as you work: ▲ Press the num lk key on the external keypad, not on the keypad performs the function indicated by using the fn key or the fn+shift key combination. ● To change the function of a keypad key to keypad functions while the...
... their standard keyboard functions and their standard keyboard functions. Enabling or disabling num lock mode as you work To turn num lock on or off on an external keypad as you work: ▲ Press the num lk key on the external keypad, not on the keypad performs the function indicated by using the fn key or the fn+shift key combination. ● To change the function of a keypad key to keypad functions while the...


