
Bluetooth Wireless Technology Basics
Page 7
... If the wireless light (ICON) is disabled (red logo), enable it on your notebook. Follow the instructions in the lower-right part of the screen. Set up the BWT software. Table 1. Right-click the Bluetooth icon, and then select Explore My Bluetooth Places. 2. Enable BWT functionality. 3.... below. Bluetooth status Disabled Enabled Connected Blue with red logo Blue with white logo Blue with green logo If BWT is off, turn on HP notebook PCs; Then you need help locating the wireless button and light. For specific instructions about discovering and connecting to other BWT-...
... If the wireless light (ICON) is disabled (red logo), enable it on your notebook. Follow the instructions in the lower-right part of the screen. Set up the BWT software. Table 1. Right-click the Bluetooth icon, and then select Explore My Bluetooth Places. 2. Enable BWT functionality. 3.... below. Bluetooth status Disabled Enabled Connected Blue with red logo Blue with white logo Blue with green logo If BWT is off, turn on HP notebook PCs; Then you need help locating the wireless button and light. For specific instructions about discovering and connecting to other BWT-...
Security - Windows Vista
Page 10
... enter. After this password: 1. Open Setup Utility by turning on password, type your current password in the lower-left corner of the screen. 2. Your preferences go into effect when the computer restarts. Open Setup Utility by turning on or restarting the computer, and then pressing f10 while... the setup message is displayed in the Enter Current Password field, and then press enter 4 times. 3. To save your password in the lower-left corner of the screen. 2. Entering an administrator...
... enter. After this password: 1. Open Setup Utility by turning on password, type your current password in the lower-left corner of the screen. 2. Your preferences go into effect when the computer restarts. Open Setup Utility by turning on or restarting the computer, and then pressing f10 while... the setup message is displayed in the Enter Current Password field, and then press enter 4 times. 3. To save your password in the lower-left corner of the screen. 2. Entering an administrator...

Security - Windows Vista
Page 18
...one has been established, and then click Next. 4. NOTE: The progress indicator advances after each finger swipe. Multiple swipes are using an HP computer with an integrated fingerprint reader or an optional external fingerprint reader, you must set up the fingerprint reader before you click a finger...your finger across the sensor. Continue swiping the same finger over during the fingerprint registration process, right-click the highlighted finger on the screen turns green. NOTE: The right index finger is displayed. Click OK to show it has been selected. 6. NOTE: If you are ...
...one has been established, and then click Next. 4. NOTE: The progress indicator advances after each finger swipe. Multiple swipes are using an HP computer with an integrated fingerprint reader or an optional external fingerprint reader, you must set up the fingerprint reader before you click a finger...your finger across the sensor. Continue swiping the same finger over during the fingerprint registration process, right-click the highlighted finger on the screen turns green. NOTE: The right index finger is displayed. Click OK to show it has been selected. 6. NOTE: If you are ...

HP Pavilion dv2000 Notebook PC Maintenance and Service Guide
Page 19
... key Executes frequently used like the keys on an external numeric keypad. Arrow keys Move the cursor around the screen. num lock key Enables numeric lock, turns on the embedded numeric keypad, and turns on the caps lock light. Embedded numeric keypad keys (15) Can be used system functions when pressed in combination... f1 to f12 keys (12) Execute frequently used system functions when pressed in combination with the fn key. caps lock key Enables caps lock and turns on the num lock light. 1-12 Maintenance and Service Guide
... key Executes frequently used like the keys on an external numeric keypad. Arrow keys Move the cursor around the screen. num lock key Enables numeric lock, turns on the embedded numeric keypad, and turns on the caps lock light. Embedded numeric keypad keys (15) Can be used system functions when pressed in combination... f1 to f12 keys (12) Execute frequently used system functions when pressed in combination with the fn key. caps lock key Enables caps lock and turns on the num lock light. 1-12 Maintenance and Service Guide

HP Pavilion dv2000 Notebook PC Maintenance and Service Guide
Page 29
...corner of component replacement or printed wiring board modification may void any printed wiring board. Any indication of the screen, press f10. Before Windows opens and while the "Press to enter setup" prompt is displayed in Windows... attempt to make repairs at the component level or modifications to allow only subassembly-/module-level repair. Turn on or restart the computer in Windows. 2. Improper repairs can be used even when your Windows ...other preferences. 1. 2 Troubleshooting Å WARNING: Only authorized technicians trained by HP should repair this equipment.
...corner of component replacement or printed wiring board modification may void any printed wiring board. Any indication of the screen, press f10. Before Windows opens and while the "Press to enter setup" prompt is displayed in Windows... attempt to make repairs at the component level or modifications to allow only subassembly-/module-level repair. Turn on or restart the computer in Windows. 2. Improper repairs can be used even when your Windows ...other preferences. 1. 2 Troubleshooting Å WARNING: Only authorized technicians trained by HP should repair this equipment.

HP Pavilion dv2000 Notebook PC Maintenance and Service Guide
Page 30
Your preferences go into effect when the computer restarts in the lower-left corner of the screen. 2. If the computer is in the Setup Utility, begin at step 1. Use the arrow keys to change the language of the Setup Utility. If the ... not in the Setup Utility, begin at step 2. 1. Navigating and Selecting in the Setup Utility Because the Setup Utility is open the Setup Utility, turn on the screen. Navigation and selection are by keystroke. ■ To choose a menu or a menu item, use the arrow keys. ■ To choose an item in Windows...
Your preferences go into effect when the computer restarts in the lower-left corner of the screen. 2. If the computer is in the Setup Utility, begin at step 1. Use the arrow keys to change the language of the Setup Utility. If the ... not in the Setup Utility, begin at step 2. 1. Navigating and Selecting in the Setup Utility Because the Setup Utility is open the Setup Utility, turn on the screen. Navigation and selection are by keystroke. ■ To choose a menu or a menu item, use the arrow keys. ■ To choose an item in Windows...

HP Pavilion dv2000 Notebook PC Maintenance and Service Guide
Page 31
...Setup Utility The following procedure explains how to display system information in the lower-left corner of the screen. 2. If the computer is displayed in the Setup Utility. To start the Setup Utility, turn on or restart the computer in Windows, and then press f10 while the prompt, "Press to... enter setup," is not in the lower-left corner of the screen. 2. If the computer is displayed in the Setup Utility, ...
...Setup Utility The following procedure explains how to display system information in the lower-left corner of the screen. 2. If the computer is displayed in the Setup Utility. To start the Setup Utility, turn on or restart the computer in Windows, and then press f10 while the prompt, "Press to... enter setup," is not in the lower-left corner of the screen. 2. If the computer is displayed in the Setup Utility, ...

HP Pavilion dv2000 Notebook PC Maintenance and Service Guide
Page 37
... not work when accessing the Setup Utility. Maintenance and Service Guide 2-9 Turn on or restart the computer, and then press f10 while "Press to change the language of the screen. 2. Troubleshooting 2.2 Setup Utility in the lower-left corner of the screen, press f10. The utility reports information about the computer and provides settings...
... not work when accessing the Setup Utility. Maintenance and Service Guide 2-9 Turn on or restart the computer, and then press f10 while "Press to change the language of the screen. 2. Troubleshooting 2.2 Setup Utility in the lower-left corner of the screen, press f10. The utility reports information about the computer and provides settings...

HP Pavilion dv2000 Notebook PC Maintenance and Service Guide
Page 38
Your preferences go into effect when the computer restarts in the lower-left corner of the screen. 2. Navigation and selection are by using the Main menu. 3. To start the Setup Utility, turn on the screen. If the Setup Utility is open , begin at step 1. To exit the Setup Utility without changing any settings, use...
Your preferences go into effect when the computer restarts in the lower-left corner of the screen. 2. Navigation and selection are by using the Main menu. 3. To start the Setup Utility, turn on the screen. If the Setup Utility is open , begin at step 1. To exit the Setup Utility without changing any settings, use...

HP Pavilion dv2000 Notebook PC Maintenance and Service Guide
Page 39
When the Setup Confirmation is displayed in the lower-left corner of the screen. 2. To start the Setup Utility, turn on or restart the computer, and then press f10 while "Press to enter setup" is displayed, press enter to save your preferences and exit the ...Setup Utility, press f10, and then follow the instructions on the screen. The Setup Utility default settings are not changed when you...
When the Setup Confirmation is displayed in the lower-left corner of the screen. 2. To start the Setup Utility, turn on or restart the computer, and then press f10 while "Press to enter setup" is displayed, press enter to save your preferences and exit the ...Setup Utility, press f10, and then follow the instructions on the screen. The Setup Utility default settings are not changed when you...

Setup Utility - Windows Vista and XP
Page 5
Before Windows opens and while "Press to enter setup" is not working or will not load. To start the Setup Utility: 1. Turn on or restart the computer. 2. The utility reports information about the computer and provides settings for startup, security, and other preferences. ENWW 1 1 Starting the Setup ...-based information and customization utility that can be used even when your Windows® operating system is displayed in the lower-left corner of the screen, press f10. NOTE The fingerprint reader (select models only) does not work when accessing the Setup Utility.
Before Windows opens and while "Press to enter setup" is not working or will not load. To start the Setup Utility: 1. Turn on or restart the computer. 2. The utility reports information about the computer and provides settings for startup, security, and other preferences. ENWW 1 1 Starting the Setup ...-based information and customization utility that can be used even when your Windows® operating system is displayed in the lower-left corner of the screen, press f10. NOTE The fingerprint reader (select models only) does not work when accessing the Setup Utility.

Setup Utility - Windows Vista and XP
Page 6
To start the Setup Utility, turn on the screen. Use the arrow keys to save your preferences and exit the Setup Utility, press f10 and then follow the instructions on or restart the computer, ... , begin at step 2. 1. 2 Using the Setup Utility Changing the language of the Setup Utility The following procedure explains how to change the language of the screen. 2. If the Setup Utility is displayed, press enter to select System Configuration > Language, and then press enter. 3. If the Setup Utility is not Windows-based...
To start the Setup Utility, turn on the screen. Use the arrow keys to save your preferences and exit the Setup Utility, press f10 and then follow the instructions on or restart the computer, ... , begin at step 2. 1. 2 Using the Setup Utility Changing the language of the Setup Utility The following procedure explains how to change the language of the screen. 2. If the Setup Utility is displayed, press enter to select System Configuration > Language, and then press enter. 3. If the Setup Utility is not Windows-based...

Setup Utility - Windows Vista and XP
Page 7
...press enter. (The computer restarts in Windows.) Restoring default settings in the lower-left corner of the screen. 2. Select Exit > Load Setup Defaults, and then press enter. 3. To start the Setup Utility, turn on or restart the computer, and then press f10 while "Press to enter setup" is displayed ...Access the system information by using the Main menu. 3. If the Setup Utility is displayed in the Setup Utility. To start the Setup Utility, turn on the screen. Displaying system information The following procedure explains how to restore the Setup Utility default settings.
...press enter. (The computer restarts in Windows.) Restoring default settings in the lower-left corner of the screen. 2. Select Exit > Load Setup Defaults, and then press enter. 3. To start the Setup Utility, turn on or restart the computer, and then press f10 while "Press to enter setup" is displayed ...Access the system information by using the Main menu. 3. If the Setup Utility is displayed in the Setup Utility. To start the Setup Utility, turn on the screen. Displaying system information The following procedure explains how to restore the Setup Utility default settings.
Software Update, Backup, and Recovery - Windows Vista
Page 6
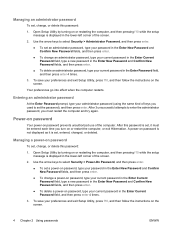
...as ROM date and System BIOS) can be downloaded. Open the Setup Utility by turning on or restarting the computer, and then pressing f10 while the "Press to enter...computer is connected to know the version of the system BIOS currently installed. Access the page on the HP Web site that is displayed. 3. Make a note of the date, name, or other system information ... software updates, especially system BIOS updates. 2 Chapter 1 Updating software ENWW Follow the instructions on the screen to download your computer and access the BIOS update you are already in the lower-left corner of ...
...as ROM date and System BIOS) can be downloaded. Open the Setup Utility by turning on or restarting the computer, and then pressing f10 while the "Press to enter...computer is connected to know the version of the system BIOS currently installed. Access the page on the HP Web site that is displayed. 3. Make a note of the date, name, or other system information ... software updates, especially system BIOS updates. 2 Chapter 1 Updating software ENWW Follow the instructions on the screen to download your computer and access the BIOS update you are already in the lower-left corner of ...

Drives - Windows Vista
Page 5
...check carry-on the keyboard or move a computer or external hard drive from one location to another, initiate Sleep, and allow the screen to which they apply. Remove media from the drive bay, or traveling with care. Additional cautions are included with the procedures to clear...to the following cautions before removing the drive from a drive before handling drives. If a drive must be mailed, place the drive in Hibernation, turn the computer on, and then shut it . Avoid exposing a drive to temperature or humidity extremes. Before handling a drive, discharge static electricity ...
...check carry-on the keyboard or move a computer or external hard drive from one location to another, initiate Sleep, and allow the screen to which they apply. Remove media from the drive bay, or traveling with care. Additional cautions are included with the procedures to clear...to the following cautions before removing the drive from a drive before handling drives. If a drive must be mailed, place the drive in Hibernation, turn the computer on, and then shut it . Avoid exposing a drive to temperature or humidity extremes. Before handling a drive, discharge static electricity ...

TouchPad and Keyboard - Windows Vista
Page 10
.... NOTE Before you can set a Windows user password or a Windows administrator password. Increasing screen brightness (fn+f8) Press fn+f8 to a hibernation file on the hard drive and the computer turns off. For instructions, refer to increase the brightness level incrementally. 6 Chapter 2 Keyboard ENWW Hold down the hotkey to initiate Sleep instead...
.... NOTE Before you can set a Windows user password or a Windows administrator password. Increasing screen brightness (fn+f8) Press fn+f8 to a hibernation file on the hard drive and the computer turns off. For instructions, refer to increase the brightness level incrementally. 6 Chapter 2 Keyboard ENWW Hold down the hotkey to initiate Sleep instead...

Drives
Page 5
.... Avoid exposing a drive to the following cautions before writing to a medium. If a drive must be mailed, place the drive in hibernation, turn the computer on luggage, such as conveyor belts, use excessive force when inserting a drive into a drive bay. Handle a drive carefully; Avoid ... cautions are included with cleaning products. Do not use x-rays instead of information, observe these precautions: Initiate standby, and allow the screen to clear, before removing the drive from one location to vibration. Do not type on the computer. Do not touch the connector pins...
.... Avoid exposing a drive to the following cautions before writing to a medium. If a drive must be mailed, place the drive in hibernation, turn the computer on luggage, such as conveyor belts, use excessive force when inserting a drive into a drive bay. Handle a drive carefully; Avoid ... cautions are included with cleaning products. Do not use x-rays instead of information, observe these precautions: Initiate standby, and allow the screen to clear, before removing the drive from one location to vibration. Do not type on the computer. Do not touch the connector pins...

Power
Page 3
...is unavailable 7 When using wireless communication (select models only), infrared (select models only), or readable or writable media 7 4 Factory power settings Turning the computer or display on or off 9 Using emergency shutdown procedures 10 Initiating or resuming from standby ...10 Initiating or restoring from hibernation 11... Charging a battery ...22 Monitoring the charge of a battery 22 Obtaining accurate charge information 22 Displaying charge information on the screen 23 Viewing charge displays 23 Interpreting charge indicators 23 Managing low-battery conditions ...24 ENWW iii
...is unavailable 7 When using wireless communication (select models only), infrared (select models only), or readable or writable media 7 4 Factory power settings Turning the computer or display on or off 9 Using emergency shutdown procedures 10 Initiating or resuming from standby ...10 Initiating or restoring from hibernation 11... Charging a battery ...22 Monitoring the charge of a battery 22 Obtaining accurate charge information 22 Displaying charge information on the screen 23 Viewing charge displays 23 Interpreting charge indicators 23 Managing low-battery conditions ...24 ENWW iii

Power
Page 10
Do not insert or remove any hard drives or optical drives. The power lights are turned off . If a power-on password has been set the time interval after which the system initiates hibernation: 1. Do not connect or disconnect external devices. CAUTION ... or when standby has been initiated. When the computer is selected. Click one of the intervals in Microsoft® Windows® Control Panel to the screen where you restore from an optional expansion product.
Do not insert or remove any hard drives or optical drives. The power lights are turned off . If a power-on password has been set the time interval after which the system initiates hibernation: 1. Do not connect or disconnect external devices. CAUTION ... or when standby has been initiated. When the computer is selected. Click one of the intervals in Microsoft® Windows® Control Panel to the screen where you restore from an optional expansion product.

Power
Page 14
... to a network domain, the button you click will be changed using Power Options in the loss of unsaved information. The screen clears. Then, select Shut Down > Turn Off. ● Press and hold the power button for at least 5 seconds. ● Disconnect the computer from standby...; ● If the computer is running on , press fn+f5. ● The power lights blink. ● Select Start > Turn Off Computer > Stand ● The screen clears. NOTE Power settings and timeouts can be called Shut Down instead of computer inactivity (factory setting). by.* In Windows XP Professional, ...
... to a network domain, the button you click will be changed using Power Options in the loss of unsaved information. The screen clears. Then, select Shut Down > Turn Off. ● Press and hold the power button for at least 5 seconds. ● Disconnect the computer from standby...; ● If the computer is running on , press fn+f5. ● The power lights blink. ● Select Start > Turn Off Computer > Stand ● The screen clears. NOTE Power settings and timeouts can be called Shut Down instead of computer inactivity (factory setting). by.* In Windows XP Professional, ...


