Backup and Recovery - Windows Vista
Page 5
As you add new software and data files, you should continue to back up your system on the hard drive or from a dedicated recovery partition (select models only) on a regular basis to help you create. This feature helps you experience system failure or...recovery discs immediately after a system failure is listed in case of the window. 1 HP recommends that do not have a recovery partition. System restore points allow you to reverse undesirable changes to factory settings in the Hard Disk Drives section of system failure or instability. ● Backing up (boot) your important ...
As you add new software and data files, you should continue to back up your system on the hard drive or from a dedicated recovery partition (select models only) on a regular basis to help you create. This feature helps you experience system failure or...recovery discs immediately after a system failure is listed in case of the window. 1 HP recommends that do not have a recovery partition. System restore points allow you to reverse undesirable changes to factory settings in the Hard Disk Drives section of system failure or instability. ● Backing up (boot) your important ...
Backup and Recovery - Windows Vista
Page 10
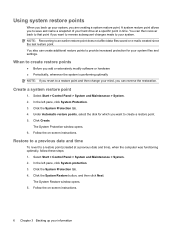
... earlier restore point does not affect data files saved or e-mails created since the last restore point. When to a restore point and then change your hard drive at a previous date and time), when the computer was functioning optimally, follow these steps: 1. Select Start > Control Panel > System and Maintenance > System. 2. Click the System...
... earlier restore point does not affect data files saved or e-mails created since the last restore point. When to a restore point and then change your hard drive at a previous date and time), when the computer was functioning optimally, follow these steps: 1. Select Start > Control Panel > System and Maintenance > System. 2. Click the System...
Backup and Recovery - Windows Vista
Page 11
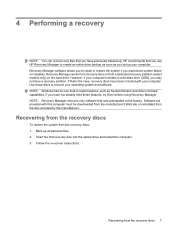
..., try them before using Recovery Manager. If you have a recovery partition. Software not provided with your computer. Follow the on the hard drive. 4 Performing a recovery NOTE: You can recover only files that you have previously backed up your computer. Recovery Manager works from recovery.... Recovering from the recovery discs To restore the system from the recovery discs 7 Recovering from the recovery discs: 1. HP recommends that you use HP Recovery Manager to repair or restore the system if you experience system failure or instability. Recovery Manager software allows you set...
..., try them before using Recovery Manager. If you have a recovery partition. Software not provided with your computer. Follow the on the hard drive. 4 Performing a recovery NOTE: You can recover only files that you have previously backed up your computer. Recovery Manager works from recovery.... Recovering from the recovery discs To restore the system from the recovery discs 7 Recovering from the recovery discs: 1. HP recommends that you use HP Recovery Manager to repair or restore the system if you experience system failure or instability. Recovery Manager software allows you set...
Backup and Recovery - Windows Vista
Page 12
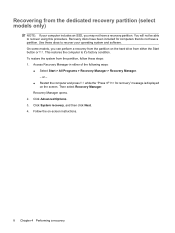
... an SSD, you can perform a recovery from either of the following ways: ● Select Start > All Programs > Recovery Manager > Recovery Manager. - Follow the on the hard drive from the partition on -screen instructions. 8 Chapter 4 Performing a recovery This restores the computer to recover using this procedure. Click Advanced Options. 3. Use these steps: 1. On...
... an SSD, you can perform a recovery from either of the following ways: ● Select Start > All Programs > Recovery Manager > Recovery Manager. - Follow the on the hard drive from the partition on -screen instructions. 8 Chapter 4 Performing a recovery This restores the computer to recover using this procedure. Click Advanced Options. 3. Use these steps: 1. On...
Backup and Recovery - Windows Vista
Page 5
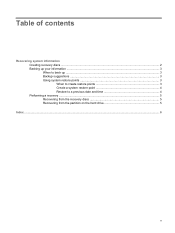
Table of contents Recovering system information Creating recovery discs ...2 Backing up your information ...3 When to back up ...3 Backup suggestions ...3 Using system restore points 3 When to create restore points 3 Create a system restore point 4 Restore to a previous date and time 4 Performing a recovery ...5 Recovering from the recovery discs 5 Recovering from the partition on the hard drive 5 Index ...6 v
Table of contents Recovering system information Creating recovery discs ...2 Backing up your information ...3 When to back up ...3 Backup suggestions ...3 Using system restore points 3 When to create restore points 3 Create a system restore point 4 Restore to a previous date and time 4 Performing a recovery ...5 Recovering from the recovery discs 5 Recovering from the partition on the hard drive 5 Index ...6 v
Backup and Recovery - Windows Vista
Page 7
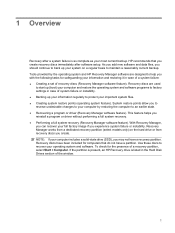
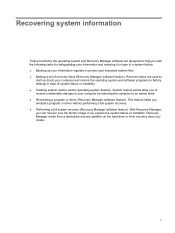
... a full system recovery (Recovery Manager software feature). This feature helps you experience system failure or instability. Recovery Manager works from a dedicated recovery partition on the hard drive or from recovery discs you create. 1 Recovering system information Tools provided by restoring the computer to protect your important system files. ● Making a set of...
... a full system recovery (Recovery Manager software feature). This feature helps you experience system failure or instability. Recovery Manager works from a dedicated recovery partition on the hard drive or from recovery discs you create. 1 Recovering system information Tools provided by restoring the computer to protect your important system files. ● Making a set of...

Backup and Recovery - Windows Vista
Page 9
... your system. Copy the screen: To copy only the active window, press alt+fn+prt sc. Using system restore points When you back up your hard drive at a specific point in a window, toolbar, or menu bar by taking a screen shot of recovery discs using Recovery Manager. ● Create system restore points using...
... your system. Copy the screen: To copy only the active window, press alt+fn+prt sc. Using system restore points When you back up your hard drive at a specific point in a window, toolbar, or menu bar by taking a screen shot of recovery discs using Recovery Manager. ● Create system restore points using...

Backup and Recovery - Windows Vista
Page 11
...capabilities. Software not provided with this computer must be downloaded from the manufacturer's Web site or reinstalled from the partition on the hard drive. Click Advanced Options. 3. Performing a recovery NOTE: You can perform a recovery from the disc provided by the manufacturer. ... repair features, such as you set up all personal files. 2. Then select Recovery Manager. HP recommends that was preinstalled at the factory. Recovering from the partition on the hard drive You can only recover files that you have not already tried these steps: 1. Recovery Manager ...
...capabilities. Software not provided with this computer must be downloaded from the manufacturer's Web site or reinstalled from the partition on the hard drive. Click Advanced Options. 3. Performing a recovery NOTE: You can perform a recovery from the disc provided by the manufacturer. ... repair features, such as you set up all personal files. 2. Then select Recovery Manager. HP recommends that was preinstalled at the factory. Recovering from the partition on the hard drive You can only recover files that you have not already tried these steps: 1. Recovery Manager ...

Drives - Windows Vista
Page 5
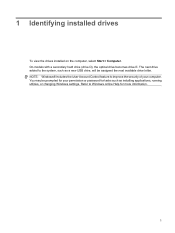
Table of contents 1 Identifying installed drives 2 Handling drives 3 Using an optical drive Inserting an optical disc ...5 Removing an optical disc when running on battery or external power 6 Removing an optical disc when no computer power is available 7 4 Improving hard drive performance Using Disk Defragmenter ...8 Using Disk Cleanup ...8 5 Replacing the hard drive Index ...12 v
Table of contents 1 Identifying installed drives 2 Handling drives 3 Using an optical drive Inserting an optical disc ...5 Removing an optical disc when running on battery or external power 6 Removing an optical disc when no computer power is available 7 4 Improving hard drive performance Using Disk Defragmenter ...8 Using Disk Cleanup ...8 5 Replacing the hard drive Index ...12 v
Drives - Windows Vista
Page 7
... be prompted for more information. 1 You may be assigned the next available drive letter. NOTE: Windows® includes the User Account Control feature to Windows online Help for your computer. On models with a secondary hard drive (drive D), the optical drive becomes drive E. The next drive added to the system, such as installing applications, running utilities, or changing...
... be prompted for more information. 1 You may be assigned the next available drive letter. NOTE: Windows® includes the User Account Control feature to Windows online Help for your computer. On models with a secondary hard drive (drive D), the optical drive becomes drive E. The next drive added to the system, such as installing applications, running utilities, or changing...
Drives - Windows Vista
Page 8
... Hibernation, turn the computer on luggage, such as conveyor belts, use excessive force when inserting a drive into a drive bay. Do not spray the drive with the procedures to which they apply. Before removing or inserting a hard drive, shut down through the operating system. Do not use x-rays instead of information, observe these precautions: Before you...
... Hibernation, turn the computer on luggage, such as conveyor belts, use excessive force when inserting a drive into a drive bay. Do not spray the drive with the procedures to which they apply. Before removing or inserting a hard drive, shut down through the operating system. Do not use x-rays instead of information, observe these precautions: Before you...

Drives - Windows Vista
Page 14
... fragmented. Disk Defragmenter consolidates the fragmented files and folders on the hard drive so that you use the computer, files on -screen instructions. 8 Chapter 4 Improving hard drive performance NOTE: Windows® includes the User Account Control feature to improve ... such as installing applications, running utilities, or changing Windows settings. Using Disk Cleanup Disk Cleanup searches the hard drive for more information. 4 Improving hard drive performance Using Disk Defragmenter As you can run more efficiently. Click Defragment now. For additional information, access the...
... fragmented. Disk Defragmenter consolidates the fragmented files and folders on the hard drive so that you use the computer, files on -screen instructions. 8 Chapter 4 Improving hard drive performance NOTE: Windows® includes the User Account Control feature to improve ... such as installing applications, running utilities, or changing Windows settings. Using Disk Cleanup Disk Cleanup searches the hard drive for more information. 4 Improving hard drive performance Using Disk Defragmenter As you can run more efficiently. Click Defragment now. For additional information, access the...
Drives - Windows Vista
Page 15
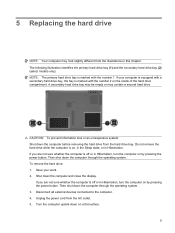
... cord from the illustrations in Hibernation, turn the computer on by pressing the power button. The following illustration identifies the primary hard drive bay (1) and the secondary hard drive bay (2) (select models only). A secondary hard drive bay may be empty or may look slightly different from the AC outlet. 5. Shut down the computer before removing the...
... cord from the illustrations in Hibernation, turn the computer on by pressing the power button. The following illustration identifies the primary hard drive bay (1) and the secondary hard drive bay (2) (select models only). A secondary hard drive bay may be empty or may look slightly different from the AC outlet. 5. Shut down the computer before removing the...
Drives - Windows Vista
Page 16
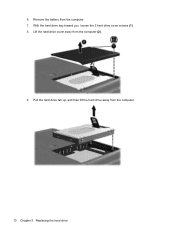
Lift the hard drive cover away from the computer. 10 Chapter 5 Replacing the hard drive 6. Pull the hard drive tab up, and then lift the hard drive away from the computer (2). 9. Remove the battery from the computer. 7. With the hard drive bay toward you, loosen the 2 hard drive cover screws (1). 8.
Lift the hard drive cover away from the computer. 10 Chapter 5 Replacing the hard drive 6. Pull the hard drive tab up, and then lift the hard drive away from the computer (2). 9. Remove the battery from the computer. 7. With the hard drive bay toward you, loosen the 2 hard drive cover screws (1). 8.
Drives - Windows Vista
Page 17
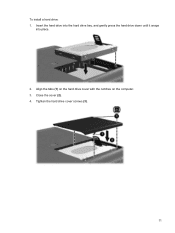
Tighten the hard drive cover screws (3). 11 Align the tabs (1) on the hard drive cover with the notches on the computer. 3. To install a hard drive: 1. Close the cover (2). 4. Insert the hard drive into the hard drive bay, and gently press the hard drive down until it snaps into place. 2.
Tighten the hard drive cover screws (3). 11 Align the tabs (1) on the hard drive cover with the notches on the computer. 3. To install a hard drive: 1. Close the cover (2). 4. Insert the hard drive into the hard drive bay, and gently press the hard drive down until it snaps into place. 2.

Drives - Windows Vista
Page 18
... power 7 optical drive 3 S software Disk Cleanup 8 Disk Defragmenter 8 H hard disk drive installing 11 removing 9 replacing 9 hard drive installing 11 removing 9 replacing 9 M maintenance Disk Cleanup 8 Disk Defragmenter 8 12 Index Index A airport security devices 2 C CD inserting 5 removing, with power 6 removing, without power 7 CD drive 3 D Disk Cleanup software 8 Disk Defragmenter software 8 disk performance 8 drives caring for 2 hard drive 9, 11 optical drive 3 See also hard drive;
... power 7 optical drive 3 S software Disk Cleanup 8 Disk Defragmenter 8 H hard disk drive installing 11 removing 9 replacing 9 hard drive installing 11 removing 9 replacing 9 M maintenance Disk Cleanup 8 Disk Defragmenter 8 12 Index Index A airport security devices 2 C CD inserting 5 removing, with power 6 removing, without power 7 CD drive 3 D Disk Cleanup software 8 Disk Defragmenter software 8 disk performance 8 drives caring for 2 hard drive 9, 11 optical drive 3 See also hard drive;
Setup Utility - Windows Vista
Page 8
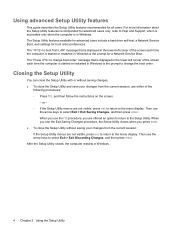
The Setup Utility features available for advanced users include a hard drive self-test, a Network Service Boot, and settings for all users. Closing the Setup Utility You can close the Setup Utility and save your changes from ...
The Setup Utility features available for advanced users include a hard drive self-test, a Network Service Boot, and settings for all users. Closing the Setup Utility You can close the Setup Utility and save your changes from ...

Setup Utility - Windows Vista
Page 10
Enable/disable the processor Virtualization Technology. NOTE: On models with two hard drives, this menu option is called the Primary Hard Disk Self Test. Run a diagnostic test on Key ◦ USB Hard drive ◦ Network adapter Enable/disable the Quick Launch Button tapping sound. System Configuration ...boot order for: ◦ USB Floppy ◦ ATAPI CD/DVD ROM Drive ◦ Hard drive ◦ USB Diskette on the system memory. 6 Chapter 3 Setup Utility menus Diagnostics menu Select Hard Disk Self Test Secondary Hard Disk Self Test (select models only) Memory Test To Do This Run...
Enable/disable the processor Virtualization Technology. NOTE: On models with two hard drives, this menu option is called the Primary Hard Disk Self Test. Run a diagnostic test on Key ◦ USB Hard drive ◦ Network adapter Enable/disable the Quick Launch Button tapping sound. System Configuration ...boot order for: ◦ USB Floppy ◦ ATAPI CD/DVD ROM Drive ◦ Hard drive ◦ USB Diskette on the system memory. 6 Chapter 3 Setup Utility menus Diagnostics menu Select Hard Disk Self Test Secondary Hard Disk Self Test (select models only) Memory Test To Do This Run...

Setup Utility - Windows Vista
Page 11
...sound 6 C changing the Setup Utility language 2 closing the Setup Utility 4 D Diagnostics menu 6 displaying system information 3 drives, boot order 6 F fingerprint reader 1 S secondary hard drive self test 6 Security menu 5 selecting in the Setup Utility 2 Setup Utility changing the language 2 closing 4 Diagnostics menu...starting 1 System Configuration menu 6 using 2 using advanced features 4 System Configuration menu 6 system information 5 H hard drive self test 6 L language support 6 M Main menu 5 N navigating in the Setup Utility 2 P passwords 5 power-on password 5 R restoring default ...
...sound 6 C changing the Setup Utility language 2 closing the Setup Utility 4 D Diagnostics menu 6 displaying system information 3 drives, boot order 6 F fingerprint reader 1 S secondary hard drive self test 6 Security menu 5 selecting in the Setup Utility 2 Setup Utility changing the language 2 closing 4 Diagnostics menu...starting 1 System Configuration menu 6 using 2 using advanced features 4 System Configuration menu 6 system information 5 H hard drive self test 6 L language support 6 M Main menu 5 N navigating in the Setup Utility 2 P passwords 5 power-on password 5 R restoring default ...
Software Updates - Windows Vista
Page 8
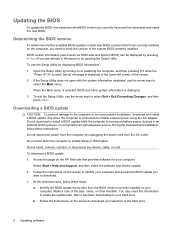
... BIOS information: 1. Follow the instructions on the HP Web site that is selected, BIOS and other identifier. BIOS version information (also known as ROM date and System BIOS) can be displayed by turning on the computer, you want to the hard drive. 2 Updating software Do not insert, remove, connect... your selection to download. 3. If the Setup Utility does not open with the system information displayed, use the Setup Utility for your hard drive. When the Main menu is later than those currently installed on or restarting the computer, and then pressing f10 while the "Press to...
... BIOS information: 1. Follow the instructions on the HP Web site that is selected, BIOS and other identifier. BIOS version information (also known as ROM date and System BIOS) can be displayed by turning on the computer, you want to the hard drive. 2 Updating software Do not insert, remove, connect... your selection to download. 3. If the Setup Utility does not open with the system information displayed, use the Setup Utility for your hard drive. When the Main menu is later than those currently installed on or restarting the computer, and then pressing f10 while the "Press to...

