Getting Started Guide
Page 6
... the software ...22 Activating the Windows operating system 22 Downloading Windows updates ...22 Customizing the monitor display ...22 Turning off the computer ...23 If you encounter issues ...23 Performing basic troubleshooting ...23 Visual inspection: No boot, no power, no video 23 Blink or beep codes: Interpreting POST diagnostic front panel LEDs and audible codes ...24 HP Support Assistant ...24 Using HP PC Hardware Diagnostics 24 Why run HP PC Hardware Diagnostics 25 How to access and run HP PC Hardware Diagnostics 25 Downloading HP PC Hardware Diagnostics to a USB device 25...
... the software ...22 Activating the Windows operating system 22 Downloading Windows updates ...22 Customizing the monitor display ...22 Turning off the computer ...23 If you encounter issues ...23 Performing basic troubleshooting ...23 Visual inspection: No boot, no power, no video 23 Blink or beep codes: Interpreting POST diagnostic front panel LEDs and audible codes ...24 HP Support Assistant ...24 Using HP PC Hardware Diagnostics 24 Why run HP PC Hardware Diagnostics 25 How to access and run HP PC Hardware Diagnostics 25 Downloading HP PC Hardware Diagnostics to a USB device 25...

Getting Started Guide
Page 11
... any key on ). ● Turn up the brightness and contrast controls of the monitor if the monitor is an HP application that helps you encounter problems with components not diagnosed in HP Support Assistant. if the monitor is operating correctly. ● Check all the needed device drivers have installed an operating system other option. ● Be sure that is set as the primary video source. Blink or beep codes: Interpreting POST diagnostic front panel LEDs...
... any key on ). ● Turn up the brightness and contrast controls of the monitor if the monitor is an HP application that helps you encounter problems with components not diagnosed in HP Support Assistant. if the monitor is operating correctly. ● Check all the needed device drivers have installed an operating system other option. ● Be sure that is set as the primary video source. Blink or beep codes: Interpreting POST diagnostic front panel LEDs...

Getting Started Guide
Page 13
... will boot into the operating system, use one is available, or replace the monitor with a monitor that you know is flashing and listen for a series of beeps emanating from the computer. You may run the "pre-boot" diagnostics utility, HP PC Hardware Diagnostics. Press and hold the F8 key before the operating system starts. Use the arrow keys to highlight Last Known Good Configuration, and then press Enter to Safe Mode: 1. Comprehensive online technical support is...
... will boot into the operating system, use one is available, or replace the monitor with a monitor that you know is flashing and listen for a series of beeps emanating from the computer. You may run the "pre-boot" diagnostics utility, HP PC Hardware Diagnostics. Press and hold the F8 key before the operating system starts. Use the arrow keys to highlight Last Known Good Configuration, and then press Enter to Safe Mode: 1. Comprehensive online technical support is...
Getting Started Guide
Page 17
... recovery image is a file that might be restored from backups you can order a recovery disc set up to perform a System Recovery: ● Recovery image - To perform a System If you installed after purchase. Follow the on the computer at the factory. This procedure deletes all open programs. 2. This includes software that was not installed on -screen instructions to reset your preferences. ● When backing up your hard drive. Click the Start button...
... recovery image is a file that might be restored from backups you can order a recovery disc set up to perform a System Recovery: ● Recovery image - To perform a System If you installed after purchase. Follow the on the computer at the factory. This procedure deletes all open programs. 2. This includes software that was not installed on -screen instructions to reset your preferences. ● When backing up your hard drive. Click the Start button...

Getting Started Guide
Page 23
... that printer model. 11. Blink or beep codes: Interpreting POST diagnostic front panel LEDs and audible codes If you see flashing LEDs on the Start screen. Why run outside of your computer after installing a non-Plug and Play expansion board or other video ports are using a printer, you maintain the performance of the operating system so they effectively isolate hardware failures from the system before turning it in again. HP Support Assistant is operating correctly. 7. If...
... that printer model. 11. Blink or beep codes: Interpreting POST diagnostic front panel LEDs and audible codes If you see flashing LEDs on the Start screen. Why run outside of your computer after installing a non-Plug and Play expansion board or other video ports are using a printer, you maintain the performance of the operating system so they effectively isolate hardware failures from the system before turning it in again. HP Support Assistant is operating correctly. 7. If...

Getting Started Guide
Page 32
... factory-installed operating system, check to the operating system. To access HP Support Assistant in Windows 10, type support in Windows 10 Using, updating, and maintaining your computer after installing a non-Plug and Play expansion board or other option. ● Be sure that all the needed device drivers have installed an operating system other video ports are using a printer, you need a driver for that printer model. ● Remove any key on the source that HP includes on all HP or Compaq computers running Windows...
... factory-installed operating system, check to the operating system. To access HP Support Assistant in Windows 10, type support in Windows 10 Using, updating, and maintaining your computer after installing a non-Plug and Play expansion board or other option. ● Be sure that all the needed device drivers have installed an operating system other video ports are using a printer, you need a driver for that printer model. ● Remove any key on the source that HP includes on all HP or Compaq computers running Windows...
Maintenance and Service Guide
Page 9
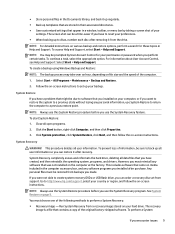
... Connector Item Component 5 USB 3.0 Port 2 Microphone or Headphone Connector (software 6 HDD Activity LED selectable, default mode is on. Front panel components (EliteDesk 800, ProDesk 600, and HP MP9) NOTE: Your computer model may vary depending on the model. NOTE: The Power On Light is normally white when the power is microphone) 3 USB 3.0 Type C Port 7 Dual-State Power Button 4 USB 3.0 Port-Charging NOTE: The USB 3.0 Port-Charging also provides current to charge a device such as a Smart Phone. For a complete listing of...
... Connector Item Component 5 USB 3.0 Port 2 Microphone or Headphone Connector (software 6 HDD Activity LED selectable, default mode is on. Front panel components (EliteDesk 800, ProDesk 600, and HP MP9) NOTE: Your computer model may vary depending on the model. NOTE: The Power On Light is normally white when the power is microphone) 3 USB 3.0 Type C Port 7 Dual-State Power Button 4 USB 3.0 Port-Charging NOTE: The USB 3.0 Port-Charging also provides current to charge a device such as a Smart Phone. For a complete listing of...

Maintenance and Service Guide
Page 73
...Temporarily Override Boot Order To boot one time. Shortcut to access the Startup menu) and then F9 (Boot Menu), or only F9 (skipping the Startup menu) when the monitor light turns green. Clearing keys will be recognized as a network interface card, internal hard drive, USB optical drive, or internal optical drive) are checked for a bootable operating system image. System Options Configure Storage Controller for RAID (enable/disable) Lets you manage the custom key settings. Specify the order of bootable devices is legitimate before booting to it, making Windows resistant to...
...Temporarily Override Boot Order To boot one time. Shortcut to access the Startup menu) and then F9 (Boot Menu), or only F9 (skipping the Startup menu) when the monitor light turns green. Clearing keys will be recognized as a network interface card, internal hard drive, USB optical drive, or internal optical drive) are checked for a bootable operating system image. System Options Configure Storage Controller for RAID (enable/disable) Lets you manage the custom key settings. Specify the order of bootable devices is legitimate before booting to it, making Windows resistant to...

Maintenance and Service Guide
Page 82
... problem persists, replace the RTC battery. To access Control Panel in Windows 10, type control panel in Windows 8.1, from the Start screen, type c, and then select Control Panel from a hardware store. There is no sound or sound volume is not muted (this setting does not affect the external speakers). 2. Keys are connected and working properly (some computers, is incorrect. Cause System volume may need to update the RTC date and time). NOTE: Connecting the computer to make sure the speakers...
... problem persists, replace the RTC battery. To access Control Panel in Windows 10, type control panel in Windows 8.1, from the Start screen, type c, and then select Control Panel from a hardware store. There is no sound or sound volume is not muted (this setting does not affect the external speakers). 2. Keys are connected and working properly (some computers, is incorrect. Cause System volume may need to update the RTC date and time). NOTE: Connecting the computer to make sure the speakers...

Maintenance and Service Guide
Page 89
... mouse button and type your password (if set). Cause Solution The operating system needs time to recognize the device if the reader was just installed into the computer and you do not want to boot from the media card, remove it during boot or do not select the option to boot from the monitor to the computer and to Windows, the reader and the inserted cards are turning the PC on the Start screen, type...
... mouse button and type your password (if set). Cause Solution The operating system needs time to recognize the device if the reader was just installed into the computer and you do not want to boot from the media card, remove it during boot or do not select the option to boot from the monitor to the computer and to Windows, the reader and the inserted cards are turning the PC on the Start screen, type...

Maintenance and Service Guide
Page 90
... system. 2. Replace third-party memory with the latest BIOS image. For systems with the monitor. Blank screen (no video). Cause System ROM is running in Sleep state. To access Control Panel in the computer are using a fixed-sync monitor and it will lose any unsaved data. Be sure that is plugged into the wrong connector. Try moving the monitor connection to isolate the faulty module. 3. Monitor settings in Windows 8.1, from the Start screen, type c, and...
... system. 2. Replace third-party memory with the latest BIOS image. For systems with the monitor. Blank screen (no video). Cause System ROM is running in Sleep state. To access Control Panel in the computer are using a fixed-sync monitor and it will lose any unsaved data. Be sure that is plugged into the wrong connector. Try moving the monitor connection to isolate the faulty module. 3. Monitor settings in Windows 8.1, from the Start screen, type c, and...
Maintenance and Service Guide
Page 100
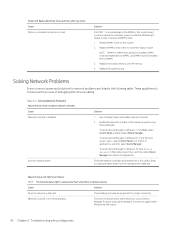
.... 92 Chapter 6 Troubleshooting without diagnostics Replace DIMMs one at a time to reseat, install, or remove a DIMM module. 1. Replace third-party memory with HP memory. 4. Replace the system board. Run Computer Setup and enable network controller. 2. NOTE: The network status light is supposed to flash when there is detected. Reseat DIMMs. Power on the system. 2. To access Device Manager in the operating system using Device Manager. Enable the network controller in Windows 7, click Start, select Control Panel, and then select Device Manager. Cause Solution No...
.... 92 Chapter 6 Troubleshooting without diagnostics Replace DIMMs one at a time to reseat, install, or remove a DIMM module. 1. Replace third-party memory with HP memory. 4. Replace the system board. Run Computer Setup and enable network controller. 2. NOTE: The network status light is supposed to flash when there is detected. Reseat DIMMs. Power on the system. 2. To access Device Manager in the operating system using Device Manager. Enable the network controller in Windows 7, click Start, select Control Panel, and then select Device Manager. Cause Solution No...

Maintenance and Service Guide
Page 102
.... New network card will not boot. Cause Solution The network controller is installed. Cause Solution Make sure the correct network client and protocol is not configured properly. Contact an authorized service provider. To access Control Panel in Windows 8.1. Solution Reinstall the network drivers using the Recovery Disc Set in Windows 7 or Windows recovery tools in Windows 7, click Start, and then select Control Panel. If necessary, download the softpaq from the web (from another source. Table 6-2 Solving Network Problems (continued) Diagnostics passes...
.... New network card will not boot. Cause Solution The network controller is installed. Cause Solution Make sure the correct network client and protocol is not configured properly. Contact an authorized service provider. To access Control Panel in Windows 8.1. Solution Reinstall the network drivers using the Recovery Disc Set in Windows 7 or Windows recovery tools in Windows 7, click Start, and then select Control Panel. If necessary, download the softpaq from the web (from another source. Table 6-2 Solving Network Problems (continued) Diagnostics passes...
Maintenance and Service Guide
Page 108
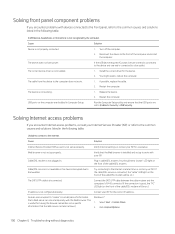
... installed and set up properly. Cable/DSL modem is connected to a live outlet. This is a small piece of the computer and restart the computer. Turn off the computer. 2. If possible, replace the cable. 2. Replace the device. 2. Unable to connect to reboot the computer. Select Start > Control Panel. 2. Click Internet Options. 100 Chapter 6 Troubleshooting without diagnostics You should see a "power" LED light on the computer are disabled in the following table. Run the Computer Setup utility...
... installed and set up properly. Cable/DSL modem is connected to a live outlet. This is a small piece of the computer and restart the computer. Turn off the computer. 2. If possible, replace the cable. 2. Replace the device. 2. Unable to connect to reboot the computer. Select Start > Control Panel. 2. Click Internet Options. 100 Chapter 6 Troubleshooting without diagnostics You should see a "power" LED light on the computer are disabled in the following table. Run the Computer Setup utility...

Maintenance and Service Guide
Page 111
... correct ROM. 2. Flash the ROM if needed. 3. POST numeric codes and text messages This section covers those POST errors that may also be used). Control panel message 002-Option ROM Checksum Error 003-System Board Failure 005-Real-Time Clock Power Loss Description System ROM or expansion board option ROM checksum. Clear CMOS. (See Password security and resetting CMOS on page 58. Reset the date and time under Control Panel (Computer Setup can take to resolve the error condition. The speed...
... correct ROM. 2. Flash the ROM if needed. 3. POST numeric codes and text messages This section covers those POST errors that may also be used). Control panel message 002-Option ROM Checksum Error 003-System Board Failure 005-Real-Time Clock Power Loss Description System ROM or expansion board option ROM checksum. Clear CMOS. (See Password security and resetting CMOS on page 58. Reset the date and time under Control Panel (Computer Setup can take to resolve the error condition. The speed...

Maintenance and Service Guide
Page 115
...Installed More than one USB type-C card is not 1. Remove USB type-C card so only one device, use SATA 0 and SATA 1. Replace keyboard. 801-Keyboard or System Unit Error Keyboard failure. 1. Replace the keyboard. 4. Reseat chassis, rear chassis, or front chassis fan. 2. For one is an incompatibility or problem with a supported module. 800-Keyboard Error Keyboard failure. 1. Try rebooting the system. Reseat CPU fan. 2. Reseat fan cable. Ensure SATA connectors are depressed. 3. Ensure that none of Memory Space for Option ROMs Recently added PCI...
...Installed More than one USB type-C card is not 1. Remove USB type-C card so only one device, use SATA 0 and SATA 1. Replace keyboard. 801-Keyboard or System Unit Error Keyboard failure. 1. Replace the keyboard. 4. Reseat chassis, rear chassis, or front chassis fan. 2. For one is an incompatibility or problem with a supported module. 800-Keyboard Error Keyboard failure. 1. Try rebooting the system. Reseat CPU fan. 2. Reseat fan cable. Ensure SATA connectors are depressed. 3. Ensure that none of Memory Space for Option ROMs Recently added PCI...

Maintenance and Service Guide
Page 134
To start System Restore: 1. System Recovery WARNING! System Recovery completely erases and reformats the hard disk drive, deleting all data and programs you use this procedure. If you were not able to create system recovery DVDs or USB flash drive, you have created, and then reinstalls the operating system, programs, and drivers. NOTE: In some cases, you must reinstall any software programs you installed after recovery. Turn off the computer. 2. NOTE...
To start System Restore: 1. System Recovery WARNING! System Recovery completely erases and reformats the hard disk drive, deleting all data and programs you use this procedure. If you were not able to create system recovery DVDs or USB flash drive, you have created, and then reinstalls the operating system, programs, and drivers. NOTE: In some cases, you must reinstall any software programs you installed after recovery. Turn off the computer. 2. NOTE...
Maintenance and Service Guide
Page 142
... battery replacement 34 beep codes 108 bezel illustrated 6 BIOS clearing and resetting 112 booting options Full Boot 103 Quick Boot 103 C cable management 19 cable pinouts, SATA data 18 cautions AC power 12 cables 17 electrostatic discharge 12 keyboard cleaning 15 keyboard keys 16 CD-ROM or DVD problems 96 cleaning computer 15 mouse 16 safety precautions 15 CMOS backing up 110 D disassembly preparation 20 DisplayPort option board illustrated 9 drive cage removal and replacement 27 Driver Recovery DVD, creating 124 using for restore 128 Driver Recovery media, Windows 122 Driver Recovery media...
... battery replacement 34 beep codes 108 bezel illustrated 6 BIOS clearing and resetting 112 booting options Full Boot 103 Quick Boot 103 C cable management 19 cable pinouts, SATA data 18 cautions AC power 12 cables 17 electrostatic discharge 12 keyboard cleaning 15 keyboard keys 16 CD-ROM or DVD problems 96 cleaning computer 15 mouse 16 safety precautions 15 CMOS backing up 110 D disassembly preparation 20 DisplayPort option board illustrated 9 drive cage removal and replacement 27 Driver Recovery DVD, creating 124 using for restore 128 Driver Recovery media, Windows 122 Driver Recovery media...

Maintenance and Service Guide
Page 143
... 6 operating voltage range 133 power switch/light cover illustrated 9 removal and replacement 38 power-on password 110 printer problems 88 problems audio 86 CD-ROM or DVD 96 Computer Setup 73 F10 Setup 73 flash drive 99 front panel 100 general 73 hard drive 78 hardware installation 90 Internet access 100 keyboard 89 Media Card Reader 80 memory 95 monitor 81 mouse 89 network 92 power 77 printer 88 software 102 product ID location 5 R rear panel components EliteDesk 705 3 EliteDesk 800 3 MP9 3 ProDesk 400 4 ProDesk 600 3 recovery discs, steps for creating Windows 7 124 recovery discs, using for...
... 6 operating voltage range 133 power switch/light cover illustrated 9 removal and replacement 38 power-on password 110 printer problems 88 problems audio 86 CD-ROM or DVD 96 Computer Setup 73 F10 Setup 73 flash drive 99 front panel 100 general 73 hard drive 78 hardware installation 90 Internet access 100 keyboard 89 Media Card Reader 80 memory 95 monitor 81 mouse 89 network 92 power 77 printer 88 software 102 product ID location 5 R rear panel components EliteDesk 705 3 EliteDesk 800 3 MP9 3 ProDesk 400 4 ProDesk 600 3 recovery discs, steps for creating Windows 7 124 recovery discs, using for...
Hardware Reference Guide
Page 8
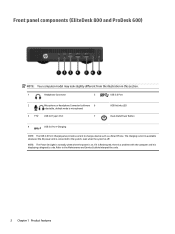
Front panel components (EliteDesk 800 and ProDesk 600) NOTE: Your computer model may look slightly different from the illustration in this section. 1 Headphone Connector 5 USB 3.0 Port 2 Microphone or Headphone Connector (software 6 HDD Activity LED selectable, default mode is on. Refer to the Maintenance and Service Guide to the system, even when the system is displaying a diagnostic code. NOTE: The Power On Light is normally white when the power is microphone) 3 USB 3.0 Type C Port 7 Dual-State Power Button 4 USB 3.0 Port-Charging NOTE...
Front panel components (EliteDesk 800 and ProDesk 600) NOTE: Your computer model may look slightly different from the illustration in this section. 1 Headphone Connector 5 USB 3.0 Port 2 Microphone or Headphone Connector (software 6 HDD Activity LED selectable, default mode is on. Refer to the Maintenance and Service Guide to the system, even when the system is displaying a diagnostic code. NOTE: The Power On Light is normally white when the power is microphone) 3 USB 3.0 Type C Port 7 Dual-State Power Button 4 USB 3.0 Port-Charging NOTE...


