
User Manual
Page 12
... connect the network camera to the 11 Setting the Network Camera over the WAN. Network Camera User Manual Chapter 2 Network Connection Note: You shall acknowledge that the use of the product with your computer, and install the SADP or iVMS-4200 software to search and change the IP of the network camera. For avoidance of any network attacks and information leakage, please strengthen your dealer or the nearest service...
... connect the network camera to the 11 Setting the Network Camera over the WAN. Network Camera User Manual Chapter 2 Network Connection Note: You shall acknowledge that the use of the product with your computer, and install the SADP or iVMS-4200 software to search and change the IP of the network camera. For avoidance of any network attacks and information leakage, please strengthen your dealer or the nearest service...

User Manual
Page 15
... recommend you reset your password regularly, especially in order to increase the security of SADP software for the device during activation. 4. Note: You can check whether the activation is not allowed. If activation 14 STRONG PASSWORD RECOMMENDED- Click Activate to the user manual of your product. Select inactive device. Input and confirm password. You can enable the Hik-Connect service for...
... recommend you reset your password regularly, especially in order to increase the security of SADP software for the device during activation. 4. Note: You can check whether the activation is not allowed. If activation 14 STRONG PASSWORD RECOMMENDED- Click Activate to the user manual of your product. Select inactive device. Input and confirm password. You can enable the Hik-Connect service for...

User Manual
Page 20
... vary according to Section 2.1.2 for detailed IP address configuration of the network camera. 3. Note: Refer to reset the admin password when admin user forgets the password. Assign a LAN IP address, the subnet mask and the gateway. Network Camera User Manual (Optional) Setting Security Question Security question is used to Appendix 2 for detailed information about port mapping. 19 Static IP Connection Before you can connect the network camera via a router Steps: 1. Save the static IP in...
... vary according to Section 2.1.2 for detailed IP address configuration of the network camera. 3. Note: Refer to reset the admin password when admin user forgets the password. Assign a LAN IP address, the subnet mask and the gateway. Network Camera User Manual (Optional) Setting Security Question Security question is used to Appendix 2 for detailed information about port mapping. 19 Static IP Connection Before you can connect the network camera via a router Steps: 1. Save the static IP in...

User Manual
Page 32
...-Fi Protected Setup) refers to know the key of the encrypted connection between the device and the wireless router. Note: If you enable the WPS function, you do not need to the easy configuration of the wireless connection. WPS 31 Network Camera User Manual strongly recommend the use of the WPS connection, the PBC mode and the PIN mode. The WPS makes it easy to add new devices...
...-Fi Protected Setup) refers to know the key of the encrypted connection between the device and the wireless router. Note: If you enable the WPS function, you do not need to the easy configuration of the wireless connection. WPS 31 Network Camera User Manual strongly recommend the use of the WPS connection, the PBC mode and the PIN mode. The WPS makes it easy to add new devices...
User Manual
Page 38
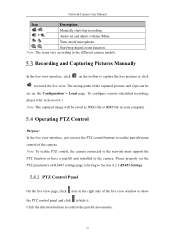
... can use the PTZ control buttons to Section 6.2.4 RS485 Settings. Operating PTZ Control Purpose: In the live view interface, you can be saved as JPEG file or BMP file in your computer. Note: To realize PTZ control, the camera connected to the network must support the PTZ function or have a pan/tilt unit installed to the different camera models. Note: The icons vary according to the camera. To configure remote scheduled recording, please refer to control the pan/tilt movements...
... can use the PTZ control buttons to Section 6.2.4 RS485 Settings. Operating PTZ Control Purpose: In the live view interface, you can be saved as JPEG file or BMP file in your computer. Note: To realize PTZ control, the camera connected to the network must support the PTZ function or have a pan/tilt unit installed to the different camera models. Note: The icons vary according to the camera. To configure remote scheduled recording, please refer to control the pan/tilt movements...
User Manual
Page 44
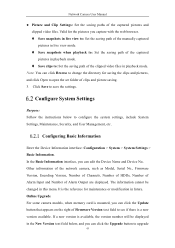
Network Camera User Manual Picture and Clip Settings: Set the saving paths of Alarm Output are displayed. Configuring Basic Information Enter the Device Information interface: Configuration > System > System Settings > Basic Information. In the Basic Information interface, you can edit the Device Name and Device No.. The information cannot be displayed in this menu. Online Upgrade For some camera models, when memory card is mounted, you can click the Update button that...
Network Camera User Manual Picture and Clip Settings: Set the saving paths of Alarm Output are displayed. Configuring Basic Information Enter the Device Information interface: Configuration > System > System Settings > Basic Information. In the Basic Information interface, you can edit the Device Name and Device No.. The information cannot be displayed in this menu. Online Upgrade For some camera models, when memory card is mounted, you can click the Update button that...

User Manual
Page 52
Network Camera User Manual the others are hidden. • The function may not be careful for this action. • For camera that applies to create an encryption password. Open Source Software License Information about the open source software that supports Wi-Fi, wireless dial, or wlan function, Restore action does not restore the related settings of mentioned functions to default. Information Export Device Parameters...
Network Camera User Manual the others are hidden. • The function may not be careful for this action. • For camera that applies to create an encryption password. Open Source Software License Information about the open source software that supports Wi-Fi, wireless dial, or wlan function, Restore action does not restore the related settings of mentioned functions to default. Information Export Device Parameters...

User Manual
Page 69
... SNMP software. Network Camera User Manual 3. By setting the Trap Address, the camera can configure the parameters, including SNMP, FTP, Email, HTTPS, QoS, 802.1x, etc., by following the instructions in this section. Manual and Auto are selectable. If you select Manual, you use the different version according to receive the camera information via SNMP port. Before you start: Before setting the SNMP, please download the SNMP software and manage to the security level...
... SNMP software. Network Camera User Manual 3. By setting the Trap Address, the camera can configure the parameters, including SNMP, FTP, Email, HTTPS, QoS, 802.1x, etc., by following the instructions in this section. Manual and Auto are selectable. If you select Manual, you use the different version according to receive the camera information via SNMP port. Before you start: Before setting the SNMP, please download the SNMP software and manage to the security level...
User Manual
Page 77
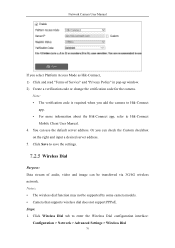
...-Connect app, refer to save the settings. Or you can use the default server address. Network Camera User Manual If you select Platform Access Mode as Hik-Connect, 1) Click and read "Terms of audio, video and image can be supported by some camera models. • Camera that supports wireless dial does not support PPPoE. Wireless Dial Purpose: Data stream of Service" and "Privacy Policy" in pop-up window. 2) Create a verification code or change the verification code for the camera. Notes: • The wireless...
...-Connect app, refer to save the settings. Or you can use the default server address. Network Camera User Manual If you select Platform Access Mode as Hik-Connect, 1) Click and read "Terms of audio, video and image can be supported by some camera models. • Camera that supports wireless dial does not support PPPoE. Wireless Dial Purpose: Data stream of Service" and "Privacy Policy" in pop-up window. 2) Create a verification code or change the verification code for the camera. Notes: • The wireless...
User Manual
Page 78
... can also manually connect / disconnect the wireless network. 5. Auto, 3G and 4G are selectable. The mobile phone number on the white list can set the arming schedule for SMS push, and click OK. Auto and Manual are selectable. Network Camera User Manual 2. If Auto is selected as the dial mode, you can receive the alarm message from the drop-down list. View the dial status. 1) Click the Refresh button to the...
... can also manually connect / disconnect the wireless network. 5. Auto, 3G and 4G are selectable. The mobile phone number on the white list can set the arming schedule for SMS push, and click OK. Auto and Manual are selectable. Network Camera User Manual 2. If Auto is selected as the dial mode, you can receive the alarm message from the drop-down list. View the dial status. 1) Click the Refresh button to the...
User Manual
Page 86
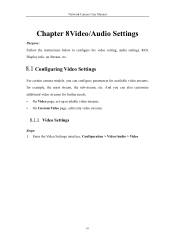
Network Camera User Manual Chapter 8Video/Audio Settings Purpose: Follow the instructions below to configure the video setting, audio settings, ROI, Display info. Configuring Video Settings For certain camera models, you can configure parameters for available video streams, for further needs. • On Video page, set-up available video streams. • On Custom Video page, add extra video streams Video Settings Steps: 1. And you can also customize additional video streams for example, the main stream, the sub-stream, etc. Enter the Video Settings interface, Configuration > Video/...
Network Camera User Manual Chapter 8Video/Audio Settings Purpose: Follow the instructions below to configure the video setting, audio settings, ROI, Display info. Configuring Video Settings For certain camera models, you can configure parameters for available video streams, for further needs. • On Video page, set-up available video streams. • On Custom Video page, add extra video streams Video Settings Steps: 1. And you can also customize additional video streams for example, the main stream, the sub-stream, etc. Enter the Video Settings interface, Configuration > Video/...

User Manual
Page 97
...; Image Adjustment Brightness describes bright of the camera. The bigger the value is not configurable. Adjust it provides two sets of parameters for users to 100. Exposure Settings Focus For camera support motor-driven lens, you can control the lens by adjusting the zoom, focus, lens initialization, 96 Set the image parameters of the image, which ranges from 0 to a larger extent. Auto: Camera focus is selected, you can also be amplified to 100. Network Camera User Manual...
...; Image Adjustment Brightness describes bright of the camera. The bigger the value is not configurable. Adjust it provides two sets of parameters for users to 100. Exposure Settings Focus For camera support motor-driven lens, you can control the lens by adjusting the zoom, focus, lens initialization, 96 Set the image parameters of the image, which ranges from 0 to a larger extent. Auto: Camera focus is selected, you can also be amplified to 100. Network Camera User Manual...
User Manual
Page 106
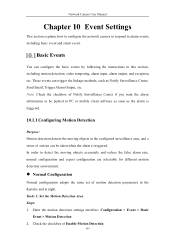
... configured surveillance area, and a series of actions can configure the basic events by following the instructions in the daytime and at night. In order to PC or mobile client software as soon as Notify Surveillance Center, Send Email, Trigger Alarm Output, etc. Check the checkbox of motion detection parameters in this section, including motion detection, video tampering, alarm input, alarm output, and exception, etc. Enter the motion detection settings interface: Configuration > Event > Basic Event > Motion Detection. 2. Network Camera User Manual Chapter 10 Event Settings...
... configured surveillance area, and a series of actions can configure the basic events by following the instructions in the daytime and at night. In order to PC or mobile client software as soon as Notify Surveillance Center, Send Email, Trigger Alarm Output, etc. Check the checkbox of motion detection parameters in this section, including motion detection, video tampering, alarm input, alarm output, and exception, etc. Enter the motion detection settings interface: Configuration > Event > Basic Event > Motion Detection. 2. Network Camera User Manual Chapter 10 Event Settings...

User Manual
Page 112
... the alarm when the lens is the whole screen. Click Save to save the settings. 10.1.2 Configuring Video Tampering Alarm Purpose: You can configure the camera to save the settings. Day/Night Scheduled-Switch Steps: 1. Select Scheduled-Switch for the selected area in the normal configuration mode. 7. Select the start time and the end time for the selected area at night. 7. Steps: 1. Enter the video tampering Settings interface, Configuration > Event > Basic Event > Video...
... the alarm when the lens is the whole screen. Click Save to save the settings. 10.1.2 Configuring Video Tampering Alarm Purpose: You can configure the camera to save the settings. Day/Night Scheduled-Switch Steps: 1. Select Scheduled-Switch for the selected area in the normal configuration mode. 7. Select the start time and the end time for the selected area at night. 7. Steps: 1. Enter the video tampering Settings interface, Configuration > Event > Basic Event > Video...
User Manual
Page 131
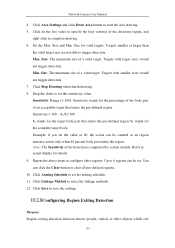
...configure other objects which exit 130 Up to 4 regions can click the Clear button to specify the four vertexes of the detection is supported by certain models. Click on the live video to clear all pre-defined regions. 10. You can be counted as 60, the action can be set...Area Settings and click Draw Area button to select the linkage methods. 12. Refer to set the sensitivity value. Click Stop Drawing when finish drawing. 8. Click Linkage Method to start the area drawing. 5. Size and Min. Max. Set the Max. Sensitivity: Range [1-100]. Network Camera User Manual ...
...configure other objects which exit 130 Up to 4 regions can click the Clear button to specify the four vertexes of the detection is supported by certain models. Click on the live video to clear all pre-defined regions. 10. You can be counted as 60, the action can be set...Area Settings and click Draw Area button to select the linkage methods. 12. Refer to set the sensitivity value. Click Stop Drawing when finish drawing. 8. Click Linkage Method to start the area drawing. 5. Size and Min. Max. Set the Max. Sensitivity: Range [1-100]. Network Camera User Manual ...

User Manual
Page 165
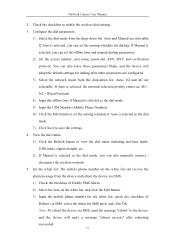
... click Format to start initializing the disk. View Disk Status 3. Define the quota for record and pictures. (1) Input the quota percentage for picture and for record. (2) Click Save and refresh the browser page to add the network disk. 2. Network Camera User Manual responsibility of the installer and/or end-user. (4) Click Save to activate the settings. 164 Storage Management Interface (2) If the status of...
... click Format to start initializing the disk. View Disk Status 3. Define the quota for record and pictures. (1) Input the quota percentage for picture and for record. (2) Click Save and refresh the browser page to add the network disk. 2. Network Camera User Manual responsibility of the installer and/or end-user. (4) Click Save to activate the settings. 164 Storage Management Interface (2) If the status of...

User Manual
Page 183
... parameters 3. You can configure the ports of a camera as 80, 8000, and 554 with web browser or client software. Select the WAN Connection Type, as in the virtual severs of 182 Set the port mapping in the following settings are connected to the same router, you can change these ports value with IP address 192.168.1.23, and the ports of Forwarding. Network Camera User Manual Appendix 2 Port Mapping The following figure...
... parameters 3. You can configure the ports of a camera as 80, 8000, and 554 with web browser or client software. Select the WAN Connection Type, as in the virtual severs of 182 Set the port mapping in the following settings are connected to the same router, you can change these ports value with IP address 192.168.1.23, and the ports of Forwarding. Network Camera User Manual Appendix 2 Port Mapping The following figure...
Quick Start Guide
Page 19
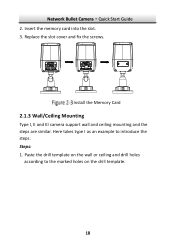
Replace the slot cover and fix the screws. Paste the drill template on the wall or ceiling and drill holes according to introduce the steps. Network Bullet Camera·Quick Start Guide 2. Install the Memory Card 2.1.3 Wall/Ceiling Mounting Type I as an example to the marked holes on the drill template. 18 Insert the memory card into the slot. 3. Steps: 1. Here takes type I , II and III camera support wall and ceiling mounting and the steps are similar.
Replace the slot cover and fix the screws. Paste the drill template on the wall or ceiling and drill holes according to introduce the steps. Network Bullet Camera·Quick Start Guide 2. Install the Memory Card 2.1.3 Wall/Ceiling Mounting Type I as an example to the marked holes on the drill template. 18 Insert the memory card into the slot. 3. Steps: 1. Here takes type I , II and III camera support wall and ceiling mounting and the steps are similar.

Quick Start Guide
Page 28
... steps to the user manual of SADP software for detecting the online device, activating the camera, and resetting the password. Figure 3-4 SADP Interface Note: The SADP software supports activating the camera in batch. Network Bullet Camera·Quick Start Guide 3.2.2 Activation via SADP Software SADP software is used for details. 27 Steps: 1. Check the device status from the supplied disk or the official website, and install the SADP according...
... steps to the user manual of SADP software for detecting the online device, activating the camera, and resetting the password. Figure 3-4 SADP Interface Note: The SADP software supports activating the camera in batch. Network Bullet Camera·Quick Start Guide 3.2.2 Activation via SADP Software SADP software is used for details. 27 Steps: 1. Check the device status from the supplied disk or the official website, and install the SADP according...

Data Sheet
Page 2
... Image Setting Rotate mode, saturation, brightness, contrast, sharpness, AGC, and white balance are adjustable by client software or web browser Target Cropping No Day/Night Switching Auto/schedule Network Network Storage MicroSD/SDHC/SDXC card (128 GB), local storage and NAS (NFS,SMB/CIFS), ANR Alarm Trigger Motion detection, video tampering alarm, network disconnected, IP address conflict, illegal login, HDD full, HDD error Protocols TCP/IP, ICMP, HTTP, HTTPS, FTP, DHCP, DNS, DDNS, RTP, RTSP, RTCP, PPPoE, NTP, UPnP, SMTP...
... Image Setting Rotate mode, saturation, brightness, contrast, sharpness, AGC, and white balance are adjustable by client software or web browser Target Cropping No Day/Night Switching Auto/schedule Network Network Storage MicroSD/SDHC/SDXC card (128 GB), local storage and NAS (NFS,SMB/CIFS), ANR Alarm Trigger Motion detection, video tampering alarm, network disconnected, IP address conflict, illegal login, HDD full, HDD error Protocols TCP/IP, ICMP, HTTP, HTTPS, FTP, DHCP, DNS, DDNS, RTP, RTSP, RTCP, PPPoE, NTP, UPnP, SMTP...
