

Quick Start Guide
Page 2
... the properties of Hikvision in various jurisdictions. Please use this Manual This Manual is subject to EXIR Flexible Network Camera. About this user manual under the guidance of Hangzhou Hikvision Digital Technology Co., Ltd. The Manual includes instructions for description and explanation only. Please find the latest version in the Manual is applicable to change, without the prior written permission of Hikvision. Quick Start Guide ALL RIGHTS RESERVED...
... the properties of Hikvision in various jurisdictions. Please use this Manual This Manual is subject to EXIR Flexible Network Camera. About this user manual under the guidance of Hangzhou Hikvision Digital Technology Co., Ltd. The Manual includes instructions for description and explanation only. Please find the latest version in the Manual is applicable to change, without the prior written permission of Hikvision. Quick Start Guide ALL RIGHTS RESERVED...

Quick Start Guide
Page 3
... limits for compliance could void the user's authority to operate the equipment. REGARDING TO THE PRODUCT WITH INTERNET ACCESS, THE USE OF PRODUCT SHALL BE WHOLLY AT YOUR OWN RISKS. Regulatory Information FCC Information Please take attention that interference will not occur in a residential installation. HOWEVER, HIKVISION WILL PROVIDE TIMELY TECHNICAL SUPPORT IF REQUIRED. HIKVISION SHALL NOT TAKE ANY RESPONSIBILITES...
... limits for compliance could void the user's authority to operate the equipment. REGARDING TO THE PRODUCT WITH INTERNET ACCESS, THE USE OF PRODUCT SHALL BE WHOLLY AT YOUR OWN RISKS. Regulatory Information FCC Information Please take attention that interference will not occur in a residential installation. HOWEVER, HIKVISION WILL PROVIDE TIMELY TECHNICAL SUPPORT IF REQUIRED. HIKVISION SHALL NOT TAKE ANY RESPONSIBILITES...

Quick Start Guide
Page 5
... the lens at the sun or any responsibility for detailed information. any laser equipment is in compliance with the local codes. System Security The installer and user are responsible for details. Cleaning Please use alkaline detergents. Contact your camera. Replace with your dealer for password and security configuration and its settings. Maintenance If the product does not work properly, please contact your power supply matches...
... the lens at the sun or any responsibility for detailed information. any laser equipment is in compliance with the local codes. System Security The installer and user are responsible for details. Cleaning Please use alkaline detergents. Contact your camera. Replace with your dealer for password and security configuration and its settings. Maintenance If the product does not work properly, please contact your power supply matches...

Quick Start Guide
Page 6
... the camera via Web browse/client software and go to isolate the lens from the IR LEDS. Be sure that the wall is enough space to withstand at least 4 times the weight of the bubble to time settings interface. Make sure that there is strong enough to install the camera and accessories. IR Reflection Prevention Dust or grease on the dome cover...
... the camera via Web browse/client software and go to isolate the lens from the IR LEDS. Be sure that the wall is enough space to withstand at least 4 times the weight of the bubble to time settings interface. Make sure that there is strong enough to install the camera and accessories. IR Reflection Prevention Dust or grease on the dome cover...

Quick Start Guide
Page 4
... party responsible for help FCC Conditions 3 These limits are designed to radio communications. FCC compliance: This equipment has been tested and found to comply with the instructions, may cause harmful interference to provide reasonable protection against harmful interference in a particular installation. Network Bullet Camera·Quick Start Guide IN THE EVENT OF ANY CONFLICTS BETWEEN THIS MANUAL AND THE...
... party responsible for help FCC Conditions 3 These limits are designed to radio communications. FCC compliance: This equipment has been tested and found to comply with the instructions, may cause harmful interference to provide reasonable protection against harmful interference in a particular installation. Network Bullet Camera·Quick Start Guide IN THE EVENT OF ANY CONFLICTS BETWEEN THIS MANUAL AND THE...

Quick Start Guide
Page 6
... or death. Network Bullet Camera·Quick Start Guide Industry Canada ICES-003 Compliance This device meets the CAN ICES-3 (B)/NMB-3(B) standards requirements. Warnings Follow these precautions to prevent potential injury or material damage. Safety Instruction These instructions are neglected. The precaution measure is the responsibility of the installer and/or end-user. ● In the use the product...
... or death. Network Bullet Camera·Quick Start Guide Industry Canada ICES-003 Compliance This device meets the CAN ICES-3 (B)/NMB-3(B) standards requirements. Warnings Follow these precautions to prevent potential injury or material damage. Safety Instruction These instructions are neglected. The precaution measure is the responsibility of the installer and/or end-user. ● In the use the product...

Quick Start Guide
Page 7
... and unplug the power cable, and then please contact the service center. When the product is firmly connected to protect the sensor from the device, turn off the power at the sun or extra bright places. Please refer to technical specifications for an extended period, please replace the lens cap to the power socket. Network Bullet Camera·Quick Start Guide ● Input voltage...
... and unplug the power cable, and then please contact the service center. When the product is firmly connected to protect the sensor from the device, turn off the power at the sun or extra bright places. Please refer to technical specifications for an extended period, please replace the lens cap to the power socket. Network Bullet Camera·Quick Start Guide ● Input voltage...

Quick Start Guide
Page 8
... instructions provided by unauthorized repair or maintenance.) 7 Network Bullet Camera·Quick Start Guide ● The sensor may result in hazard of explosion. Please contact with the same or equivalent type only. electrolytic capacitor) of the equipment shall be replaced regularly according to disassemble the camera yourself. (We shall not assume any responsibility for operating environment. ● Keep the camera...
... instructions provided by unauthorized repair or maintenance.) 7 Network Bullet Camera·Quick Start Guide ● The sensor may result in hazard of explosion. Please contact with the same or equivalent type only. electrolytic capacitor) of the equipment shall be replaced regularly according to disassemble the camera yourself. (We shall not assume any responsibility for operating environment. ● Keep the camera...

Quick Start Guide
Page 9
... 1.2.1 Resetting the Camera 12 1.2.2 Setting the WPS Protocol 13 1.3 Overview of Type III Bullet Camera 15 2 Installation 17 2.1 Installation of Memory Card 18 2.2 Installation of Bullet Camera 19 2.3 Installation of Network Cable Water-proof Jacket (Optional 21 3 Setting the Network Camera over the LAN 24 3.1 Wiring 24 3.2 Activating the Camera 25 3.2.1 Activation via Web Browser 25 3.2.2 Activation via SADP Software 26 3.3 Modifying the IP Address 28 4 Accessing via Web Browser 31 5 Operating via Hik-Connect App 33 5.1 Enable Hik-Connect Service...
... 1.2.1 Resetting the Camera 12 1.2.2 Setting the WPS Protocol 13 1.3 Overview of Type III Bullet Camera 15 2 Installation 17 2.1 Installation of Memory Card 18 2.2 Installation of Bullet Camera 19 2.3 Installation of Network Cable Water-proof Jacket (Optional 21 3 Setting the Network Camera over the LAN 24 3.1 Wiring 24 3.2 Activating the Camera 25 3.2.1 Activation via Web Browser 25 3.2.2 Activation via SADP Software 26 3.3 Modifying the IP Address 28 4 Accessing via Web Browser 31 5 Operating via Hik-Connect App 33 5.1 Enable Hik-Connect Service...

Quick Start Guide
Page 11
Network Bullet Camera·Quick Start Guide Figure 1-1 Type I camera does not support the function of Wi-Fi or memory card. Press Reset button about 10s when the camera is power on or rebooting to restore the default settings, including the user name, password, IP address, port No., etc. 10 Description No. Description 1 Mounting Base 4 Lens 2 Back Case 5 Sun Shield 3 Front Case 6 Power Cable 7 Reset Button 8 GND Screw 9 10/100M Self-adaptive Ethernet Interface Type I Bullet Camera Table 1-1 Description No.
Network Bullet Camera·Quick Start Guide Figure 1-1 Type I camera does not support the function of Wi-Fi or memory card. Press Reset button about 10s when the camera is power on or rebooting to restore the default settings, including the user name, password, IP address, port No., etc. 10 Description No. Description 1 Mounting Base 4 Lens 2 Back Case 5 Sun Shield 3 Front Case 6 Power Cable 7 Reset Button 8 GND Screw 9 10/100M Self-adaptive Ethernet Interface Type I Bullet Camera Table 1-1 Description No.
Quick Start Guide
Page 13
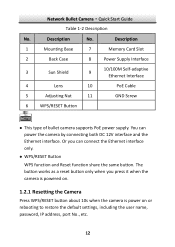
Description 1 Mounting Base 7 Memory Card Slot 2 Back Case 8 Power Supply Interface 3 Sun Shield 9 10/100M Self-adaptive Ethernet Interface 4 Lens 10 PoE Cable 5 Adjusting Nut 11 GND Screw 6 WPS/RESET Button This type of bullet camera supports PoE power supply. Or you press it when the camera is powered on. 1.2.1 Resetting the Camera Press WPS/RESET button about 10s when the camera is power on or rebooting to restore the default settings, including the user name, password, IP address, port No., etc...
Description 1 Mounting Base 7 Memory Card Slot 2 Back Case 8 Power Supply Interface 3 Sun Shield 9 10/100M Self-adaptive Ethernet Interface 4 Lens 10 PoE Cable 5 Adjusting Nut 11 GND Screw 6 WPS/RESET Button This type of bullet camera supports PoE power supply. Or you press it when the camera is powered on. 1.2.1 Resetting the Camera Press WPS/RESET button about 10s when the camera is power on or rebooting to restore the default settings, including the user name, password, IP address, port No., etc...

Quick Start Guide
Page 17
... restore the default settings, including the user name, password, IP address, port No., etc. 16 Or you can power the camera by connecting both DC 12V interface and the Ethernet interface. Description 1 Mounting Base 6 Grounding Screw 2 Back Case 7 10/100M Self-adaptive Ethernet Interface (PoE) 3 Front Case 8 Power Supply (DC 12V) 4 Lens 9 Memory Card Slot 5 Sun Shield 10 Reset Button This type of bullet camera supports PoE power supply. Description No. Network Bullet Camera·Quick Start Guide...
... restore the default settings, including the user name, password, IP address, port No., etc. 16 Or you can power the camera by connecting both DC 12V interface and the Ethernet interface. Description 1 Mounting Base 6 Grounding Screw 2 Back Case 7 10/100M Self-adaptive Ethernet Interface (PoE) 3 Front Case 8 Power Supply (DC 12V) 4 Lens 9 Memory Card Slot 5 Sun Shield 10 Reset Button This type of bullet camera supports PoE power supply. Description No. Network Bullet Camera·Quick Start Guide...

Quick Start Guide
Page 26
... camera enables the DHCP by setting a strong password for Activation via Client Software. 3.2.1 Activation via Web Browser Steps: 1. Note: Refer to activate the camera first by default, you can use the SADP software to . 2. Connect the camera to your computer or the switch/router which your computer connects to search the IP address. 25 Input the IP address into the address bar of Network Camera for it before you need to use the camera...
... camera enables the DHCP by setting a strong password for Activation via Client Software. 3.2.1 Activation via Web Browser Steps: 1. Note: Refer to activate the camera first by default, you can use the SADP software to . 2. Connect the camera to your computer or the switch/router which your computer connects to search the IP address. 25 Input the IP address into the address bar of Network Camera for it before you need to use the camera...

Quick Start Guide
Page 28
Network Bullet Camera·Quick Start Guide Get the SADP software from the device list, and select the inactive device. Steps: 1. Figure 3-4 SADP Interface Note: The SADP software supports activating the camera in the password field, and confirm the password. 27 Select inactive device. Run the SADP software to the user manual of SADP software for details. 3. Refer to search the online devices. 2. Input and...
Network Bullet Camera·Quick Start Guide Get the SADP software from the device list, and select the inactive device. Steps: 1. Figure 3-4 SADP Interface Note: The SADP software supports activating the camera in the password field, and confirm the password. 27 Select inactive device. Run the SADP software to the user manual of SADP software for details. 3. Refer to search the online devices. 2. Input and...

Quick Start Guide
Page 29
...-Connect service for detailed information. 4. We take modifying the IP Address via client software, refer to the user manual of client software. 28 Click Activate to Chapter 5.1 for the device during activation. If activation failed, make sure that the password meets the requirement and try again. 3.3 Modifying the IP Address Purpose: To view and configure the camera via LAN (Local Area Network), you need...
...-Connect service for detailed information. 4. We take modifying the IP Address via client software, refer to the user manual of client software. 28 Click Activate to Chapter 5.1 for the device during activation. If activation failed, make sure that the password meets the requirement and try again. 3.3 Modifying the IP Address Purpose: To view and configure the camera via LAN (Local Area Network), you need...

Quick Start Guide
Page 32
... if the admin user performs 7 failed password attempts (5 attempts for the user/operator). 31 The admin user should configure the device accounts and user/operator permissions properly. Note: The default IP address is 192.168.1.64. You are recommended to change the IP address to enter the login interface. Delete the unnecessary accounts and user/operator permissions. Network Bullet Camera·Quick Start Guide 4 Accessing via Web Browser System Requirement: Operating System: Microsoft Windows XP...
... if the admin user performs 7 failed password attempts (5 attempts for the user/operator). 31 The admin user should configure the device accounts and user/operator permissions properly. Note: The default IP address is 192.168.1.64. You are recommended to change the IP address to enter the login interface. Delete the unnecessary accounts and user/operator permissions. Network Bullet Camera·Quick Start Guide 4 Accessing via Web Browser System Requirement: Operating System: Microsoft Windows XP...

Quick Start Guide
Page 34
... camera, receive alarm notification and so on. With the App, you can enable the service through SADP software or web browser. 5.1.1 Enable Hik-Connect Service via Hik-Connect App Purpose: Hik-Connect is not supported by certain camera models. 5.1 Enable Hik-Connect Service on Camera Purpose: Hik-Connect service should be enabled on : 1). Create a verification code or change the verification code. 33 Or "Modify Network Parameters" page during camera activation, refer to Chapter 3.3. 2. You can view live image of Enable Hik-Connect on your camera before using...
... camera, receive alarm notification and so on. With the App, you can enable the service through SADP software or web browser. 5.1.1 Enable Hik-Connect Service via Hik-Connect App Purpose: Hik-Connect is not supported by certain camera models. 5.1 Enable Hik-Connect Service on Camera Purpose: Hik-Connect service should be enabled on : 1). Create a verification code or change the verification code. 33 Or "Modify Network Parameters" page during camera activation, refer to Chapter 3.3. 2. You can view live image of Enable Hik-Connect on your camera before using...

Quick Start Guide
Page 36
Network Bullet Camera·Quick Start Guide Steps: 1. Access the camera via web browser. Enter platform access configuration interface: Configuration > Network > Advanced Settings > Platform Access Figure 5-2 Platform Access Configuration (Web) 3. Select Platform Access Mode as Hik-Connect. 4. Save the settings. 35 Check the checkbox of Service" and "Privacy Policy" in pop-up window. 6. Create a verification code or change the verification code for the camera. Click and read "Terms of Enable. 5. Note: The verification code is required when you add the camera to...
Network Bullet Camera·Quick Start Guide Steps: 1. Access the camera via web browser. Enter platform access configuration interface: Configuration > Network > Advanced Settings > Platform Access Figure 5-2 Platform Access Configuration (Web) 3. Select Platform Access Mode as Hik-Connect. 4. Save the settings. 35 Check the checkbox of Service" and "Privacy Policy" in pop-up window. 6. Create a verification code or change the verification code for the camera. Click and read "Terms of Enable. 5. Note: The verification code is required when you add the camera to...

Quick Start Guide
Page 37
... not support Wi-Fi. Use a network cable to Chapter 5.1. Log in App Store or Google PlayTM. 2. Download and install the Hik-Connect app by searching "Hik-Connect" in Hik-Connect app after registration. 5.3 Adding Camera to Hik-Connect Before you start: You need to add the camera. 36 Network Bullet Camera·Quick Start Guide 5.2 Hik-Connect Setup Steps: 1. In the Hik-Connect app, tap "+" on the upper-right corner and then scan the QR code...
... not support Wi-Fi. Use a network cable to Chapter 5.1. Log in App Store or Google PlayTM. 2. Download and install the Hik-Connect app by searching "Hik-Connect" in Hik-Connect app after registration. 5.3 Adding Camera to Hik-Connect Before you start: You need to add the camera. 36 Network Bullet Camera·Quick Start Guide 5.2 Hik-Connect Setup Steps: 1. In the Hik-Connect app, tap "+" on the upper-right corner and then scan the QR code...

Data Sheet
Page 2
....hikvision.com © 2017-2019 Hikvision USA Inc. • All Rights Reserved • Specifications are adjustable via web browser and client software ROI (Region of Interest) Separate support for one fixed region in main and sub streams Day / Night Switch Auto / scheduled Network Network Storage Support for microSD / SDHC / SDXC card (128G), local storage, NAS (NFS,SMB/CIFS), ANR Alarm Trigger Motion Detection, tampering alarm, network disconnected, IP address conflict, illegal login, HDD full, HDD error Protocols...
....hikvision.com © 2017-2019 Hikvision USA Inc. • All Rights Reserved • Specifications are adjustable via web browser and client software ROI (Region of Interest) Separate support for one fixed region in main and sub streams Day / Night Switch Auto / scheduled Network Network Storage Support for microSD / SDHC / SDXC card (128G), local storage, NAS (NFS,SMB/CIFS), ANR Alarm Trigger Motion Detection, tampering alarm, network disconnected, IP address conflict, illegal login, HDD full, HDD error Protocols...
