User Manual
Page 7
... Settings for Wireless Network Connection 33 Chapter 5 Live View 35 5.1 Live View Page ...35 5.2 Starting Live View 36 5.3 Recording and Capturing Pictures Manually 37 5.4 Operating PTZ Control 37 5.4.1 PTZ Control Panel ...37 5.4.2 Setting / Calling a Preset 38 5.4.3 Setting / Calling a Patrol 40 Chapter 6 Network Camera Configuration 41 6.1 Configuring Local Parameters 41 6.2 Configuring Time Settings 43 6.3 Configuring Network Settings 45 6.3.1 Configuring TCP/IP Settings 45 6.3.2 Configuring Port Settings 46 6.3.3 Configuring PPPoE Settings 47 6.3.4 Configuring DDNS Settings...
... Settings for Wireless Network Connection 33 Chapter 5 Live View 35 5.1 Live View Page ...35 5.2 Starting Live View 36 5.3 Recording and Capturing Pictures Manually 37 5.4 Operating PTZ Control 37 5.4.1 PTZ Control Panel ...37 5.4.2 Setting / Calling a Preset 38 5.4.3 Setting / Calling a Patrol 40 Chapter 6 Network Camera Configuration 41 6.1 Configuring Local Parameters 41 6.2 Configuring Time Settings 43 6.3 Configuring Network Settings 45 6.3.1 Configuring TCP/IP Settings 45 6.3.2 Configuring Port Settings 46 6.3.3 Configuring PPPoE Settings 47 6.3.4 Configuring DDNS Settings...
User Manual
Page 15
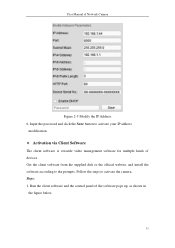
Follow the steps to the prompts. Steps: 1. Run the client software and the control panel of Network Camera Figure 2-5 Modify the IP Address 6. Get the client software from the supplied disk or the official website, and install the software according to activate the camera. User Manual of the software pops up, as shown in the figure below. 15 Input the password and click the Save button to activate your IP address modification. Activation via Client Software The client software is versatile video management software for multiple kinds of devices.
Follow the steps to the prompts. Steps: 1. Run the client software and the control panel of Network Camera Figure 2-5 Modify the IP Address 6. Get the client software from the supplied disk or the official website, and install the software according to activate the camera. User Manual of the software pops up, as shown in the figure below. 15 Input the password and click the Save button to activate your IP address modification. Activation via Client Software The client software is versatile video management software for multiple kinds of devices.
User Manual
Page 20
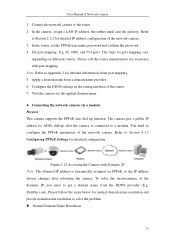
...; Connecting the network camera via a modem Purpose: This camera supports the PPPoE auto dial-up after the camera is dynamically assigned via PPPoE, so the IP address always changes after rebooting the camera. DynDns.com). User Manual of the router. 7. Figure 2-12 Accessing the Camera with port mapping. Please follow the steps below for detailed information about port mapping. 5. E.g. 80, 8000, and 554 ports. Configure the DDNS settings in the setting interface...
...; Connecting the network camera via a modem Purpose: This camera supports the PPPoE auto dial-up after the camera is dynamically assigned via PPPoE, so the IP address always changes after rebooting the camera. DynDns.com). User Manual of the router. 7. Figure 2-12 Accessing the Camera with port mapping. Please follow the steps below for detailed information about port mapping. 5. E.g. 80, 8000, and 554 ports. Configure the DDNS settings in the setting interface...
User Manual
Page 24
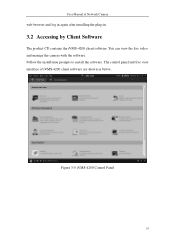
You can view the live view interface of Network Camera web browser and log in again after installing the plug-in. 3.2 Accessing by Client Software The product CD contains the iVMS-4200 client software. Follow the installation prompts to install the software. Figure 3-5 iVMS-4200 Control Panel 24 The control panel and live video and manage the camera with the software. User Manual of iVMS-4200 client software are shown as below.
You can view the live view interface of Network Camera web browser and log in again after installing the plug-in. 3.2 Accessing by Client Software The product CD contains the iVMS-4200 client software. Follow the installation prompts to install the software. Figure 3-5 iVMS-4200 Control Panel 24 The control panel and live video and manage the camera with the software. User Manual of iVMS-4200 client software are shown as below.
User Manual
Page 31
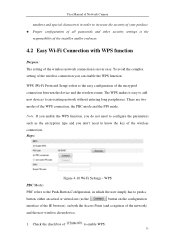
... wireless connection you don't need to increase the security of your product. Proper configuration of all passwords and other security settings is the responsibility of the installer and/or end-user. 4.2 Easy Wi-Fi Connection with WPS function Purpose: The setting of the wireless network connection is never easy. Check the checkbox of to the easy configuration of the encrypted connection between the device and the wireless router...
... wireless connection you don't need to increase the security of your product. Proper configuration of all passwords and other security settings is the responsibility of the installer and/or end-user. 4.2 Easy Wi-Fi Connection with WPS function Purpose: The setting of the wireless network connection is never easy. Check the checkbox of to the easy configuration of the encrypted connection between the device and the wireless router...
User Manual
Page 33
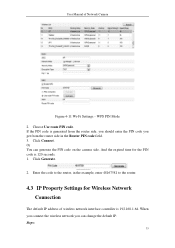
... code to the router, in the Router PIN code field. 3. Choose Use route PIN code. Steps: 33 And the expired time for Wireless Network Connection The default IP address of Network Camera Figure 4-11 Wi-Fi Settings - Click Generate. 2. When you connect the wireless network you get from the router side, you should enter the PIN code you can generate the PIN code on the camera side. WPS PIN Mode 2. Click Connect. User Manual of wireless network interface controller...
... code to the router, in the Router PIN code field. 3. Choose Use route PIN code. Steps: 33 And the expired time for Wireless Network Connection The default IP address of Network Camera Figure 4-11 Wi-Fi Settings - Click Generate. 2. When you connect the wireless network you get from the router side, you should enter the PIN code you can generate the PIN code on the camera side. WPS PIN Mode 2. Click Connect. User Manual of wireless network interface controller...

User Manual
Page 36
... (internet explorer) user, webcomponents and quick time are supported by the web browser. Live View Window: Display the live view window as shown in . The window size is 4:3. Live view with the third stream. 36 User Manual of Network Camera Display Control: Click each tab to adjust the layout and the stream type of the Toolbar Icon Description / Start/Stop live view. PTZ Control: Panning, tilting and zooming actions of the camera. Live view with the sub stream. The window size is 16:9. Toolbar: Operations on the live view page, e.g., live view, capture, record, audio...
... (internet explorer) user, webcomponents and quick time are supported by the web browser. Live View Window: Display the live view window as shown in . The window size is 4:3. Live view with the third stream. 36 User Manual of Network Camera Display Control: Click each tab to adjust the layout and the stream type of the Toolbar Icon Description / Start/Stop live view. PTZ Control: Panning, tilting and zooming actions of the camera. Live view with the sub stream. The window size is 16:9. Toolbar: Operations on the live view page, e.g., live view, capture, record, audio...
User Manual
Page 37
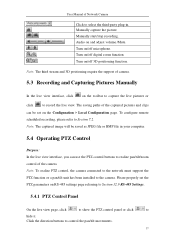
... file in . Manually capture the picture. Turn on and adjust volume /Mute. Note: The third stream and 3D positioning require the support of camera. 5.3 Recording and Capturing Pictures Manually In the live view interface, click on the Configuration > Local Configuration page. Manually start/stop recording. Note: To realize PTZ control, the camera connected to the network must support the PTZ function or a pan/tilt unit has been installed to control the pan/tilt movements. 37 Audio on /off digital zoom function. Click...
... file in . Manually capture the picture. Turn on and adjust volume /Mute. Note: The third stream and 3D positioning require the support of camera. 5.3 Recording and Capturing Pictures Manually In the live view interface, click on the Configuration > Local Configuration page. Manually start/stop recording. Note: To realize PTZ control, the camera connected to the network must support the PTZ function or a pan/tilt unit has been installed to control the pan/tilt movements. 37 Audio on /off digital zoom function. Click...
User Manual
Page 42
..., and the face detection is enabled as of TCP without setting specific ports for streaming under some network environments. Valid for the pictures you captured with the web browser. Record File Size: Select the packed size of the manually recorded and downloaded video files to 256M, 512M or 1G. Note: You can click Browse to select MCAST type when using the Multicast function. After...
..., and the face detection is enabled as of TCP without setting specific ports for streaming under some network environments. Valid for the pictures you captured with the web browser. Record File Size: Select the packed size of the manually recorded and downloaded video files to 256M, 512M or 1G. Note: You can click Browse to select MCAST type when using the Multicast function. After...
User Manual
Page 51
... version you use of strong passwords for all passwords and other security settings is connected to receive the camera information via SNMP port. And SNMP v3 provides encryption and if you select should be the same as that of the SNMP software. Enter the SNMP Settings interface: Configuration > Advanced Configuration > Network > SNMP 51 Before you required. Note: A reboot is required for access. By setting the Trap Address, the camera...
... version you use of strong passwords for all passwords and other security settings is connected to receive the camera information via SNMP port. And SNMP v3 provides encryption and if you select should be the same as that of the SNMP software. Enter the SNMP Settings interface: Configuration > Advanced Configuration > Network > SNMP 51 Before you required. Note: A reboot is required for access. By setting the Trap Address, the camera...
User Manual
Page 55
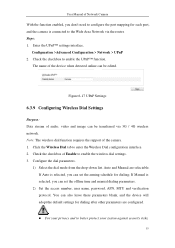
... drop-down list. Enter the UPnP™ settings interface. Steps: 1. User Manual of Network Camera With the function enabled, you don't need to configure the port mapping for each port, and the camera is connected to the Wide Area Network via 3G / 4G wireless network. Figure 6-17 UPnP Settings 6.3.9 Configuring Wireless Dial Settings Purpose: Data stream of audio, video and image can set the offline time and manual dialing parameters. 2) Set the access number, user name, password, APN, MTU and verification protocol.
... drop-down list. Enter the UPnP™ settings interface. Steps: 1. User Manual of Network Camera With the function enabled, you don't need to configure the port mapping for each port, and the camera is connected to the Wide Area Network via 3G / 4G wireless network. Figure 6-17 UPnP Settings 6.3.9 Configuring Wireless Dial Settings Purpose: Data stream of audio, video and image can set the offline time and manual dialing parameters. 2) Set the access number, user name, password, APN, MTU and verification protocol.
User Manual
Page 59
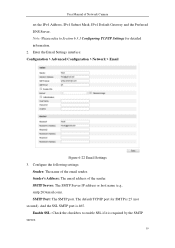
Enter the Email Settings interface: Configuration > Advanced Configuration > Network > Email Figure 6-22 Email Settings 3. Configure the following settings: Sender: The name of Network Camera set the IPv4 Address, IPv4 Subnet Mask, IPv4 Default Gateway and the Preferred DNS Server. The default TCP/IP port for detailed information. 2. SMTP Server: The SMTP Server IP address or host name (e.g., smtp.263xmail.com). User Manual of the email sender. And the SSL SMTP port is required by the SMTP server. 59 Enable SSL: Check the checkbox...
Enter the Email Settings interface: Configuration > Advanced Configuration > Network > Email Figure 6-22 Email Settings 3. Configure the following settings: Sender: The name of Network Camera set the IPv4 Address, IPv4 Subnet Mask, IPv4 Default Gateway and the Preferred DNS Server. The default TCP/IP port for detailed information. 2. SMTP Server: The SMTP Server IP address or host name (e.g., smtp.263xmail.com). User Manual of the email sender. And the SSL SMTP port is required by the SMTP server. 59 Enable SSL: Check the checkbox...
User Manual
Page 63
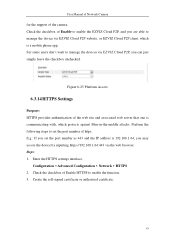
Perform the following steps to enable the function. 3. Steps: 1. Check the checkbox of Enable HTTPS to set the port number as 443 and the IP address is a mobile phone app. Configuration > Advanced Configuration > Network > HTTPS 2. Figure 6-25 Platform Access 6.3.14 HTTPS Settings Purpose: HTTPS provides authentication of https. Enter the HTTPS settings interface. User Manual of Network Camera for the support of Enable to enable the EZVIZ Cloud P2P, and you are...
Perform the following steps to enable the function. 3. Steps: 1. Check the checkbox of Enable HTTPS to set the port number as 443 and the IP address is a mobile phone app. Configuration > Advanced Configuration > Network > HTTPS 2. Figure 6-25 Platform Access 6.3.14 HTTPS Settings Purpose: HTTPS provides authentication of https. Enter the HTTPS settings interface. User Manual of Network Camera for the support of Enable to enable the EZVIZ Cloud P2P, and you are...
User Manual
Page 136
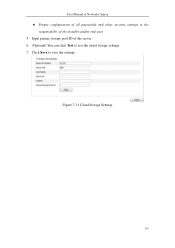
Input picture storage pool ID of the installer and/or end-user. 5. User Manual of Network Camera Proper configuration of all passwords and other security settings is the responsibility of the server. 6. (Optional) You can click Test to save the settings. Click Save to test the cloud storage settings. 7. Figure 7-11 Cloud Storage Settings 136
Input picture storage pool ID of the installer and/or end-user. 5. User Manual of Network Camera Proper configuration of all passwords and other security settings is the responsibility of the server. 6. (Optional) You can click Test to save the settings. Click Save to test the cloud storage settings. 7. Figure 7-11 Cloud Storage Settings 136
User Manual
Page 149
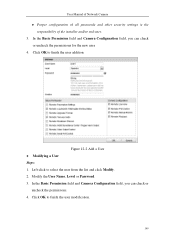
... permissions. 4. Click OK to finish the user addition. In the Basic Permission field and Camera Configuration field, you can check or uncheck the permissions for the new user. 4. Left-click to select the user from the list and click Modify. 2. User Manual of Network Camera ● Proper configuration of all passwords and other security settings is the responsibility of the installer and/or end...
... permissions. 4. Click OK to finish the user addition. In the Basic Permission field and Camera Configuration field, you can check or uncheck the permissions for the new user. 4. Left-click to select the user from the list and click Modify. 2. User Manual of Network Camera ● Proper configuration of all passwords and other security settings is the responsibility of the installer and/or end...
User Manual
Page 157
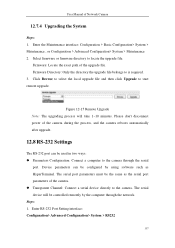
... controlled remotely by using software such as the serial port parameters of the camera during the process, and the camera reboots automatically after upgrade. 12.8 RS-232 Settings The RS-232 port can be the same as HyperTerminal. Enter RS-232 Port Setting interface: Configuration> Advanced Configuration> System > RS232 157 Firmware: Locate the exact path of Network Camera 12.7.4 Upgrading the System Steps: 1. Figure 12-15 Remote Upgrade Note: The upgrading...
... controlled remotely by using software such as the serial port parameters of the camera during the process, and the camera reboots automatically after upgrade. 12.8 RS-232 Settings The RS-232 port can be the same as HyperTerminal. Enter RS-232 Port Setting interface: Configuration> Advanced Configuration> System > RS232 157 Firmware: Locate the exact path of Network Camera 12.7.4 Upgrading the System Steps: 1. Figure 12-15 Remote Upgrade Note: The upgrading...
User Manual
Page 163
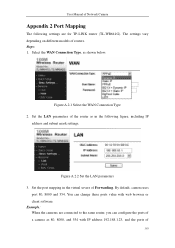
... web browser or client software. Set the LAN parameters of the router as in the virtual severs of Forwarding. Set the port mapping in the following settings are connected to the same router, you can change these ports value with IP address 192.168.1.23, and the ports of 163 Figure A.2.2 Set the LAN parameters 3. By default, camera uses port 80, 8000 and 554. Steps: 1. The settings vary depending on different models...
... web browser or client software. Set the LAN parameters of the router as in the virtual severs of Forwarding. Set the port mapping in the following settings are connected to the same router, you can change these ports value with IP address 192.168.1.23, and the ports of 163 Figure A.2.2 Set the LAN parameters 3. By default, camera uses port 80, 8000 and 554. Steps: 1. The settings vary depending on different models...

Quick Start Guide
Page 27
Steps: 1. Network Mini Dome Camera·Quick Start Guide Figure 2-16 Install the Front Cover 5. Tear off the protection film softly to complete the installation. Do not tear off the protection film until the installation is completed. Do not touch the inside face of the bubble with your hands. 2.1.5 Install the Micro SD Card This series of camera supports local storage, please refer to the following steps to install the micro SD card. Remove the front cover by loosening the set screws on it. 26
Steps: 1. Network Mini Dome Camera·Quick Start Guide Figure 2-16 Install the Front Cover 5. Tear off the protection film softly to complete the installation. Do not tear off the protection film until the installation is completed. Do not touch the inside face of the bubble with your hands. 2.1.5 Install the Micro SD Card This series of camera supports local storage, please refer to the following steps to install the micro SD card. Remove the front cover by loosening the set screws on it. 26

Quick Start Guide
Page 45
...-Connect. 4. Note: The verification code is required when you add the camera to Chapter 4. 2. Refer to Hik-Connect app. 7. Enter platform access configuration interface: Configuration > Network > Advanced Settings > Platform Access Figure 5-2 Platform Access Configuration (Web) 3. Check the checkbox of Service" and "Privacy Policy" in pop-up window. 6. Save the settings. 44 Access the camera via web browser. Create a verification code or change the verification code for the camera. Click and read "Terms of Enable. 5. Network Mini Dome Camera·Quick Start Guide...
...-Connect. 4. Note: The verification code is required when you add the camera to Chapter 4. 2. Refer to Hik-Connect app. 7. Enter platform access configuration interface: Configuration > Network > Advanced Settings > Platform Access Figure 5-2 Platform Access Configuration (Web) 3. Check the checkbox of Service" and "Privacy Policy" in pop-up window. 6. Save the settings. 44 Access the camera via web browser. Create a verification code or change the verification code for the camera. Click and read "Terms of Enable. 5. Network Mini Dome Camera·Quick Start Guide...
Data Sheet
Page 1
...; 720) Image Setting Rotate mode, saturation, brightness, contrast, sharpness adjustable by client software or Web browser BLC Supported, zone configurable ROI Codec Supported Network Network Storage NAS (supports NFS, SMB/CIFS), ANR Alarm Trigger Motion detection, tampering alarm, network disconnect, IP address conflict, storage exception TCP/IP, UDP, ICMP, HTTP, HTTPS, FTP, DHCP, DNS, DDNS, RTP, Protocols RTSP, RTCP, PPPoE, NTP, UPnP, SMTP, SNMP, IGMP, 802.1X, QoS, IPv6, Bonjour One-key reset, flash-prevention, dual stream, heartbeat...
...; 720) Image Setting Rotate mode, saturation, brightness, contrast, sharpness adjustable by client software or Web browser BLC Supported, zone configurable ROI Codec Supported Network Network Storage NAS (supports NFS, SMB/CIFS), ANR Alarm Trigger Motion detection, tampering alarm, network disconnect, IP address conflict, storage exception TCP/IP, UDP, ICMP, HTTP, HTTPS, FTP, DHCP, DNS, DDNS, RTP, Protocols RTSP, RTCP, PPPoE, NTP, UPnP, SMTP, SNMP, IGMP, 802.1X, QoS, IPv6, Bonjour One-key reset, flash-prevention, dual stream, heartbeat...
