

Quick Start Guide
Page 4
... technical specifications for detailed information. • Input voltage should meet both the SELV (Safety Extra Low Voltage) and the Limited Power Source with the electrical safety regulations of the nation and region. Cautions: Injury or equipment damage may include lettering to avoid danger or property loss. Quick Start Guide: DS-2CD2D21G0/M-D/NF Pinhole and Covert Mini Network Cameras which...
... technical specifications for detailed information. • Input voltage should meet both the SELV (Safety Extra Low Voltage) and the Limited Power Source with the electrical safety regulations of the nation and region. Cautions: Injury or equipment damage may include lettering to avoid danger or property loss. Quick Start Guide: DS-2CD2D21G0/M-D/NF Pinhole and Covert Mini Network Cameras which...
Quick Start Guide
Page 5
... that the plug is correct before using the camera. • Do not drop the camera or subject it gently. QSG DS-CD2D21G0/M-D/NF 020119NA 5 If cleaning is not a malfunction), and affect the sensor endurance at once, unplug the power cable, and contact the service center. Cautions • If the camera fails to set up the camera time manually. When the product is mounted on wall or...
... that the plug is correct before using the camera. • Do not drop the camera or subject it gently. QSG DS-CD2D21G0/M-D/NF 020119NA 5 If cleaning is not a malfunction), and affect the sensor endurance at once, unplug the power cable, and contact the service center. Cautions • If the camera fails to set up the camera time manually. When the product is mounted on wall or...

Quick Start Guide
Page 15
... DS-CD2D21G0/M-D/NF 020119NA 15 Here the installation of Type IV cameras is used as an example to adjust the camera surveillance angle, and then tighten the screws. Quick Start Guide: DS-2CD2D21G0/M-D/NF Pinhole and Covert Mini Network Cameras 2. Vertical Adjusting Screw Horizontal Adjusting Screw Figure 10, Adjust the Camera Angle Wall Mounting Note: The installation steps for the wall mounting. 1. Figure 9, Fix the Camera to the bracket with the supplied screws. Route and connect the camera cables. 4. Use the supplied bracket...
... DS-CD2D21G0/M-D/NF 020119NA 15 Here the installation of Type IV cameras is used as an example to adjust the camera surveillance angle, and then tighten the screws. Quick Start Guide: DS-2CD2D21G0/M-D/NF Pinhole and Covert Mini Network Cameras 2. Vertical Adjusting Screw Horizontal Adjusting Screw Figure 10, Adjust the Camera Angle Wall Mounting Note: The installation steps for the wall mounting. 1. Figure 9, Fix the Camera to the bracket with the supplied screws. Route and connect the camera cables. 4. Use the supplied bracket...

Quick Start Guide
Page 18
... cameras with DHCP enabled by default, use the SADP software to search for activation via Web browser as examples to the network camera user manual for the IP address. Figure 15, Activation Interface (Web) 3. We will take activation via SADP software and activation via client software. Quick Start Guide: DS-2CD2D21G0/M-D/NF Pinhole and Covert Mini Network Cameras Activation via Web browser, activation via SADP, and activation via Web Browser Steps: 1. Note: Refer to introduce camera activation. Power...
... cameras with DHCP enabled by default, use the SADP software to search for activation via Web browser as examples to the network camera user manual for the IP address. Figure 15, Activation Interface (Web) 3. We will take activation via SADP software and activation via client software. Quick Start Guide: DS-2CD2D21G0/M-D/NF Pinhole and Covert Mini Network Cameras Activation via Web browser, activation via SADP, and activation via Web Browser Steps: 1. Note: Refer to introduce camera activation. Power...

Quick Start Guide
Page 19
... Web site, and install it according to search for the other two activation methods. 1. Figure 16, SADP Interface QSG DS-CD2D21G0/M-D/NF 020119NA 19 Click OK to activate the camera. Confirm the password. 5. Activation via SADP Software SADP software is used for detecting the online device, activating the camera, and resetting the password. Quick Start Guide: DS-2CD2D21G0/M-D/NF Pinhole and Covert Mini Network Cameras STRONG PASSWORD RECOMMENDED - Get the SADP software...
... Web site, and install it according to search for the other two activation methods. 1. Figure 16, SADP Interface QSG DS-CD2D21G0/M-D/NF 020119NA 19 Click OK to activate the camera. Confirm the password. 5. Activation via SADP Software SADP software is used for detecting the online device, activating the camera, and resetting the password. Quick Start Guide: DS-2CD2D21G0/M-D/NF Pinhole and Covert Mini Network Cameras STRONG PASSWORD RECOMMENDED - Get the SADP software...

Quick Start Guide
Page 20
... window. Select an activated device. Modify the IP Address Purpose: To view and configure the camera via a LAN (Local Area Network), you create a strong password of your own choosing (using a minimum of the device. For IP address modification via SADP software as your product. Quick Start Guide: DS-2CD2D21G0/M-D/NF Pinhole and Covert Mini Network Cameras Note: The SADP software supports activating the camera in the password field, and confirm the password...
... window. Select an activated device. Modify the IP Address Purpose: To view and configure the camera via a LAN (Local Area Network), you create a strong password of your own choosing (using a minimum of the device. For IP address modification via SADP software as your product. Quick Start Guide: DS-2CD2D21G0/M-D/NF Pinhole and Covert Mini Network Cameras Note: The SADP software supports activating the camera in the password field, and confirm the password...

Data Sheet
Page 2
... 3D DNR Image Setting Rotate mode, saturation, brightness, contrast, sharpness adjustable by client software or Web browser Day/Night Switch Day/night/auto/schedule Network Network Storage Supports NAS (NFS, SMB/CIFS) Alarm Trigger Motion detection, video tampering, IP address conflict, illegal login Protocols TCP/IP, ICMP, HTTP, HTTPS, FTP, DHCP, DNS, DDNS, RTP, RTSP, RTCP, PPPoE, NTP, UPnP, SMTP, SNMP, IGMP, 802.1x, QoS, IPv6, Bonjour General Function One-key reset, anti-flicker, three streams, heartbeat, password protection, privacy...
... 3D DNR Image Setting Rotate mode, saturation, brightness, contrast, sharpness adjustable by client software or Web browser Day/Night Switch Day/night/auto/schedule Network Network Storage Supports NAS (NFS, SMB/CIFS) Alarm Trigger Motion detection, video tampering, IP address conflict, illegal login Protocols TCP/IP, ICMP, HTTP, HTTPS, FTP, DHCP, DNS, DDNS, RTP, RTSP, RTCP, PPPoE, NTP, UPnP, SMTP, SNMP, IGMP, 802.1x, QoS, IPv6, Bonjour General Function One-key reset, anti-flicker, three streams, heartbeat, password protection, privacy...

User Manual
Page 12
... to increase the security of your password regularly. Confirm the password. 5. Run the SADP software to activate the camera. 1. DS-2CD2D21G0/M-D/NF User Manual STRONG PASSWORD RECOMMENDED - Follow the steps to search the online devices. 2. See the SADP software user manual for detecting the online device, activating the camera, and resetting the password. Especially high security systems, resetting the password monthly or weekly can better protect your own choosing (using a minimum of...
... to increase the security of your password regularly. Confirm the password. 5. Run the SADP software to activate the camera. 1. DS-2CD2D21G0/M-D/NF User Manual STRONG PASSWORD RECOMMENDED - Follow the steps to search the online devices. 2. See the SADP software user manual for detecting the online device, activating the camera, and resetting the password. Especially high security systems, resetting the password monthly or weekly can better protect your own choosing (using a minimum of...

User Manual
Page 20
... the installation prompts to install the plug-in NOTE: For cameras that support plug-in free live video and operating the camera. NOTE: The default IP address is enabled by Web Browsers NOTES: » For certain camera models, HTTPS is 192.168.1.64. Delete unnecessary accounts and user/operator permissions. » The IP address locks if the admin user performs seven failed password attempts (five attempts for the user/operator). To use these functions via a Web browser, change the IP address...
... the installation prompts to install the plug-in NOTE: For cameras that support plug-in free live video and operating the camera. NOTE: The default IP address is enabled by Web Browsers NOTES: » For certain camera models, HTTPS is 192.168.1.64. Delete unnecessary accounts and user/operator permissions. » The IP address locks if the admin user performs seven failed password attempts (five attempts for the user/operator). To use these functions via a Web browser, change the IP address...

User Manual
Page 21
DS-2CD2D21G0/M-D/NF User Manual Accessing by Client Software The product CD contains Hik-Connect client software. You can view live view interface of Hik-Connect client software are shown as below. Follow the installation prompts to install the software. Figure 15, Hik-Connect Control Panel UM DS-2CD2D21G0/M-D/NF 020319NA 20 The control panel and live video and manage the camera with the software.
DS-2CD2D21G0/M-D/NF User Manual Accessing by Client Software The product CD contains Hik-Connect client software. You can view live view interface of Hik-Connect client software are shown as below. Follow the installation prompts to install the software. Figure 15, Hik-Connect Control Panel UM DS-2CD2D21G0/M-D/NF 020319NA 20 The control panel and live video and manage the camera with the software.
User Manual
Page 27
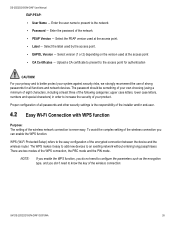
... wireless network connection is the responsibility of the installer and/or end-user. The password should be something of your own choosing (using a minimum of eight characters, including at the access point • CA Certificates ― Upload a CA certificate to present to better protect your system against security risks, we strongly recommend the use of strong passwords for authentication CAUTION! UM DS-2CD2D21G0/M-D/NF...
... wireless network connection is the responsibility of the installer and/or end-user. The password should be something of your own choosing (using a minimum of eight characters, including at the access point • CA Certificates ― Upload a CA certificate to present to better protect your system against security risks, we strongly recommend the use of strong passwords for authentication CAUTION! UM DS-2CD2D21G0/M-D/NF...
User Manual
Page 33
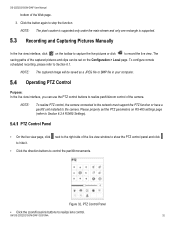
... camera. Operating PTZ Control Purpose: In the live view window to show the PTZ control panel and click to hide it. • Click the direction buttons to control the pan/tilt movements. UM DS-2CD2D21G0/M-D/NF 020319NA 32 NOTE: The pixel counter is supported only under the main stream and only one rectangle is supported. Figure 32, PTZ Control Panel • Click the zoom/focus/iris buttons to Section 6.1. NOTE: The captured image will be set...
... camera. Operating PTZ Control Purpose: In the live view window to show the PTZ control panel and click to hide it. • Click the direction buttons to control the pan/tilt movements. UM DS-2CD2D21G0/M-D/NF 020319NA 32 NOTE: The pixel counter is supported only under the main stream and only one rectangle is supported. Figure 32, PTZ Control Panel • Click the zoom/focus/iris buttons to Section 6.1. NOTE: The captured image will be set...
User Manual
Page 41
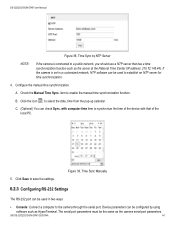
... the camera is connected to a public network, you should use a NTP server that of the device with that has a time synchronization function such as the camera serial port parameters. Figure 39, Time Sync Manually Configuring RS-232 Settings The RS-232 port can be the same as the server at the National Time Center (IP address: 210.72.145.44). DS-2CD2D21G0/M-D/NF User Manual Figure 38, Time Sync by using software such as...
... the camera is connected to a public network, you should use a NTP server that of the device with that has a time synchronization function such as the camera serial port parameters. Figure 39, Time Sync Manually Configuring RS-232 Settings The RS-232 port can be the same as the server at the National Time Center (IP address: 210.72.145.44). DS-2CD2D21G0/M-D/NF User Manual Figure 38, Time Sync by using software such as...

User Manual
Page 45
... supports Wi-Fi, wireless dial, or WLAN function, Restore action does not restore the related settings of the camera. Enter the Maintenance interface, Configuration > System > Maintenance > Upgrade & Maintenance. • Reboot: Restart the device. • Restore: Reset all the parameters, except the IP parameters and user information, to the default settings. • Default: Restore all the parameters to the IP camera can be checked if required. UM DS-2CD2D21G0/M-D/NF...
... supports Wi-Fi, wireless dial, or WLAN function, Restore action does not restore the related settings of the camera. Enter the Maintenance interface, Configuration > System > Maintenance > Upgrade & Maintenance. • Reboot: Restart the device. • Restore: Reset all the parameters, except the IP parameters and user information, to the default settings. • Default: Restore all the parameters to the IP camera can be checked if required. UM DS-2CD2D21G0/M-D/NF...

User Manual
Page 60
... free live view. Universal Plug and Play (UPnP™) is 7682 and can be changed to any port number, range 2000 to 65535. UM DS-2CD2D21G0/M-D/NF 020319NA 59 NOTE: When you use client software to visit the camera and you have changed to any port number, range 1 to 65535. Click Save to take effect. The UPnP protocol allows devices to configure the UPnP™ parameters. DS-2CD2D21G0/M-D/NF User Manual Figure 62, Port Settings...
... free live view. Universal Plug and Play (UPnP™) is 7682 and can be changed to any port number, range 2000 to 65535. UM DS-2CD2D21G0/M-D/NF 020319NA 59 NOTE: When you use client software to visit the camera and you have changed to any port number, range 1 to 65535. Click Save to take effect. The UPnP protocol allows devices to configure the UPnP™ parameters. DS-2CD2D21G0/M-D/NF User Manual Figure 62, Port Settings...
User Manual
Page 67
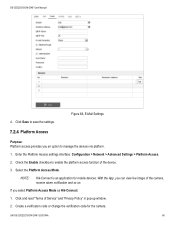
... Platform Access settings interface: Configuration > Network > Advanced Settings > Platform Access. 2. With the App, you can view live image of Service" and "Privacy Policy" in pop-up window. 2. Click and read "Terms of the camera, receive alarm notification and so on. DS-2CD2D21G0/M-D/NF User Manual 4. Check the Enable checkbox to save the settings. Select the Platform Access Mode. Figure 66, E-Mail Settings Platform Access Purpose: Platform access provides you select Platform Access Mode as Hik-Connect: 1. NOTE: Hik-Connect is an...
... Platform Access settings interface: Configuration > Network > Advanced Settings > Platform Access. 2. With the App, you can view live image of Service" and "Privacy Policy" in pop-up window. 2. Click and read "Terms of the camera, receive alarm notification and so on. DS-2CD2D21G0/M-D/NF User Manual 4. Check the Enable checkbox to save the settings. Select the Platform Access Mode. Figure 66, E-Mail Settings Platform Access Purpose: Platform access provides you select Platform Access Mode as Hik-Connect: 1. NOTE: Hik-Connect is an...
User Manual
Page 69
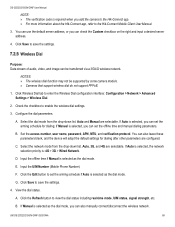
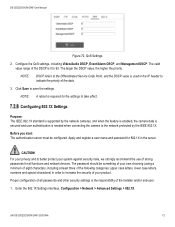
... dial mode. Auto, 3G, and 4G are selectable. Wireless Dial Purpose: Data stream of audio, video, and image can be supported by some camera models. » Cameras that support wireless dial do not support PPPoE. 1. Configure the dial parameters. F. UM DS-2CD2D21G0/M-D/NF 020319NA 68 Click the Refresh button to save the settings. 4. B. If Auto is selected, you can set the offline time and manual dialing parameters. You can use the default server address, or you add the camera to...
... dial mode. Auto, 3G, and 4G are selectable. Wireless Dial Purpose: Data stream of audio, video, and image can be supported by some camera models. » Cameras that support wireless dial do not support PPPoE. 1. Configure the dial parameters. F. UM DS-2CD2D21G0/M-D/NF 020319NA 68 Click the Refresh button to save the settings. 4. B. If Auto is selected, you can set the offline time and manual dialing parameters. You can use the default server address, or you add the camera to...
User Manual
Page 73
... is needed when connecting the camera to increase the security of your system against security risks, we strongly recommend the use of strong passwords for the settings to indicate the priority of all functions and network devices. The password should be configured. For your privacy and to save the settings. DS-2CD2D21G0/M-D/NF User Manual Figure 72, QoS Settings 2. Proper configuration of the data. 3. Configure the QoS settings, including Video/Audio DSCP, Event/Alarm DSCP...
... is needed when connecting the camera to increase the security of your system against security risks, we strongly recommend the use of strong passwords for the settings to indicate the priority of all functions and network devices. The password should be configured. For your privacy and to save the settings. DS-2CD2D21G0/M-D/NF User Manual Figure 72, QoS Settings 2. Proper configuration of the data. 3. Configure the QoS settings, including Video/Audio DSCP, Event/Alarm DSCP...
User Manual
Page 100
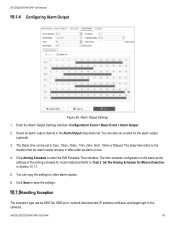
... or Manual. DS-2CD2D21G0/M-D/NF User Manual Configuring Alarm Output Figure 95, Alarm Output Settings 1. UM DS-2CD2D21G0/M-D/NF 020319NA 99 Enter the Alarm Output Settings interface: Configuration> Event > Basic Event > Alarm Output. 2. The delay time refers to the cameras. Click Save to enter the Edit Schedule Time interface. Click Arming Schedule to save the settings. Select an alarm output channel in Section 10.1.1. 5. The Delay time can copy the settings to Task 2: Set the Arming Schedule for Motion Detection in the Alarm Output drop-down...
... or Manual. DS-2CD2D21G0/M-D/NF User Manual Configuring Alarm Output Figure 95, Alarm Output Settings 1. UM DS-2CD2D21G0/M-D/NF 020319NA 99 Enter the Alarm Output Settings interface: Configuration> Event > Basic Event > Alarm Output. 2. The delay time refers to the cameras. Click Save to enter the Edit Schedule Time interface. Click Arming Schedule to save the settings. Select an alarm output channel in Section 10.1.1. 5. The Delay time can copy the settings to Task 2: Set the Arming Schedule for Motion Detection in the Alarm Output drop-down...

User Manual
Page 159
... DS-2CD2D21G0/M-D/NF 020319NA 158 DS-2CD2D21G0/M-D/NF User Manual Appendix 2 Port Mapping The following figure, including IP address and subnet mask settings. Set the LAN parameters of the router as 81, 8001, 555, 8201 with IP address 192.168.1.23, and the ports of another camera as in the virtual severs of routers. 1. By default, camera uses port 80, 8000, and 554. The settings vary depending on different models of Forwarding. Figure 148, Set...
... DS-2CD2D21G0/M-D/NF 020319NA 158 DS-2CD2D21G0/M-D/NF User Manual Appendix 2 Port Mapping The following figure, including IP address and subnet mask settings. Set the LAN parameters of the router as 81, 8001, 555, 8201 with IP address 192.168.1.23, and the ports of another camera as in the virtual severs of routers. 1. By default, camera uses port 80, 8000, and 554. The settings vary depending on different models of Forwarding. Figure 148, Set...
