
User Manual
Page 2
... their respective owners. Trademarks Acknowledgement and other information hereinafter are the properties of Hikvision. Any and all other Hikvision's trademarks and logos are the properties of Hikvision in various jurisdictions. This user manual (hereinafter referred to be "the Manual") cannot be "Hikvision"). About this user manual under the guidance of professionals. Legal Disclaimer TO THE MAXIMUM EXTENT PERMITTED BY...
... their respective owners. Trademarks Acknowledgement and other information hereinafter are the properties of Hikvision. Any and all other Hikvision's trademarks and logos are the properties of Hikvision in various jurisdictions. This user manual (hereinafter referred to be "the Manual") cannot be "Hikvision"). About this user manual under the guidance of professionals. Legal Disclaimer TO THE MAXIMUM EXTENT PERMITTED BY...

User Manual
Page 3
...YOUR USE CONFORMS THE APPLICABLE LAW. Notice: If camera fails to synchronize local time with that the user can use the product correctly to set up camera time manually. IN NO EVENT WILL HIKVISION, ITS DIRECTORS, OFFICERS, EMPLOYEES, OR AGENTS BE LIABLE TO YOU FOR ANY SPECIAL, CONSEQUENTIAL, INCIDENTAL,... OF BUSINESS PROFITS, BUSINESS INTERRUPTION, OR LOSS OF DATA OR DOCUMENTATION, IN CONNECTION WITH THE USE OF THIS PRODUCT, EVEN IF HIKVISION HAS BEEN ADVISED OF THE POSSIBILITY OF SUCH DAMAGES. Network Camera User Manual FITNESS FOR A PARTICULAR PURPOSE, AND NON-INFRINGEMENT OF THIRD PARTY.
...YOUR USE CONFORMS THE APPLICABLE LAW. Notice: If camera fails to synchronize local time with that the user can use the product correctly to set up camera time manually. IN NO EVENT WILL HIKVISION, ITS DIRECTORS, OFFICERS, EMPLOYEES, OR AGENTS BE LIABLE TO YOU FOR ANY SPECIAL, CONSEQUENTIAL, INCIDENTAL,... OF BUSINESS PROFITS, BUSINESS INTERRUPTION, OR LOSS OF DATA OR DOCUMENTATION, IN CONNECTION WITH THE USE OF THIS PRODUCT, EVEN IF HIKVISION HAS BEEN ADVISED OF THE POSSIBILITY OF SUCH DAMAGES. Network Camera User Manual FITNESS FOR A PARTICULAR PURPOSE, AND NON-INFRINGEMENT OF THIRD PARTY.

User Manual
Page 4
... if any responsibility for convenient supply interruption. Please make sure that the ceiling can meet the safety extra low voltage (SELV) standard. Network Camera User Manual The precaution measure is fixed to the ceiling. If the product does not work properly, please contact your dealer or the nearest service center...
... if any responsibility for convenient supply interruption. Please make sure that the ceiling can meet the safety extra low voltage (SELV) standard. Network Camera User Manual The precaution measure is fixed to the ceiling. If the product does not work properly, please contact your dealer or the nearest service center...

User Manual
Page 5
...), dusty or damp environment, and do not remove the dome cover film until the installation is finished. Please use or replacement of explosion. Network Camera User Manual Make sure the power supply voltage is correct before using the camera. Do not drop the camera or subject it to high electromagnetic...
...), dusty or damp environment, and do not remove the dome cover film until the installation is finished. Please use or replacement of explosion. Network Camera User Manual Make sure the power supply voltage is correct before using the camera. Do not drop the camera or subject it to high electromagnetic...

User Manual
Page 6
Network Camera User Manual body so that the foam ring and the dome cover are attached seamlessly. 5
Network Camera User Manual body so that the foam ring and the dome cover are attached seamlessly. 5

User Manual
Page 7
Network Camera User Manual Table of Contents Chapter 1 System Requirement 1 Chapter 2 Network Connection 2 2.1 Setting the Network Camera over the LAN 2 2.1.1 Wiring over the LAN...2 2.1.2 Activating the Camera 3 2.1.3 (Optional... 21 4.3 IP Property Settings for Wireless Network Connection 23 Chapter 5 Live View 25 5.1 Live View Page 25 5.2 Starting Live View 26 5.3 Recording and Capturing Pictures Manually 27 5.4 Operating PTZ Control 27 5.4.1 PTZ Control Panel...27 5.4.2 Setting/Calling a Preset 28 5.4.3 Setting/Calling a Patrol 29 Chapter 6 Network Camera Configuration 31 6.1 ...
Network Camera User Manual Table of Contents Chapter 1 System Requirement 1 Chapter 2 Network Connection 2 2.1 Setting the Network Camera over the LAN 2 2.1.1 Wiring over the LAN...2 2.1.2 Activating the Camera 3 2.1.3 (Optional... 21 4.3 IP Property Settings for Wireless Network Connection 23 Chapter 5 Live View 25 5.1 Live View Page 25 5.2 Starting Live View 26 5.3 Recording and Capturing Pictures Manually 27 5.4 Operating PTZ Control 27 5.4.1 PTZ Control Panel...27 5.4.2 Setting/Calling a Preset 28 5.4.3 Setting/Calling a Patrol 29 Chapter 6 Network Camera Configuration 31 6.1 ...

User Manual
Page 9
Network Camera User Manual 9.1.2 Day/Night Scheduled-Switch 84 9.2 Configuring OSD Settings 85 9.3 Configuring Privacy Mask 87 9.4 Configuring Picture Overlay 88 Chapter 10 Event Settings 90 10.1 Basic Events ......
Network Camera User Manual 9.1.2 Day/Night Scheduled-Switch 84 9.2 Configuring OSD Settings 85 9.3 Configuring Privacy Mask 87 9.4 Configuring Picture Overlay 88 Chapter 10 Event Settings 90 10.1 Basic Events ......

User Manual
Page 10
Network Camera User Manual Chapter 14 Application 155 14.1 Face Capture Statistics 155 14.2 People Counting Statistics 155 14.3 Heat Map Statistics 156 14.4 Counting Statistics 157 Appendix...159 Appendix 1 SADP Software Introduction 159 Appendix 2 Port Mapping 162 0505001070731 9
Network Camera User Manual Chapter 14 Application 155 14.1 Face Capture Statistics 155 14.2 People Counting Statistics 155 14.3 Heat Map Statistics 156 14.4 Counting Statistics 157 Appendix...159 Appendix 1 SADP Software Introduction 159 Appendix 2 Port Mapping 162 0505001070731 9

User Manual
Page 11
Network Camera User Manual Chapter 1 System Requirement Operating System: Microsoft Windows XP SP1 and above version CPU: 2.0 GHz or higher RAM: 1G or higher Display: 1024×768 resolution or higher Web Browser: Internet Explorer 8.0 and above version, Apple Safari 5.0.2 and above version, Mozilla Firefox 5.0 and above version and Google Chrome 18 and above version. 1
Network Camera User Manual Chapter 1 System Requirement Operating System: Microsoft Windows XP SP1 and above version CPU: 2.0 GHz or higher RAM: 1G or higher Display: 1024×768 resolution or higher Web Browser: Internet Explorer 8.0 and above version, Apple Safari 5.0.2 and above version, Mozilla Firefox 5.0 and above version and Google Chrome 18 and above version. 1

User Manual
Page 12
... service center. To ensure the network security of the network camera, we recommend you can contact us if you need such service. Network Camera User Manual Chapter 2 Network Connection Note: You shall acknowledge that the use of the product with your own protection. Note: For the detailed introduction of SADP...
... service center. To ensure the network security of the network camera, we recommend you can contact us if you need such service. Network Camera User Manual Chapter 2 Network Connection Note: You shall acknowledge that the use of the product with your own protection. Note: For the detailed introduction of SADP...

User Manual
Page 13
Network Camera User Manual Refer to the Figure 2-2 to set network camera over the LAN via Web Browser Steps: 1. Power on the camera, and connect the camera to ...
Network Camera User Manual Refer to the Figure 2-2 to set network camera over the LAN via Web Browser Steps: 1. Power on the camera, and connect the camera to ...
User Manual
Page 14
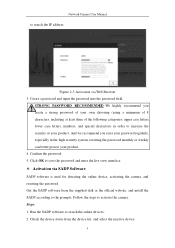
... used for detecting the online device, activating the camera, and resetting the password. Create a password and input the password into the password field. Network Camera User Manual to increase the security of the following categories: upper case letters, lower case letters, numbers, and special characters) in the high security system, resetting the...
... used for detecting the online device, activating the camera, and resetting the password. Create a password and input the password into the password field. Network Camera User Manual to increase the security of the following categories: upper case letters, lower case letters, numbers, and special characters) in the high security system, resetting the...
User Manual
Page 15
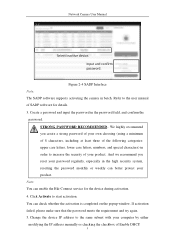
... checking the checkbox of Enable DHCP. 5 You can better protect your password regularly, especially in order to the user manual of your product. We highly recommend you reset your product. If activation failed, please make sure that the password meets the ...SADP software supports activating the camera in the password field, and confirm the password. Create a password and input the password in batch. Network Camera User Manual Select inactive device. Note: You can enable the Hik-Connect service for details. 3. Click Activate to the same subnet with your own choosing ...
... checking the checkbox of Enable DHCP. 5 You can better protect your password regularly, especially in order to the user manual of your product. We highly recommend you reset your product. If activation failed, please make sure that the password meets the ...SADP software supports activating the camera in the password field, and confirm the password. Create a password and input the password in batch. Network Camera User Manual Select inactive device. Note: You can enable the Hik-Connect service for details. 3. Click Activate to the same subnet with your own choosing ...

User Manual
Page 16
.... Steps: 1. Refer to activate your IP address modification. The batch IP address modification is versatile video management software for multiple kinds of devices. Network Camera User Manual Figure 2-5 Modify the IP Address 6. Input the admin password and click Modify to the user manual of the software pops up, as shown in the figure below. 6
.... Steps: 1. Refer to activate your IP address modification. The batch IP address modification is versatile video management software for multiple kinds of devices. Network Camera User Manual Figure 2-5 Modify the IP Address 6. Input the admin password and click Modify to the user manual of the software pops up, as shown in the figure below. 6

User Manual
Page 17
Network Camera User Manual Figure 2-6 Control Panel 2. Click the Device Management icon to enter the Device Management interface, as shown in the figure below. 7
Network Camera User Manual Figure 2-6 Control Panel 2. Click the Device Management icon to enter the Device Management interface, as shown in the figure below. 7

User Manual
Page 18
... choosing (using a minimum of 8 characters, including at least three of your product. Create a password and input the password in order to start activation. 7. Network Camera User Manual Figure 2-7 Device Management Interface 3. Check the device status from the device list, and select an inactive device. 4. We recommend you create a strong password of the...
... choosing (using a minimum of 8 characters, including at least three of your product. Create a password and input the password in order to start activation. 7. Network Camera User Manual Figure 2-7 Device Management Interface 3. Check the device status from the device list, and select an inactive device. 4. We recommend you create a strong password of the...

User Manual
Page 19
... Security question is used to the same subnet with a static IP or a dynamic IP. 9 Network Camera User Manual Figure 2-9 Modifying the Network Parameters 8. Input the password to activate your computer by either modifying the IP address manually or checking the checkbox of Enable DHCP. 9. Change the device IP address to reset the admin...
... Security question is used to the same subnet with a static IP or a dynamic IP. 9 Network Camera User Manual Figure 2-9 Modifying the Network Parameters 8. Input the password to activate your computer by either modifying the IP address manually or checking the checkbox of Enable DHCP. 9. Change the device IP address to reset the admin...

User Manual
Page 20
... network camera with port mapping. Refer to Section 2.1.2 for assistance with static IP directly You can connect the network camera via a router Steps: 1. Network Camera User Manual 2.2.1 Static IP Connection Before you can also save the static IP in the router. 4. Set port mapping, e.g., 80, 8000, and 554 ports. With the static...
... network camera with port mapping. Refer to Section 2.1.2 for assistance with static IP directly You can connect the network camera via a router Steps: 1. Network Camera User Manual 2.2.1 Static IP Connection Before you can also save the static IP in the router. 4. Set port mapping, e.g., 80, 8000, and 554 ports. With the static...

User Manual
Page 21
... name from an ISP. The steps for assistance with port mapping. Set port mapping. Figure 2-12 Accessing the Camera with Dynamic IP 11 Network Camera User Manual Figure 2-11 Accessing the Camera with Static IP Directly 2.2.2 Dynamic IP Connection Before you can connect the network camera to a modem or a router. Connecting...
... name from an ISP. The steps for assistance with port mapping. Set port mapping. Figure 2-12 Accessing the Camera with Dynamic IP 11 Network Camera User Manual Figure 2-11 Accessing the Camera with Static IP Directly 2.2.2 Dynamic IP Connection Before you can connect the network camera to a modem or a router. Connecting...

User Manual
Page 22
Network Camera User Manual Note: The obtained IP address is dynamically assigned via the applied domain name. 12 Please follow the steps below for detailed configuration. 3. Refer to Section 7.1.2 ...
Network Camera User Manual Note: The obtained IP address is dynamically assigned via the applied domain name. 12 Please follow the steps below for detailed configuration. 3. Refer to Section 7.1.2 ...