

Spec Sheet
Page 1
... Hisense HS214 can even use the Roku Tv remote to find a space for a full-bodied audio experience. Wireless Music Streaming The HS214 includes Bluetooth technology for easy wireless connections to make sure that improves your Hisense audio experience right out of your TV sound experience and is fully compatible with multiple preset EQ settings. We've included an HDMI cable, optical cable, and a wall mounting kit to make the most of the box...
... Hisense HS214 can even use the Roku Tv remote to find a space for a full-bodied audio experience. Wireless Music Streaming The HS214 includes Bluetooth technology for easy wireless connections to make sure that improves your Hisense audio experience right out of your TV sound experience and is fully compatible with multiple preset EQ settings. We've included an HDMI cable, optical cable, and a wall mounting kit to make the most of the box...

Spec Sheet
Page 2
108 watts Hisense All-In-One 2.1 Ch Soundbar MODEL HS214 TECHNICAL SPECIFICATIONS DIMENSIONS/WEIGHT Soundbar Dimensions Soundbar Weight Soundbar Package Dimensions Soundbar Package Weight Master Carton Dimensions for shipping Master Carton Weight for shipping Soundbar Qty in a Master Carton Sound Performance Channels Speakers Subwoofer Max Output Power Frequency Response Sound Enhancement Sound Mode Virtual Surround Audio Decoder Dolby Digital PCM Multi ch PCM FLAC/WAV/ALAC/WMA/MP3/AAC/AAC+ Display Display Screen Standby LED Indicator POWER Power Consumption Standby Consumption Power Supply...
108 watts Hisense All-In-One 2.1 Ch Soundbar MODEL HS214 TECHNICAL SPECIFICATIONS DIMENSIONS/WEIGHT Soundbar Dimensions Soundbar Weight Soundbar Package Dimensions Soundbar Package Weight Master Carton Dimensions for shipping Master Carton Weight for shipping Soundbar Qty in a Master Carton Sound Performance Channels Speakers Subwoofer Max Output Power Frequency Response Sound Enhancement Sound Mode Virtual Surround Audio Decoder Dolby Digital PCM Multi ch PCM FLAC/WAV/ALAC/WMA/MP3/AAC/AAC+ Display Display Screen Standby LED Indicator POWER Power Consumption Standby Consumption Power Supply...

Quick Start Guide
Page 1
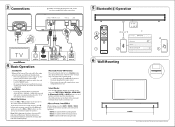
... the Box Main Unit Remote Control AC Power Cord Optical Cable Wall Mounting Kit R03(Size AAA)Battery x2 User Manual/ Quick Start Guide HDMI Cable 1 Remote Control 1 (ON/OFF) Switch the unit between ON and Standby mode. 4 (SOURCE) Button Select the play mode. 5 +/- (Vol+/Vol-) Buttons Increase/decrease the volume level. 6 Wall Mount Install the wall mounting screws into the remote control before use. 2 Replace the Remote Control Battery: 6 1 2 8 9 3 Do not expose the battery or other direct heat sources. 6 7 34 5 8 9 10 11 12 13 6 1 Remote Control Sensor Receive signal...
... the Box Main Unit Remote Control AC Power Cord Optical Cable Wall Mounting Kit R03(Size AAA)Battery x2 User Manual/ Quick Start Guide HDMI Cable 1 Remote Control 1 (ON/OFF) Switch the unit between ON and Standby mode. 4 (SOURCE) Button Select the play mode. 5 +/- (Vol+/Vol-) Buttons Increase/decrease the volume level. 6 Wall Mount Install the wall mounting screws into the remote control before use. 2 Replace the Remote Control Battery: 6 1 2 8 9 3 Do not expose the battery or other direct heat sources. 6 7 34 5 8 9 10 11 12 13 6 1 Remote Control Sensor Receive signal...
Quick Start Guide
Page 2
... remote control to select the preset equalizers: MOVIE (recommended for watching movie) MUSIC (recommended for listening to music) NEWS (recommended for listening to news) < 8 m / 27 ft Settings Bluetooth Bluetooth DEVICES 1 2 Hisense HS214 Connected 3 Now Discoverable 6 Wall Mounting 540MM Roku TV Ready and the Roku TV Ready logo are trademarks of the main unit will show which mode is switched on. 3 Connections ● Before connecting the AC power cord...
... remote control to select the preset equalizers: MOVIE (recommended for watching movie) MUSIC (recommended for listening to music) NEWS (recommended for listening to news) < 8 m / 27 ft Settings Bluetooth Bluetooth DEVICES 1 2 Hisense HS214 Connected 3 Now Discoverable 6 Wall Mounting 540MM Roku TV Ready and the Roku TV Ready logo are trademarks of the main unit will show which mode is switched on. 3 Connections ● Before connecting the AC power cord...

User Manual
Page 1
Dolby, Dolby Audio, and the double-D symbol are trademarks of Dolby Laboratories. Roku TV Ready and the Roku TV Ready logo are trademarks of Roku, Inc. 2.1 Channel Sound Bar Home Theater System Model: HS214 Manufactured under license from Dolby Laboratories. USER MANUAL Before using the sound bar, please read this manual thoroughly and retain it for future reference.
Dolby, Dolby Audio, and the double-D symbol are trademarks of Dolby Laboratories. Roku TV Ready and the Roku TV Ready logo are trademarks of Roku, Inc. 2.1 Channel Sound Bar Home Theater System Model: HS214 Manufactured under license from Dolby Laboratories. USER MANUAL Before using the sound bar, please read this manual thoroughly and retain it for future reference.

User Manual
Page 2
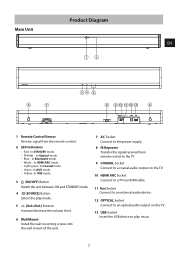
... 6 Product Diagram 7 Main Unit ...7 Remote Control...8 Instructions 8 Prepare the Remote Control ...8 Replace the Remote Control Battery...8 Precautions Concerning Batteries ...8 Placement and Mounting...9 Wall Mounting (if using option-B)...9 Connections 10 Connect to COAXIAL Socket ...10 Connect to HDMI ARC Socket ...10 Connect to AUX Socket ...10 Connect to OPTICAL Socket ...11 Connect Power ...11 Basic Operation 11 Standby/On ...11 Auto Wake ...11 How to Enable Auto Wake ...11 Automatic Power O Function ...11 Select Modes ...11 Adjust the Volume ...12 Select a Preset Sound...
... 6 Product Diagram 7 Main Unit ...7 Remote Control...8 Instructions 8 Prepare the Remote Control ...8 Replace the Remote Control Battery...8 Precautions Concerning Batteries ...8 Placement and Mounting...9 Wall Mounting (if using option-B)...9 Connections 10 Connect to COAXIAL Socket ...10 Connect to HDMI ARC Socket ...10 Connect to AUX Socket ...10 Connect to OPTICAL Socket ...11 Connect Power ...11 Basic Operation 11 Standby/On ...11 Auto Wake ...11 How to Enable Auto Wake ...11 Automatic Power O Function ...11 Select Modes ...11 Adjust the Volume ...12 Select a Preset Sound...

User Manual
Page 3
... been designed in any ventilation openings. Servicing is required when the apparatus has been damaged in such a way that may be of su cient magnitude as power supply cord or plug is operated. 2 Keep these instructions - The exclamation point within the product's enclosure that it does not require a safety connection to . 4 Follow all warnings - A grounding plug has two blades and a third...
... been designed in any ventilation openings. Servicing is required when the apparatus has been damaged in such a way that may be of su cient magnitude as power supply cord or plug is operated. 2 Keep these instructions - The exclamation point within the product's enclosure that it does not require a safety connection to . 4 Follow all warnings - A grounding plug has two blades and a third...

User Manual
Page 4
... Accessories/components marketed together: Remote control operate the equipment. • The rating label is used batteries away from the wall outlet, always pull directly on the plug, never yank on and keep it responsibly to cause cancer Warning and birth defects or other household wastes throughout the EU. clean, dry or slightly damp cloth. • When removing the power plug from children. HDMI...
... Accessories/components marketed together: Remote control operate the equipment. • The rating label is used batteries away from the wall outlet, always pull directly on the plug, never yank on and keep it responsibly to cause cancer Warning and birth defects or other household wastes throughout the EU. clean, dry or slightly damp cloth. • When removing the power plug from children. HDMI...

User Manual
Page 5
... maintain compliance with the instructions, may cause undesired operation. - models Warning: FCC Information cEoNuld void the user's authority to Part 15 of the following two conditions: (1) this device may not cause harmful interference, and (2) this equipment does cause harmful interference to radio or television reception, which can radiate radio frequency energy and, if not installed and used in accordance with the...
... maintain compliance with the instructions, may cause undesired operation. - models Warning: FCC Information cEoNuld void the user's authority to Part 15 of the following two conditions: (1) this device may not cause harmful interference, and (2) this equipment does cause harmful interference to radio or television reception, which can radiate radio frequency energy and, if not installed and used in accordance with the...
User Manual
Page 7
... Switch the unit between ON and STANDBY mode. 4 (SOURCE) Button Select the play mode. 5 +/- (Vol+/Vol-) Buttons Increase/decrease the volume level. 6 Wall Mount Install the wall mounting screws into the wall mount of the unit. 7 AC Socket Connect to the power supply. 8 IR Repeater Transfer the signal received from remote control to the TV 9 COAXIAL Socket Connect to a coaxial audio output on the TV. 10 HDMI ARC Socket Connect to a TV via HDMI cable...
... Switch the unit between ON and STANDBY mode. 4 (SOURCE) Button Select the play mode. 5 +/- (Vol+/Vol-) Buttons Increase/decrease the volume level. 6 Wall Mount Install the wall mounting screws into the wall mount of the unit. 7 AC Socket Connect to the power supply. 8 IR Repeater Transfer the signal received from remote control to the TV 9 COAXIAL Socket Connect to a coaxial audio output on the TV. 10 HDMI ARC Socket Connect to a TV via HDMI cable...

User Manual
Page 8
... BASS + , BASS - Doing so could cause batteries to activate the 11 pairing function in Bluetooth mode or disconnect the existing paired Bluetooth device. 7 SURR Adjust the surround ON/OFF. 8 DIM - Increase/decrease the bass level. 11 SOURCE Select the play mode. Place 2 x new AAA batteries into the battery tray with other metallic objects. Conversely, the other remote control devices using infrared rays are used for a long time (more than a month), remove the batteries from...
... BASS + , BASS - Doing so could cause batteries to activate the 11 pairing function in Bluetooth mode or disconnect the existing paired Bluetooth device. 7 SURR Adjust the surround ON/OFF. 8 DIM - Increase/decrease the bass level. 11 SOURCE Select the play mode. Place 2 x new AAA batteries into the battery tray with other metallic objects. Conversely, the other remote control devices using infrared rays are used for a long time (more than a month), remove the batteries from...
User Manual
Page 9
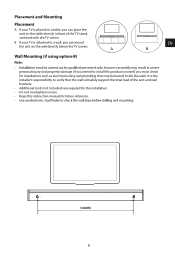
... included) are required for the installation. - Placement and Mounting Placement A If your TV is attached to verify that may personal injury and property damage (if you intend to install this instruction manual for installations such as electrical wiring and plumbing that the wall will safely support the total load of the TV stand, centered with the TV screen. A EN EN B Wall Mounting (if using option-B) Note: -
... included) are required for the installation. - Placement and Mounting Placement A If your TV is attached to verify that may personal injury and property damage (if you intend to install this instruction manual for installations such as electrical wiring and plumbing that the wall will safely support the total load of the TV stand, centered with the TV screen. A EN EN B Wall Mounting (if using option-B) Note: -

User Manual
Page 10
..., turn on the TV might be set to connect the TV's audio output socket and the AUX socket on the unit. Tips: - Only HDMI 1.4 compatible cables can hear the TV audio through your TV user manual. - Your TV must be labelled di erently. TV, DVD or Blu-ray player). The HDMI ARC connector on HDMI-CEC operations. HDMI-CEC and ARC must support the...
..., turn on the TV might be set to connect the TV's audio output socket and the AUX socket on the unit. Tips: - Only HDMI 1.4 compatible cables can hear the TV audio through your TV user manual. - Your TV must be labelled di erently. TV, DVD or Blu-ray player). The HDMI ARC connector on HDMI-CEC operations. HDMI-CEC and ARC must support the...
User Manual
Page 11
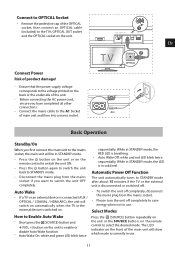
... other connections. • Connect the mains cable to save energy when not in use . Remove the protective cap of product damage! - EN EN Connect Power Risk of the OPTICAL socket, then connect an OPTICAL cable (included) to STANDBY mode after about 15 minutes if the TV or the external unit is switched on the remote control to switch the unit OFF completely. Before connecting the AC power cord...
... other connections. • Connect the mains cable to save energy when not in use . Remove the protective cap of product damage! - EN EN Connect Power Risk of the OPTICAL socket, then connect an OPTICAL cable (included) to STANDBY mode after about 15 minutes if the TV or the external unit is switched on the remote control to switch the unit OFF completely. Before connecting the AC power cord...

User Manual
Page 12
... unit, you connect a Bluetooth device to adjust the volume. Adjust the Volume Press the + / - TV, DVD or Blu-ray 3 Operate your Bluetooth receiver may need to pair your Bluetooth device list. • button on your desired level. support, the LED light would be purple and on the unit or the mode, if there's no sound output from the connected Bluetooth device. 12 on the remote control. Note: - You will re-enter pairing mode automatically. 1 During...
... unit, you connect a Bluetooth device to adjust the volume. Adjust the Volume Press the + / - TV, DVD or Blu-ray 3 Operate your Bluetooth receiver may need to pair your Bluetooth device list. • button on your desired level. support, the LED light would be purple and on the unit or the mode, if there's no sound output from the connected Bluetooth device. 12 on the remote control. Note: - You will re-enter pairing mode automatically. 1 During...

User Manual
Page 13
... for the password if necessary. • If no other Bluetooth device pairs with the unit. 2 Play music via your device (if it supports A2DP). 3 Use supplied remote control to select USB mode. 3 During playback: - USB Operation 1 Insert an USB device. 2 Press the button repeatedly on the unit or press the SOURCE button on the unit. - Switch to another source on the remote control to control play /pause...
... for the password if necessary. • If no other Bluetooth device pairs with the unit. 2 Play music via your device (if it supports A2DP). 3 Use supplied remote control to select USB mode. 3 During playback: - USB Operation 1 Insert an USB device. 2 Press the button repeatedly on the unit or press the SOURCE button on the unit. - Switch to another source on the remote control to control play /pause...

User Manual
Page 14
... not pass through digital audio. • Your TV may be turned o automatically • Reduce the distance between the remote control and the unit. No sound • Increase the volume. If you encounter problems when using Bluetooth, ensure that the volume on your Bluetooth device. • Ensure that the audio output setting is set to your TV's user manual for saving power • When the unit's external input signal level is not...
... not pass through digital audio. • Your TV may be turned o automatically • Reduce the distance between the remote control and the unit. No sound • Increase the volume. If you encounter problems when using Bluetooth, ensure that the volume on your Bluetooth device. • Ensure that the audio output setting is set to your TV's user manual for saving power • When the unit's external input signal level is not...

User Manual
Page 15
... USB Compatibility USB Playback Support/File Formats Dimension (WxDxH) Net Weight Impedance Frequency Response HS214 100-240V~ 50/60Hz 20W 0.45W 5V Hi-Speed USB (2.0) / FAT32 WAVaMP3aWMAaFLAC 25.59 x 3.74 x 2.42 inches / (650 x 95 x 61.5 mm ) 4.78 lbs (2.17kg) 4Ω+8Ω x 2 40Hz-20KHz EENN Bluetooth Version Bluetooth Maximum Power Transmitted Frequency Bands V4.2 9dBm 2402 ~ 2480 MHz Ampli er(Output power) Total Remote Control Distance/Angle Battery Type...
... USB Compatibility USB Playback Support/File Formats Dimension (WxDxH) Net Weight Impedance Frequency Response HS214 100-240V~ 50/60Hz 20W 0.45W 5V Hi-Speed USB (2.0) / FAT32 WAVaMP3aWMAaFLAC 25.59 x 3.74 x 2.42 inches / (650 x 95 x 61.5 mm ) 4.78 lbs (2.17kg) 4Ω+8Ω x 2 40Hz-20KHz EENN Bluetooth Version Bluetooth Maximum Power Transmitted Frequency Bands V4.2 9dBm 2402 ~ 2480 MHz Ampli er(Output power) Total Remote Control Distance/Angle Battery Type...

