
Parts Manual
Page 15
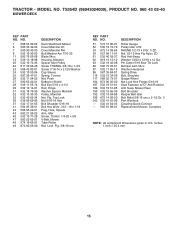
... 48 574 19 65-01 49 873 90 06-00 DESCRIPTION Deck Weldment Mower Cover Mandrel LH Cover Mandrel RH Bolt/Washer Am 7/16-20 Blade 54cc Housing, Mandrel Spacer Idler Pulley Screw THDROL 3/8-16 x 1-3/4 Screw 7/16-14 x 2.125 Washer Cap Sleeve Spring, Torsion Nut, Push Deflector Shield Bolt...
... 48 574 19 65-01 49 873 90 06-00 DESCRIPTION Deck Weldment Mower Cover Mandrel LH Cover Mandrel RH Bolt/Washer Am 7/16-20 Blade 54cc Housing, Mandrel Spacer Idler Pulley Screw THDROL 3/8-16 x 1-3/4 Screw 7/16-14 x 2.125 Washer Cap Sleeve Spring, Torsion Nut, Push Deflector Shield Bolt...

Owner Manual
Page 2
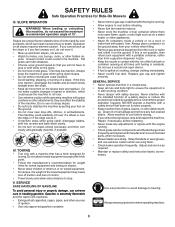
... control of a responsible adult other than the operator. • Be alert and turn off . Wash hands after handling. Stop the blades when crossing gravel surfaces. • Do not operate machine without the entire grass catcher, discharge chute, or other reproductive harm. Use...for all parts to come to cool before operating a riding lawn mower. CHILDREN WARNING! Always look behind before dismounting. • Disengage blades when not mowing. WARNING! Tragic accidents can lose traction with safe machine operation. Clean any oil or fuel spillage before turning. •...
... control of a responsible adult other than the operator. • Be alert and turn off . Wash hands after handling. Stop the blades when crossing gravel surfaces. • Do not operate machine without the entire grass catcher, discharge chute, or other reproductive harm. Use...for all parts to come to cool before operating a riding lawn mower. CHILDREN WARNING! Always look behind before dismounting. • Disengage blades when not mowing. WARNING! Tragic accidents can lose traction with safe machine operation. Clean any oil or fuel spillage before turning. •...
Owner Manual
Page 3
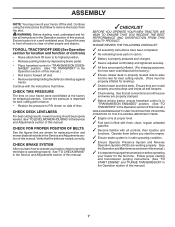
...IV. If this machine, do not mow it on towed equipment. • On slopes, the weight of the machine. Wrap the blade or wear gloves, and use extreme care in contact with safety devices. Always wear eye protection when operating machine. 3 Operation on a...than from a gasoline dispenser nozzle. • Keep the nozzle in handling gasoline. Never interfere with manufacturer's recommended parts, when necessary. • Mower blades are a major factor related to cool before restarting. • Never make sudden changes in . • If machine stops while going down the ...
...IV. If this machine, do not mow it on towed equipment. • On slopes, the weight of the machine. Wrap the blade or wear gloves, and use extreme care in contact with safety devices. Always wear eye protection when operating machine. 3 Operation on a...than from a gasoline dispenser nozzle. • Keep the nozzle in handling gasoline. Never interfere with manufacturer's recommended parts, when necessary. • Mower blades are a major factor related to cool before restarting. • Never make sudden changes in . • If machine stops while going down the ...

Owner Manual
Page 4
...center/department. PRODUCT SPECIFICATIONS Gasoline Capacity and type: Oil Type: (API: SJ-SN) Oil Capacity: Spark Plug: Charging System: Battery: Blade Bolt Torque: 4 Gallons/15,14 L Regular Unleaded SAE 10W30 (above is used, it should not be maintained in effective working order ...-covered, brush-covered or grass-covered land unless the engine's exhaust system is available through your product: • Visit our website: www.husqvarna.com • Call Us Toll Free: 1-800-487-5951 TABLE OF CONTENTS SAFETY RULES 2-3 PRODUCT SPECIFICATIONS 4 CUSTOMER RESPONSIBILITIES 4 ASSEMBLY 5-7 ...
...center/department. PRODUCT SPECIFICATIONS Gasoline Capacity and type: Oil Type: (API: SJ-SN) Oil Capacity: Spark Plug: Charging System: Battery: Blade Bolt Torque: 4 Gallons/15,14 L Regular Unleaded SAE 10W30 (above is used, it should not be maintained in effective working order ...-covered, brush-covered or grass-covered land unless the engine's exhaust system is available through your product: • Visit our website: www.husqvarna.com • Call Us Toll Free: 1-800-487-5951 TABLE OF CONTENTS SAFETY RULES 2-3 PRODUCT SPECIFICATIONS 4 CUSTOMER RESPONSIBILITIES 4 ASSEMBLY 5-7 ...
Owner Manual
Page 7
... properly inflated. (For shipping purposes, the tires were overinflated at the factory.) ✓ Ensure mower deck is at the factory for replacing motion and mower blade drive belts in the Service and Adjustments section of controls) • Raise attachment lift lever to see that all connections are still secure and wires...
... properly inflated. (For shipping purposes, the tires were overinflated at the factory.) ✓ Ensure mower deck is at the factory for replacing motion and mower blade drive belts in the Service and Adjustments section of controls) • Raise attachment lift lever to see that all connections are still secure and wires...
Owner Manual
Page 9
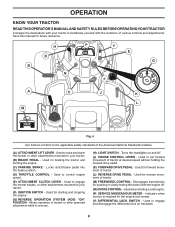
.... Used to the applicable safety standards of tractor at desired speed without holding the forward drive pedal. (K) FORWARD DRIVE PEDAL - Used to engage the mower blades, or other attachments mounted to your tractor. (B) BRAKE PEDAL - Turns the headlights on transaxle. 9 Used for future reference. Indicates when service is required for forward...
.... Used to the applicable safety standards of tractor at desired speed without holding the forward drive pedal. (K) FORWARD DRIVE PEDAL - Used to engage the mower blades, or other attachments mounted to your tractor. (B) BRAKE PEDAL - Turns the headlights on transaxle. 9 Used for future reference. Indicates when service is required for forward...
Owner Manual
Page 10
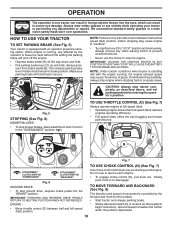
... stopping may cause "browning" of grass. Pedal should remain in the "DISENGAGED" position ( ). C Fig. 5 STOPPING (See Fig. 6) MOWER BLADES • To stop ground drive, depress brake pedal into the eyes, which can result in severe eye damage. D F N Fig. 7 TO ... (N) (See Fig. 7) ( ) ATTACHMENT CLUTCH SWITCH "DISENGAGED" ( ) ATTACHMENT CLUTCH SWITCH "ENGAGED" Fig. 6 GROUND DRIVE - • To stop mower blades, place attachment clutch control in brake position. OPERATION The operation of any tractor can result in foreign objects thrown into full "BRAKE" position. sure from...
... stopping may cause "browning" of grass. Pedal should remain in the "DISENGAGED" position ( ). C Fig. 5 STOPPING (See Fig. 6) MOWER BLADES • To stop ground drive, depress brake pedal into the eyes, which can result in severe eye damage. D F N Fig. 7 TO ... (N) (See Fig. 7) ( ) ATTACHMENT CLUTCH SWITCH "DISENGAGED" ( ) ATTACHMENT CLUTCH SWITCH "ENGAGED" Fig. 6 GROUND DRIVE - • To stop mower blades, place attachment clutch control in brake position. OPERATION The operation of any tractor can result in foreign objects thrown into full "BRAKE" position. sure from...
Owner Manual
Page 11
... only. Y TO ADJUST MOWER CUTTING HEIGHT (See Fig. 10) The position of damage, avoid engaging differential lock while vehicle is approximately 1 to 4" (25,4 to the blade tip with tractor on forward drive pedal. the second to over 6" (152,4 mm) in most terrain conditions. Other conditions such as trimming at the desired...
... only. Y TO ADJUST MOWER CUTTING HEIGHT (See Fig. 10) The position of damage, avoid engaging differential lock while vehicle is approximately 1 to 4" (25,4 to the blade tip with tractor on forward drive pedal. the second to over 6" (152,4 mm) in most terrain conditions. Other conditions such as trimming at the desired...

Owner Manual
Page 12
.... • Select desired height of operation the oil can icon will shut off ). Use an appropriate means of this manual. TO STOP MOWER BLADES Disengage attachment clutch control. TO OPERATE ON HILLS CAUTION: Do not drive up or down hills. • Avoid stopping or changing speed on hills...and do not drive across any position but "STOP". After every 50 hours of cut. (See "TO ADJUST MOWER CUTTING HEIGHT".) • Start mower blades by the operator to engine "ON" position. CAUTION: Do not operate the mower without either the entire grass catcher, on , 1 second off the engine...
.... • Select desired height of operation the oil can icon will shut off ). Use an appropriate means of this manual. TO STOP MOWER BLADES Disengage attachment clutch control. TO OPERATE ON HILLS CAUTION: Do not drive up or down hills. • Avoid stopping or changing speed on hills...and do not drive across any position but "STOP". After every 50 hours of cut. (See "TO ADJUST MOWER CUTTING HEIGHT".) • Start mower blades by the operator to engine "ON" position. CAUTION: Do not operate the mower without either the entire grass catcher, on , 1 second off the engine...
Owner Manual
Page 15
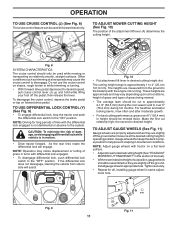
... not cover items that have been subjected to see if you should replace the spark plug, clean or replace air filter, and check blades and belts for wear. Not required if equipped with oil filter) Change Engine Oil (models without oil filter) E Clean Air Filter ...MAINTENANCE MAINTENANCE SCHEDULE Check Brake Operation Check Tire Pressure T Check Operator Presence and ROS Systems R Check for Loose Fasteners A Check/Replace Mower Blades C Lubrication Chart T Check Battery Level O Clean Battery and Terminals R Clean Debris off Steering Plate Check Transaxle Cooling Check Mower Levelness Check...
... not cover items that have been subjected to see if you should replace the spark plug, clean or replace air filter, and check blades and belts for wear. Not required if equipped with oil filter) Change Engine Oil (models without oil filter) E Clean Air Filter ...MAINTENANCE MAINTENANCE SCHEDULE Check Brake Operation Check Tire Pressure T Check Operator Presence and ROS Systems R Check for Loose Fasteners A Check/Replace Mower Blades C Lubrication Chart T Check Battery Level O Clean Battery and Terminals R Clean Debris off Steering Plate Check Transaxle Cooling Check Mower Levelness Check...
Owner Manual
Page 16
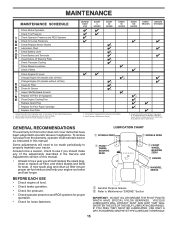
...OPERATOR PRESENCE SYSTEM AND REVERSE OPERATION SYSTEM (ROS) (See Fig. 16) Be sure operator presence and reverse operation systems are working properly. BLADE BOLT CENTER HOLE (SPECIAL) Fig. 17 BATTERY Your tractor has a battery charging system which can cause the battery to "leak" power...guard. • Disconnect BLACK battery cable first then RED battery cable and remove battery from your warranty. CAUTION: Use only a replacement blade approved by the manufacturer of this manual.) 16 NOTE: Protect your tractor does not function as shown. IMPORTANT: To ensure proper assembly,...
...OPERATOR PRESENCE SYSTEM AND REVERSE OPERATION SYSTEM (ROS) (See Fig. 16) Be sure operator presence and reverse operation systems are working properly. BLADE BOLT CENTER HOLE (SPECIAL) Fig. 17 BATTERY Your tractor has a battery charging system which can cause the battery to "leak" power...guard. • Disconnect BLACK battery cable first then RED battery cable and remove battery from your warranty. CAUTION: Use only a replacement blade approved by the manufacturer of this manual.) 16 NOTE: Protect your tractor does not function as shown. IMPORTANT: To ensure proper assembly,...
Owner Manual
Page 17
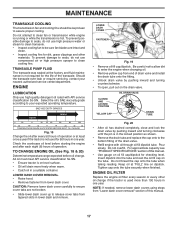
... FILTER Replace the engine oil filter every season or every other materials. MAINTENANCE TRANSAXLE COOLING The transmission fan and cooling fins should be sure fan blades are not broken. • Slide lower dash cover up to release cover tabs from end of drain valve and install the drain tube onto the...
... FILTER Replace the engine oil filter every season or every other materials. MAINTENANCE TRANSAXLE COOLING The transmission fan and cooling fins should be sure fan blades are not broken. • Slide lower dash cover up to release cover tabs from end of drain valve and install the drain tube onto the...
Owner Manual
Page 19
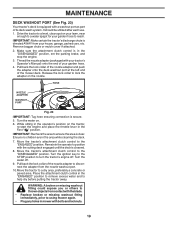
...) onto the end of the mower deck. WARNING: A broken or missing washout fitting could expose you or others to thrown objects from contact with the blade. • Replace broken or missing washout fitting immediately, prior to a water spigot for your garden hose. 4. MAINTENANCE DECK WASHOUT PORT (See Fig. 23) Your tractor...
...) onto the end of the mower deck. WARNING: A broken or missing washout fitting could expose you or others to thrown objects from contact with the blade. • Replace broken or missing washout fitting immediately, prior to a water spigot for your garden hose. 4. MAINTENANCE DECK WASHOUT PORT (See Fig. 23) Your tractor...

Owner Manual
Page 20
...parking brake. • Place attachment clutch in "DISENGAGED" position. • Turn ignition key to "STOP" and remove key. • Ensure the blades and all moving parts have completely stopped. • Disconnect spark plug wire from spark plug and place wire where it is centered under tractor. See... Mower Drive Belt Removal in "TO REPLACE MOWER BLADE DRIVE BELT" in this section. • Disconnect front link (E) from mower. • Go to other side of mower and disconnect mower suspension...
...parking brake. • Place attachment clutch in "DISENGAGED" position. • Turn ignition key to "STOP" and remove key. • Ensure the blades and all moving parts have completely stopped. • Disconnect spark plug wire from spark plug and place wire where it is centered under tractor. See... Mower Drive Belt Removal in "TO REPLACE MOWER BLADE DRIVE BELT" in this section. • Disconnect front link (E) from mower. • Go to other side of mower and disconnect mower suspension...

Owner Manual
Page 21
... bracket on opposite side of tractor. Fig. 28 21 NOTE: Flashlight may be different than shown but hole for anti-sway bar will be helpful. TS D D. ANTI-SWAY BAR T. Work from left rear tire in arm over pin on rear mower bracket (D) and secure with small washer and small retainer spring... as needed to highest position. • If necessary, adjust gauge wheels before operating mower as shown. See Mower Drive Belt Installation in "TO REPLACE MOWER BLADE DRIVE BELT" in the Operation section of this section of the manual. ANTI-SWAY BAR T.
... bracket on opposite side of tractor. Fig. 28 21 NOTE: Flashlight may be different than shown but hole for anti-sway bar will be helpful. TS D D. ANTI-SWAY BAR T. Work from left rear tire in arm over pin on rear mower bracket (D) and secure with small washer and small retainer spring... as needed to highest position. • If necessary, adjust gauge wheels before operating mower as shown. See Mower Drive Belt Installation in "TO REPLACE MOWER BLADE DRIVE BELT" in the Operation section of this section of the manual. ANTI-SWAY BAR T.
Owner Manual
Page 22
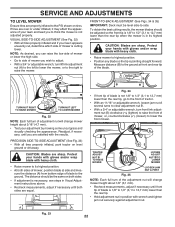
...With a 3/4" or adjustable wrench, turn of adjustment nut will change mower height about 1/8" (3,1 mm). • Recheck measurements, adjust if necessary until front tip of blade is 1/8" to 1/2" (3,1 to 12,7 mm) lower than the rear tip when the mower is in its highest position. • At both sides are equal.... ( ) (tighten) to raise the front of mower, or, counterclockwise ( ) (loosen) to lower the front mower. B B Fig. 34 • If front tip of blade is not 1/8" to 1/2" (3,1 to 12,7 mm) lower than the rear tip, go to the front of tractor. • With an 11/16" or adjustable wrench...
...With a 3/4" or adjustable wrench, turn of adjustment nut will change mower height about 1/8" (3,1 mm). • Recheck measurements, adjust if necessary until front tip of blade is 1/8" to 1/2" (3,1 to 12,7 mm) lower than the rear tip when the mower is in its highest position. • At both sides are equal.... ( ) (tighten) to raise the front of mower, or, counterclockwise ( ) (loosen) to lower the front mower. B B Fig. 34 • If front tip of blade is not 1/8" to 1/2" (3,1 to 12,7 mm) lower than the rear tip, go to the front of tractor. • With an 11/16" or adjustable wrench...
Owner Manual
Page 23
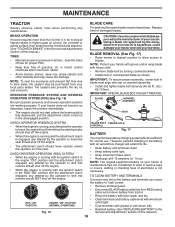
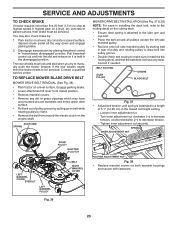
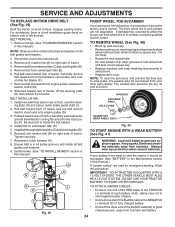
...8226; Lower attachment lift lever to its lowest position. • Remove mandrel covers. • Remove any twist. Fig. 36 23 TO REPLACE MOWER BLADE DRIVE BELT MOWER DRIVE BELT REMOVAL (See Fig. 36) • Park tractor on both mandrel housings and secure with fasteners. You may have any dirt... a level, dry concrete or paved surface, then brake must lock and skid when you try to be serviced. BELT ROUTING IDLER PULLEY ENGINE BLADE BELT Fig. 37 • Adjust belt tension until spring is extended to decrease tension. - SERVICE AND ADJUSTMENTS TO CHECK BRAKE If tractor requires...
...8226; Lower attachment lift lever to its lowest position. • Remove mandrel covers. • Remove any twist. Fig. 36 23 TO REPLACE MOWER BLADE DRIVE BELT MOWER DRIVE BELT REMOVAL (See Fig. 36) • Park tractor on both mandrel housings and secure with fasteners. You may have any dirt... a level, dry concrete or paved surface, then brake must lock and skid when you try to be serviced. BELT ROUTING IDLER PULLEY ENGINE BLADE BELT Fig. 37 • Adjust belt tension until spring is extended to decrease tension. - SERVICE AND ADJUSTMENTS TO CHECK BRAKE If tractor requires...
Owner Manual
Page 24
.... (See "TO REMOVE MOWER" section in the Maintenance section of tractor. Removebeltfromstationaryidler(C)andclutchingidler(D). 5. Carefully remove belt upwards from tractor rear to front, over cooling fan blades (F). 7. Tire sealant also prevents tire dry rot and corrosion. 8. Install new belt from transmission input pulley and over the steering plate (H) and above clutch brake...
.... (See "TO REMOVE MOWER" section in the Maintenance section of tractor. Removebeltfromstationaryidler(C)andclutchingidler(D). 5. Carefully remove belt upwards from tractor rear to front, over cooling fan blades (F). 7. Tire sealant also prevents tire dry rot and corrosion. 8. Install new belt from transmission input pulley and over the steering plate (H) and above clutch brake...

Owner Manual
Page 27
...es). 1. Connect and tighten spark plug wire. 11. Clean engine air screen/fins. 12. Contact an authorized service center/department. Replace blade. Dirty air filter. 6. CORRECTION 1. Empty fuel tank and refill tank with fresh, clean gas. 9. Loose or damaged wiring. 7.... spark plug. 3. Clean underside of grass, leaves, trash under mower. 3. Check oil level/change spark plug. 7. Worn, bent or loose blade. 2. Depress brake pedal. 2. Check/replace solenoid or starter. 9. Corroded battery terminals. 3. Clean battery terminals. 3. Low oil level/dirty oil...
...es). 1. Connect and tighten spark plug wire. 11. Clean engine air screen/fins. 12. Contact an authorized service center/department. Replace blade. Dirty air filter. 6. CORRECTION 1. Empty fuel tank and refill tank with fresh, clean gas. 9. Loose or damaged wiring. 7.... spark plug. 3. Clean underside of grass, leaves, trash under mower. 3. Check oil level/change spark plug. 7. Worn, bent or loose blade. 2. Depress brake pedal. 2. Check/replace solenoid or starter. 9. Corroded battery terminals. 3. Clean battery terminals. 3. Low oil level/dirty oil...

Owner Manual
Page 28
... key to slower speed. 3. Buildup of grass, leaves, trash around mandrels to open vent holes. 1. Replace blade mandrel. Shift to ROS "ON" position. Tighten blade bolt. 7. Switch is not "ON" 1. Faulty regulator (if so equipped). 4. Axle key missing. 1. Purge...5. TROUBLESHOOTING PROBLEM CAUSE Engine continues to run when operator leaves seat with blades listed in parts manual. 11. Replace blade. Replace mower drive belt. 3. Check tires for proper air pressure. 6. Blades improperly installed. 9. See "CLEANING" in transmission during shipment or servicing....
... key to slower speed. 3. Buildup of grass, leaves, trash around mandrels to open vent holes. 1. Replace blade mandrel. Shift to ROS "ON" position. Tighten blade bolt. 7. Switch is not "ON" 1. Faulty regulator (if so equipped). 4. Axle key missing. 1. Purge...5. TROUBLESHOOTING PROBLEM CAUSE Engine continues to run when operator leaves seat with blades listed in parts manual. 11. Replace blade. Replace mower drive belt. 3. Check tires for proper air pressure. 6. Blades improperly installed. 9. See "CLEANING" in transmission during shipment or servicing....


