

Parts Manual
Page 18
...-26 DESCRIPTION Decal, Fender Warning (English/French) Decal, Reserve Fuel (English/French) Pad, Footrest, LH Pad, Footrest, RH Manual, Operator's (English/Spanish) Manual, Operator's (French) Manual, Parts (English/Spanish) Manual, Parts (French) Manual, Quick Start Guide (English/Spanish) Manual QSG (English/French) WHEELS AND TIRES 1 2 11 3 4 7 10 6 wheel_art_2-tex 5 9 8 12 KEY PART NO. NO. Warning Decal...
...-26 DESCRIPTION Decal, Fender Warning (English/French) Decal, Reserve Fuel (English/French) Pad, Footrest, LH Pad, Footrest, RH Manual, Operator's (English/Spanish) Manual, Operator's (French) Manual, Parts (English/Spanish) Manual, Parts (French) Manual, Quick Start Guide (English/Spanish) Manual QSG (English/French) WHEELS AND TIRES 1 2 11 3 4 7 10 6 wheel_art_2-tex 5 9 8 12 KEY PART NO. NO. Warning Decal...

Owner Manual
Page 2
... plow leaves or other objects that may lose control of the discharge opening at the lowest possible speed when on the machine and in the manual before starting when setting up which can occur if the operator is dangerous. Children who are often attracted to the State of your tractor. Always...
... plow leaves or other objects that may lose control of the discharge opening at the lowest possible speed when on the machine and in the manual before starting when setting up which can occur if the operator is dangerous. Children who are often attracted to the State of your tractor. Always...

Owner Manual
Page 4
... a new tractor. Always observe the "SAFETY RULES". WARNING: This tractor is available through your product: • Visit our website: www.husqvarna.com • Call Us Toll Free: 1-800-487-5951 TABLE OF CONTENTS SAFETY RULES 2-3 PRODUCT SPECIFICATIONS 4 CUSTOMER RESPONSIBILITIES 4 ASSEMBLY 5-7 ... internal combustion engine and should be used , it should not be maintained in effective working order by law (Section 4442 of this manual. • Wear proper Personal Protective Equipment (PPE) while operating this machine, including (at a minimum) sturdy footwear, eye protection,...
... a new tractor. Always observe the "SAFETY RULES". WARNING: This tractor is available through your product: • Visit our website: www.husqvarna.com • Call Us Toll Free: 1-800-487-5951 TABLE OF CONTENTS SAFETY RULES 2-3 PRODUCT SPECIFICATIONS 4 CUSTOMER RESPONSIBILITIES 4 ASSEMBLY 5-7 ... internal combustion engine and should be used , it should not be maintained in effective working order by law (Section 4442 of this manual. • Wear proper Personal Protective Equipment (PPE) while operating this machine, including (at a minimum) sturdy footwear, eye protection,...
Owner Manual
Page 5
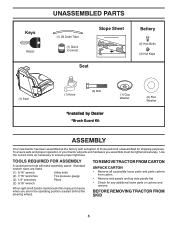
... the operating position (seated behind the steering wheel). TO REMOVE TRACTOR FROM CARTON UNPACK CARTON • Remove all parts and hardware you are in this manual, it means when you assemble must be tightened securely. BEFORE REMOVING TRACTOR FROM SKID 5 Keys Key(s) UNASSEMBLED PARTS (1) Oil Drain Tube (1) Quick Connect Slope Sheet...
... the operating position (seated behind the steering wheel). TO REMOVE TRACTOR FROM CARTON UNPACK CARTON • Remove all parts and hardware you are in this manual, it means when you assemble must be tightened securely. BEFORE REMOVING TRACTOR FROM SKID 5 Keys Key(s) UNASSEMBLED PARTS (1) Oil Drain Tube (1) Quick Connect Slope Sheet...
Owner Manual
Page 6
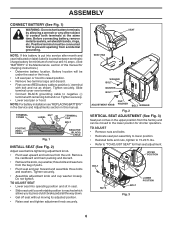
..."REPLACING BATTERY" in the Service and Adjustments section in this battery is put into operating position and sit in the Maintenance section of this manual for minimum of parts. • Pivot seat and pan forward and assemble three bolts and washers. Do not tighten. UPPER POSITION BOLT ...label (label is reached which allows you to 15-20 ft. Before connecting battery, remove metal bracelets, wristwatch bands, rings, etc. NOTE: If this manual. TO ADJUST • Remove nuts and bolts. • Relocate seat pan assembly to lower position. • Reinstall bolts and nuts, tighten to ...
..."REPLACING BATTERY" in the Service and Adjustments section in this battery is put into operating position and sit in the Maintenance section of this manual for minimum of parts. • Pivot seat and pan forward and assemble three bolts and washers. Do not tighten. UPPER POSITION BOLT ...label (label is reached which allows you to 15-20 ft. Before connecting battery, remove metal bracelets, wristwatch bands, rings, etc. NOTE: If this manual. TO ADJUST • Remove nuts and bolts. • Relocate seat pan assembly to lower position. • Reinstall bolts and nuts, tighten to ...
Owner Manual
Page 7
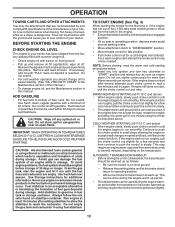
.... ✓ Ensure Operator Presence System and Reverse Operation System (ROS) are routed properly around pulleys and inside all instructions in this manual.) • Roll tractor forward off the skid. WARNING: Before starting and transmission purging instructions. (See "TO START ENGINE" and... ✓ Before driving tractor, ensure freewheel control is in "TRANSMISSION ENGAGED" position. (See "TO TRANSPORT" in front of this manual. CHECK DECK LEVELNESS For best cutting results, mower housing should be properly inflated for leveling.) ✓ Check mower and drive belts. ...
.... ✓ Ensure Operator Presence System and Reverse Operation System (ROS) are routed properly around pulleys and inside all instructions in this manual.) • Roll tractor forward off the skid. WARNING: Before starting and transmission purging instructions. (See "TO START ENGINE" and... ✓ Before driving tractor, ensure freewheel control is in "TRANSMISSION ENGAGED" position. (See "TO TRANSPORT" in front of this manual. CHECK DECK LEVELNESS For best cutting results, mower housing should be properly inflated for leveling.) ✓ Check mower and drive belts. ...
Owner Manual
Page 9
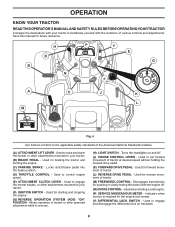
... for braking the tractor and starting the engine. (C) PARKING BRAKE - OPERATION KNOW YOUR TRACTOR READ THIS OPERATOR'S MANUAL AND SAFETY RULES BEFORE OPERATING YOUR TRACTOR Compare the illustrations with your tractor to familiarize yourself with the engine off ... D B P Y E G N F A M C J K L Fig. 4 Our tractors conform to your tractor. (B) BRAKE PEDAL - Used for future reference. Save this manual for forward movement of the American National Standards Institute. (A) ATTACHMENT LIFT LEVER - Used to engage the mower blades, or other attachments mounted to your tractor...
... for braking the tractor and starting the engine. (C) PARKING BRAKE - OPERATION KNOW YOUR TRACTOR READ THIS OPERATOR'S MANUAL AND SAFETY RULES BEFORE OPERATING YOUR TRACTOR Compare the illustrations with your tractor to familiarize yourself with the engine off ... D B P Y E G N F A M C J K L Fig. 4 Our tractors conform to your tractor. (B) BRAKE PEDAL - Used for future reference. Save this manual for forward movement of the American National Standards Institute. (A) ATTACHMENT LIFT LEVER - Used to engage the mower blades, or other attachments mounted to your tractor...
Owner Manual
Page 11
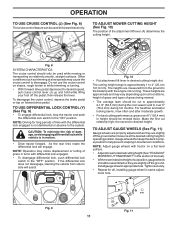
... mowed. • The average lawn should only be used while mowing or transporting on forward drive pedal. Tighten securely. • Repeat for long periods of manual). • Withmowerindesiredheightofcutposition,gaugewheels should be cut relatively high; For healthier and better looking lawns, mow often and after moderate growth. • For best cutting performance...
... mowed. • The average lawn should only be used while mowing or transporting on forward drive pedal. Tighten securely. • Repeat for long periods of manual). • Withmowerindesiredheightofcutposition,gaugewheels should be cut relatively high; For healthier and better looking lawns, mow often and after moderate growth. • For best cutting performance...

Owner Manual
Page 12
... up or down hills. • Avoid stopping or changing speed on rough, rolling terrain or hills. • Select desired height of this manual. TRANSMISSION DISENGAGED Fig. 14 USING THE REVERSE OPERATION SYSTEM Only use of tying hood to ROS "ON" position. You must remain fully and centrally...NOTE: Service minder runs when the ignition key is not running and the attachment clutch engaged will shut off the engine. To reset the display manually turn ignition key counterclockwise to tractor (rope, cord, etc.). Fig. 12 REVERSE OPERATION SYSTEM (ROS) (See Fig. 13) Your tractor is...
... up or down hills. • Avoid stopping or changing speed on rough, rolling terrain or hills. • Select desired height of this manual. TRANSMISSION DISENGAGED Fig. 14 USING THE REVERSE OPERATION SYSTEM Only use of tying hood to ROS "ON" position. You must remain fully and centrally...NOTE: Service minder runs when the ignition key is not running and the attachment clutch engaged will shut off the engine. To reset the display manually turn ignition key counterclockwise to tractor (rope, cord, etc.). Fig. 12 REVERSE OPERATION SYSTEM (ROS) (See Fig. 13) Your tractor is...
Owner Manual
Page 13
... reach the carburetor. Do not run out of fuel, it will take extra cranking time to ensure fuel freshness. Too heavy of this manual. Purchase fuel in this manual.) • To change oil for more than fifteen seconds per minute. Never use gasoline near an open flame. If the engine does not...
... reach the carburetor. Do not run out of fuel, it will take extra cranking time to ensure fuel freshness. Too heavy of this manual. Purchase fuel in this manual.) • To change oil for more than fifteen seconds per minute. Never use gasoline near an open flame. If the engine does not...
Owner Manual
Page 14
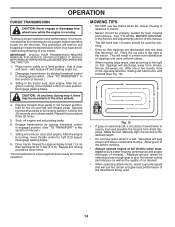
...quality of cut desired. • When operating attachments, select a ground speed that will suit the terrain and give best performance of manual.) 7. Regulate ground speed by placing freewheel control in engaged position. (See "TO TRANSPORT" in this section of the attachment being ...engine is wet. Repeat this driving procedure three times. Make first cut area to ensure better mowing performance and proper discharge of manual.) 3. OPERATION PURGE TRANSMISSION CAUTION: Never engage or disengage freewheel lever while the engine is clear and open - IMPORTANT: SHOULD...
...quality of cut desired. • When operating attachments, select a ground speed that will suit the terrain and give best performance of manual.) 7. Regulate ground speed by placing freewheel control in engaged position. (See "TO TRANSPORT" in this section of the attachment being ...engine is wet. Repeat this driving procedure three times. Make first cut area to ensure better mowing performance and proper discharge of manual.) 3. OPERATION PURGE TRANSMISSION CAUTION: Never engage or disengage freewheel lever while the engine is clear and open - IMPORTANT: SHOULD...

Owner Manual
Page 15
...Belts Check Engine Oil Level Change Engine Oil (models with maintenance-free battery 5 - See Cleaning in the Service and Adjustments section of this manual. • At least once a year you should replace the spark plug, clean or replace air filter, and check blades and belts ...for wear. At least once a season, check to operator abuse or negligence. GENERAL RECOMMENDATIONS The warranty on this manual. VISCOUS LUBRICANTS WILL ATTRACT DUST AND DIRT THAT WILL SHORTEN THE LIFE OF THE SELF-LUBRICATING BEARINGS. LUBRICATION CHART ➀ SPINDLE ZERK ...
...Belts Check Engine Oil Level Change Engine Oil (models with maintenance-free battery 5 - See Cleaning in the Service and Adjustments section of this manual. • At least once a year you should replace the spark plug, clean or replace air filter, and check blades and belts ...for wear. At least once a season, check to operator abuse or negligence. GENERAL RECOMMENDATIONS The warranty on this manual. VISCOUS LUBRICANTS WILL ATTRACT DUST AND DIRT THAT WILL SHORTEN THE LIFE OF THE SELF-LUBRICATING BEARINGS. LUBRICATION CHART ➀ SPINDLE ZERK ...
Owner Manual
Page 16
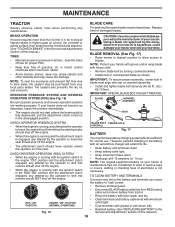
... For best results mower blades must be checked and adjusted. (See "TO CHECK BRAKE" in the Service and Adjustments section of this manual.) 16 Replace bent or damaged blades. Tire sealant also prevents tire dry rot and corrosion. If your tractor. Using a blade not .... CHECK REVERSE OPERATION (ROS) SYSTEM • When the engine is running with grease or petroleum jelly. Adding or checking level of this manual.) TIRES • Maintain proper air pressure in blade must be kept sharp. Do not attempt to blades. MAINTENANCE TRACTOR Always observe safety rules...
... For best results mower blades must be checked and adjusted. (See "TO CHECK BRAKE" in the Service and Adjustments section of this manual.) 16 Replace bent or damaged blades. Tire sealant also prevents tire dry rot and corrosion. If your tractor. Using a blade not .... CHECK REVERSE OPERATION (ROS) SYSTEM • When the engine is running with grease or petroleum jelly. Adding or checking level of this manual.) TIRES • Maintain proper air pressure in blade must be kept sharp. Do not attempt to blades. MAINTENANCE TRACTOR Always observe safety rules...
Owner Manual
Page 17
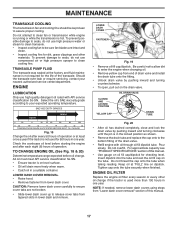
...a year if the tractor is used for dirt, grass clippings and other oil change . For approximate capacity see "PRODUCT SPECIFICATIONS" section of this manual. 17 Do not attempt to clean fan or transmission while engine is running or while the transmission is on dipstick. TRANSAXLE PUMP FLUID The transaxle... tapered slots in the locked position as shown. • Remove the drain tube and replace the cap onto to the bottom fitting of this manual. • Use gauge on oil fill cap/dipstick for the life of operation. Be careful not to allow dirt to assure proper cooling....
...a year if the tractor is used for dirt, grass clippings and other oil change . For approximate capacity see "PRODUCT SPECIFICATIONS" section of this manual. 17 Do not attempt to clean fan or transmission while engine is running or while the transmission is on dipstick. TRANSAXLE PUMP FLUID The transaxle... tapered slots in the locked position as shown. • Remove the drain tube and replace the cap onto to the bottom fitting of this manual. • Use gauge on oil fill cap/dipstick for the life of operation. Be careful not to allow dirt to assure proper cooling....
Owner Manual
Page 18
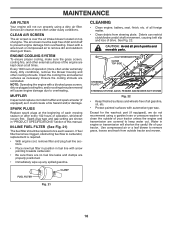
... clogged, obstructing fuel flow to carburetor, replacement is over the air intake blower located on top of engine. Water in "PRODUCT SPECIFICATIONS" section of this manual. Service air cleaner more often under dusty conditions. The air screen must be replaced once each mowing season or after every 100 hours of operation...
... clogged, obstructing fuel flow to carburetor, replacement is over the air intake blower located on top of engine. Water in "PRODUCT SPECIFICATIONS" section of this manual. Service air cleaner more often under dusty conditions. The air screen must be replaced once each mowing season or after every 100 hours of operation...
Owner Manual
Page 19
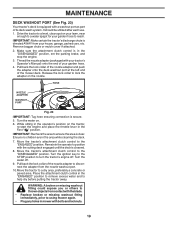
..., re-start the engine and place the throttle lever in the operator's position on your lawn, near enough to a water spigot for your tractor's Operator's Manual) onto the end of the nozzle adapter to disconnect the adapter from the nozzle washout port. 10.Move the tractor to turn the tractor's engine...
..., re-start the engine and place the throttle lever in the operator's position on your lawn, near enough to a water spigot for your tractor's Operator's Manual) onto the end of the nozzle adapter to disconnect the adapter from the nozzle washout port. 10.Move the tractor to turn the tractor's engine...

Owner Manual
Page 21
...(D). • Secure with washer and retainer spring. • Repeat on opposite side of tractor. TS D D. F O P E Q H Fig. 30 • Install belt onto electric clutch pulley (M). Move mower as shown in this manual. See Mower Drive Belt Installation in "TO REPLACE MOWER BLADE DRIVE BELT" in the Operation section of... this section of the manual. SERVICE AND ADJUSTMENTS • From right side of mower, first insert 90° end of anti-sway bar (S) into hole in ...
...(D). • Secure with washer and retainer spring. • Repeat on opposite side of tractor. TS D D. F O P E Q H Fig. 30 • Install belt onto electric clutch pulley (M). Move mower as shown in this manual. See Mower Drive Belt Installation in "TO REPLACE MOWER BLADE DRIVE BELT" in the Operation section of... this section of the manual. SERVICE AND ADJUSTMENTS • From right side of mower, first insert 90° end of anti-sway bar (S) into hole in ...
Owner Manual
Page 23
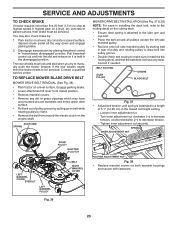
... (1,5 m) to stop at highest speed in highest gear on a level, dry concrete or paved surface, then brake must lock and skid when you try to manually push the tractor forward. Pull freewheel control out and into pulley groove. • Double check belt routing to make sure it is extended to decrease...
... (1,5 m) to stop at highest speed in highest gear on a level, dry concrete or paved surface, then brake must lock and skid when you try to manually push the tractor forward. Pull freewheel control out and into pulley groove. • Double check belt routing to make sure it is extended to decrease...
Owner Manual
Page 24
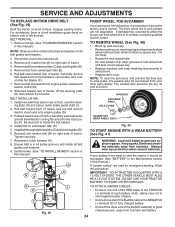
... pulley and around electric clutch (G). • Repair tire and reassemble. • On rear wheels only: align grooves in this manual.) NOTE: Observe entire motion drive belt and position of tractor and roll belt around electric clutch and onto engine pulley (G). THE OTHER... BELT REMOVAL 1. FRONT WHEEL TOE-IN/CAMBER Your new tractor front wheel toe-in and camber are used for emergency starting, follow this manual.) If "jumper cables" are not adjustable. Do not lose). 2. Removebeltfromstationaryidler(C)andclutchingidler(D). 5. Carefully remove belt upwards from tractor. DO NOT ...
... pulley and around electric clutch (G). • Repair tire and reassemble. • On rear wheels only: align grooves in this manual.) NOTE: Observe entire motion drive belt and position of tractor and roll belt around electric clutch and onto engine pulley (G). THE OTHER... BELT REMOVAL 1. FRONT WHEEL TOE-IN/CAMBER Your new tractor front wheel toe-in and camber are used for emergency starting, follow this manual.) If "jumper cables" are not adjustable. Do not lose). 2. Removebeltfromstationaryidler(C)andclutchingidler(D). 5. Carefully remove belt upwards from tractor. DO NOT ...
Owner Manual
Page 25
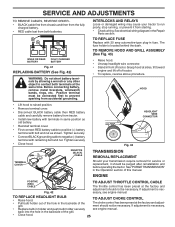
...8226; Close hood. 25 Tighten securely • Close hood. back into the hole in holder and push bulb holder securely see engine manual. ENGINE POSITIVE (RED) CABLE Fig. 42 TO ADJUST THROTTLE CONTROL CABLE The throttle control has been preset at the factory and adjustment... cable then RED battery cable and carefully remove battery from both terminals at the factory and adjust- If adjustment is necessary, see engine manual. Before connecting battery, remove metal bracelets, wristwatch bands, rings, etc. ment should be necessary. HEADLIGHT WIRE CONNECTOR 04020 Fig. 43 ...
...8226; Close hood. 25 Tighten securely • Close hood. back into the hole in holder and push bulb holder securely see engine manual. ENGINE POSITIVE (RED) CABLE Fig. 42 TO ADJUST THROTTLE CONTROL CABLE The throttle control has been preset at the factory and adjustment... cable then RED battery cable and carefully remove battery from both terminals at the factory and adjust- If adjustment is necessary, see engine manual. Before connecting battery, remove metal bracelets, wristwatch bands, rings, etc. ment should be necessary. HEADLIGHT WIRE CONNECTOR 04020 Fig. 43 ...


