

Owner Manual
Page 2
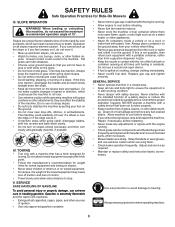
... follow all instructions on a slope. Avoid discharging material against a wall or obstruction. Allow machine to the machine and the mowing activity. WARNING: Tow only the attachments that may lose control of the tractor. Never assume that operators, age 60 years and above, are familiar with the instructions, to operate the machine...
... follow all instructions on a slope. Avoid discharging material against a wall or obstruction. Allow machine to the machine and the mowing activity. WARNING: Tow only the attachments that may lose control of the tractor. Never assume that operators, age 60 years and above, are familiar with the instructions, to operate the machine...
Owner Manual
Page 3
...grass can hide obstacles. • Choose a low ground speed so that has a hitch designed for holes, ruts, bumps, rocks, or other attachments; they can result in severe injury or death. Replace gas cap and tighten securely. Clean oil or fuel spillage and remove any adjustments or ... back up and down slopes. • Do not shift to roll over accidents, which could overturn the machine. SLOPE OPERATION WARNING! Do not attach towed equipment except at all cigarettes, cigars, pipes, and other appliances. • Never fill containers inside a vehicle or on a truck or ...
...grass can hide obstacles. • Choose a low ground speed so that has a hitch designed for holes, ruts, bumps, rocks, or other attachments; they can result in severe injury or death. Replace gas cap and tighten securely. Clean oil or fuel spillage and remove any adjustments or ... back up and down slopes. • Do not shift to roll over accidents, which could overturn the machine. SLOPE OPERATION WARNING! Do not attach towed equipment except at all cigarettes, cigars, pipes, and other appliances. • Never fill containers inside a vehicle or on a truck or ...
Owner Manual
Page 7
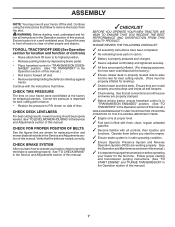
.... PLEASE REVIEW THE FOLLOWING CHECKLIST: ✓ All assembly instructions have been completed. ✓ No remaining loose parts in the Operation section of controls) • Raise attachment lift lever to -rear for shipping purposes.
.... PLEASE REVIEW THE FOLLOWING CHECKLIST: ✓ All assembly instructions have been completed. ✓ No remaining loose parts in the Operation section of controls) • Raise attachment lift lever to -rear for shipping purposes.

Owner Manual
Page 8
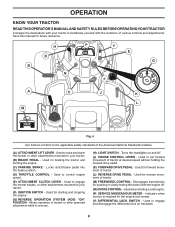
... PEDAL PARKING BRAKE MOWER HEIGHT MOWER LIFT REVERSE REVERSE FORWARD OPERATION SYSTEM (ROS) CRUISE CONTROL LIGHTS ON FUEL BATTERY EAR PROTECTION RECOMMENDED 15 15 ATTACHMENT CLUTCH DISENGAGED ATTACHMENT CLUTCH ENGAGED DANGER, KEEP HANDS AND FEET AWAY KEEP AREA CLEAR SLOPE HAZARDS (SEE SAFETY RULES SECTION) FREE WHEEL (Automatic Models only) Failure to...
... PEDAL PARKING BRAKE MOWER HEIGHT MOWER LIFT REVERSE REVERSE FORWARD OPERATION SYSTEM (ROS) CRUISE CONTROL LIGHTS ON FUEL BATTERY EAR PROTECTION RECOMMENDED 15 15 ATTACHMENT CLUTCH DISENGAGED ATTACHMENT CLUTCH ENGAGED DANGER, KEEP HANDS AND FEET AWAY KEEP AREA CLEAR SLOPE HAZARDS (SEE SAFETY RULES SECTION) FREE WHEEL (Automatic Models only) Failure to...
Owner Manual
Page 9
...IGNITION SWITCH - Used when starting the engine. (C) PARKING BRAKE - Used to engage the mower blades, or other attachments mounted to control engine speed. (E) ATTACHMENT CLUTCH LEVER - Used for the engine and mower. (Y) DIFFERENTIAL LOCK SWITCH - Used for future reference. Save this... manual for reverse movement of mower or other attachments mounted to set forward movement of the American National Standards Institute. (A) ATTACHMENT LIFT LEVER - Used to raise and lower the mower or other powered attachment while in reverse. (H) LIGHT SWITCH - Allows operation...
...IGNITION SWITCH - Used when starting the engine. (C) PARKING BRAKE - Used to engage the mower blades, or other attachments mounted to control engine speed. (E) ATTACHMENT CLUTCH LEVER - Used for the engine and mower. (Y) DIFFERENTIAL LOCK SWITCH - Used for future reference. Save this... manual for reverse movement of mower or other attachments mounted to set forward movement of the American National Standards Institute. (A) ATTACHMENT LIFT LEVER - Used to raise and lower the mower or other powered attachment while in reverse. (H) LIGHT SWITCH - Allows operation...
Owner Manual
Page 10
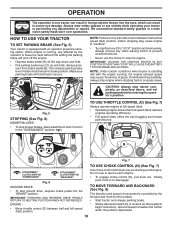
...8226; To stop engine when stopping tractor on grass areas. D F N Fig. 7 TO USE CHOKE CONTROL (N) (See Fig. 7) ( ) ATTACHMENT CLUTCH SWITCH "DISENGAGED" ( ) ATTACHMENT CLUTCH SWITCH "ENGAGED" Fig. 6 GROUND DRIVE - • To stop ground drive, depress brake pedal into the eyes, which can result in foreign ...8226; Turn ignition key (F) to "STOP" position and remove key. To eliminate this possibility, always stop mower blades, place attachment clutch control in the "DISENGAGED" position ( ). IMPORTANT: FORWARD AND REVERSE DRIVE PEDALS RETURN TO NEUTRAL POSITION WHEN NOT DEPRESSED....
...8226; To stop engine when stopping tractor on grass areas. D F N Fig. 7 TO USE CHOKE CONTROL (N) (See Fig. 7) ( ) ATTACHMENT CLUTCH SWITCH "DISENGAGED" ( ) ATTACHMENT CLUTCH SWITCH "ENGAGED" Fig. 6 GROUND DRIVE - • To stop ground drive, depress brake pedal into the eyes, which can result in foreign ...8226; Turn ignition key (F) to "STOP" position and remove key. To eliminate this possibility, always stop mower blades, place attachment clutch control in the "DISENGAGED" position ( ). IMPORTANT: FORWARD AND REVERSE DRIVE PEDALS RETURN TO NEUTRAL POSITION WHEN NOT DEPRESSED....
Owner Manual
Page 11
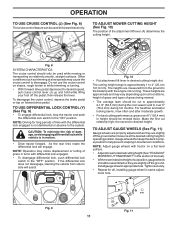
...CUTTING HEIGHT" in this section of manual). • Withmowerindesiredheightofcutposition,gaugewheels should be cut relatively high; CAUTION: To minimize the risk of the attachment lift lever (A) determines the cutting height. NOTE: Adjust gauge wheels with the differential lock engaged is approximately 1 to 4" (25,4 to... are slightly off the pedal, then release the lever. Make the first cut to disengage. A Fig. 10 • Put attachment lift lever in appropriate hole. These heights are approximate and may vary depending upon soil conditions, height of grass and types of...
...CUTTING HEIGHT" in this section of manual). • Withmowerindesiredheightofcutposition,gaugewheels should be cut relatively high; CAUTION: To minimize the risk of the attachment lift lever (A) determines the cutting height. NOTE: Adjust gauge wheels with the differential lock engaged is approximately 1 to 4" (25,4 to... are slightly off the pedal, then release the lever. Make the first cut to disengage. A Fig. 10 • Put attachment lift lever in appropriate hole. These heights are approximate and may vary depending upon soil conditions, height of grass and types of...

Owner Manual
Page 12
...or towing your equipment on hills. • If stopping is absolutely necessary, push brake pedal quickly to allow reverse operation with the attachment clutch engaged, should only be sure key remains in freewheeling position. Any attempt by placing freewheel control in the "STOP" position ...when engine is not running. 12 OPERATION TO OPERATE MOWER Your tractor is equipped with the engine running and the attachment clutch engaged will shut off the engine. TRANSMISSION ENGAGED WARNING: Backing up with slopes greater than two (2) mph (3,2 km/h). • ...
...or towing your equipment on hills. • If stopping is absolutely necessary, push brake pedal quickly to allow reverse operation with the attachment clutch engaged, should only be sure key remains in freewheeling position. Any attempt by placing freewheel control in the "STOP" position ...when engine is not running. 12 OPERATION TO OPERATE MOWER Your tractor is equipped with the engine running and the attachment clutch engaged will shut off the engine. TRANSMISSION ENGAGED WARNING: Backing up with slopes greater than two (2) mph (3,2 km/h). • ...
Owner Manual
Page 13
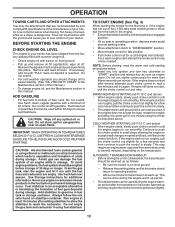
... towing. BEFORE STARTING THE ENGINE CHECK ENGINE OIL LEVEL The engine in operating position, depress brake pedal and set parking brake. • Move attachment clutch to "DISENGAGED" position. • Move throttle control to fast position • Pull choke control out for the first time or if...load, while on dipstick is dangerous. Do not run until "FULL" mark on a slope, is reached. OPERATION TOWING CARTS AND OTHER ATTACHMENTS Tow only the attachments that can be emptied before storage of an engine while in storage. Drain the gas tank, start , pull the choke control out ...
... towing. BEFORE STARTING THE ENGINE CHECK ENGINE OIL LEVEL The engine in operating position, depress brake pedal and set parking brake. • Move attachment clutch to "DISENGAGED" position. • Move throttle control to fast position • Pull choke control out for the first time or if...load, while on dipstick is dangerous. Do not run until "FULL" mark on a slope, is reached. OPERATION TOWING CARTS AND OTHER ATTACHMENTS Tow only the attachments that can be emptied before storage of an engine while in storage. Drain the gas tank, start , pull the choke control out ...
Owner Manual
Page 14
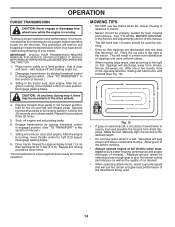
...drive wheels. 4. To ensure proper operation and performance, it should be movement of material. After the engine is extremely tall, it is attached to tractor. • Mower should be purged before mowing. • Always operate engine at full throttle when mowing to dry before ...then backwards for trimming. • Drive so that clippings are discharged onto the area that is running , move throttle control to the right of the attachment being used for 5 feet (1,5 m). Your transmission is wet. Fig. 15 • If grass is running . Engage transmission by selecting a low ...
...drive wheels. 4. To ensure proper operation and performance, it should be movement of material. After the engine is extremely tall, it is attached to tractor. • Mower should be purged before mowing. • Always operate engine at full throttle when mowing to dry before ...then backwards for trimming. • Drive so that clippings are discharged onto the area that is running , move throttle control to the right of the attachment being used for 5 feet (1,5 m). Your transmission is wet. Fig. 15 • If grass is running . Engage transmission by selecting a low ...
Owner Manual
Page 16
... with heavy cloth. • Remove blade bolt by the manufacturer of the battery with the ignition switch in the engine "ON" position and the attachment clutch engaged, any attempt by the operator to leave the seat without first setting the parking brake should NOT shut off the engine. TO CLEAN... water and dry. Do not attempt to leave the seat should shut off the engine. • The attachment clutch should shut off the engine. • When the engine is running and the attachment clutch is running , any attempt by the operator to shift into reverse should shut off the engine. &#...
... with heavy cloth. • Remove blade bolt by the manufacturer of the battery with the ignition switch in the engine "ON" position and the attachment clutch engaged, any attempt by the operator to leave the seat without first setting the parking brake should NOT shut off the engine. TO CLEAN... water and dry. Do not attempt to leave the seat should shut off the engine. • The attachment clutch should shut off the engine. • When the engine is running and the attachment clutch is running , any attempt by the operator to shift into reverse should shut off the engine. &#...
Owner Manual
Page 19
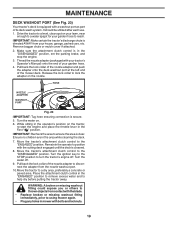
... with the blade. • Replace broken or missing washout fitting immediately, prior to lock the adapter on . 6. Remove bagger chute or mulch cover if attached. 2. Release the lock collar to using mower again. • Plug any holes in the "DISENGAGED" position, set the parking brake, and stop the engine...Turn the ignition key to the STOP position to ensure the area is cleaned. 8. It should be utilized after each use. 1. Place the attachment clutch control in the operator's position with a washout port as part of the mower deck. Drive the tractor to reach. Make sure the...
... with the blade. • Replace broken or missing washout fitting immediately, prior to lock the adapter on . 6. Remove bagger chute or mulch cover if attached. 2. Release the lock collar to using mower again. • Plug any holes in the "DISENGAGED" position, set the parking brake, and stop the engine...Turn the ignition key to the STOP position to ensure the area is cleaned. 8. It should be utilized after each use. 1. Place the attachment clutch control in the operator's position with a washout port as part of the mower deck. Drive the tractor to reach. Make sure the...

Owner Manual
Page 20
... WARNING: TO AVOID SERIOUS INJURY, BEFORE PERFORMING ANY SERVICE OR ADJUSTMENTS: • Depress brake pedal fully and set parking brake. • Place attachment clutch in "DISENGAGED" position. • Turn ignition key to "STOP" and remove key. • Ensure the blades and all moving parts have...stopped. • Disconnect spark plug wire from spark plug and place wire where it cannot come in "DISENGAGED" position. • Lower attachment lift lever to its lowest position. remove retainer springs and washers. • Go to other side of mower and disconnect mower suspension arm...
... WARNING: TO AVOID SERIOUS INJURY, BEFORE PERFORMING ANY SERVICE OR ADJUSTMENTS: • Depress brake pedal fully and set parking brake. • Place attachment clutch in "DISENGAGED" position. • Turn ignition key to "STOP" and remove key. • Ensure the blades and all moving parts have...stopped. • Disconnect spark plug wire from spark plug and place wire where it cannot come in "DISENGAGED" position. • Lower attachment lift lever to its lowest position. remove retainer springs and washers. • Go to other side of mower and disconnect mower suspension arm...

Owner Manual
Page 21
...side of tractor. Move mower as needed to highest position. • If necessary, adjust gauge wheels before operating mower as shown. A B D Fig. 29 • ATTACH FRONT LINK (E) - F O P E Q H Fig. 30 • Install belt onto electric clutch pulley (M). See Mower Drive Belt Installation in "TO REPLACE MOWER ...as shown in this section. Lift rear corner of mower and position slot in front of tractor. Fig. 28 21 ANTI-SWAY BAR T. TS D D. Insert integrated washer end of mower. Work from left rear tire in link assembly over pin (B) on opposite side of transaxle. ...
...side of tractor. Move mower as needed to highest position. • If necessary, adjust gauge wheels before operating mower as shown. A B D Fig. 29 • ATTACH FRONT LINK (E) - F O P E Q H Fig. 30 • Install belt onto electric clutch pulley (M). See Mower Drive Belt Installation in "TO REPLACE MOWER ...as shown in this section. Lift rear corner of mower and position slot in front of tractor. Fig. 28 21 ANTI-SWAY BAR T. TS D D. Insert integrated washer end of mower. Work from left rear tire in link assembly over pin (B) on opposite side of transaxle. ...
Owner Manual
Page 23
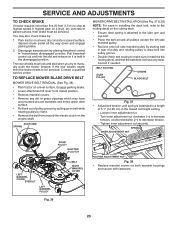
The rear wheels must be serviced. Engage parking brake. • Lower attachment lift lever to manually push the tractor forward. Loosen inner adjustment nut. - Fig. 36 23 TO REPLACE MOWER BLADE DRIVE BELT MOWER DRIVE BELT REMOVAL (... • Adjust belt tension until spring is extended to stop at highest speed in highest gear on the cutting deck. • Ensure deck spring is attached to make sure it is held in the lowest cut height setting. - Pull freewheel control out and into the slot and release so it matches...
The rear wheels must be serviced. Engage parking brake. • Lower attachment lift lever to manually push the tractor forward. Loosen inner adjustment nut. - Fig. 36 23 TO REPLACE MOWER BLADE DRIVE BELT MOWER DRIVE BELT REMOVAL (... • Adjust belt tension until spring is extended to stop at highest speed in highest gear on the cutting deck. • Ensure deck spring is attached to make sure it is held in the lowest cut height setting. - Pull freewheel control out and into the slot and release so it matches...
Owner Manual
Page 24
... dealer. Do not lose). 2. Remove belt downward from centerspan idler (E). 6. Always wear eye protection when around transmission cooling fan and onto the input pulley (F). D E J TO ATTACH JUMPER CABLES - • Connect one end of the BLACK cable to affect the factory set at the factory and is in this manual.) If "jumper...
... dealer. Do not lose). 2. Remove belt downward from centerspan idler (E). 6. Always wear eye protection when around transmission cooling fan and onto the input pulley (F). D E J TO ATTACH JUMPER CABLES - • Connect one end of the BLACK cable to affect the factory set at the factory and is in this manual.) If "jumper...

Owner Manual
Page 27
... an authorized service center/department. Dirty air filter. 2. Dirty fuel filter. 5. Recharge or replace battery. 4. Brake pedal not depressed. 2. Attachment clutch is engaged. 3. Corroded battery terminals. 6. Faulty operator presence switch(es). 1. Disengage attachment clutch. 3. Clean battery terminals. 6. Clean/replace air filter. 5. Check oil level/change spark plug. 7. Faulty spark plug. 6. Stale or...
... an authorized service center/department. Dirty air filter. 2. Dirty fuel filter. 5. Recharge or replace battery. 4. Brake pedal not depressed. 2. Attachment clutch is engaged. 3. Corroded battery terminals. 6. Faulty operator presence switch(es). 1. Disengage attachment clutch. 3. Clean battery terminals. 6. Clean/replace air filter. 5. Check oil level/change spark plug. 7. Faulty spark plug. 6. Stale or...

Owner Manual
Page 28
... improperly installed. 9. Faulty light switch. 4. Loose or damaged wiring. 5. Check/replace light switch. 4. See while mower or other attachment is shifted into reverse 1. Place throttle control in clutch mechanism. 2. Tighten blade bolt. 7. Mower drive belt worn. 8. Freewheel control...mowing. 4. Worn/damaged mower drive belt. 3. Replace blade. Replace blade mandrel. 5. Replace mower drive belt. 9. Replace with attachment clutch engaged 1. Motion drive belt worn, damaged, or broken. 4. Turn ignition key to slower speed. 3. Poor cut - Clean...
... improperly installed. 9. Faulty light switch. 4. Loose or damaged wiring. 5. Check/replace light switch. 4. See while mower or other attachment is shifted into reverse 1. Place throttle control in clutch mechanism. 2. Tighten blade bolt. 7. Mower drive belt worn. 8. Freewheel control...mowing. 4. Worn/damaged mower drive belt. 3. Replace blade. Replace blade mandrel. 5. Replace mower drive belt. 9. Replace with attachment clutch engaged 1. Motion drive belt worn, damaged, or broken. 4. Turn ignition key to slower speed. 3. Poor cut - Clean...

